Manual
Page 5
Table of Contents ItemChecklist ...7 OptionalAccessories ...7 GA-965P-DS3/S3 Motherboard Layout 8 Block Diagram ...9 Chapter 1 Hardware Installation 11 1-1 Considerations Prior to Installation 11 1-2 Feature Summary 12 1-3 Installation of the CPU...1-5 Installation of Expansion Cards 18 1-6 I/O Back Panel Introduction 19 1-7 Connectors Introduction 20 Chapter 2 BIOS Setup 31 The Main Menu (Example BIOS Ver.: GA-965P-DS3, F10a 32 2-1 Standard CMOS Features 34 2-2 Advanced BIOS Features 36 2-3 IntegratedPeripherals 38 2-4 Power Management Setup 41 2-5 PnP/PCI Configurations 43 2-6 PC ...
Table of Contents ItemChecklist ...7 OptionalAccessories ...7 GA-965P-DS3/S3 Motherboard Layout 8 Block Diagram ...9 Chapter 1 Hardware Installation 11 1-1 Considerations Prior to Installation 11 1-2 Feature Summary 12 1-3 Installation of the CPU...1-5 Installation of Expansion Cards 18 1-6 I/O Back Panel Introduction 19 1-7 Connectors Introduction 20 Chapter 2 BIOS Setup 31 The Main Menu (Example BIOS Ver.: GA-965P-DS3, F10a 32 2-1 Standard CMOS Features 34 2-2 Advanced BIOS Features 36 2-3 IntegratedPeripherals 38 2-4 Power Management Setup 41 2-5 PnP/PCI Configurations 43 2-6 PC ...
Manual
Page 8
GA-965P-DS3/S3 Motherboard Layout KB_MS COAXIAL OPTICAL ATX_12V LGA775 CPU_FAN ATX COM LPT SYS_FAN GA-965P-DS3/S3 DDRII1 USB USB LAN F_AUDIO AUDIO NB_FAN Marvell 88E8056 PCIE_3 PCIE_16 PCIE_1 CODEC PCIE_2 PCI1 PCI2 IT8718 PCI3 CD_IN Intel® P965 FDD DDRII3 DDRII4 DDRII2 PWR_FAN CLR_CMOS BATTERY Intel® ICH8 GSATAII0 GIGABYTE SATA2 GSATAII1 BIOS IDE1 CI F_PANEL SATAII0 SATAII1 SATAII2 SATAII3 SPDIF_I F_USB1 F_USB2 F_USB3 PWR_LED - 8 -
GA-965P-DS3/S3 Motherboard Layout KB_MS COAXIAL OPTICAL ATX_12V LGA775 CPU_FAN ATX COM LPT SYS_FAN GA-965P-DS3/S3 DDRII1 USB USB LAN F_AUDIO AUDIO NB_FAN Marvell 88E8056 PCIE_3 PCIE_16 PCIE_1 CODEC PCIE_2 PCI1 PCI2 IT8718 PCI3 CD_IN Intel® P965 FDD DDRII3 DDRII4 DDRII2 PWR_FAN CLR_CMOS BATTERY Intel® ICH8 GSATAII0 GIGABYTE SATA2 GSATAII1 BIOS IDE1 CI F_PANEL SATAII0 SATAII1 SATAII2 SATAII3 SPDIF_I F_USB1 F_USB2 F_USB3 PWR_LED - 8 -
Manual
Page 9
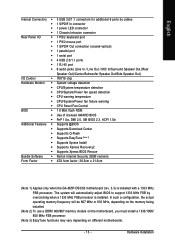
...be 667 MHz or 833 MHz, depending on the memory being installed. (Note 2) To use a DDRII 800/667 memory module on the motherboard, you must install a 1333/1066/ 800 MHz FSB processor. - 9 - Block Diagram PCIe CLK (100 MHz) LGA775 Processor CPU ...333(Note 1)/266/200/133 MHz) PCI Express x16 2 SATA 3Gb/s LAN ATA 33/66/100/133 RJ45 IDE Channel GIGABYTE Marvell SATA2 88E8056 x1 PCI Express Bus x1 x1 x1 x1 PCIe CLK (100 MHz) 3 PCI Express x1 PCI Bus ...Line-In SPDIF In SPDIF Out 3 PCI PCICLK (33 MHz) (Note 1) Applies only when the GA-965P-DS3/S3 motherboard (rev. 3.3) is installed.
...be 667 MHz or 833 MHz, depending on the memory being installed. (Note 2) To use a DDRII 800/667 memory module on the motherboard, you must install a 1333/1066/ 800 MHz FSB processor. - 9 - Block Diagram PCIe CLK (100 MHz) LGA775 Processor CPU ...333(Note 1)/266/200/133 MHz) PCI Express x16 2 SATA 3Gb/s LAN ATA 33/66/100/133 RJ45 IDE Channel GIGABYTE Marvell SATA2 88E8056 x1 PCI Express Bus x1 x1 x1 x1 PCIe CLK (100 MHz) 3 PCI Express x1 PCI Bus ...Line-In SPDIF In SPDIF Out 3 PCI PCICLK (33 MHz) (Note 1) Applies only when the GA-965P-DS3/S3 motherboard (rev. 3.3) is installed.
Manual
Page 12
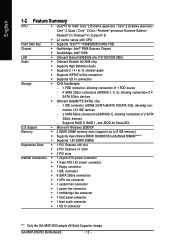
... ICH8 Southbrigde - 1 FDD connector, allowing connection of 1 FDD device - 4 SATA 3Gb/s connectors (SATAII0,1, 2, 3), allowing connection of 4 SATA 3Gb/s devices Š Onboard GIGABYTE SATA2 chip - 1 IDE connector (UDMA 33/ATA 66/ATA 100/ATA 133), allowing connection of 2 IDE devices - 2 SATA 3Gb/s connectors (GSATAII0,1), allowing connection of 2...; 1 power fan connector Š 1 northbridge fan connector Š 1 front panel connector Š 1 front audio connector Š 1 CD In connector "*" Only the GA-965P-DS3 adopts All-Solid Capacitor design. GA-965P-DS3/S3 Motherboard - 12 -
... ICH8 Southbrigde - 1 FDD connector, allowing connection of 1 FDD device - 4 SATA 3Gb/s connectors (SATAII0,1, 2, 3), allowing connection of 4 SATA 3Gb/s devices Š Onboard GIGABYTE SATA2 chip - 1 IDE connector (UDMA 33/ATA 66/ATA 100/ATA 133), allowing connection of 2 IDE devices - 2 SATA 3Gb/s connectors (GSATAII0,1), allowing connection of 2...; 1 power fan connector Š 1 northbridge fan connector Š 1 front panel connector Š 1 front audio connector Š 1 CD In connector "*" Only the GA-965P-DS3 adopts All-Solid Capacitor design. GA-965P-DS3/S3 Motherboard - 12 -
Manual
Page 13
... MHz, depending on the memory being installed. (Note 2) To use a DDRII 800/667 memory module on the motherboard, you must install a 1333/1066/ 800 MHz FSB processor. (Note 3) EasyTune functions may vary depending on different motherboards. - 13 - In such a configuration, the actual operating memory frequency will automatically adjust BIOS to support 1333... BIOS Rescue Bundle Software Š Norton Internet Security (OEM revision) Form Factor Š ATX form factor; 30.5cm x 21.0cm (Note 1) Applies only when the GA-965P-DS3/S3 motherboard (rev. 3.3) is installed.
... MHz, depending on the memory being installed. (Note 2) To use a DDRII 800/667 memory module on the motherboard, you must install a 1333/1066/ 800 MHz FSB processor. (Note 3) EasyTune functions may vary depending on different motherboards. - 13 - In such a configuration, the actual operating memory frequency will automatically adjust BIOS to support 1333... BIOS Rescue Bundle Software Š Norton Internet Security (OEM revision) Form Factor Š ATX form factor; 30.5cm x 21.0cm (Note 1) Applies only when the GA-965P-DS3/S3 motherboard (rev. 3.3) is installed.
Manual
Page 14
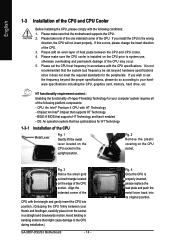
...platform components: - BIOS: A BIOS that supports HT Technology - Please set beyond the proper specifications, please do so according to the CPU during installation.) GA-965P-DS3/S3 Motherboard - 14 - Please make sure that has optimizations for your computer system requires all of the CPU. Chipset: An Intel® Chipset that supports HT Technology... metal lever back into the socket in the wrong direction, the CPU will not insert properly. OS: An operation system that the motherboard supports the CPU. 2. If you install the CPU in a straight and downwards motion.
...platform components: - BIOS: A BIOS that supports HT Technology - Please set beyond the proper specifications, please do so according to the CPU during installation.) GA-965P-DS3/S3 Motherboard - 14 - Please make sure that has optimizations for your computer system requires all of the CPU. Chipset: An Intel® Chipset that supports HT Technology... metal lever back into the socket in the wrong direction, the CPU will not insert properly. OS: An operation system that the motherboard supports the CPU. 2. If you install the CPU in a straight and downwards motion.

Manual
Page 16
...comply with each slot. Memory modules are unable to remove the DIMM module. Insert the DIMM memory module vertically into the DIMM socket. GA-965P-DS3/S3 Motherboard - 16 - Notch DDRII Fig.1 The DIMM socket has a notch, so the DIMM memory module can be installed in only one ...direction. Please make sure that they can only fit in one direction. The motherboard supports DDRII memory modules, whereby BIOS will automatically detect memory capacity and specifications. The memory capacity used is switched off to lock...
...comply with each slot. Memory modules are unable to remove the DIMM module. Insert the DIMM memory module vertically into the DIMM socket. GA-965P-DS3/S3 Motherboard - 16 - Notch DDRII Fig.1 The DIMM socket has a notch, so the DIMM memory module can be installed in only one ...direction. Please make sure that they can only fit in one direction. The motherboard supports DDRII memory modules, whereby BIOS will automatically detect memory capacity and specifications. The memory capacity used is switched off to lock...
Manual
Page 18
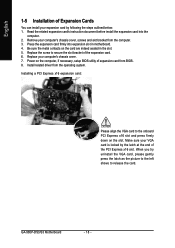
...metal contacts on the computer, if necessary, setup BIOS utility of expansion card from BIOS. 8. Power on the card are indeed seated in motherboard. 4. When you try uninstall the VGA card, please gently press the latch as the picture to the left shows to the onboard PCI ...the slot. 5. Make sure your VGA card is locked by following the steps outlined below: 1. Press the expansion card firmly into the computer. 2. GA-965P-DS3/S3 Motherboard - 18 - English 1-5 Installation of Expansion Cards You can install your expansion card by the latch at the end of the PCI Express x16 slot...
...metal contacts on the computer, if necessary, setup BIOS utility of expansion card from BIOS. 8. Power on the card are indeed seated in motherboard. 4. When you try uninstall the VGA card, please gently press the latch as the picture to the left shows to the onboard PCI ...the slot. 5. Make sure your VGA card is locked by following the steps outlined below: 1. Press the expansion card firmly into the computer. 2. GA-965P-DS3/S3 Motherboard - 18 - English 1-5 Installation of Expansion Cards You can install your expansion card by the latch at the end of the PCI Express x16 slot...
Manual
Page 20
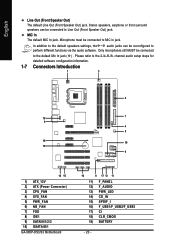
... detailed software configuration information. 1-7 Connectors Introduction 1 3 2 12 7 6 4 5 18 10 19 9 14 15 1) ATX_12V 2) ATX (Power Connector) 3) CPU_FAN 4) SYS_FAN 5) PWR_FAN 6) NB_FAN 7) FDD 8) IDE1 9) SATAII0/1/2/3 10) GSATAII0/1 GA-965P-DS3/S3 Motherboard 16 8 17 13 11 11) F_PANEL 12) F_AUDIO 13) PWR_LED 14) CD_IN 15) SPDIF_I 16) F_USB1/F_USB2/F_USB3 17) CI 18) CLR_CMOS 19) BATTERY - 20...
... detailed software configuration information. 1-7 Connectors Introduction 1 3 2 12 7 6 4 5 18 10 19 9 14 15 1) ATX_12V 2) ATX (Power Connector) 3) CPU_FAN 4) SYS_FAN 5) PWR_FAN 6) NB_FAN 7) FDD 8) IDE1 9) SATAII0/1/2/3 10) GSATAII0/1 GA-965P-DS3/S3 Motherboard 16 8 17 13 11 11) F_PANEL 12) F_AUDIO 13) PWR_LED 14) CD_IN 15) SPDIF_I 16) F_USB1/F_USB2/F_USB3 17) CI 18) CLR_CMOS 19) BATTERY - 20...
Manual
Page 22
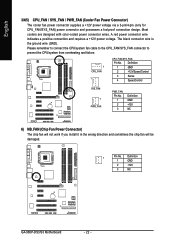
... wrong direction and sometimes the chip fan will be damaged. 1 Pin No. The black connector wire is the ground wire (GND). Definition 1 GND 2 +12V 3 NC GA-965P-DS3/S3 Motherboard - 22 - English 3/4/5) CPU_FAN / SYS_FAN / PWR_FAN (Cooler Fan Power Connector) The cooler fan power connector supplies a +12V power voltage via a 3-pin/4-pin (only for CPU_FAN/SYS_FAN...
... wrong direction and sometimes the chip fan will be damaged. 1 Pin No. The black connector wire is the ground wire (GND). Definition 1 GND 2 +12V 3 NC GA-965P-DS3/S3 Motherboard - 22 - English 3/4/5) CPU_FAN / SYS_FAN / PWR_FAN (Cooler Fan Power Connector) The cooler fan power connector supplies a +12V power voltage via a 3-pin/4-pin (only for CPU_FAN/SYS_FAN...
Manual
Page 24
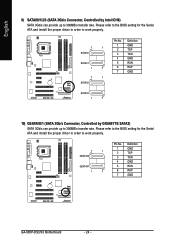
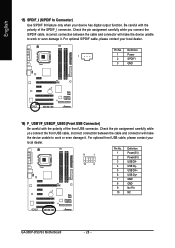
... install the proper driver in order to work properly. 7 1 GSATAII0 GSATAII1 1 7 Pin No. 1 2 3 4 5 6 7 Definition GND TXP TXN GND RXN RXP GND GA-965P-DS3/S3 Motherboard - 24 - Please refer to the BIOS setting for the Serial ATA and install the proper driver in order to work properly. 7 1 SATAII0 SATAII1 1 7 7 1 SATAII2 Pin...GSATAII0/1 (SATA 3Gb/s Connector, Controlled by Intel ICH8) SATA 3Gb/s can provide up to 300MB/s transfer rate. English 9) SATAII0/1/2/3 (SATA 3Gb/s Connector, Controlled by GIGABYTE SATA2) SATA 3Gb/s can provide up to 300MB/s transfer rate.
... install the proper driver in order to work properly. 7 1 GSATAII0 GSATAII1 1 7 Pin No. 1 2 3 4 5 6 7 Definition GND TXP TXN GND RXN RXP GND GA-965P-DS3/S3 Motherboard - 24 - Please refer to the BIOS setting for the Serial ATA and install the proper driver in order to work properly. 7 1 SATAII0 SATAII1 1 7 7 1 SATAII2 Pin...GSATAII0/1 (SATA 3Gb/s Connector, Controlled by Intel ICH8) SATA 3Gb/s can provide up to 300MB/s transfer rate. English 9) SATAII0/1/2/3 (SATA 3Gb/s Connector, Controlled by GIGABYTE SATA2) SATA 3Gb/s can provide up to 300MB/s transfer rate.
Manual
Page 26
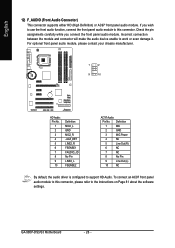
... chassis manufacturer. 1 2 9 10 HD Audio: Pin No. 1 2 3 4 5 6 7 8 9 10 Definition MIC2_L GND MIC2_R -ACZ_DET LINE2_R FSENSE1 FAUDIO_JD No Pin LINE2_L FSENSE2 AC'97 Audio: Pin No. GA-965P-DS3/S3 Motherboard - 26 - Check the pin assignments carefully while you wish to use the front audio function, connect the front panel audio module to the instructions on...
... chassis manufacturer. 1 2 9 10 HD Audio: Pin No. 1 2 3 4 5 6 7 8 9 10 Definition MIC2_L GND MIC2_R -ACZ_DET LINE2_R FSENSE1 FAUDIO_JD No Pin LINE2_L FSENSE2 AC'97 Audio: Pin No. GA-965P-DS3/S3 Motherboard - 26 - Check the pin assignments carefully while you wish to use the front audio function, connect the front panel audio module to the instructions on...
Manual
Page 28
..., please contact your local dealer. 9 1 10 2 Pin No. 1 2 3 4 5 6 7 8 9 10 Definition Power(5V) Power(5V) USB DXUSB DyUSB DX+ USB Dy+ GND GND No Pin NC GA-965P-DS3/S3 Motherboard - 28 - Check the pin assignment carefully while you connect the front USB cable, incorrect connection between the cable and connector will make the device unable...
..., please contact your local dealer. 9 1 10 2 Pin No. 1 2 3 4 5 6 7 8 9 10 Definition Power(5V) Power(5V) USB DXUSB DyUSB DX+ USB Dy+ GND GND No Pin NC GA-965P-DS3/S3 Motherboard - 28 - Check the pin assignment carefully while you connect the front USB cable, incorrect connection between the cable and connector will make the device unable...
Manual
Page 30
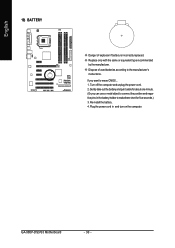
... erase CMOS... 1. Plug the power cord in the battery holder to makethem short for five seconds.) 3. Turn off the computer and unplug the power cord. 2. GA-965P-DS3/S3 Motherboard - 30 - English 19) BATTERY Danger of used batteries according to the manufacturer's instructions. If you can use a metal object to connect the positive and negative...
... erase CMOS... 1. Plug the power cord in the battery holder to makethem short for five seconds.) 3. Turn off the computer and unplug the power cord. 2. GA-965P-DS3/S3 Motherboard - 30 - English 19) BATTERY Danger of used batteries according to the manufacturer's instructions. If you can use a metal object to connect the positive and negative...
Manual
Page 32
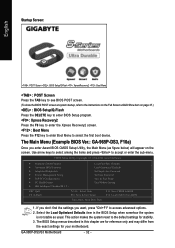
...screen. : Boot Menu Press the F12 key to enter Boot Menu to select the first boot device. The Main Menu (Example BIOS Ver.: GA-965P-DS3, F10a) Once you want, press "Ctrl+F1" to access advanced options. 2. Select the Load Optimized Defaults item in this chapter are ...the screen. Use arrow keys to select among the items and press to BIOS F12: Load CMOS from the exact settings for stability. 3. GA-965P-DS3/S3 Motherboard - 32 - CMOS Setup Utility-Copyright (C) 1984-2006 Award Software Standard CMOS Features Advanced BIOS Features Integrated Peripherals Power Management Setup PnP/PCI...
...screen. : Boot Menu Press the F12 key to enter Boot Menu to select the first boot device. The Main Menu (Example BIOS Ver.: GA-965P-DS3, F10a) Once you want, press "Ctrl+F1" to access advanced options. 2. Select the Load Optimized Defaults item in this chapter are ...the screen. Use arrow keys to select among the items and press to BIOS F12: Load CMOS from the exact settings for stability. 3. GA-965P-DS3/S3 Motherboard - 32 - CMOS Setup Utility-Copyright (C) 1984-2006 Award Software Standard CMOS Features Advanced BIOS Features Integrated Peripherals Power Management Setup PnP/PCI...
Manual
Page 34
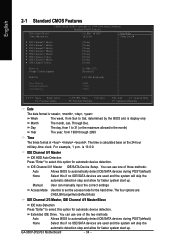
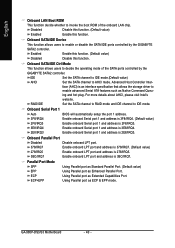
... allow for automatic device detection. Extended IDE Drive. You can manually input the correct settings Access Mode Use this option for faster system start up . GA-965P-DS3/S3 Motherboard - 34 - Manual User can use one of three methods: Auto Allows BIOS to automatically detect IDE/SATA devices during POST(default) None Select this option...
... allow for automatic device detection. Extended IDE Drive. You can manually input the correct settings Access Mode Use this option for faster system start up . GA-965P-DS3/S3 Motherboard - 34 - Manual User can use one of three methods: Auto Allows BIOS to automatically detect IDE/SATA devices during POST(default) None Select this option...
Manual
Page 36
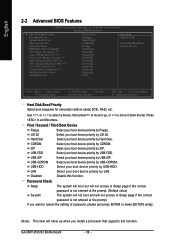
... Device Third Boot Device Password Check HDD S.M.A.R.T. USB-HDD Select your boot device priority by USB-HDD. LAN Select your boot device priority by LAN. GA-965P-DS3/S3 Motherboard - 36 - to move it up when you want to cancel the setting of password, please just press ENTER to exit this function. Disabled Disable this...
... Device Third Boot Device Password Check HDD S.M.A.R.T. USB-HDD Select your boot device priority by USB-HDD. LAN Select your boot device priority by LAN. GA-965P-DS3/S3 Motherboard - 36 - to move it up when you want to cancel the setting of password, please just press ENTER to exit this function. Disabled Disable this...
Manual
Page 38
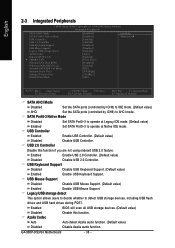
... USB storage detect This option allows users to decide whether to detect USB storage devices, including USB flash drives and USB hard drives during POST. GA-965P-DS3/S3 Motherboard - 38 - USB Mouse Support Disabled Disable USB Mouse Support. (Default value) Enabled Enable USB Mouse Support.
... USB storage detect This option allows users to decide whether to detect USB storage devices, including USB flash drives and USB hard drives during POST. GA-965P-DS3/S3 Motherboard - 38 - USB Mouse Support Disabled Disable USB Mouse Support. (Default value) Enabled Enable USB Mouse Support.
Manual
Page 40
...Extended Capabilities Port. Onboard SATA/IDE Device This function allows users to enable or disable the SATA/IDE ports controlled by the GIGABYTE SATA2 controller. Enabled Enable this function. (Default value) Disabled Disable this function. IDE Set the SATA channel to IDE mode...3BC/IRQ7. GA-965P-DS3/S3 Motherboard - 40 - Advanced Host Controller Inter- ECP+EPP Using Parallel port as Native Command Queu- ing and hot plug. English Onboard LAN Boot ROM This function decide whether to invoke the boot ROM of the SATA ports controlled by the GIGABYTE SATA2 controller....
...Extended Capabilities Port. Onboard SATA/IDE Device This function allows users to enable or disable the SATA/IDE ports controlled by the GIGABYTE SATA2 controller. Enabled Enable this function. (Default value) Disabled Disable this function. IDE Set the SATA channel to IDE mode...3BC/IRQ7. GA-965P-DS3/S3 Motherboard - 40 - Advanced Host Controller Inter- ECP+EPP Using Parallel port as Native Command Queu- ing and hot plug. English Onboard LAN Boot ROM This function decide whether to invoke the boot ROM of the SATA ports controlled by the GIGABYTE SATA2 controller....

Manual
Page 42
... left button on the system. When AC-power back to power on the PS/2 mouse to the system, the system will be in "On" state. GA-965P-DS3/S3 Motherboard - 42 - AC Back Function Soft-Off When AC-power back to the system, the system will return to power on Vista operating system only. KB...
... left button on the system. When AC-power back to power on the PS/2 mouse to the system, the system will be in "On" state. GA-965P-DS3/S3 Motherboard - 42 - AC Back Function Soft-Off When AC-power back to the system, the system will return to power on Vista operating system only. KB...


