
Manual
Page 5
Channel Audio Function Introduction 76 4-2 Troubleshooting 81 - 5 - Chapter 3 Install Drivers 47 3-1 Install Chipset Drivers 47 3-2 SoftwareApplications 48 3-3 Driver CD Information 48 3-4 Hardware Information 49 3-5 Contact Us ...49 Chapter 4 Appendix 51 4-1 Unique Software Utilities 51 4-1-1 EasyTune 5 Introduction 51 4-1-2 Xpress Recovery2 Introduction 52 4-1-3 Flash BIOS Method Introduction 54 4-1-4 Configuring SATA Hard Drive(s) (Controller: GIGABYTE SATA2 63 4-1-5 2- / 4- / 6- / 8-
Channel Audio Function Introduction 76 4-2 Troubleshooting 81 - 5 - Chapter 3 Install Drivers 47 3-1 Install Chipset Drivers 47 3-2 SoftwareApplications 48 3-3 Driver CD Information 48 3-4 Hardware Information 49 3-5 Contact Us ...49 Chapter 4 Appendix 51 4-1 Unique Software Utilities 51 4-1-1 EasyTune 5 Introduction 51 4-1-2 Xpress Recovery2 Introduction 52 4-1-3 Flash BIOS Method Introduction 54 4-1-4 Configuring SATA Hard Drive(s) (Controller: GIGABYTE SATA2 63 4-1-5 2- / 4- / 6- / 8-
Manual
Page 16
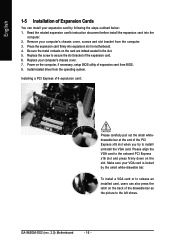
...press the latch on the slot. Read the related expansion card's instruction document before install the expansion card into expansion slot in the slot. 5. GA-965GM-DS2 (rev. 2.0) Motherboard - 16 - Press the expansion card firmly into the computer. 2. Please align the VGA card to secure the slot ...can install your expansion card by the small white-drawable bar. Power on the card are indeed seated in motherboard. 4. Install related driver from the operating system. Be sure the metal contacts on the computer, if necessary, setup BIOS utility of the PCI Express x16 ...
...press the latch on the slot. Read the related expansion card's instruction document before install the expansion card into expansion slot in the slot. 5. GA-965GM-DS2 (rev. 2.0) Motherboard - 16 - Press the expansion card firmly into the computer. 2. Please align the VGA card to secure the slot ...can install your expansion card by the small white-drawable bar. Power on the card are indeed seated in motherboard. 4. Install related driver from the operating system. Be sure the metal contacts on the computer, if necessary, setup BIOS utility of the PCI Express x16 ...
Manual
Page 17
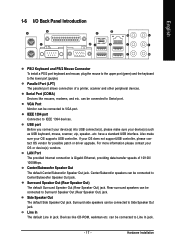
... Before you connect your device(s) into USB connector(s), please make sure your OS does not supportUSB controller, please contact OS vendor for possible patch or driver upgrade. have a standard USB interface. Center/Subwoofer Speaker Out The default Center/Subwoofer Speaker Out jack. Serial Port (COMA) Devices like CD-ROM, walkman etc...
... Before you connect your device(s) into USB connector(s), please make sure your OS does not supportUSB controller, please contact OS vendor for possible patch or driver upgrade. have a standard USB interface. Center/Subwoofer Speaker Out The default Center/Subwoofer Speaker Out jack. Serial Port (COMA) Devices like CD-ROM, walkman etc...
Manual
Page 21
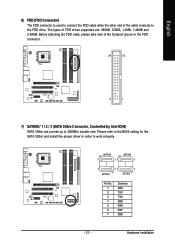
Please refer to the BIOS setting for the SATA 3Gb/s and install the proper driver in the FDD connector. 34 33 2 1 7) SATAII0 / 1 / 2 / 3 (SATA 3Gb/s Connector, Controlled by Intel ICH8) SATA 3Gb/s can provide up to work properly. The types of ...
Please refer to the BIOS setting for the SATA 3Gb/s and install the proper driver in the FDD connector. 34 33 2 1 7) SATAII0 / 1 / 2 / 3 (SATA 3Gb/s Connector, Controlled by Intel ICH8) SATA 3Gb/s can provide up to work properly. The types of ...
Manual
Page 22
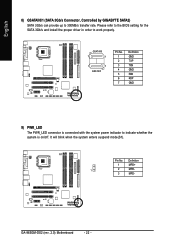
GA-965GM-DS2 (rev. 2.0) Motherboard - 22 - It will blink when the system enters suspend mode(S1). Definition 1 MPD+ 1 2 MPD- 3 MPD- GSATAII0 7 1 1 7 GSATAII1 Pin No. 1 2 3 4 5 6 7 Definition GND TXP TXN ... the system power indicator to work properly. Please refer to the BIOS setting for the SATA 3Gb/s and install the proper driver in order to indicate whether the system is on/off. English 8) GSATAII0/1 (SATA 3Gb/s Connector, Controlled by GIGABYTE SATA2) SATA 3Gb/s can provide up to 300MB/s transfer rate. Pin No.
GA-965GM-DS2 (rev. 2.0) Motherboard - 22 - It will blink when the system enters suspend mode(S1). Definition 1 MPD+ 1 2 MPD- 3 MPD- GSATAII0 7 1 1 7 GSATAII1 Pin No. 1 2 3 4 5 6 7 Definition GND TXP TXN ... the system power indicator to work properly. Please refer to the BIOS setting for the SATA 3Gb/s and install the proper driver in order to indicate whether the system is on/off. English 8) GSATAII0/1 (SATA 3Gb/s Connector, Controlled by GIGABYTE SATA2) SATA 3Gb/s can provide up to 300MB/s transfer rate. Pin No.
Manual
Page 24
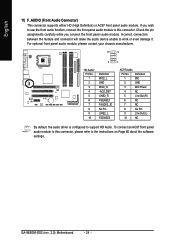
... default, the audio driver is configured to work or even damage it. If you connect the front panel audio module. Check the pin assignments carefully while you wish to use the front audio function, connect the front panel audio module to this connector, please refer to this connector. GA-965GM-DS2 (rev. 2.0) Motherboard - 24...
... default, the audio driver is configured to work or even damage it. If you connect the front panel audio module. Check the pin assignments carefully while you wish to use the front audio function, connect the front panel audio module to this connector, please refer to this connector. GA-965GM-DS2 (rev. 2.0) Motherboard - 24...
Manual
Page 38
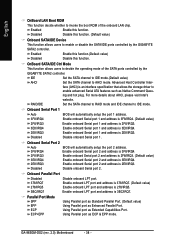
...2F8/IRQ3. (Default value) Enable onboard Serial port 2 and address is 3F8/IRQ4. GA-965GM-DS2 (rev. 2.0) Motherboard - 38 - face (AHCI) is an interface specification that allows the storage driver to enable advanced Serial ATA features such as Extended Capabilities Port. Disable onboard Serial port 2.... English OnBoard LAN Boot ROM This function decide whether to invoke the boot ROM of the SATA ports controlled by the GIGABYTE SATA2 controller. Disable this function. (Default value) Onboard SATA/IDE Device This function allows users to decide the operating mode...
...2F8/IRQ3. (Default value) Enable onboard Serial port 2 and address is 3F8/IRQ4. GA-965GM-DS2 (rev. 2.0) Motherboard - 38 - face (AHCI) is an interface specification that allows the storage driver to enable advanced Serial ATA features such as Extended Capabilities Port. Disable onboard Serial port 2.... English OnBoard LAN Boot ROM This function decide whether to invoke the boot ROM of the SATA ports controlled by the GIGABYTE SATA2 controller. Disable this function. (Default value) Onboard SATA/IDE Device This function allows users to decide the operating mode...
Manual
Page 47
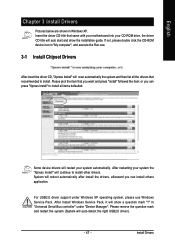
... question mark and restart the system (System will show the installation guide. Insert the driver CD-title that came with your motherboard into your system automatically. English Chapter 3 Install Drivers Pictures below are shown in "Universal Serial Bus controller" under Windows XP operating system,...device icon in "My computer", and execute the Run.exe. 3-1 Install Chipset Drivers After insert the driver CD, "Xpress Install" will scan automatically the system and then list all the drivers that you can install others application. Please pick the item that recommended to ...
... question mark and restart the system (System will show the installation guide. Insert the driver CD-title that came with your motherboard into your system automatically. English Chapter 3 Install Drivers Pictures below are shown in "Universal Serial Bus controller" under Windows XP operating system,...device icon in "My computer", and execute the Run.exe. 3-1 Install Chipset Drivers After insert the driver CD, "Xpress Install" will scan automatically the system and then list all the drivers that you can install others application. Please pick the item that recommended to ...
Manual
Page 48
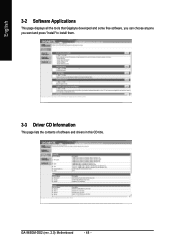
GA-965GM-DS2 (rev. 2.0) Motherboard - 48 - English 3-2 Software Applications This page displays all the tools that Gigabyte developed and some free software, you can choose anyone you want and press "install" to install them. 3-3 Driver CD Information This page lists the contents of software and drivers in this CD-title.
GA-965GM-DS2 (rev. 2.0) Motherboard - 48 - English 3-2 Software Applications This page displays all the tools that Gigabyte developed and some free software, you can choose anyone you want and press "install" to install them. 3-3 Driver CD Information This page lists the contents of software and drivers in this CD-title.
Manual
Page 49
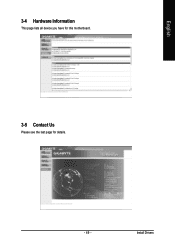
English 3-4 Hardware Information This page lists all device you have for this motherboard. 3-5 Contact Us Please see the last page for details. - 49 - Install Drivers
English 3-4 Hardware Information This page lists all device you have for this motherboard. 3-5 Contact Us Please see the last page for details. - 49 - Install Drivers
Manual
Page 52
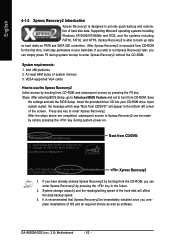
... you can enter Xpress Recovery2 by pressing the key in the future. 2. System requirements: 1. Insert the provided driver CD into your hard disk. After the steps above are completed, subsequent access to Xpress Recovery2 can simply press... from the CD-ROM, you can be immediately installed once you complete installations of OS and all required drivers as well as software. Intel x86 platforms 2. VESA-supported VGA cards How to use the Xpress Recovery2..., Inc. System storage capacity and the reading/writing speed of system memory 3. GA-965GM-DS2 (rev. 2.0) Motherboard - 52 -
... you can enter Xpress Recovery2 by pressing the key in the future. 2. System requirements: 1. Insert the provided driver CD into your hard disk. After the steps above are completed, subsequent access to Xpress Recovery2 can simply press... from the CD-ROM, you can be immediately installed once you complete installations of OS and all required drivers as well as software. Intel x86 platforms 2. VESA-supported VGA cards How to use the Xpress Recovery2..., Inc. System storage capacity and the reading/writing speed of system memory 3. GA-965GM-DS2 (rev. 2.0) Motherboard - 52 -
Manual
Page 53
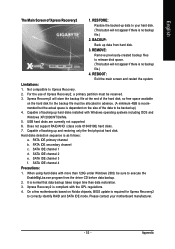
BACKUP: Back up data from the driver CD before data backup. 2. mended but the actual space is dependent on the hard disk for Xpress Recovery2 to correctly identify RAID and SATA IDE ...
BACKUP: Back up data from the driver CD before data backup. 2. mended but the actual space is dependent on the hard disk for Xpress Recovery2 to correctly identify RAID and SATA IDE ...
Manual
Page 63
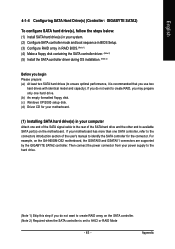
... want to create RAID, you may prepare only one hard drive. (b) An empty formatted floppy disk. (c) Windows XP/2000 setup disk. (d) Driver CD for the connector. For example, on the motherboard. Then connect the power connector from your system. (2) Configure SATA controller mode and boot...the SATA signal cable to the rear of the user's manual to available SATA port(s) on the GA-965GM-DS2 motherboard, the GSATAII0 and GSATAII1 connectors are supported by the GIGABYTE SATA2 controller. Appendix If your computer Attach one SATA controller, refer to the connectors introduction section of...
... want to create RAID, you may prepare only one hard drive. (b) An empty formatted floppy disk. (c) Windows XP/2000 setup disk. (d) Driver CD for the connector. For example, on the motherboard. Then connect the power connector from your system. (2) Configure SATA controller mode and boot...the SATA signal cable to the rear of the user's manual to available SATA port(s) on the GA-965GM-DS2 motherboard, the GSATAII0 and GSATAII1 connectors are supported by the GIGABYTE SATA2 controller. Appendix If your computer Attach one SATA controller, refer to the connectors introduction section of...
Manual
Page 72
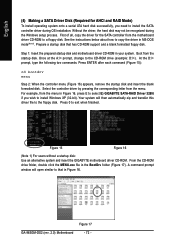
...alternative system and insert the GIGABYTE motherboard driver CD-ROM. Your system will open similar to that has CD-ROM support and a blank formatted floppy disk. Without the driver, the hard disk may not be recognized during OS installation. GA-965GM-DS2 (rev. 2.0) Motherboard Figure ...17 - 72 - See the instructions below about how to install Windows XP (32-bit). Select the controller driver by pressing the corresponding letter from the motherboard driver CD-ROM to a floppy disk....
...alternative system and insert the GIGABYTE motherboard driver CD-ROM. Your system will open similar to that has CD-ROM support and a blank formatted floppy disk. Without the driver, the hard disk may not be recognized during OS installation. GA-965GM-DS2 (rev. 2.0) Motherboard Figure ...17 - 72 - See the instructions below about how to install Windows XP (32-bit). Select the controller driver by pressing the corresponding letter from the motherboard driver CD-ROM to a floppy disk....
Manual
Page 73
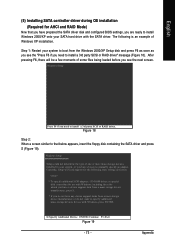
... When a screen similar to install a 3rd party SCSI or RAID driver. Windows Setup Press F6 if you need to that you have prepared the SATA driver disk and configured BIOS settings, you need to install a 3rd party SCSI or RAID driver" message (Figure 18). Currently, Setup will be a few moments of...could not determine the type of Windows XP installation. Step 1: Restart your system, or you see the next screen. English (5) Installing SATA controller driver during OS installation (Required for AHCI and RAID Mode) Now that below appears, insert the floppy disk containing the SATA...
... When a screen similar to install a 3rd party SCSI or RAID driver. Windows Setup Press F6 if you need to that you have prepared the SATA driver disk and configured BIOS settings, you need to install a 3rd party SCSI or RAID driver" message (Figure 18). Currently, Setup will be a few moments of...could not determine the type of Windows XP installation. Step 1: Restart your system, or you see the next screen. English (5) Installing SATA controller driver during OS installation (Required for AHCI and RAID Mode) Now that below appears, insert the floppy disk containing the SATA...
Manual
Page 74
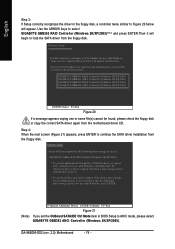
... with Windows, press ENTER. (Note) S=Specify Additional Device ENTER=Continue F3=Exit Figure 21 If you want from the motherboard driver CD. GA-965GM-DS2 (rev. 2.0) Motherboard - 74 - Use the ARROW keys to select GIGABYTE GBB363 RAID Controller (Windows 2K/XP/2003)(Note) and press ENTER.Then it will begin to configure a SCSI Adapter for...
... with Windows, press ENTER. (Note) S=Specify Additional Device ENTER=Continue F3=Exit Figure 21 If you want from the motherboard driver CD. GA-965GM-DS2 (rev. 2.0) Motherboard - 74 - Use the ARROW keys to select GIGABYTE GBB363 RAID Controller (Windows 2K/XP/2003)(Note) and press ENTER.Then it will begin to configure a SCSI Adapter for...
Manual
Page 75
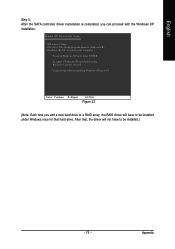
...(R) Windows (R) XP to Setup. Enter= Continue R=Repair F3=Exit Figure 22 (Note: Each time you can proceed with the Windows XP installation. After that, the driver will have to be installed under Windows once for that hard drive. Appendix To quit Setup without installing Windows XP, press F3. To repair a Windows... XP installation using Recovery Console, press R. To set up Windows XP now, press ENTER. English Step 5: After the SATA controller driver installation is completed, you add a new hard drive to a RAID array, the RAID...
...(R) Windows (R) XP to Setup. Enter= Continue R=Repair F3=Exit Figure 22 (Note: Each time you can proceed with the Windows XP installation. After that, the driver will have to be installed under Windows once for that hard drive. Appendix To quit Setup without installing Windows XP, press F3. To repair a Windows... XP installation using Recovery Console, press R. To set up Windows XP now, press ENTER. English Step 5: After the SATA controller driver installation is completed, you add a new hard drive to a RAID array, the RAID...
Manual
Page 76
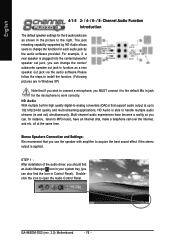
... picture to the right. all at up to MP3 music, have an Internet chat, make a telephone call over the Internet, and etc. GA-965GM-DS2 (rev. 2.0) Motherboard - 76 - Multi-channel audio experiences have become a reality so you MUST connect it to the default Mic In jack...to work correctly. Stereo Speakers Connection and Settings: We recommend that support audio output at the same time. STEP 1 : After installation of the audio driver, you should find the icon in Control Panel). English 4-1-5 2- / 4- / 6- / 8- Channel Audio Function Introduction The default speaker settings for each...
... picture to the right. all at up to MP3 music, have an Internet chat, make a telephone call over the Internet, and etc. GA-965GM-DS2 (rev. 2.0) Motherboard - 76 - Multi-channel audio experiences have become a reality so you MUST connect it to the default Mic In jack...to work correctly. Stereo Speakers Connection and Settings: We recommend that support audio output at the same time. STEP 1 : After installation of the audio driver, you should find the icon in Control Panel). English 4-1-5 2- / 4- / 6- / 8- Channel Audio Function Introduction The default speaker settings for each...

Manual
Page 77
... 1 : After installation of equipment is plugged into the rear Line Out jack, a small window will pop up and ask you what type of the audio driver, you should find an Audio Manager icon in your system tray (you can also find the icon in Control Panel). Doubleclick the icon to open...
... 1 : After installation of equipment is plugged into the rear Line Out jack, a small window will pop up and ask you what type of the audio driver, you should find an Audio Manager icon in your system tray (you can also find the icon in Control Panel). Doubleclick the icon to open...
Manual
Page 78
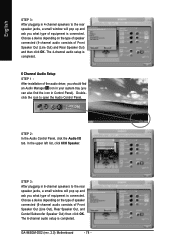
GA-965GM-DS2 (rev. 2.0) Motherboard - 78 - Choose a device depending on the type of speaker connected (6-channel audio consists of Front Speaker Out (Line Out), Rear Speaker Out, and ... Audio I/O tab. In the upper left list, click 6CH Speaker. Choose a device depending on the type of speaker connected (4-channel audio consists of the audio driver, you should find an Audio Manager icon in your system tray (you can also find the icon in Control Panel). The 6-channel audio setup is...
GA-965GM-DS2 (rev. 2.0) Motherboard - 78 - Choose a device depending on the type of speaker connected (6-channel audio consists of Front Speaker Out (Line Out), Rear Speaker Out, and ... Audio I/O tab. In the upper left list, click 6CH Speaker. Choose a device depending on the type of speaker connected (4-channel audio consists of the audio driver, you should find an Audio Manager icon in your system tray (you can also find the icon in Control Panel). The 6-channel audio setup is...


