Manual
Page 16
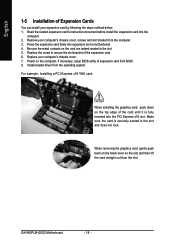
Replace the screw to secure the slot bracket of expansion card from the slot. Install related driver from the computer. 3. Read the related expansion card's instruction document before install the expansion card into expansion slot in the slot ...Express x16 slot. Press the expansion card firmly into the computer. 2. Replace your computer's chassis cover, screws and slot bracket from the operating system. GA-945PLM-(D)S2 Motherboard - 16 - Be sure the metal contacts on the slot and then lift the card straight out from BIOS. 8. Remove your computer's chassis cover...
Replace the screw to secure the slot bracket of expansion card from the slot. Install related driver from the computer. 3. Read the related expansion card's instruction document before install the expansion card into expansion slot in the slot ...Express x16 slot. Press the expansion card firmly into the computer. 2. Replace your computer's chassis cover, screws and slot bracket from the operating system. GA-945PLM-(D)S2 Motherboard - 16 - Be sure the metal contacts on the slot and then lift the card straight out from BIOS. 8. Remove your computer's chassis cover...
Manual
Page 24
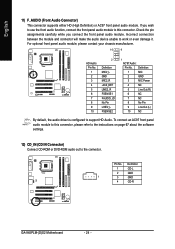
...: Pin No. 1 2 3 4 5 6 7 8 9 10 2 Definition MIC2_L GND MIC2_R -ACZ_DET LINE2_R FSENSE1 FAUDIO_JD No Pin LINE2_L FSENSE2 1 AC'97 Audio: Pin No. Definition 1 CD-L 2 GND 1 3 GND 4 CD-R GA-945PLM-(D)S2 Motherboard - 24 - Check the pin assignments carefully while you wish to use the front audio function, connect the front panel audio module to this connector... unable to support HD Audio. Definition 1 MIC 2 GND 3 MIC Power 4 NC 5 Line Out (R) 6 NC 7 NC 8 No Pin 9 Line Out (L) 10 NC By default, the audio driver is configured to work or even damage it.
...: Pin No. 1 2 3 4 5 6 7 8 9 10 2 Definition MIC2_L GND MIC2_R -ACZ_DET LINE2_R FSENSE1 FAUDIO_JD No Pin LINE2_L FSENSE2 1 AC'97 Audio: Pin No. Definition 1 CD-L 2 GND 1 3 GND 4 CD-R GA-945PLM-(D)S2 Motherboard - 24 - Check the pin assignments carefully while you wish to use the front audio function, connect the front panel audio module to this connector... unable to support HD Audio. Definition 1 MIC 2 GND 3 MIC Power 4 NC 5 Line Out (R) 6 NC 7 NC 8 No Pin 9 Line Out (L) 10 NC By default, the audio driver is configured to work or even damage it.
Manual
Page 52
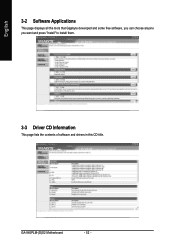
GA-945PLM-(D)S2 Motherboard - 52 - English 3-2 Software Applications This page displays all the tools that Gigabyte developed and some free software, you can choose anyone you want and press "install" to install them. 3-3 Driver CD Information This page lists the contents of software and drivers in this CD-title.
GA-945PLM-(D)S2 Motherboard - 52 - English 3-2 Software Applications This page displays all the tools that Gigabyte developed and some free software, you can choose anyone you want and press "install" to install them. 3-3 Driver CD Information This page lists the contents of software and drivers in this CD-title.
Manual
Page 56
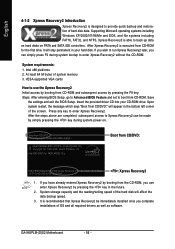
... the first time, it will stay permanent in the bottom left corner of OS and all required drivers as well as software. Upon system restart, the message which says "Boot from CD-ROM for 945PLM-DS2 F2a . . . . :BIOS Setup/Q-Flash :Xpress Recovery2 :Boot Menu :Qflash 12/27/2006-I945-...CD-ROM. System storage capacity and the reading/writing speed of system memory 3. GA-945PLM-(D)S2 Motherboard - 56 - At least 64 M bytes of the hard disk will appear in your CD-ROM drive. Insert the provided driver CD into your hard disk. If you complete installations of the screen. After Xpress...
... the first time, it will stay permanent in the bottom left corner of OS and all required drivers as well as software. Upon system restart, the message which says "Boot from CD-ROM for 945PLM-DS2 F2a . . . . :BIOS Setup/Q-Flash :Xpress Recovery2 :Boot Menu :Qflash 12/27/2006-I945-...CD-ROM. System storage capacity and the reading/writing speed of system memory 3. GA-945PLM-(D)S2 Motherboard - 56 - At least 64 M bytes of the hard disk will appear in your CD-ROM drive. Insert the provided driver CD into your hard disk. If you complete installations of the screen. After Xpress...
Manual
Page 62
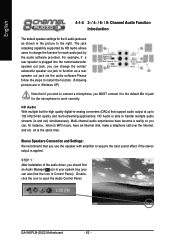
.../ 4- / 6- / 8- The jack retasking capability supported by HD Audio allows users to open the Audio Control Panel. STEP 1 : After installation of the audio driver, you should find an Audio Manager icon in Windows XP) Center/Subwoofer Speaker Out Rear Speaker Out Side Speaker Out Line In Line Out (Front...are in your system tray (you MUST connect it to the default Mic In jack for each audio jack by the audio software provided. GA-945PLM-(D)S2 Motherboard - 62 - Multi-channel audio experiences have an Internet chat, make a telephone call over the Internet, and etc. Channel Audio ...
.../ 4- / 6- / 8- The jack retasking capability supported by HD Audio allows users to open the Audio Control Panel. STEP 1 : After installation of the audio driver, you should find an Audio Manager icon in Windows XP) Center/Subwoofer Speaker Out Rear Speaker Out Side Speaker Out Line In Line Out (Front...are in your system tray (you MUST connect it to the default Mic In jack for each audio jack by the audio software provided. GA-945PLM-(D)S2 Motherboard - 62 - Multi-channel audio experiences have an Internet chat, make a telephone call over the Internet, and etc. Channel Audio ...
Manual
Page 64
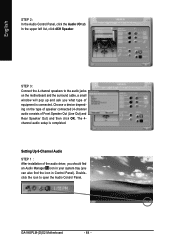
The 4channel audio setup is connected. GA-945PLM-(D)S2 Motherboard - 64 - In the upper left list, click 4CH Speaker. Setting Up 6-Channel Audio STEP 1 : After installation of the audio driver, you should find the icon in Control Panel). Doubleclick the icon to the audio jacks on the type of speaker connected (4-channel audio consists of...
The 4channel audio setup is connected. GA-945PLM-(D)S2 Motherboard - 64 - In the upper left list, click 4CH Speaker. Setting Up 6-Channel Audio STEP 1 : After installation of the audio driver, you should find the icon in Control Panel). Doubleclick the icon to the audio jacks on the type of speaker connected (4-channel audio consists of...


