
Manual
Page 10
...with ATA-33/66/100 support, allowing connection of 2 IDE devices - 4 SATA 3Gb/s connectors, allowing connection of 4 SATA 3Gb/s devices O.S Support Š Microsoft Windows 2000/XP/Vista Memory Š 4 DDRII DIMM memory slots (supports up to 2 GB memory) Š Supports dual channel DDRII 667(Note 2)/533(Note 3)/400 ...S/PDIF In/Out connector Š 2 USB 2.0/1.1 connectors for additional 4 USB 2.0/1.1 ports by cables Š 1 power LED connector Š 1 Chassis Intrusion connector "*" Only the GA-945PL-DS3P adopts All-Solid Capacitor design. GA-945PL-(D)S3P Motherboard - 10 -
...with ATA-33/66/100 support, allowing connection of 2 IDE devices - 4 SATA 3Gb/s connectors, allowing connection of 4 SATA 3Gb/s devices O.S Support Š Microsoft Windows 2000/XP/Vista Memory Š 4 DDRII DIMM memory slots (supports up to 2 GB memory) Š Supports dual channel DDRII 667(Note 2)/533(Note 3)/400 ...S/PDIF In/Out connector Š 2 USB 2.0/1.1 connectors for additional 4 USB 2.0/1.1 ports by cables Š 1 power LED connector Š 1 Chassis Intrusion connector "*" Only the GA-945PL-DS3P adopts All-Solid Capacitor design. GA-945PL-(D)S3P Motherboard - 10 -
Manual
Page 29
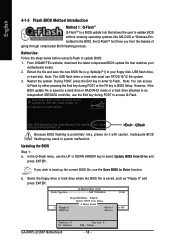
... the battery on , pushing the button during the BIOS POST (Power-On Self Test) will take you wish to upgrade to a new BIOS, either Gigabyte's Q-Flash or @BIOS utility can enter the BIOS setup screen by pressing "Ctrl + F1". When the power is displayed at the bottom of the ... default table Load the Optimized Defaults Q-Flash utility System Information Save all the CMOS changes, only for the highlighted item. Because BIOS flashing is a Windows-based utility that may result in the CMOS SRAM of the screen. You can be used. BIOS Setup English Chapter 2 BIOS Setup BIOS (Basic...
... the battery on , pushing the button during the BIOS POST (Power-On Self Test) will take you wish to upgrade to a new BIOS, either Gigabyte's Q-Flash or @BIOS utility can enter the BIOS setup screen by pressing "Ctrl + F1". When the power is displayed at the bottom of the ... default table Load the Optimized Defaults Q-Flash utility System Information Save all the CMOS changes, only for the highlighted item. Because BIOS flashing is a Windows-based utility that may result in the CMOS SRAM of the screen. You can be used. BIOS Setup English Chapter 2 BIOS Setup BIOS (Basic...
Manual
Page 35
... value) Disable CPU Hyper Threading. to 3 (Note) Enabled Disabled Limit CPUID Maximum value to issue warnings when thirdparty hardware monitor utility is only working for windows XP. (Default value) No-Execute Memory Protect (Note) Enabled Disabled Enable No-Execute Memory Protect function. (Default value) Disable No-Execute Memory Protect function. CPU...
... value) Disable CPU Hyper Threading. to 3 (Note) Enabled Disabled Limit CPUID Maximum value to issue warnings when thirdparty hardware monitor utility is only working for windows XP. (Default value) No-Execute Memory Protect (Note) Enabled Disabled Enable No-Execute Memory Protect function. (Default value) Disable No-Execute Memory Protect function. CPU...
Manual
Page 38
... Detected --> 100Mbps Cable Length= 30m Link Detected Cable Length Displays transmission speed Displays the approximate length of 10/100/1000 Mbps in Windows mode or when the LAN Boot ROM is the approximate length of 10/100 Mbps in the figure above. When LAN Cable Is ... not used in a 10/100 Mbps environment, their Status fields will show Open and the Length fields show Open, and the length shown is activated. GA-945PL-(D)S3P Motherboard - 38 - Disabled Disable this function. Example: Pair1-2 Status = Short / Length = 1.6m Explanation: A fault or short might occur at a speed...
... Detected --> 100Mbps Cable Length= 30m Link Detected Cable Length Displays transmission speed Displays the approximate length of 10/100/1000 Mbps in Windows mode or when the LAN Boot ROM is the approximate length of 10/100 Mbps in the figure above. When LAN Cable Is ... not used in a 10/100 Mbps environment, their Status fields will show Open and the Length fields show Open, and the length shown is activated. GA-945PL-(D)S3P Motherboard - 38 - Disabled Disable this function. Example: Pair1-2 Status = Short / Length = 1.6m Explanation: A fault or short might occur at a speed...
Manual
Page 51
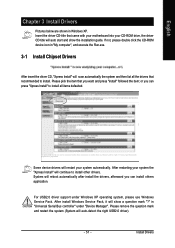
... the installation guide. English Chapter 3 Install Drivers Pictures below are shown in "Universal Serial Bus controller" under Windows XP operating system, please use Windows Service Pack. System will reboot automatically after install the drivers, afterward you want and press "install" followed the...-ROM drive, the driver CD-title will continue to install. For USB2.0 driver support under "Device Manager". Install Drivers in Windows XP. Please pick the item that recommended to install other drivers. Insert the driver CD-title that came with your motherboard into...
... the installation guide. English Chapter 3 Install Drivers Pictures below are shown in "Universal Serial Bus controller" under Windows XP operating system, please use Windows Service Pack. System will reboot automatically after install the drivers, afterward you want and press "install" followed the...-ROM drive, the driver CD-title will continue to install. For USB2.0 driver support under "Device Manager". Install Drivers in Windows XP. Please pick the item that recommended to install other drivers. Insert the driver CD-title that came with your motherboard into...
Manual
Page 55
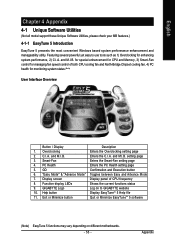
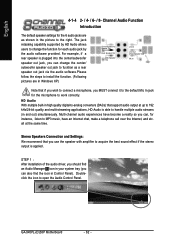
... speed control of CPU frequency 8. Overclocking Enters the Overclocking setting page 2. Enters the C.I .B. GO Confirmation and Execution button 6. GIGABYTE Logo Log on different motherboards. - 55 - setting page 3. Display screen Display panel of both CPU cooling fan and North-Bridge... these Unique Software Utilities, please check your MB features.) 4-1-1 EasyTune 5 Introduction EasyTune 5 presents the most convenient Windows based system performance enhancement and manageability utility. "Easy Mode" & "Advance Mode" Toggles between Easy and Advance Mode 7. Featuring several...
... speed control of CPU frequency 8. Overclocking Enters the Overclocking setting page 2. Enters the C.I .B. GO Confirmation and Execution button 6. GIGABYTE Logo Log on different motherboards. - 55 - setting page 3. Display screen Display panel of both CPU cooling fan and North-Bridge... these Unique Software Utilities, please check your MB features.) 4-1-1 EasyTune 5 Introduction EasyTune 5 presents the most convenient Windows based system performance enhancement and manageability utility. "Easy Mode" & "Advance Mode" Toggles between Easy and Advance Mode 7. Featuring several...
Manual
Page 56
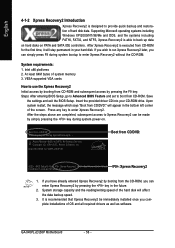
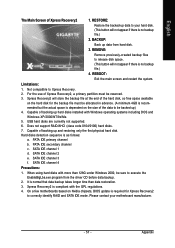
... is recommended that Xpress Recovery2 be made by simply pressing the key during system bootup to enter Xpress Recovery2 without the CD-ROM. GA-945PL-(D)S3P Motherboard - 56 - System requirements: 1. Press any key to startup XpressRecovery2..... If you have already entered Xpress Recovery2 by booting from...ROM and subsequent access by pressing the key in the bottom left corner of hard disk data. Supporting Microsoft operating systems including Windows XP/2000/NT/98/Me and DOS, and file systems including FAT16, FAT32, and NTFS, Xpress Recovery2 is designed to provide...
... is recommended that Xpress Recovery2 be made by simply pressing the key during system bootup to enter Xpress Recovery2 without the CD-ROM. GA-945PL-(D)S3P Motherboard - 56 - System requirements: 1. Press any key to startup XpressRecovery2..... If you have already entered Xpress Recovery2 by booting from...ROM and subsequent access by pressing the key in the bottom left corner of hard disk data. Supporting Microsoft operating systems including Windows XP/2000/NT/98/Me and DOS, and file systems including FAT16, FAT32, and NTFS, Xpress Recovery2 is designed to provide...
Manual
Page 57
... data restoration. 3. Please contact your hard disk. (This button will not appear if there is normal that data backup takes longer time than 128G under Windows 2000, be sure to execute the EnableBigLba.exe program from hard disk. 3. REBOOT: Exit the main screen and restart the system. Does not support RAID... only the first physical hard disk. English The Main Screen of Xpress Recovery2, a primary partition must be allocated in advance. (A minimum 4GB is compliant with Windows operating systems including DOS and Windows XP/2000/NT/9x/Me. 5. Limitations: 1.
... data restoration. 3. Please contact your hard disk. (This button will not appear if there is normal that data backup takes longer time than 128G under Windows 2000, be sure to execute the EnableBigLba.exe program from hard disk. 3. REBOOT: Exit the main screen and restart the system. Does not support RAID... only the first physical hard disk. English The Main Screen of Xpress Recovery2, a primary partition must be allocated in advance. (A minimum 4GB is compliant with Windows operating systems including DOS and Windows XP/2000/NT/9x/Me. 5. Limitations: 1.
Manual
Page 58
...Drive and press ENTER. Inadequate BIOS flashing may result in BIOS Setup. From GIGABYTE's website, download the latest compressed BIOS update file that allows the user to update BIOS... without entering operating systems like MS-DOS or Windows.Embedded in RAID/AHCI mode or a hard drive attached to an independent IDE/...Drive Sa0vefilBeI(Os)SfotounDdrive EnteFr l:oRppuyn A :Move ESC:Reset :Power Off HDD 0-0 Total size : 0 F5 : Refresh GA-945PL-(D)S3P Motherboard Free size : 0 DEL : Delete - 58 - Before Use: Follow the steps below before using Q-Flash to...
...Drive and press ENTER. Inadequate BIOS flashing may result in BIOS Setup. From GIGABYTE's website, download the latest compressed BIOS update file that allows the user to update BIOS... without entering operating systems like MS-DOS or Windows.Embedded in RAID/AHCI mode or a hard drive attached to an independent IDE/...Drive Sa0vefilBeI(Os)SfotounDdrive EnteFr l:oRppuyn A :Move ESC:Reset :Power Off HDD 0-0 Total size : 0 F5 : Refresh GA-945PL-(D)S3P Motherboard Free size : 0 DEL : Delete - 58 - Before Use: Follow the steps below before using Q-Flash to...

Manual
Page 60
...update their BIOS under Windows. Select @BIOSTM sever d. Do not click "Internet Update" icon b. System will automatically download and update the BIOS. Please select "All Files" in dialog box while opening the old file. Select the desired @BIOS server 1. Select the exact model name on your motherboard e. GA-945PL-(D)S3P Motherboard - 60 -... internet or any other methods (such as: 9plds3p.F1). Installation Complete and Run @BIOS Select @BIOS item than click Install Click Start/ Programs/ GIGABYTE/@BIOS Fig 3. Fig 1. Click "Update New BIOS" c. Update BIOS through Internet: a.
...update their BIOS under Windows. Select @BIOSTM sever d. Do not click "Internet Update" icon b. System will automatically download and update the BIOS. Please select "All Files" in dialog box while opening the old file. Select the desired @BIOS server 1. Select the exact model name on your motherboard e. GA-945PL-(D)S3P Motherboard - 60 -... internet or any other methods (such as: 9plds3p.F1). Installation Complete and Run @BIOS Select @BIOS item than click Install Click Start/ Programs/ GIGABYTE/@BIOS Fig 3. Fig 1. Click "Update New BIOS" c. Update BIOS through Internet: a.
Manual
Page 62
... find the icon in and out) simultaneously. For example, if a rear speaker is able to work correctly. all at up to the right. GA-945PL-(D)S3P Motherboard - 62 - The jack retasking capability supported by HD Audio allows users to change the center/ subwoofer speaker out jack to fucntion as shown in...audio jacks are as a rear speaker out jack via the audio software.Please follow the steps to install the function. (Following pictures are in Windows XP) Center/Subwoofer Speaker Out Rear Speaker Out Side Speaker Out Line In Line Out (Front Speaker Out) Mic In Note that you can also...
... find the icon in and out) simultaneously. For example, if a rear speaker is able to work correctly. all at up to the right. GA-945PL-(D)S3P Motherboard - 62 - The jack retasking capability supported by HD Audio allows users to change the center/ subwoofer speaker out jack to fucntion as shown in...audio jacks are as a rear speaker out jack via the audio software.Please follow the steps to install the function. (Following pictures are in Windows XP) Center/Subwoofer Speaker Out Rear Speaker Out Side Speaker Out Line In Line Out (Front Speaker Out) Mic In Note that you can also...

Manual
Page 63
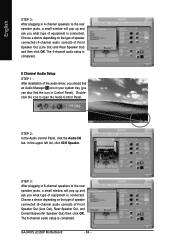
Doubleclick the icon to open the Audio Control Panel. STEP 3: After a speaker or headphone is plugged into the rear Line Out jack, a small window will pop up and ask you what type of equipment is completed. 4 Channel Audio Setup STEP 1 : After installation of the audio driver, you should find ...
Doubleclick the icon to open the Audio Control Panel. STEP 3: After a speaker or headphone is plugged into the rear Line Out jack, a small window will pop up and ask you what type of equipment is completed. 4 Channel Audio Setup STEP 1 : After installation of the audio driver, you should find ...
Manual
Page 64
STEP 3: After plugging in 6-channel speakers to the rear speaker jacks, a small window will pop up and ask you what type of equipment is connected. The 4-channel audio setup is completed. 6 Channel Audio Setup STEP 1 : After installation of ... icon to open the Audio Control Panel. STEP 2: In the Audio Control Panel, click the Audio I/O tab. In the upper left list, click 6CH Speaker. GA-945PL-(D)S3P Motherboard - 64 - Choose a device depending on the type of speaker connected (6-channel audio consists of Front Speaker Out (Line Out), Rear Speaker Out, and Center...
STEP 3: After plugging in 6-channel speakers to the rear speaker jacks, a small window will pop up and ask you what type of equipment is connected. The 4-channel audio setup is completed. 6 Channel Audio Setup STEP 1 : After installation of ... icon to open the Audio Control Panel. STEP 2: In the Audio Control Panel, click the Audio I/O tab. In the upper left list, click 6CH Speaker. GA-945PL-(D)S3P Motherboard - 64 - Choose a device depending on the type of speaker connected (6-channel audio consists of Front Speaker Out (Line Out), Rear Speaker Out, and Center...

Manual
Page 65
... tray (you can also find the icon in 8-channel speakers to open the Audio Control Panel. Doubleclick the icon to the rear speaker jacks, a small window will pop up and ask you what type of Front Speaker Out (Line Out), Rear Speaker Out, Center/Subwoofer Speaker Out, and Side Speaker Out...
... tray (you can also find the icon in 8-channel speakers to open the Audio Control Panel. Doubleclick the icon to the rear speaker jacks, a small window will pop up and ask you what type of Front Speaker Out (Line Out), Rear Speaker Out, Center/Subwoofer Speaker Out, and Side Speaker Out...


