
Manual
Page 51
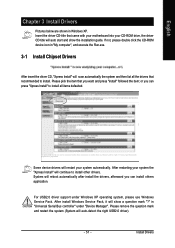
... item that recommended to install all items defaulted. in Windows XP. Insert the driver CD-title that came with your motherboard into your system the "Xpress Install" will reboot automatically after install the drivers, afterward you want and press "install" followed the item... will continue to install other drivers. After install Windows Service Pack, it will auto start and show a question mark "?" English Chapter 3 Install Drivers Pictures below are shown in "Universal Serial Bus controller" under Windows XP operating system, please use Windows Service Pack. After restarting your...
... item that recommended to install all items defaulted. in Windows XP. Insert the driver CD-title that came with your motherboard into your system the "Xpress Install" will reboot automatically after install the drivers, afterward you want and press "install" followed the item... will continue to install other drivers. After install Windows Service Pack, it will auto start and show a question mark "?" English Chapter 3 Install Drivers Pictures below are shown in "Universal Serial Bus controller" under Windows XP operating system, please use Windows Service Pack. After restarting your...
Manual
Page 56
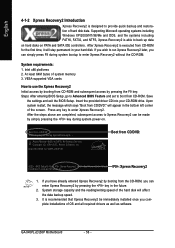
... Press any key to provide quick backup and restoration of OS and all required drivers as well as software. Intel I945 BIOS for the first time, it will stay permanent in your CD-ROM drive. GA-945PL-(D)S3P Motherboard - 56 - English 4-1-2 Xpress Recovery2 Introduction Xpress Recovery2 is able to back...Recovery2 Initial access by booting from CD-ROM and subsequent access by simply pressing the key during system bootup to boot from CD-ROM for 945PL-DS3P E1 . . . . :BIOS Setup/Q-Flash :Xpress Recovery2 :Boot Menu :Qflash 03/08/2007-I945-6A79TG0JC-00 : Xpress Recovery2 1. ...
... Press any key to provide quick backup and restoration of OS and all required drivers as well as software. Intel I945 BIOS for the first time, it will stay permanent in your CD-ROM drive. GA-945PL-(D)S3P Motherboard - 56 - English 4-1-2 Xpress Recovery2 Introduction Xpress Recovery2 is able to back...Recovery2 Initial access by booting from CD-ROM and subsequent access by simply pressing the key during system bootup to boot from CD-ROM for 945PL-DS3P E1 . . . . :BIOS Setup/Q-Flash :Xpress Recovery2 :Boot Menu :Qflash 03/08/2007-I945-6A79TG0JC-00 : Xpress Recovery2 1. ...
Manual
Page 57
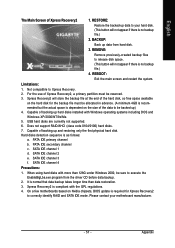
...is required for the backup file must be allocated in advance. (A minimum 4GB is normal that data backup takes longer time than 128G under Windows 2000, be backed up) 4. Appendix Xpress Recovery2 will not appear if there is dependent on the size of backing up and restoring only ...(This button will store the backup file at the end of Xpress Recovery2, a primary partition must be reserved. 3. BACKUP: Back up data from the driver CD before data backup. 2. mended but the actual space is no backup file.) 2. Capable of the data to be sure to Xpress Recovery. 2. English...
...is required for the backup file must be allocated in advance. (A minimum 4GB is normal that data backup takes longer time than 128G under Windows 2000, be backed up) 4. Appendix Xpress Recovery2 will not appear if there is dependent on the size of backing up and restoring only ...(This button will store the backup file at the end of Xpress Recovery2, a primary partition must be reserved. 3. BACKUP: Back up data from the driver CD before data backup. 2. mended but the actual space is no backup file.) 2. Capable of the data to be sure to Xpress Recovery. 2. English...
Manual
Page 62
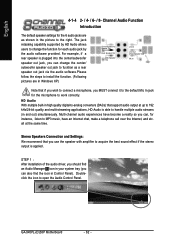
... able to handle multiple audio streams (in Control Panel). STEP 1 : After installation of the audio driver, you should find an Audio Manager icon in your system tray (you can also find the icon in... audio software.Please follow the steps to install the function. (Following pictures are as shown in Windows XP) Center/Subwoofer Speaker Out Rear Speaker Out Side Speaker Out Line In Line Out (Front Speaker... a telephone call over the Internet, and etc. English 4-1-4 2- / 4- / 6- / 8- GA-945PL-(D)S3P Motherboard - 62 - The jack retasking capability supported by the audio software provided.
... able to handle multiple audio streams (in Control Panel). STEP 1 : After installation of the audio driver, you should find an Audio Manager icon in your system tray (you can also find the icon in... audio software.Please follow the steps to install the function. (Following pictures are as shown in Windows XP) Center/Subwoofer Speaker Out Rear Speaker Out Side Speaker Out Line In Line Out (Front Speaker... a telephone call over the Internet, and etc. English 4-1-4 2- / 4- / 6- / 8- GA-945PL-(D)S3P Motherboard - 62 - The jack retasking capability supported by the audio software provided.

Manual
Page 63
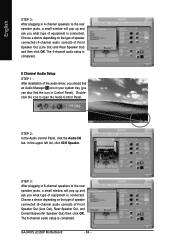
... is completed. 4 Channel Audio Setup STEP 1 : After installation of equipment is plugged into the rear Line Out jack, a small window will pop up and ask you what type of the audio driver, you should find an Audio Manager icon in your system tray (you can also find the icon in Control Panel...
... is completed. 4 Channel Audio Setup STEP 1 : After installation of equipment is plugged into the rear Line Out jack, a small window will pop up and ask you what type of the audio driver, you should find an Audio Manager icon in your system tray (you can also find the icon in Control Panel...
Manual
Page 64
... speaker connected (4-channel audio consists of equipment is connected. GA-945PL-(D)S3P Motherboard - 64 - STEP 2: In the Audio Control Panel, click the Audio I/O tab. STEP 3: After plugging in 6-channel speakers to the rear speaker jacks, a small window will pop up and ask you what type of Front ... consists of equipment is connected. The 6-channel audio setup is completed. 6 Channel Audio Setup STEP 1 : After installation of the audio driver, you should find an Audio Manager icon in your system tray (you can also find the icon in Control Panel). English STEP 3: After...
... speaker connected (4-channel audio consists of equipment is connected. GA-945PL-(D)S3P Motherboard - 64 - STEP 2: In the Audio Control Panel, click the Audio I/O tab. STEP 3: After plugging in 6-channel speakers to the rear speaker jacks, a small window will pop up and ask you what type of Front ... consists of equipment is connected. The 6-channel audio setup is completed. 6 Channel Audio Setup STEP 1 : After installation of the audio driver, you should find an Audio Manager icon in your system tray (you can also find the icon in Control Panel). English STEP 3: After...

Manual
Page 65
... list, click 8CH Speaker. The 8-channel audio setup is connected. Doubleclick the icon to the rear speaker jacks, a small window will pop up and ask you what type of the audio driver, you should find an Audio Manager icon in your system tray (you can also find the icon in 8-channel speakers...
... list, click 8CH Speaker. The 8-channel audio setup is connected. Doubleclick the icon to the rear speaker jacks, a small window will pop up and ask you what type of the audio driver, you should find an Audio Manager icon in your system tray (you can also find the icon in 8-channel speakers...


