Manual
Page 5
Channel Audio Function Introduction 65 4-2 Troubleshooting 70 - 5 - Chapter 3 Install Drivers 49 3-1 Install Chipset Drivers 49 3-2 SoftwareApplications 50 3-3 Driver CD Information 50 3-4 Hardware Information 51 3-5 Contact Us ...51 Chapter 4 Appendix 53 4-1 Unique Software Utilities 53 4-1-1 EasyTune 5 Introduction 53 4-1-2 Xpress Recovery2 Introduction 54 4-1-3 Flash BIOS Method Introduction 56 4-1-4 2- / 4- / 6- / 8-
Channel Audio Function Introduction 65 4-2 Troubleshooting 70 - 5 - Chapter 3 Install Drivers 49 3-1 Install Chipset Drivers 49 3-2 SoftwareApplications 50 3-3 Driver CD Information 50 3-4 Hardware Information 51 3-5 Contact Us ...51 Chapter 4 Appendix 53 4-1 Unique Software Utilities 53 4-1-1 EasyTune 5 Introduction 53 4-1-2 Xpress Recovery2 Introduction 54 4-1-3 Flash BIOS Method Introduction 56 4-1-4 2- / 4- / 6- / 8-
Manual
Page 16
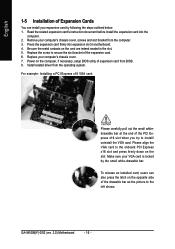
... bar as the picture to the onboard PCI Express x16 slot and press firmly down on the card are indeed seated in motherboard. 4. GA-945GM(F)-DS2 (rev. 2.0) Motherboard - 16 - Replace your VGA card is locked by following the steps outlined below: 1. To release an installed card... necessary, setup BIOS utility of expansion card from the operating system. Replace the screw to install/ uninstall the VGA card. Install related driver from BIOS. 8. Read the related expansion card's instruction document before install the expansion card into expansion slot in the slot. 5. Remove...
... bar as the picture to the onboard PCI Express x16 slot and press firmly down on the card are indeed seated in motherboard. 4. GA-945GM(F)-DS2 (rev. 2.0) Motherboard - 16 - Replace your VGA card is locked by following the steps outlined below: 1. To release an installed card... necessary, setup BIOS utility of expansion card from the operating system. Replace the screw to install/ uninstall the VGA card. Install related driver from BIOS. 8. Read the related expansion card's instruction document before install the expansion card into expansion slot in the slot. 5. Remove...
Manual
Page 17
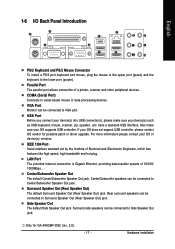
... Before you connect your device(s) into USB connector(s), please make sure your OS does not support USB controller, please contact OS vendor for GA-945GMF-DS2 (rev. 2.0). - 17 - IEEE 1394 Port Serial interface standard set by the Institute of a printer, scanner and other peripheral devices.... Center/Subwoofer speakers can be connected to VGA port. Only for possible patch or driver upgrade. VGA Port Monitor can be connected to Center/...
... Before you connect your device(s) into USB connector(s), please make sure your OS does not support USB controller, please contact OS vendor for GA-945GMF-DS2 (rev. 2.0). - 17 - IEEE 1394 Port Serial interface standard set by the Institute of a printer, scanner and other peripheral devices.... Center/Subwoofer speakers can be connected to VGA port. Only for possible patch or driver upgrade. VGA Port Monitor can be connected to Center/...
Manual
Page 21
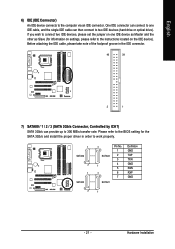
One IDE connector can connect to one IDE device as Master and the other as Slave (for the SATA 3Gb/s and install the proper driver in the IDE connector. 40 39 2 1 7) SATAII0 / 1 / 2 / 3 (SATA 3Gb/s Connector, Controlled by ICH7) SATA 3Gb/s can then connect to two IDE devices (hard drive or ...
One IDE connector can connect to one IDE device as Master and the other as Slave (for the SATA 3Gb/s and install the proper driver in the IDE connector. 40 39 2 1 7) SATAII0 / 1 / 2 / 3 (SATA 3Gb/s Connector, Controlled by ICH7) SATA 3Gb/s can then connect to two IDE devices (hard drive or ...
Manual
Page 24
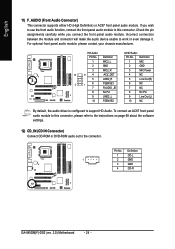
... 9 LINE2_L 9 Line Out (L) 10 FSENSE2 10 NC By default, the audio driver is configured to the connector. If you connect the front panel audio module. To connect an AC97 front panel audio module to this connector. Definition 1 CD-L 1 2 GND 3 GND 4 CD-R GA-945GM(F)-DS2 (rev. 2.0) Motherboard - 24 - Incorrect connection between the module and connector...
... 9 LINE2_L 9 Line Out (L) 10 FSENSE2 10 NC By default, the audio driver is configured to the connector. If you connect the front panel audio module. To connect an AC97 front panel audio module to this connector. Definition 1 CD-L 1 2 GND 3 GND 4 CD-R GA-945GM(F)-DS2 (rev. 2.0) Motherboard - 24 - Incorrect connection between the module and connector...
Manual
Page 49
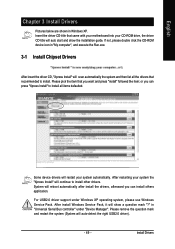
...Service Pack, it will auto start and show a question mark "?" Install Drivers System will reboot automatically after install the drivers, afterward you can press "Xpress Install" to install all the drivers that recommended to install other drivers. After restarting your system the "Xpress Install" will scan automatically the system... "install" followed the item; If not, please double click the CD-ROM device icon in Windows XP. For USB2.0 driver support under "Device Manager". Please remove the question mark and restart the system (System will restart your CD-ROM drive, the...
...Service Pack, it will auto start and show a question mark "?" Install Drivers System will reboot automatically after install the drivers, afterward you can press "Xpress Install" to install all the drivers that recommended to install other drivers. After restarting your system the "Xpress Install" will scan automatically the system... "install" followed the item; If not, please double click the CD-ROM device icon in Windows XP. For USB2.0 driver support under "Device Manager". Please remove the question mark and restart the system (System will restart your CD-ROM drive, the...
Manual
Page 50
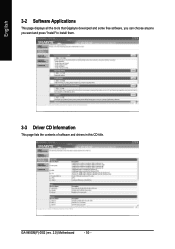
English 3-2 Software Applications This page displays all the tools that Gigabyte developed and some free software, you can choose anyone you want and press "install" to install them. 3-3 Driver CD Information This page lists the contents of software and drivers in this CD-title. GA-945GM(F)-DS2 (rev. 2.0) Motherboard - 50 -
English 3-2 Software Applications This page displays all the tools that Gigabyte developed and some free software, you can choose anyone you want and press "install" to install them. 3-3 Driver CD Information This page lists the contents of software and drivers in this CD-title. GA-945GM(F)-DS2 (rev. 2.0) Motherboard - 50 -
Manual
Page 51
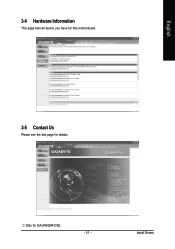
Only for details. English 3-4 Hardware Information This page lists all device you have for this motherboard. 3-5 Contact Us Please see the last page for GA-945GMF-DS2. - 51 - Install Drivers
Only for details. English 3-4 Hardware Information This page lists all device you have for this motherboard. 3-5 Contact Us Please see the last page for GA-945GMF-DS2. - 51 - Install Drivers
Manual
Page 54
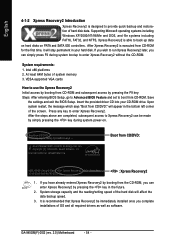
..., you can be immediately installed once you complete installations of the hard disk will affect the data backup speed. 3. Insert the provided driver CD into your hard disk. Boot from CD-ROM and subsequent access by pressing the key in the future. 2. Intel I945 BIOS ... access to back up data on hard disks on . . . Upon system restart, the message which says "Boot from CD/DVD: : Xpress Recovery2 1. GA-945GM(F)-DS2 (rev. 2.0) Motherboard - 54 - Supporting Microsoft operating systems including Windows XP/2000/NT/98/Me and DOS, and file systems including FAT16, FAT32, and ...
..., you can be immediately installed once you complete installations of the hard disk will affect the data backup speed. 3. Insert the provided driver CD into your hard disk. Boot from CD-ROM and subsequent access by pressing the key in the future. 2. Intel I945 BIOS ... access to back up data on hard disks on . . . Upon system restart, the message which says "Boot from CD/DVD: : Xpress Recovery2 1. GA-945GM(F)-DS2 (rev. 2.0) Motherboard - 54 - Supporting Microsoft operating systems including Windows XP/2000/NT/98/Me and DOS, and file systems including FAT16, FAT32, and ...
Manual
Page 55
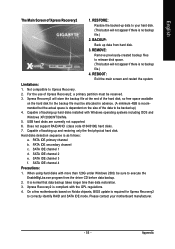
... previously-created backup files to be reserved. 3. BACKUP: Back up data to Xpress Recovery. 2. SATA IDE channel 1 d. RESTORE: Restore the backed-up data from the driver CD before data backup. 2.
... previously-created backup files to be reserved. 3. BACKUP: Back up data to Xpress Recovery. 2. SATA IDE channel 1 d. RESTORE: Restore the backed-up data from the driver CD before data backup. 2.

Manual
Page 65
... Panel. - 65 - all at up to 192 kHz/24-bit quality and multi-streaming applications, HD Audio is applied. STEP 1 : After installation of the audio driver, you should find the icon in the picture to the right. Doubleclick the icon to handle multiple audio streams (in your system tray (you use...
... Panel. - 65 - all at up to 192 kHz/24-bit quality and multi-streaming applications, HD Audio is applied. STEP 1 : After installation of the audio driver, you should find the icon in the picture to the right. Doubleclick the icon to handle multiple audio streams (in your system tray (you use...
Manual
Page 66
... audio driver, you should find an Audio Manager icon in Control Panel). STEP 2: In the Audio Control Panel, click the Audio I /O tab. Doubleclick the icon to open the Audio Control Panel. English STEP 2: In the Audio Control Panel, click the Audio I /O tab. In the upper left list, click 2CH Speaker. GA-945GM(F)-DS2 (rev...
... audio driver, you should find an Audio Manager icon in Control Panel). STEP 2: In the Audio Control Panel, click the Audio I /O tab. Doubleclick the icon to open the Audio Control Panel. English STEP 2: In the Audio Control Panel, click the Audio I /O tab. In the upper left list, click 2CH Speaker. GA-945GM(F)-DS2 (rev...
Manual
Page 67
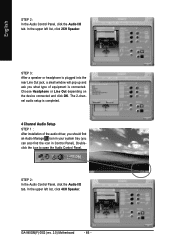
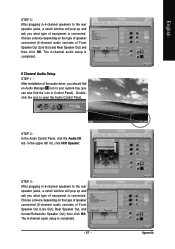
The 6-channel audio setup is completed. 6 Channel Audio Setup STEP 1 : After installation of the audio driver, you should find an Audio Manager icon in your system tray (you can also find the icon in Control Panel). In the upper left list, ...
The 6-channel audio setup is completed. 6 Channel Audio Setup STEP 1 : After installation of the audio driver, you should find an Audio Manager icon in your system tray (you can also find the icon in Control Panel). In the upper left list, ...

Manual
Page 68
... connected (8-channel audio consists of equipment is completed. STEP 2: In the Audio Control Panel, click the Audio I/O tab. The 8-channel audio setup is connected. GA-945GM(F)-DS2 (rev. 2.0) Motherboard - 68 - Doubleclick the icon to the rear speaker jacks, a small window will pop up and ask you can also find an Audio...Rear Speaker Out, Center/Subwoofer Speaker Out, and Side Speaker Out) then click OK. English 8 Channel Audio Setup STEP 1 : After installation of the audio driver, you should find the icon in Control Panel). In the upper left list, click 8CH Speaker.
... connected (8-channel audio consists of equipment is completed. STEP 2: In the Audio Control Panel, click the Audio I/O tab. The 8-channel audio setup is connected. GA-945GM(F)-DS2 (rev. 2.0) Motherboard - 68 - Doubleclick the icon to the rear speaker jacks, a small window will pop up and ask you can also find an Audio...Rear Speaker Out, Center/Subwoofer Speaker Out, and Side Speaker Out) then click OK. English 8 Channel Audio Setup STEP 1 : After installation of the audio driver, you should find the icon in Control Panel). In the upper left list, click 8CH Speaker.


