
Manual
Page 1
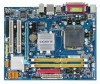
GA-945GCM-S2L/ GA-945GCM-S2C LGA775 socket motherboard for Intel® CoreTM processor family/ Intel® Pentium® processor family/Intel® Celeron® processor family User's Manual Rev. 1007 12ME-945GCMS2-1007R
GA-945GCM-S2L/ GA-945GCM-S2C LGA775 socket motherboard for Intel® CoreTM processor family/ Intel® Pentium® processor family/Intel® Celeron® processor family User's Manual Rev. 1007 12ME-945GCMS2-1007R
Manual
Page 3
... the exclu- For product-related information, check on our website at: http://www.gigabyte.com.tw Identifying Your Motherboard Revision The revision number on our website. All rights reserved. Disclaimer Information in this : "REV: X.X." Check your motherboard looks like this manual is protected by copyright laws and is exclusively licensed to the specifications and...
... the exclu- For product-related information, check on our website at: http://www.gigabyte.com.tw Identifying Your Motherboard Revision The revision number on our website. All rights reserved. Disclaimer Information in this : "REV: X.X." Check your motherboard looks like this manual is protected by copyright laws and is exclusively licensed to the specifications and...
Manual
Page 6
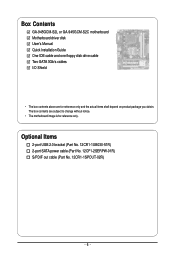
... (Part No. 12CF1-2SERPW-01R) S/PDIF out cable (Part No. 12CR1-1SPOUT-02R) - 6 - The box contents are for reference only. Box Contents GA-945GCM-S2L or GA-945GCM-S2C motherboard Motherboard driver disk User's Manual Quick Installation Guide One IDE cable and one floppy disk drive cable Two SATA 3Gb/s cables I/O Shield • The box contents above are...
... (Part No. 12CF1-2SERPW-01R) S/PDIF out cable (Part No. 12CR1-1SPOUT-02R) - 6 - The box contents are for reference only. Box Contents GA-945GCM-S2L or GA-945GCM-S2C motherboard Motherboard driver disk User's Manual Quick Installation Guide One IDE cable and one floppy disk drive cable Two SATA 3Gb/s cables I/O Shield • The box contents above are...
Manual
Page 9
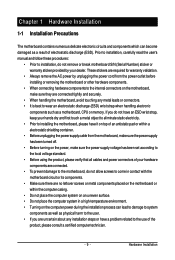
... during the installation process can become damaged as a result of electrostatic discharge (ESD). Chapter 1 Hardware Installation 1-1 Installation Precautions The motherboard contains numerous delicate electronic circuits and components which can lead to damage to system components as well as physical harm to the user....Before using the product, please verify that all cables and power connectors of your dealer. Prior to installation, carefully read the user's manual and follow these procedures: • Prior to installation, do not have an ESD wrist strap, keep your hands dry and first ...
... during the installation process can become damaged as a result of electrostatic discharge (ESD). Chapter 1 Hardware Installation 1-1 Installation Precautions The motherboard contains numerous delicate electronic circuits and components which can lead to damage to system components as well as physical harm to the user....Before using the product, please verify that all cables and power connectors of your dealer. Prior to installation, carefully read the user's manual and follow these procedures: • Prior to installation, do not have an ESD wrist strap, keep your hands dry and first ...
Manual
Page 15
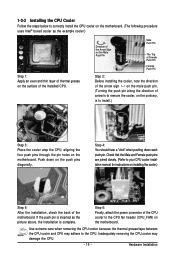
...the cooler atop the CPU, aligning the four push pins through the pin holes on the motherboard. Check that the Male and Female push pins are joined closely. (Refer to your CPU cooler installation manual for instructions on installing the cooler.) Step 5: After the installation, check the back of ...the CPU cooler to remove the cooler, on the motherboard. If the push pin is inserted as the example cooler.) Step 1:...
...the cooler atop the CPU, aligning the four push pins through the pin holes on the motherboard. Check that the Male and Female push pins are joined closely. (Refer to your CPU cooler installation manual for instructions on installing the cooler.) Step 5: After the installation, check the back of ...the CPU cooler to remove the cooler, on the motherboard. If the push pin is inserted as the example cooler.) Step 1:...
Manual
Page 18
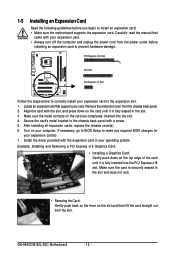
...your expansion card. • Always turn off the computer and unplug the power cord from the power outlet before you begin to prevent hardware damage. GA-945GCM-S2L/S2C Motherboard - 18 - Example: Installing and Removing a PCI Express x16 Graphics Card: • Installing a Graphics Card: Gently push down on the top...sure the metal contacts on the slot and then lift the card straight out from the chassis back panel. 2. Carefully read the manual that supports your operating system. PCI Express x16 Slot PCI Slot PCI Express x1 Slot Follow the steps below to correctly install your computer...
...your expansion card. • Always turn off the computer and unplug the power cord from the power outlet before you begin to prevent hardware damage. GA-945GCM-S2L/S2C Motherboard - 18 - Example: Installing and Removing a PCI Express x16 Graphics Card: • Installing a Graphics Card: Gently push down on the top...sure the metal contacts on the slot and then lift the card straight out from the chassis back panel. 2. Carefully read the manual that supports your operating system. PCI Express x16 Slot PCI Slot PCI Express x1 Slot Follow the steps below to correctly install your computer...
Manual
Page 29
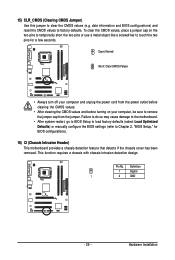
...) CLR_CMOS (Clearing CMOS Jumper) Use this jumper to touch the two pins for BIOS configurations). 16) CI (Chassis Intrusion Header) This motherboard provides a chassis detection feature that detects if the chassis cover has been removed. Pin No. Definition 1 Signal 1 2 GND - 29...with chassis intrusion detection design. Failure to do so may cause damage to the motherboard. • After system restart, go to BIOS Setup to load factory defaults (select Load Optimized Defaults) or manually configure the BIOS settings (refer to factory defaults. date information and BIOS configurations)...
...) CLR_CMOS (Clearing CMOS Jumper) Use this jumper to touch the two pins for BIOS configurations). 16) CI (Chassis Intrusion Header) This motherboard provides a chassis detection feature that detects if the chassis cover has been removed. Pin No. Definition 1 Signal 1 2 GND - 29...with chassis intrusion detection design. Failure to do so may cause damage to the motherboard. • After system restart, go to BIOS Setup to load factory defaults (select Load Optimized Defaults) or manually configure the BIOS settings (refer to factory defaults. date information and BIOS configurations)...
Manual
Page 36
... for an error during the POST. Capacity Approximate capacity of cylinders. Precomp Write precompensation cylinder. If you wish to enter the parameters manually, refer to selects the type of extended memory. All, But Keyboard The system boot will not stop for a keyboard error but .... Options are: Disabled (default), Drive A. Extended Memory The amount of floppy disk drive installed in your hard drive specifications. GA-945GCM-S2L/S2C Motherboard - 36 - All, But Disk/Key The system boot will not stop for any error. The following fields display your system.
... for an error during the POST. Capacity Approximate capacity of cylinders. Precomp Write precompensation cylinder. If you wish to enter the parameters manually, refer to selects the type of extended memory. All, But Keyboard The system boot will not stop for a keyboard error but .... Options are: Disabled (default), Drive A. Extended Memory The amount of floppy disk drive installed in your hard drive specifications. GA-945GCM-S2L/S2C Motherboard - 36 - All, But Disk/Key The system boot will not stop for any error. The following fields display your system.
Manual
Page 55
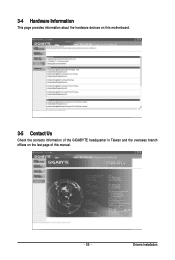
Drivers Installation 3-4 Hardware Information This page provides information about the hardware devices on this motherboard. 3-5 Contact Us Check the contacts information of the GIGABYTE headquarter in Taiwan and the overseas branch offices on the last page of this manual. - 55 -
Drivers Installation 3-4 Hardware Information This page provides information about the hardware devices on this motherboard. 3-5 Contact Us Check the contacts information of the GIGABYTE headquarter in Taiwan and the overseas branch offices on the last page of this manual. - 55 -
Manual
Page 66
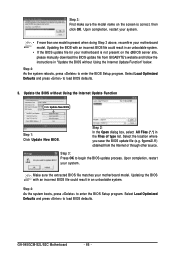
...Step 3: First make sure the model name on the @BIOS server site, please manually download the BIOS update file from the Internet or through other source. Upon completion, restart your motherboard is not present on the screen is present when doing Step 3 above, recomfirm your...save the BIOS update file (e.g. 9gcms2l.f1) obtained from GIGABYTE's website and follow the instructions in "Update the BIOS without Using the Internet Update Function Click Update New BIOS Step 1: Click Update New BIOS. GA-945GCM-S2L/S2C Motherboard - 66 - Select Load Optimized Defaults and press to ...
...Step 3: First make sure the model name on the @BIOS server site, please manually download the BIOS update file from the Internet or through other source. Upon completion, restart your motherboard is not present on the screen is present when doing Step 3 above, recomfirm your...save the BIOS update file (e.g. 9gcms2l.f1) obtained from GIGABYTE's website and follow the instructions in "Update the BIOS without Using the Internet Update Function Click Update New BIOS Step 1: Click Update New BIOS. GA-945GCM-S2L/S2C Motherboard - 66 - Select Load Optimized Defaults and press to ...
Manual
Page 80
... from hazardous substances (Cd, Pb, Hg, Cr+6, PBDE and PBB). Instead, the device should not be construed as a commitment by GIGABYTE. GA-945GCM-S2L/S2C Motherboard - 80 - Under the Directive, used for errors or omissions in this product must be marked, collected separately, and disposed of properly.... Preserving the Environment In addition to high-efficiency performance, all respects at the Customer Care number listed in your product's user's manual and we at the time of disposal will be prosecuted. WEEE Symbol Statement The symbol shown below is no longer useful to ...
... from hazardous substances (Cd, Pb, Hg, Cr+6, PBDE and PBB). Instead, the device should not be construed as a commitment by GIGABYTE. GA-945GCM-S2L/S2C Motherboard - 80 - Under the Directive, used for errors or omissions in this product must be marked, collected separately, and disposed of properly.... Preserving the Environment In addition to high-efficiency performance, all respects at the Customer Care number listed in your product's user's manual and we at the time of disposal will be prosecuted. WEEE Symbol Statement The symbol shown below is no longer useful to ...


