
Manual
Page 29
... wish to upgrade to select item Select Item Main Menu - To exit the Help Window press . - 29 - When the power is displayed at the bottom of the screen. CONTROL KEYS Enter> Move to a new BIOS, either Gigabyte's Q-Flash or @BIOS utility can enter the BIOS setup screen by pressing ..."Ctrl + F1". Exit current page and return to Main Menu Increase the numeric value or make changes Decrease the numeric value or make changes General help window that does not require ...
... wish to upgrade to select item Select Item Main Menu - To exit the Help Window press . - 29 - When the power is displayed at the bottom of the screen. CONTROL KEYS Enter> Move to a new BIOS, either Gigabyte's Q-Flash or @BIOS utility can enter the BIOS setup screen by pressing ..."Ctrl + F1". Exit current page and return to Main Menu Increase the numeric value or make changes Decrease the numeric value or make changes General help window that does not require ...

Manual
Page 31
...:dd:yy) Time (hh:mm:ss) CMOS Setup Utility-Copyright (C) 1984-2005 Award Software Standard CMOS Features Mon, Feb 14 2005 15:31:24 Item Help Menu Level` ` IDE Channel 0 Master ` IDE Channel 0 Slave ` IDE Channel 1 Master ` IDE Channel 1 Slave ` IDE Channel 2 Master ` IDE Channel 3 Master Drive A Drive B...or the maximum allowed in the month) Year The year, from Sun to 2098 F10: Save ESC: Exit F7: Optimized Defaults F1: General Help Date The date format is display only Month The month, Jan. IDE Device Setup. The four options are used and the system will skip the...
...:dd:yy) Time (hh:mm:ss) CMOS Setup Utility-Copyright (C) 1984-2005 Award Software Standard CMOS Features Mon, Feb 14 2005 15:31:24 Item Help Menu Level` ` IDE Channel 0 Master ` IDE Channel 0 Slave ` IDE Channel 1 Master ` IDE Channel 1 Slave ` IDE Channel 2 Master ` IDE Channel 3 Master Drive A Drive B...or the maximum allowed in the month) Year The year, from Sun to 2098 F10: Save ESC: Exit F7: Optimized Defaults F1: General Help Date The date format is display only Month The month, Jan. IDE Device Setup. The four options are used and the system will skip the...

Manual
Page 34
.../ Second / Third Boot Device Floppy Select your boot device priority by Floppy. Legacy LAN Select your boot device priority by Legacy LAN. GA-8VT880P Combo Motherboard - 34 - Hard Disk Select your boot device priority by Hard Disk. USB-HDD Select your boot device priority by USB-HDD....174; Pentium® 4 processor with HT Technology. to 3 [Press Enter] [Floppy] [Hard Disk] [CDROM] [Setup] [Enabled] [Disabled] Item Help Menu Level` Select Hard Disk Boot Device Priority KLJI: Move Enter: Select F5: Previous Values +/-/PU/PD: Value F10: Save F6: Fail-Safe Defaults ...
.../ Second / Third Boot Device Floppy Select your boot device priority by Floppy. Legacy LAN Select your boot device priority by Legacy LAN. GA-8VT880P Combo Motherboard - 34 - Hard Disk Select your boot device priority by Hard Disk. USB-HDD Select your boot device priority by USB-HDD....174; Pentium® 4 processor with HT Technology. to 3 [Press Enter] [Floppy] [Hard Disk] [CDROM] [Setup] [Enabled] [Disabled] Item Help Menu Level` Select Hard Disk Boot Device Priority KLJI: Move Enter: Select F5: Previous Values +/-/PU/PD: Value F10: Save F6: Fail-Safe Defaults ...
Manual
Page 35
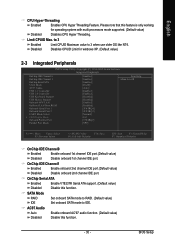
... Port Parallel Port Mode [Enabled] [Enabled] [Enabled] [RAID] [Auto] [Enabled] [Enabled] [Disabled] [Disabled] [Enabled] [Disabled] [3F8/IRQ4] [2F8/IRQ3] [Normal] Half [378/IRQ7] [SPP] Item Help Menu Level` KLJI: Move Enter: Select F5: Previous Values +/-/PU/PD: Value F10: Save F6: Fail-Safe Defaults ESC: Exit F1: General...
... Port Parallel Port Mode [Enabled] [Enabled] [Enabled] [RAID] [Auto] [Enabled] [Enabled] [Disabled] [Disabled] [Enabled] [Disabled] [3F8/IRQ4] [2F8/IRQ3] [Normal] Half [378/IRQ7] [SPP] Item Help Menu Level` KLJI: Move Enter: Select F5: Previous Values +/-/PU/PD: Value F10: Save F6: Fail-Safe Defaults ESC: Exit F1: General...
Manual
Page 38
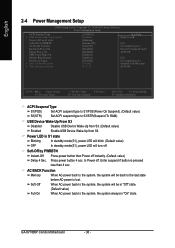
... Month) Alarm x Time (hh:mm:ss) Alarm [S1(POS)] Disabled [Blinking] [Instant-Off] [Soft-Off] [Disabled] [Disabled] [Enabled] [Enabled] [Disabled] Everday 0 : 0 : 0 Item Help Menu Level` [S1] Set suspend type to Power On Suspend under ACPI OS [S3] Set suspend type to Suspend to RAM under ACPI OS KLJI...Defaults ESC: Exit F1: General Help F7: Optimized Defaults ACPI Suspend Type S1(POS) Set ACPI suspend type to S1/POS(Power On Suspend). (Default value) S3(STR) Set ACPI suspend type to the last state before AC-power is pressed less than 4 sec. GA-8VT880P Combo Motherboard - 38 - AC ...
... Month) Alarm x Time (hh:mm:ss) Alarm [S1(POS)] Disabled [Blinking] [Instant-Off] [Soft-Off] [Disabled] [Disabled] [Enabled] [Enabled] [Disabled] Everday 0 : 0 : 0 Item Help Menu Level` [S1] Set suspend type to Power On Suspend under ACPI OS [S3] Set suspend type to Suspend to RAM under ACPI OS KLJI...Defaults ESC: Exit F1: General Help F7: Optimized Defaults ACPI Suspend Type S1(POS) Set ACPI suspend type to S1/POS(Power On Suspend). (Default value) S3(STR) Set ACPI suspend type to the last state before AC-power is pressed less than 4 sec. GA-8VT880P Combo Motherboard - 38 - AC ...

Manual
Page 40
...GA-8VT880P Combo Motherboard - 40 - Auto assign IRQ to PCI 2. (Default value) Set IRQ 3,4,5,7,9,10,11,12,14,15 to PCI 3. English 2-5 PnP/PCI Configurations CMOS Setup Utility-Copyright (C) 1984-2005 Award Software PnP/PCI Configurations PCI 1 IRQ Assignment PCI 2 IRQ Assignment PCI 3 IRQ Assignment [Auto] [Auto] [Auto] Item Help...` KLJI: Move Enter: Select F5: Previous Values +/-/PU/PD: Value F10: Save F6: Fail-Safe Defaults ESC: Exit F1: General Help F7: Optimized Defaults PCI 1 IRQ Assignment Auto 3,4,5,7,9,10,11,12,14,15 PCI 2 IRQ Assignment Auto 3,4,5,7,9,10,11,12,14,15 PCI...
...GA-8VT880P Combo Motherboard - 40 - Auto assign IRQ to PCI 2. (Default value) Set IRQ 3,4,5,7,9,10,11,12,14,15 to PCI 3. English 2-5 PnP/PCI Configurations CMOS Setup Utility-Copyright (C) 1984-2005 Award Software PnP/PCI Configurations PCI 1 IRQ Assignment PCI 2 IRQ Assignment PCI 3 IRQ Assignment [Auto] [Auto] [Auto] Item Help...` KLJI: Move Enter: Select F5: Previous Values +/-/PU/PD: Value F10: Save F6: Fail-Safe Defaults ESC: Exit F1: General Help F7: Optimized Defaults PCI 1 IRQ Assignment Auto 3,4,5,7,9,10,11,12,14,15 PCI 2 IRQ Assignment Auto 3,4,5,7,9,10,11,12,14,15 PCI...

Manual
Page 41
... SYSTEM FAN Speed CPU Smart FAN Control CPU Smart FAN Mode [Disabled] No OK OK OK OK 44oC 4687 RPM 0 RPM [Enabled] [Auto] Item Help Menu Level` KLJI: Move Enter: Select F5: Previous Values +/-/PU/PD: Value F10: Save ESC: Exit F6: Fail-Safe Defaults F7: Optimized Defaults ...F1: General Help Reset Case Open Status Disabled Don't reset case open status. (Default value) Enabled Clear case open status at different speed depending on their requirements. (...
... SYSTEM FAN Speed CPU Smart FAN Control CPU Smart FAN Mode [Disabled] No OK OK OK OK 44oC 4687 RPM 0 RPM [Enabled] [Auto] Item Help Menu Level` KLJI: Move Enter: Select F5: Previous Values +/-/PU/PD: Value F10: Save ESC: Exit F6: Fail-Safe Defaults F7: Optimized Defaults ...F1: General Help Reset Case Open Status Disabled Don't reset case open status. (Default value) Enabled Clear case open status at different speed depending on their requirements. (...

Manual
Page 42
...Voltage Control [16X] [Disabled] 200MHz [Disabled] Cruise Disabled 66/33 [Auto] [Normal] 1.3875V [Normal] [Normal] Item Help Menu Level` KLJI: Move Enter: Select F5: Previous Values +/-/PU/PD: Value F10: Save F6: Fail-Safe Defaults ESC: Exit F1: General... .A. For power end-user use a CPU fan with 3-pin or 4-pin power cables. Incorrectly using these features may damage your system broken. GA-8VT880P Combo Motherboard - 42 - English Voltage Set to 600MHz. The option will display "Locked" and read only if the CPU ratio is overclocked and cannot...
...Voltage Control [16X] [Disabled] 200MHz [Disabled] Cruise Disabled 66/33 [Auto] [Normal] 1.3875V [Normal] [Normal] Item Help Menu Level` KLJI: Move Enter: Select F5: Previous Values +/-/PU/PD: Value F10: Save F6: Fail-Safe Defaults ESC: Exit F1: General... .A. For power end-user use a CPU fan with 3-pin or 4-pin power cables. Incorrectly using these features may damage your system broken. GA-8VT880P Combo Motherboard - 42 - English Voltage Set to 600MHz. The option will display "Locked" and read only if the CPU ratio is overclocked and cannot...

Manual
Page 53
Overclocking 2. PC Health 5. Featuring several powerful yet easy to GIGABYTE website Display EasyTuneTM 5 Help file Quit or Minimize EasyTuneTM 5 software (Note) EasyTune 5 functions may vary depending on to...system status.(Note) User Interface Overview Button / Display 1. and M.I .B.2 3. C.I.A./C.I.A.2 and M.I.B./M.I .B. Function display LEDs 9. Appendix Smart-Fan 4. Display screen 8. Help button 11. Exit or Minimize button Description Enters the Overclocking setting page Enters the C.I.A./2 and M.I .A. GO 6. English Chapter 4 Appendix 4-1 Unique Software Utilities ...
Overclocking 2. PC Health 5. Featuring several powerful yet easy to GIGABYTE website Display EasyTuneTM 5 Help file Quit or Minimize EasyTuneTM 5 software (Note) EasyTune 5 functions may vary depending on to...system status.(Note) User Interface Overview Button / Display 1. and M.I .B.2 3. C.I.A./C.I.A.2 and M.I.B./M.I .B. Function display LEDs 9. Appendix Smart-Fan 4. Display screen 8. Help button 11. Exit or Minimize button Description Enters the Overclocking setting page Enters the C.I.A./2 and M.I .A. GO 6. English Chapter 4 Appendix 4-1 Unique Software Utilities ...

Manual
Page 64
... system unbooted GA-8VT880P Combo Motherboard - 64 - It can help you need cannot be found in dialog box. II. In method II, be selected, please make sure your system won't boot. In method I . Save BIOS In the very beginning, there is "About this program" icon shown in @BIOSTM server, please go onto Gigabyte's web site...
... system unbooted GA-8VT880P Combo Motherboard - 64 - It can help you need cannot be found in dialog box. II. In method II, be selected, please make sure your system won't boot. In method I . Save BIOS In the very beginning, there is "About this program" icon shown in @BIOSTM server, please go onto Gigabyte's web site...

Manual
Page 80
... BIOS version. Re-insert the battery to MB again and turn on power. 6. Why? Please refer to the steps below may help you will be able to see some boards, a small amount of electricity is kept on standby after computer shuts down ? Press... error Continuous long beeps: DRAM error Continuous short beeps: Power error GA-8VT880P Combo Motherboard - 80 - English 4-2 Troubleshooting Below is a collection of general asked questions based on a specific motherboard model, please log on to http://www.gigabyte.com.tw Question 1: I hear different continuous beeps from computer after ...
... BIOS version. Re-insert the battery to MB again and turn on power. 6. Why? Please refer to the steps below may help you will be able to see some boards, a small amount of electricity is kept on standby after computer shuts down ? Press... error Continuous long beeps: DRAM error Continuous short beeps: Power error GA-8VT880P Combo Motherboard - 80 - English 4-2 Troubleshooting Below is a collection of general asked questions based on a specific motherboard model, please log on to http://www.gigabyte.com.tw Question 1: I hear different continuous beeps from computer after ...
Manual
Page 3
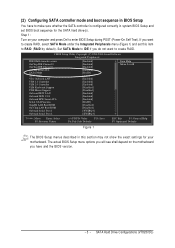
...Enabled] [Enabled] [Enabled] [Enabled] [RAID] [Auto] [Enabled] [Enabled] [Enabled] [Disabled] [Disabled] [Enabled] [Enabled] [Enabled] [RAID] [Disabled] [Disabled] [3F8/IRQ4] [2F8/IRQ3] Item Help Menu Level} higf: Move Enter: Select F5: Previous Values +/-/PU/PD: Value F10: Save F6: Fail-Safe Defaults ESC: Exit F1: General... Help F7: Optimized Defaults Figure 1 The BIOS Setup menus described in this item to RAID (RAID by default). SATA Hard Drive Configurations (...
...Enabled] [Enabled] [Enabled] [Enabled] [RAID] [Auto] [Enabled] [Enabled] [Enabled] [Disabled] [Disabled] [Enabled] [Enabled] [Enabled] [RAID] [Disabled] [Disabled] [3F8/IRQ4] [2F8/IRQ3] Item Help Menu Level} higf: Move Enter: Select F5: Previous Values +/-/PU/PD: Value F10: Save F6: Fail-Safe Defaults ESC: Exit F1: General... Help F7: Optimized Defaults Figure 1 The BIOS Setup menus described in this item to RAID (RAID by default). SATA Hard Drive Configurations (...

Manual
Page 4
... Setup Utility-Copyright (C) 1984-2004 Award Software Advanced BIOS Features } Hard Disk Boot Priority First Boot Device [Press Enter] [CDROM] Item Help Menu Level} Second Boot Device [Hard Disk] Third Boot Device [CDROM] Boot Up Floopy Seek Password Check Flexible AGP 8X [Disabled] ...Previous Values Step 4: Save and exit BIOS Setup. +/-/PU/PD: Value F10: Save F6: Fail-Safe Defaults Figure 3 ESC: Exit F1: General Help F7: Optimized Defaults SATA Hard Drive Configurations (VT8237(R)) 4 - SCSI-1 : ST3120026AS 3. Ác Step 2: Later, select Hard Disk Boot Priority ...
... Setup Utility-Copyright (C) 1984-2004 Award Software Advanced BIOS Features } Hard Disk Boot Priority First Boot Device [Press Enter] [CDROM] Item Help Menu Level} Second Boot Device [Hard Disk] Third Boot Device [CDROM] Boot Up Floopy Seek Password Check Flexible AGP 8X [Disabled] ...Previous Values Step 4: Save and exit BIOS Setup. +/-/PU/PD: Value F10: Save F6: Fail-Safe Defaults Figure 3 ESC: Exit F1: General Help F7: Optimized Defaults SATA Hard Drive Configurations (VT8237(R)) 4 - SCSI-1 : ST3120026AS 3. Ác Step 2: Later, select Hard Disk Boot Priority ...


