Manual
Page 1
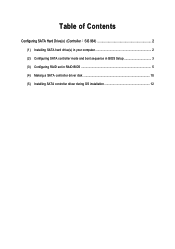
Table of Contents Configuring SATA Hard Drive(s) (Controller SiS 964 2 (1) Installing SATA hard drive(s) in your computer 2 (2) Configuring SATA controller mode and boot sequence in BIOS Setup 3 (3) Configuring RAID set in RAID BIOS 5 (4) Making a SATA controller driver disk 10 (5) Installing SATA controller driver during OS installation 12
Table of Contents Configuring SATA Hard Drive(s) (Controller SiS 964 2 (1) Installing SATA hard drive(s) in your computer 2 (2) Configuring SATA controller mode and boot sequence in BIOS Setup 3 (3) Configuring RAID set in RAID BIOS 5 (4) Making a SATA controller driver disk 10 (5) Installing SATA controller driver during OS installation 12

Manual
Page 2
... RAID set in your computer Attach one end of the SATA signal cable to the rear of the SATA connector to identify the SATA controller for your motherboard. (1) Installing SATA hard drive(s) in RAID BIOS. (4) Make a floppy disk containing the SATA controller driver. (5) Install the SATA controller driver during OS installation. If you use two hard drives with...
... RAID set in your computer Attach one end of the SATA signal cable to the rear of the SATA connector to identify the SATA controller for your motherboard. (1) Installing SATA hard drive(s) in RAID BIOS. (4) Make a floppy disk containing the SATA controller driver. (5) Install the SATA controller driver during OS installation. If you use two hard drives with...
Manual
Page 9
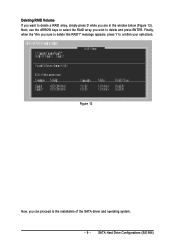
Figure 12 Now, you are in the window below (Figure 12). SATA Hard Drive Configurations (SiS 964) Deleting RAID Volume If you want to delete a RAID array, simply press D while you can proceed to the installation of the SATA driver and operating system. - 9 - Finally, when the "Are you wish to delete and press ENTER. message appears, press Y to delete this RAID?" Next, use the ARROW keys to select the RAID array you sure to confirm your selections.
Figure 12 Now, you are in the window below (Figure 12). SATA Hard Drive Configurations (SiS 964) Deleting RAID Volume If you want to delete a RAID array, simply press D while you can proceed to the installation of the SATA driver and operating system. - 9 - Finally, when the "Are you wish to delete and press ENTER. message appears, press Y to delete this RAID?" Next, use the ARROW keys to select the RAID array you sure to confirm your selections.
Manual
Page 10
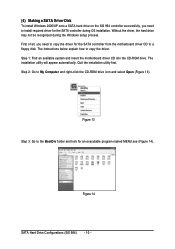
... disk. The installation utility will appear automatically. Figure 14 SATA Hard Drive Configurations (SiS 964) - 10 - Ác (4) Making a SATA Driver Disk Åé To install Windows 2000/XP onto a SATA hard drive on the SiS 964 controller successfully, you need to install required driver for the SATA controller during the Windows setup process. ¤å First...
... disk. The installation utility will appear automatically. Figure 14 SATA Hard Drive Configurations (SiS 964) - 10 - Ác (4) Making a SATA Driver Disk Åé To install Windows 2000/XP onto a SATA hard drive on the SiS 964 controller successfully, you need to install required driver for the SATA controller during the Windows setup process. ¤å First...
Manual
Page 11
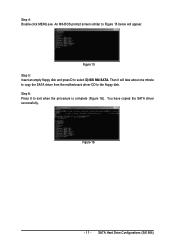
Step 4: Double-click MENU.exe. An MS-DOS prompt screen similar to Figure 15 below will take about one minute to copy the SATA driver from the motherboard driver CD to the floppy disk. Then it will appear. Step 6: Press 0 to select D) SiS 964 SATA. SATA Hard Drive Configurations (SiS 964) You have copied the SATA driver successfully. Figure 16 - 11 - Figure 15 Step 5: Insert an empty floppy disk and press D to exit when the procedure is complete (Figure 16).
Step 4: Double-click MENU.exe. An MS-DOS prompt screen similar to Figure 15 below will take about one minute to copy the SATA driver from the motherboard driver CD to the floppy disk. Then it will appear. Step 6: Press 0 to select D) SiS 964 SATA. SATA Hard Drive Configurations (SiS 964) You have copied the SATA driver successfully. Figure 16 - 11 - Figure 15 Step 5: Insert an empty floppy disk and press D to exit when the procedure is complete (Figure 16).
Manual
Page 12
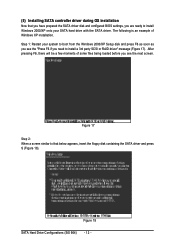
... from the Windows 2000/XP Setup disk and press F6 as soon as you are ready to install Windows 2000/XP onto your SATA hard drive with the SATA driver. The following is an example of some files being loaded before you see the "Press F6 if you need to that you... have prepared the SATA driver disk and configured BIOS settings, you see the next screen. Ác (5) Installing SATA controller driver during OS installation Åé Now that below appears, insert the floppy disk containing the...
... from the Windows 2000/XP Setup disk and press F6 as soon as you are ready to install Windows 2000/XP onto your SATA hard drive with the SATA driver. The following is an example of some files being loaded before you see the "Press F6 if you need to that you... have prepared the SATA driver disk and configured BIOS settings, you see the next screen. Ác (5) Installing SATA controller driver during OS installation Åé Now that below appears, insert the floppy disk containing the...
Manual
Page 13
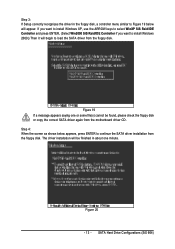
... the floppy disk, a controller menu similar to Figure 19 below appears, press ENTER to load the SATA driver from the motherboard driver CD. The driver installation will appear. If you want to install Windows XP, use the ARROW keys to select WinXP SiS Raid/IDE Controller and press ENTER. (...Select Win2000 SiS Raid/IDE Controller if you want to install Windows 2000.) Then it will begin to continue the SATA driver installation from the floppy disk. Figure 20 - 13 - Step 4: When the screen as shown below will be finished in about one or some file(s) ...
... the floppy disk, a controller menu similar to Figure 19 below appears, press ENTER to load the SATA driver from the motherboard driver CD. The driver installation will appear. If you want to install Windows XP, use the ARROW keys to select WinXP SiS Raid/IDE Controller and press ENTER. (...Select Win2000 SiS Raid/IDE Controller if you want to install Windows 2000.) Then it will begin to continue the SATA driver installation from the floppy disk. Figure 20 - 13 - Step 4: When the screen as shown below will be finished in about one or some file(s) ...
Manual
Page 14
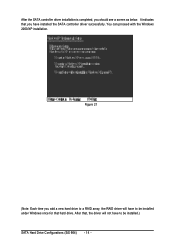
You can proceed with the Windows Åé 2000/XP installation. ¤¤ ¤å Figure 21 (Note: Each time you add a new hard drive to a RAID array, the RAID driver will not have to be installed under Windows once for that hard drive. Ác After the SATA controller driver installation is completed, you have to be installed.) SATA Hard Drive Configurations (SiS 964) - 14 - It indicates that , the driver will have installed the SATA controller driver successfully. After that you should see a screen as below.
You can proceed with the Windows Åé 2000/XP installation. ¤¤ ¤å Figure 21 (Note: Each time you add a new hard drive to a RAID array, the RAID driver will not have to be installed under Windows once for that hard drive. Ác After the SATA controller driver installation is completed, you have to be installed.) SATA Hard Drive Configurations (SiS 964) - 14 - It indicates that , the driver will have installed the SATA controller driver successfully. After that you should see a screen as below.

Manual
Page 54
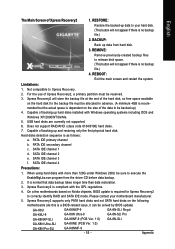
... the CD-ROM. GA-8S661GXM-775 Motherboard - 54 - After Xpress Recovery2 is executed from CD-ROM for 8I945GME E7 . . . . :BIOS Setup/Q-Flash, : Xpress Recovery2 11/07/2005-I945-6A79HG0GC-00 Boot from CD-ROM. System requirements: 1. At least 64M bytes of OS and all required drivers as well as software... simply pressing the key during system bootup to enter Xpress Recovery2. Insert the provided driver CD into your hard disk. If you can simply press F9 during system power-on PATA and SATA IDE controllers. System storage capacity and the reading/writing speed of the hard disk ...
... the CD-ROM. GA-8S661GXM-775 Motherboard - 54 - After Xpress Recovery2 is executed from CD-ROM for 8I945GME E7 . . . . :BIOS Setup/Q-Flash, : Xpress Recovery2 11/07/2005-I945-6A79HG0GC-00 Boot from CD-ROM. System requirements: 1. At least 64M bytes of OS and all required drivers as well as software... simply pressing the key during system bootup to enter Xpress Recovery2. Insert the provided driver CD into your hard disk. If you can simply press F9 during system power-on PATA and SATA IDE controllers. System storage capacity and the reading/writing speed of the hard disk ...
Manual
Page 55
...size of the data to release disk space. (This button will store the backup file at the end of backing up data from the driver CD before data backup. 2. USB hard disks are currently not supported. 6. Hard disks detection sequence is compliant with the GPL regulations. 4...., be solved by BIOS update) GA-K8U GA-K8U-9 GA-K8NXP-SLI GA-K8N Ultra-SLI GA-K8N Pro-SLI GA-K8NXP-9 GA-K8N Ultra-9 GA-K8NF-9 (PCB Ver. 1.0) GA-K8NE (PCB Ver. 1.0) GA-K8NMF-9 - 55 - SATA IDE channel 2 e. It is no backup file.) 2. GA-8N-SLI Royal GA-8N-SLI Pro GA-8N-SLI Appendix RESTORE: English Restore...
...size of the data to release disk space. (This button will store the backup file at the end of backing up data from the driver CD before data backup. 2. USB hard disks are currently not supported. 6. Hard disks detection sequence is compliant with the GPL regulations. 4...., be solved by BIOS update) GA-K8U GA-K8U-9 GA-K8NXP-SLI GA-K8N Ultra-SLI GA-K8N Pro-SLI GA-K8NXP-9 GA-K8N Ultra-9 GA-K8NF-9 (PCB Ver. 1.0) GA-K8NE (PCB Ver. 1.0) GA-K8NMF-9 - 55 - SATA IDE channel 2 e. It is no backup file.) 2. GA-8N-SLI Royal GA-8N-SLI Pro GA-8N-SLI Appendix RESTORE: English Restore...

Manual
Page 66
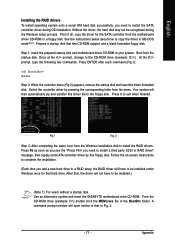
...setup utility [Q] : Exit current menu Location Model Disk 1 Disk 2 ST3120026AS ST3120026AS GA-8S661GXM-775 Motherboard Capacity 111GB 111GB Mode UDMA 6 UDMA 6 RAID Type Single Single ¹Ï5 Figure 2 - 66 - IDE, SCSI, or SATA. 3) Enter the motherboard BIOS and locate RAID setup (Please refer to the ... construction. You have a few seconds to Figure 2). Press to enter Setup Menu or to enter SiS RAID BIOS). 5) Complete driver installation. 6) Complete RAID utility installation. English Please follow the steps below . Note: To achieve best performance, it is provided on...
...setup utility [Q] : Exit current menu Location Model Disk 1 Disk 2 ST3120026AS ST3120026AS GA-8S661GXM-775 Motherboard Capacity 111GB 111GB Mode UDMA 6 UDMA 6 RAID Type Single Single ¹Ï5 Figure 2 - 66 - IDE, SCSI, or SATA. 3) Enter the motherboard BIOS and locate RAID setup (Please refer to the ... construction. You have a few seconds to Figure 2). Press to enter Setup Menu or to enter SiS RAID BIOS). 5) Complete driver installation. 6) Complete RAID utility installation. English Please follow the steps below . Note: To achieve best performance, it is provided on...
Manual
Page 71
...a third party SCSI or RAID driver" message, then supply serial ATA controller driver by pressing the corresponding letter from the Windows installation disk to install the RAID drivers. See the instructions below about how to install the SATA controller driver during the Windows setup process. ...Your system will then automatically zip and transfer this floppy disk. Use an alternative system and insert the GIGABYTE motherboard drive CD-ROM....
...a third party SCSI or RAID driver" message, then supply serial ATA controller driver by pressing the corresponding letter from the Windows installation disk to install the RAID drivers. See the instructions below about how to install the SATA controller driver during the Windows setup process. ...Your system will then automatically zip and transfer this floppy disk. Use an alternative system and insert the GIGABYTE motherboard drive CD-ROM....


