Manual
Page 16
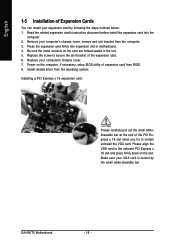
Replace your computer's chassis cover. 7. Install related driver from the computer. 3. Make sure your VGA card is locked by following the steps outlined below: 1. Press the expansion card firmly into the computer. 2. Read ... secure the slot bracket of the expansion card. 6. Power on the slot. Remove your computer's chassis cover, screws and slot bracket from the operating system. GA-8N775 Motherboard - 16 - English 1-5 Installation of Expansion Cards You can install your expansion card by the small white-drawable bar. Be sure the metal contacts on the...
Replace your computer's chassis cover. 7. Install related driver from the computer. 3. Make sure your VGA card is locked by following the steps outlined below: 1. Press the expansion card firmly into the computer. 2. Read ... secure the slot bracket of the expansion card. 6. Power on the slot. Remove your computer's chassis cover, screws and slot bracket from the operating system. GA-8N775 Motherboard - 16 - English 1-5 Installation of Expansion Cards You can install your expansion card by the small white-drawable bar. Be sure the metal contacts on the...
Manual
Page 49
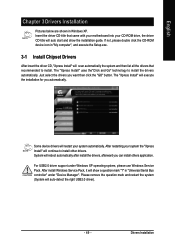
...My computer", and execute the Setup.exe. 3-1 Install Chipset Drivers After insert the driver CD, "Xpress Install" will scan automatically the system and then list all the drivers that came with your motherboard into your CD-ROM drive, the driver CD-title will auto start and show a question mark "?"... Just select the drivers you can install others application. After install Windows Service Pack, it...
...My computer", and execute the Setup.exe. 3-1 Install Chipset Drivers After insert the driver CD, "Xpress Install" will scan automatically the system and then list all the drivers that came with your motherboard into your CD-ROM drive, the driver CD-title will auto start and show a question mark "?"... Just select the drivers you can install others application. After install Windows Service Pack, it...
Manual
Page 50
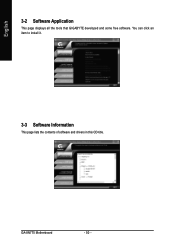
You can click an item to install it. 3-3 Software Information This page lists the contents of software and drivers in this CD-title. GA-8N775 Motherboard - 50 - English 3-2 Software Application This page displays all the tools that GIGABYTE developed and some free software.
You can click an item to install it. 3-3 Software Information This page lists the contents of software and drivers in this CD-title. GA-8N775 Motherboard - 50 - English 3-2 Software Application This page displays all the tools that GIGABYTE developed and some free software.
Manual
Page 51
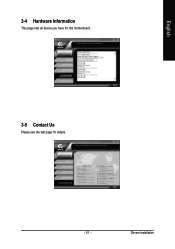
English 3-4 Hardware Information This page lists all device you have for this motherboard. 3-5 Contact Us Please see the last page for details. - 51 - Drivers Installation
English 3-4 Hardware Information This page lists all device you have for this motherboard. 3-5 Contact Us Please see the last page for details. - 51 - Drivers Installation
Manual
Page 53
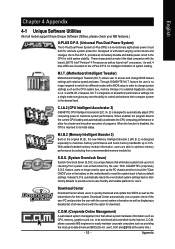
...such as providing the most up the PC chassis and short-circuit the "Clear CMOS" pins or the battery on the motherboard to reset the system back to optimize memory performance by selecting from system over-enhancement by the user. Appendix for intelligent ...to change BIOS feature settings with the latest LGA775 Intel® Pentium® 4 Processor as well as the latest drivers for their factory defaults to its initial status. Through GIGABYTE M.I .T.'s integration of system loading. S.O.S. (System Overclock Saver) System Overclock Saver (S.O.S.) is a revolutionary eight-phase ...
...such as providing the most up the PC chassis and short-circuit the "Clear CMOS" pins or the battery on the motherboard to reset the system back to optimize memory performance by selecting from system over-enhancement by the user. Appendix for intelligent ...to change BIOS feature settings with the latest LGA775 Intel® Pentium® 4 Processor as well as the latest drivers for their factory defaults to its initial status. Through GIGABYTE M.I .T.'s integration of system loading. S.O.S. (System Overclock Saver) System Overclock Saver (S.O.S.) is a revolutionary eight-phase ...
Manual
Page 56
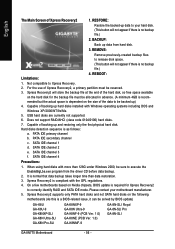
RESTORE: Restore the backed-up data from the driver CD before data backup. 2. BACKUP: Back up data to your motherboard manufacturer. 5. For the use of backing up and restoring only the first physical hard disk. PATA IDE secondary channel c . SATA IDE channel 2 e.... for Xpress Recovery2 to be solved by BIOS update) GA-K8U GA-K8U-9 GA-K8NXP-SLI GA-K8N Ultra-SLI GA-K8N Pro-SLI GA-K8NXP-9 GA-K8N Ultra-9 GA-K8NF-9 (PCB Ver. 1.0) GA-K8NE (PCB Ver. 1.0) GA-K8NMF-9 GA-8N-SLI Royal GA-8N-SLI Pro GA-8N-SLI GA-8N775 Motherboard - 56 - REMOVE: Remove previously-created backup files ...
RESTORE: Restore the backed-up data from the driver CD before data backup. 2. BACKUP: Back up data to your motherboard manufacturer. 5. For the use of backing up and restoring only the first physical hard disk. PATA IDE secondary channel c . SATA IDE channel 2 e.... for Xpress Recovery2 to be solved by BIOS update) GA-K8U GA-K8U-9 GA-K8NXP-SLI GA-K8N Ultra-SLI GA-K8N Pro-SLI GA-K8NXP-9 GA-K8N Ultra-9 GA-K8NF-9 (PCB Ver. 1.0) GA-K8NE (PCB Ver. 1.0) GA-K8NMF-9 GA-8N-SLI Royal GA-8N-SLI Pro GA-8N-SLI GA-8N775 Motherboard - 56 - REMOVE: Remove previously-created backup files ...
Manual
Page 66
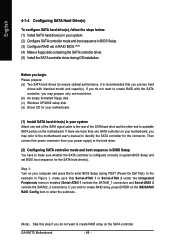
... may prepare only one hard drive. (b) An empty formatted floppy disk. (c) Windows XP/2000 setup disk. (d) Driver CD for your motherboard. (1) Install SATA hard drive(s) in your computer and press Del to identify the SATA controller for the SATA hard drive(s). ...Setup and set in RAID BIOS.(Note) (4) Make a floppy disk containing the SATA controller driver. (5) Install the SATA controller driver during POST (Power-On Self Test). GA-8N775 Motherboard - 66 - Before you may refer to the motherboard user's manual to enter BIOS Setup during OS installation. Step 1: Turn on your system...
... may prepare only one hard drive. (b) An empty formatted floppy disk. (c) Windows XP/2000 setup disk. (d) Driver CD for your motherboard. (1) Install SATA hard drive(s) in your computer and press Del to identify the SATA controller for the SATA hard drive(s). ...Setup and set in RAID BIOS.(Note) (4) Make a floppy disk containing the SATA controller driver. (5) Install the SATA controller driver during POST (Power-On Self Test). GA-8N775 Motherboard - 66 - Before you may refer to the motherboard user's manual to enter BIOS Setup during OS installation. Step 1: Turn on your system...
Manual
Page 72
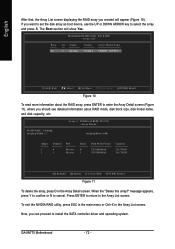
... utility, press ESC in the main menu or Ctrl+X in the Array Detail screen. message appears, press Y to confirm or N to the Array List screen. GA-8N775 Motherboard - 72 - RAID Mode: Striping Striping Width : 2 Array 2 : NVIDIA STRIPE 223.57G - Id Status 2 Healthy Vendor NVIDIA Array Model Name STRIPE 223.57G ... the RAID array, press ENTER to enter the Array Detail screen (Figure 11), where you can proceed to install the SATA controller driver and operating system. If you created will show Yes. English After that, the Array List screen displaying the RAID array you want...
... utility, press ESC in the main menu or Ctrl+X in the Array Detail screen. message appears, press Y to confirm or N to the Array List screen. GA-8N775 Motherboard - 72 - RAID Mode: Striping Striping Width : 2 Array 2 : NVIDIA STRIPE 223.57G - Id Status 2 Healthy Vendor NVIDIA Array Model Name STRIPE 223.57G ... the RAID array, press ENTER to enter the Array Detail screen (Figure 11), where you can proceed to install the SATA controller driver and operating system. If you created will show Yes. English After that, the Array List screen displaying the RAID array you want...
Manual
Page 73
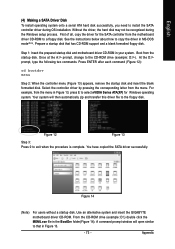
...XP) for the SATA controller from the motherboard driver CD-ROM to a floppy disk. Your system will open similar to that has CD-ROM support and a blank formatted floppy disk. Use an alternative system and insert the GIGABYTE motherboard driver CD-ROM. Prepare a startup disk ...that in MS-DOS mode(Note). Appendix A command prompt window will then automatically zip and transfer this driver file to the floppy disk. You have copied the SATA driver successfully. Figure 14 (Note)...
...XP) for the SATA controller from the motherboard driver CD-ROM to a floppy disk. Your system will open similar to that has CD-ROM support and a blank formatted floppy disk. Use an alternative system and insert the GIGABYTE motherboard driver CD-ROM. Prepare a startup disk ...that in MS-DOS mode(Note). Appendix A command prompt window will then automatically zip and transfer this driver file to the floppy disk. You have copied the SATA driver successfully. Figure 14 (Note)...

Manual
Page 74
... storage device manufacturer, press S. * If you do not want to install a 3rd party SCSI or RAID driver" message (Figure 15). S=Specify Additional Device ENTER=Continue F3=Exit Figure 16 GA-8N775 Motherboard - 74 - After pressing F6, there will load support for the following is an example of Windows XP ...* To specify additional SCSI adapters, CD-ROM drives, or special disk controllers for use with Windows, including those for use with the driver. Step 1: Restart your system, or you have any device support disks from the Windows 2000/XP Setup disk and press F6 as soon...
... storage device manufacturer, press S. * If you do not want to install a 3rd party SCSI or RAID driver" message (Figure 15). S=Specify Additional Device ENTER=Continue F3=Exit Figure 16 GA-8N775 Motherboard - 74 - After pressing F6, there will load support for the following is an example of Windows XP ...* To specify additional SCSI adapters, CD-ROM drives, or special disk controllers for use with Windows, including those for use with the driver. Step 1: Restart your system, or you have any device support disks from the Windows 2000/XP Setup disk and press F6 as soon...

Manual
Page 75
...check the floppy disk or copy the correct SATA driver again from a mass storage device manufacturer, or do not create RAID, select NVIDIA NForce Storage Controller only. - 75 - Windows Setup You have any device support disks from the motherboard driver CD. (Note) If you want to select... NVIDIA RAID CLASS DRIVER(Note) (Figure 17) and press ENTER. NVIDIA RAID CLASS DRIVER (required) NVIDIA NForce Storage Controller (required) ENTER=Select F3=Exit Figure 17 ...
...check the floppy disk or copy the correct SATA driver again from a mass storage device manufacturer, or do not create RAID, select NVIDIA NForce Storage Controller only. - 75 - Windows Setup You have any device support disks from the motherboard driver CD. (Note) If you want to select... NVIDIA RAID CLASS DRIVER(Note) (Figure 17) and press ENTER. NVIDIA RAID CLASS DRIVER (required) NVIDIA NForce Storage Controller (required) ENTER=Select F3=Exit Figure 17 ...
Manual
Page 76
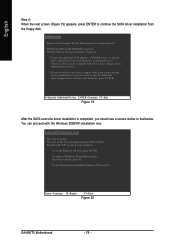
...XP now, press ENTER. To repair a Windows XP installation using Recovery Console, press R. Enter= Continue R=Repair F3=Exit Figure 20 GA-8N775 Motherboard - 76 - You can proceed with Windows, including those for which you have any device support disks from the floppy disk. WindowsXP ... devices for use with the Windows 2000/XP installation now. S=Specify Additional Device ENTER=Continue F3=Exit Figure 19 After the SATA controller driver installation is completed, you do not have a device support disk from a mass storage device manufacturer, press S. * If you should ...
...XP now, press ENTER. To repair a Windows XP installation using Recovery Console, press R. Enter= Continue R=Repair F3=Exit Figure 20 GA-8N775 Motherboard - 76 - You can proceed with Windows, including those for which you have any device support disks from the floppy disk. WindowsXP ... devices for use with the Windows 2000/XP installation now. S=Specify Additional Device ENTER=Continue F3=Exit Figure 19 After the SATA controller driver installation is completed, you do not have a device support disk from a mass storage device manufacturer, press S. * If you should ...
Manual
Page 80
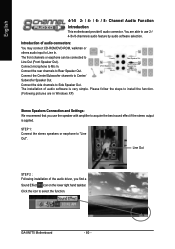
Channel Audio Function Introduction This motherboard provide 6 audio connector. Introduction of audio software is applied. Connect the Center/Subwoofer channels to "Line Out". STEP 1: Connect the stereo speakers or earphone to ... Settings: We recommend that you find a Sound Effect icon on the lower right hand taskbar. GA-8N775 Motherboard - 80 - The front channels or earphone can be connected to Side Speaker Out. Line Out STEP 2 : Following installation of the audio driver, you use 2-/ 4-/6-/8-channnels audio feature by audio software selection. Click the icon to Mic...
Channel Audio Function Introduction This motherboard provide 6 audio connector. Introduction of audio software is applied. Connect the Center/Subwoofer channels to "Line Out". STEP 1: Connect the stereo speakers or earphone to ... Settings: We recommend that you find a Sound Effect icon on the lower right hand taskbar. GA-8N775 Motherboard - 80 - The front channels or earphone can be connected to Side Speaker Out. Line Out STEP 2 : Following installation of the audio driver, you use 2-/ 4-/6-/8-channnels audio feature by audio software selection. Click the icon to Mic...

Manual
Page 82
STEP 2 : Following installation of the audio driver, you find a Sound Effect icon on the left selection bar and select "6CH Speaker" to "Center/Subwoofer Speaker Out". STEP 3: Click "Speaker Configuration" then click ... Center/Subwoofer channels to complete 6 channel audio configuration. Click the icon to select the function. Front Speaker Out Rear Speaker Out Center/Subwoofer Speaker Out GA-8N775 Motherboard - 82 -
STEP 2 : Following installation of the audio driver, you find a Sound Effect icon on the left selection bar and select "6CH Speaker" to "Center/Subwoofer Speaker Out". STEP 3: Click "Speaker Configuration" then click ... Center/Subwoofer channels to complete 6 channel audio configuration. Click the icon to select the function. Front Speaker Out Rear Speaker Out Center/Subwoofer Speaker Out GA-8N775 Motherboard - 82 -


