Manual
Page 5
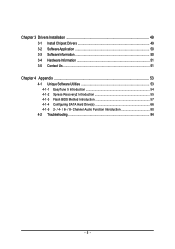
Channel Audio Function Introduction 80 4-2 Troubleshooting 84 - 5 - Chapter 3 Drivers Installation 49 3-1 Install Chipset Drivers 49 3-2 SoftwareApplication 50 3-3 Software Information 50 3-4 Hardware Information 51 3-5 Contact Us ...51 Chapter 4 Appendix 53 4-1 Unique Software Utilities 53 4-1-1 EasyTune 5 Introduction 54 4-1-2 Xpress Recovery2 Introduction 55 4-1-3 Flash BIOS Method Introduction 57 4-1-4 Configuring SATA Hard Drive(s 66 4-1-5 2- / 4- / 6- / 8-
Channel Audio Function Introduction 80 4-2 Troubleshooting 84 - 5 - Chapter 3 Drivers Installation 49 3-1 Install Chipset Drivers 49 3-2 SoftwareApplication 50 3-3 Software Information 50 3-4 Hardware Information 51 3-5 Contact Us ...51 Chapter 4 Appendix 53 4-1 Unique Software Utilities 53 4-1-1 EasyTune 5 Introduction 54 4-1-2 Xpress Recovery2 Introduction 55 4-1-3 Flash BIOS Method Introduction 57 4-1-4 Configuring SATA Hard Drive(s 66 4-1-5 2- / 4- / 6- / 8-
Manual
Page 16
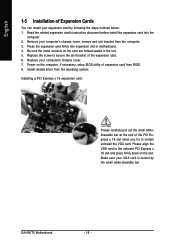
GA-8N775 Motherboard - 16 - Installing a PCI Express x 16 expansion card: Please carefully pull out the small whitedrawable bar at the end of the PCI Express x 16 slot ... card's instruction document before install the expansion card into expansion slot in the slot. 5. Power on the card are indeed seated in motherboard. 4. Install related driver from BIOS. 8. Be sure the metal contacts on the computer, if necessary, setup BIOS utility of expansion card from the operating system. Replace the screw...
GA-8N775 Motherboard - 16 - Installing a PCI Express x 16 expansion card: Please carefully pull out the small whitedrawable bar at the end of the PCI Express x 16 slot ... card's instruction document before install the expansion card into expansion slot in the slot. 5. Power on the card are indeed seated in motherboard. 4. Install related driver from BIOS. 8. Be sure the metal contacts on the computer, if necessary, setup BIOS utility of expansion card from the operating system. Replace the screw...

Manual
Page 17
... you connect your device(s) into USB connector(s), please make sure your OS does not support USB controller, please contact OS vendor for possible patch or driver upgrade. Also make sure your OS or device(s) vendors. English 1-6 I/O Back Panel Introduction PS/2 Keyboard and PS/2 Mouse Connector To install a PS/2 port keyboard and...
... you connect your device(s) into USB connector(s), please make sure your OS does not support USB controller, please contact OS vendor for possible patch or driver upgrade. Also make sure your OS or device(s) vendors. English 1-6 I/O Back Panel Introduction PS/2 Keyboard and PS/2 Mouse Connector To install a PS/2 port keyboard and...

Manual
Page 21
... Installation One IDE connector can connect to one IDE device as Master and the other as Slave (for the SATA 3Gb/s and install the proper driver in order to the instructions located on settings, please refer to work properly, please attach it to the IDE 1 / IDE 2 connector. 40 39 2 IDE2 1 IDE1...
... Installation One IDE connector can connect to one IDE device as Master and the other as Slave (for the SATA 3Gb/s and install the proper driver in order to the instructions located on settings, please refer to work properly, please attach it to the IDE 1 / IDE 2 connector. 40 39 2 IDE2 1 IDE1...
Manual
Page 49
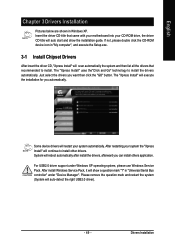
...Pack. The "Xpress Install" will continue to install. After restarting your system automatically. Insert the driver CD-title that recommended to install other drivers. Some device drivers will auto start and show a question mark "?" Please remove the question mark and restart the ...-ROM device icon in "My computer", and execute the Setup.exe. 3-1 Install Chipset Drivers After insert the driver CD, "Xpress Install" will reboot automatically after install the drivers, afterward you automatically. System will scan automatically the system and then list all the...
...Pack. The "Xpress Install" will continue to install. After restarting your system automatically. Insert the driver CD-title that recommended to install other drivers. Some device drivers will auto start and show a question mark "?" Please remove the question mark and restart the ...-ROM device icon in "My computer", and execute the Setup.exe. 3-1 Install Chipset Drivers After insert the driver CD, "Xpress Install" will reboot automatically after install the drivers, afterward you automatically. System will scan automatically the system and then list all the...
Manual
Page 50
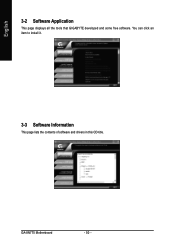
You can click an item to install it. 3-3 Software Information This page lists the contents of software and drivers in this CD-title. GA-8N775 Motherboard - 50 - English 3-2 Software Application This page displays all the tools that GIGABYTE developed and some free software.
You can click an item to install it. 3-3 Software Information This page lists the contents of software and drivers in this CD-title. GA-8N775 Motherboard - 50 - English 3-2 Software Application This page displays all the tools that GIGABYTE developed and some free software.
Manual
Page 51
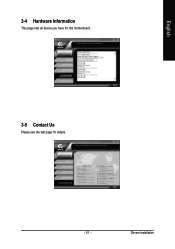
Drivers Installation English 3-4 Hardware Information This page lists all device you have for this motherboard. 3-5 Contact Us Please see the last page for details. - 51 -
Drivers Installation English 3-4 Hardware Information This page lists all device you have for this motherboard. 3-5 Contact Us Please see the last page for details. - 51 -
Manual
Page 53
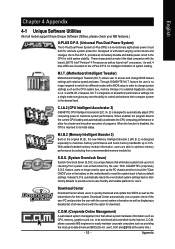
... boot-up to the desired level. As well, 4 blue LED's are able to allow for ultimate system protection. C.I.A.2 (CPU Intelligent Accelerator 2) GIGABYTE CPU Intelligent Accelerator 2(C.I .T.'s integration of all new drivers with the latest LGA775 Intel® Pentium® 4 Processor as well as CPU, memory, graphics card, etc. When enabled, the program detects...
... boot-up to the desired level. As well, 4 blue LED's are able to allow for ultimate system protection. C.I.A.2 (CPU Intelligent Accelerator 2) GIGABYTE CPU Intelligent Accelerator 2(C.I .T.'s integration of all new drivers with the latest LGA775 Intel® Pentium® 4 Processor as well as CPU, memory, graphics card, etc. When enabled, the program detects...

Manual
Page 55
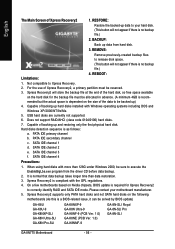
...the future. 2. If you wish to run Xpress Recovery2 later, you can be immediately installed once you complete installations of OS and all required drivers as well as software. - 55 - VESA-supported VGA cards How to use the Xpress Recovery2 Initial access by booting from CD/DVD:" ...set to enter Xpress Recovery2 without the CD-ROM. After the steps above are completed, subsequent access to back up data on hard disks on . . . GA-8N775 E5 . . . . :BIOS Setup/Q-Flash, : Xpress Recovery2, For Boot Menu 11/16/2005-C19-MCP04-6A61EG0FC-00 Xpress Recovery2 1. Supporting Microsoft operating ...
...the future. 2. If you wish to run Xpress Recovery2 later, you can be immediately installed once you complete installations of OS and all required drivers as well as software. - 55 - VESA-supported VGA cards How to use the Xpress Recovery2 Initial access by booting from CD/DVD:" ...set to enter Xpress Recovery2 without the CD-ROM. After the steps above are completed, subsequent access to back up data on hard disks on . . . GA-8N775 E5 . . . . :BIOS Setup/Q-Flash, : Xpress Recovery2, For Boot Menu 11/16/2005-C19-MCP04-6A61EG0FC-00 Xpress Recovery2 1. Supporting Microsoft operating ...
Manual
Page 56
...EnableBigLba.exe program from hard disk. 3. Capable of the hard disk, so free space available on the size of backing up data from the driver CD before data backup. 2. Please contact your hard disk. (This button will not appear if there is no backup file.) 2. PATA ..., a primary partition must be solved by BIOS update) GA-K8U GA-K8U-9 GA-K8NXP-SLI GA-K8N Ultra-SLI GA-K8N Pro-SLI GA-K8NXP-9 GA-K8N Ultra-9 GA-K8NF-9 (PCB Ver. 1.0) GA-K8NE (PCB Ver. 1.0) GA-K8NMF-9 GA-8N-SLI Royal GA-8N-SLI Pro GA-8N-SLI GA-8N775 Motherboard - 56 - REBOOT: 1. Hard disks detection sequence...
...EnableBigLba.exe program from hard disk. 3. Capable of the hard disk, so free space available on the size of backing up data from the driver CD before data backup. 2. Please contact your hard disk. (This button will not appear if there is no backup file.) 2. PATA ..., a primary partition must be solved by BIOS update) GA-K8U GA-K8U-9 GA-K8NXP-SLI GA-K8N Ultra-SLI GA-K8N Pro-SLI GA-K8NXP-9 GA-K8N Ultra-9 GA-K8NF-9 (PCB Ver. 1.0) GA-K8NE (PCB Ver. 1.0) GA-K8NMF-9 GA-8N-SLI Royal GA-8N-SLI Pro GA-8N-SLI GA-8N775 Motherboard - 56 - REBOOT: 1. Hard disks detection sequence...
Manual
Page 66
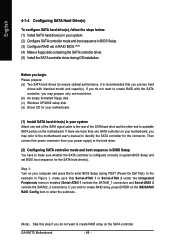
Step 1: Turn on your computer and press Del to create RAID array on the SATA controller. GA-8N775 Motherboard - 66 - In the example in Figure 1, make sure whether the SATA controller is enabled (Serial-ATAII 1 controls the SATAII0_1 connectors and Serial-ATAII 2...(s) in your system. (2) Configure SATA controller mode and boot sequence in RAID BIOS.(Note) (4) Make a floppy disk containing the SATA controller driver. (5) Install the SATA controller driver during POST (Power-On Self Test). If you may refer to the motherboard user's manual to available SATA port(s) on the IDE/SATAII...
Step 1: Turn on your computer and press Del to create RAID array on the SATA controller. GA-8N775 Motherboard - 66 - In the example in Figure 1, make sure whether the SATA controller is enabled (Serial-ATAII 1 controls the SATAII0_1 connectors and Serial-ATAII 2...(s) in your system. (2) Configure SATA controller mode and boot sequence in RAID BIOS.(Note) (4) Make a floppy disk containing the SATA controller driver. (5) Install the SATA controller driver during POST (Power-On Self Test). If you may refer to the motherboard user's manual to available SATA port(s) on the IDE/SATAII...
Manual
Page 72
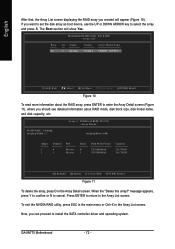
... NVIDIA RAID utility, press ESC in the main menu or Ctrl+X in the Array Detail screen. If you can proceed to install the SATA controller driver and operating system. Id Status 2 Healthy Vendor NVIDIA Array Model Name STRIPE 223.57G [Ctrl-X] Exit [ ] Select [B] Set Boot [N] New Array [ENTER] Detail Figure 10... RAID array, press ENTER to enter the Array Detail screen (Figure 11), where you created will show Yes. Boot No MediaShield RAID Utility Feb 8 2005 - GA-8N775 Motherboard - 72 -
... NVIDIA RAID utility, press ESC in the main menu or Ctrl+X in the Array Detail screen. If you can proceed to install the SATA controller driver and operating system. Id Status 2 Healthy Vendor NVIDIA Array Model Name STRIPE 223.57G [Ctrl-X] Exit [ ] Select [B] Set Boot [N] New Array [ENTER] Detail Figure 10... RAID array, press ENTER to enter the Array Detail screen (Figure 11), where you created will show Yes. Boot No MediaShield RAID Utility Feb 8 2005 - GA-8N775 Motherboard - 72 -
Manual
Page 73
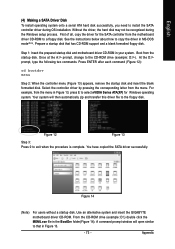
... the procedure is complete. Select the controller driver by pressing the corresponding letter from the startup disk. Figure 12 Figure 13 Step 3: Press 0 to the CD-ROM drive (example: D:\>). Use an alternative system and insert the GIGABYTE motherboard driver CD-ROM. Step 1: Insert the prepared startup... disk and motherboard driver CD-ROM in Figure 13, press E to select nVIDIA Series ATA(XP) for the SATA controller from ...
... the procedure is complete. Select the controller driver by pressing the corresponding letter from the startup disk. Figure 12 Figure 13 Step 3: Press 0 to the CD-ROM drive (example: D:\>). Use an alternative system and insert the GIGABYTE motherboard driver CD-ROM. Step 1: Insert the prepared startup... disk and motherboard driver CD-ROM in Figure 13, press E to select nVIDIA Series ATA(XP) for the SATA controller from ...

Manual
Page 74
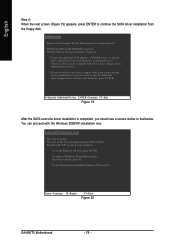
...loaded before you need to that you have prepared the SATA driver disk and configured BIOS settings, you need to install a 3rd party SCSI or RAID driver" message (Figure 15). S=Specify Additional Device ENTER=Continue F3=Exit Figure 16 GA-8N775 Motherboard - 74 - Figure 15 Step 2: When a ...screen similar to install a third party SCSI or RAID driver. Windows Setup Setup could not determine the type...
...loaded before you need to that you have prepared the SATA driver disk and configured BIOS settings, you need to install a 3rd party SCSI or RAID driver" message (Figure 15). S=Specify Additional Device ENTER=Continue F3=Exit Figure 16 GA-8N775 Motherboard - 74 - Figure 15 Step 2: When a ...screen similar to install a third party SCSI or RAID driver. Windows Setup Setup could not determine the type...

Manual
Page 75
... F3=Exit Figure 18 If a message appears saying one or some file(s) cannot be found, please check the floppy disk or copy the correct SATA driver again from a mass storage device manufacturer, or do not create RAID, select NVIDIA NForce Storage Controller only. - 75 - Later, when a screen... similar to Figure 18 appears, you do not want from the following mass storage device(s): NVIDIA RAID CLASS DRIVER (required) * To specify additional SCSI adapters, CD-ROM drives, or special disk controllers for use with Windows, including those for use with Windows, ...
... F3=Exit Figure 18 If a message appears saying one or some file(s) cannot be found, please check the floppy disk or copy the correct SATA driver again from a mass storage device manufacturer, or do not create RAID, select NVIDIA NForce Storage Controller only. - 75 - Later, when a screen... similar to Figure 18 appears, you do not want from the following mass storage device(s): NVIDIA RAID CLASS DRIVER (required) * To specify additional SCSI adapters, CD-ROM drives, or special disk controllers for use with Windows, including those for use with Windows, ...
Manual
Page 76
...= Continue R=Repair F3=Exit Figure 20 GA-8N775 Motherboard - 76 - This port of the Setup program prepares Microsoft(R) Windows (R) XP to Setup. To repair a Windows XP installation using Recovery Console, press R. Windows Setup Setup will load support for the following mass storage device(s): NVIDIA RAID CLASS DRIVER (required) NVIDIA NForce Storage Controller (required...
...= Continue R=Repair F3=Exit Figure 20 GA-8N775 Motherboard - 76 - This port of the Setup program prepares Microsoft(R) Windows (R) XP to Setup. To repair a Windows XP installation using Recovery Console, press R. Windows Setup Setup will load support for the following mass storage device(s): NVIDIA RAID CLASS DRIVER (required) NVIDIA NForce Storage Controller (required...
Manual
Page 77
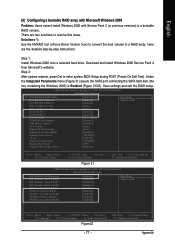
... with Service Pack 2 (or previous versions) to resolve this issue. Step 2: After system restarts, press Del to a RAID array. Solutions 1: Use the NVRAID tool (nForce Driver Version 5.xx) to convert the boot volume to enter system BIOS Setup during POST (Power-On Self Test).
... with Service Pack 2 (or previous versions) to resolve this issue. Step 2: After system restarts, press Del to a RAID array. Solutions 1: Use the NVRAID tool (nForce Driver Version 5.xx) to convert the boot volume to enter system BIOS Setup during POST (Power-On Self Test).

Manual
Page 79
... size. Appendix You are prompted to select the desired Free Disk(s) to add to create a bootable RAID volume. - 79 - English Step 5: Install the NVIDIA nForce Driver Package while in a bootable format. Select Convert Array under the System Tasks and select Next following website: http://www.microsoft.com/windows2000/downloads/servicepacks/sp4...
... size. Appendix You are prompted to select the desired Free Disk(s) to add to create a bootable RAID volume. - 79 - English Step 5: Install the NVIDIA nForce Driver Package while in a bootable format. Select Convert Array under the System Tasks and select Next following website: http://www.microsoft.com/windows2000/downloads/servicepacks/sp4...
Manual
Page 80
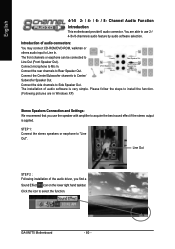
... the lower right hand taskbar. Introduction of audio connectors: You may connect CD-ROM/DVD-ROM, walkman or others audio input to Rear Speaker Out. GA-8N775 Motherboard - 80 - English 4-1-5 2- / 4- / 6- / 8- Connect the rear channels to Line In. Connect the side channels to Line Out (Front ... Connect the stereo speakers or earphone to select the function. Click the icon to "Line Out". The installation of the audio driver, you use 2-/ 4-/6-/8-channnels audio feature by audio software selection. Please follow the steps to acquire the best sound effect if the...
... the lower right hand taskbar. Introduction of audio connectors: You may connect CD-ROM/DVD-ROM, walkman or others audio input to Rear Speaker Out. GA-8N775 Motherboard - 80 - English 4-1-5 2- / 4- / 6- / 8- Connect the rear channels to Line In. Connect the side channels to Line Out (Front ... Connect the stereo speakers or earphone to select the function. Click the icon to "Line Out". The installation of the audio driver, you use 2-/ 4-/6-/8-channnels audio feature by audio software selection. Please follow the steps to acquire the best sound effect if the...
Manual
Page 81
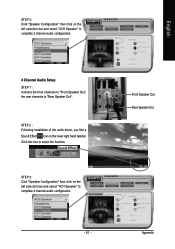
Click the icon to "Rear Speaker Out". STEP 2 : Following installation of the audio driver, you find a Sound Effect icon on the left selection bar and select "2CH Speaker" to complete 2 channel audio configuration. 4 Channel Audio Setup STEP 1 : Connect the ...
Click the icon to "Rear Speaker Out". STEP 2 : Following installation of the audio driver, you find a Sound Effect icon on the left selection bar and select "2CH Speaker" to complete 2 channel audio configuration. 4 Channel Audio Setup STEP 1 : Connect the ...


