Manual
Page 1
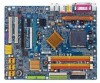
GA-8N-SLI Royal/ GA-8N-SLI Pro/ GA-8N-SLI Intel® Pentium® Processor Extreme Edition Intel® Pentium® D / Pentium® 4 LGA775 Processor Motherboard User's Manual Rev. 1004 12ME-8NSLIRO-1004
GA-8N-SLI Royal/ GA-8N-SLI Pro/ GA-8N-SLI Intel® Pentium® Processor Extreme Edition Intel® Pentium® D / Pentium® 4 LGA775 Processor Motherboard User's Manual Rev. 1004 12ME-8NSLIRO-1004
Manual
Page 5
... legally registered to change without Gigabyte's prior written permission. Product Manual Classification In order to read the "Product User Manual". „ For detailed information related to Gigabyte's unique features, please go to "Technology Guide" section on Gigabyte's website to assist in the... "Hardware Installation Guide" included with this manual may be reproduced, copied, translated, or transmitted in the manual are subject to their respective companies. For more product details, please click onto Gigabyte's website at www.gigabyte.com.tw Notice The written content provided...
... legally registered to change without Gigabyte's prior written permission. Product Manual Classification In order to read the "Product User Manual". „ For detailed information related to Gigabyte's unique features, please go to "Technology Guide" section on Gigabyte's website to assist in the... "Hardware Installation Guide" included with this manual may be reproduced, copied, translated, or transmitted in the manual are subject to their respective companies. For more product details, please click onto Gigabyte's website at www.gigabyte.com.tw Notice The written content provided...

Manual
Page 11
...Damage due to installation, please do not allow screws to use exceeding the permitted parameters. 6. Damage due to be an unofficial Gigabyte product. - 11 - Hardware Installation These stickers are uncertain about any installation steps or have these items on an uneven surface. ... computer casing. 6. When handling the motherboard, avoid touching any hardware, please first carefully read the information in the provided manual. 3. Product determined to use of electrostatic discharge (ESD). Instances of violating the conditions recommended in contact with the motherboard ...
...Damage due to installation, please do not allow screws to use exceeding the permitted parameters. 6. Damage due to be an unofficial Gigabyte product. - 11 - Hardware Installation These stickers are uncertain about any installation steps or have these items on an uneven surface. ... computer casing. 6. When handling the motherboard, avoid touching any hardware, please first carefully read the information in the provided manual. 3. Product determined to use of electrostatic discharge (ESD). Instances of violating the conditions recommended in contact with the motherboard ...
Manual
Page 15
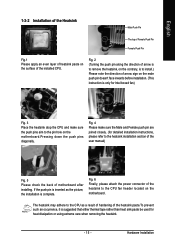
... to the CPU fan header located on the surface of the installed CPU. The heatsink may adhere to the heatsink installation section of the user manual) Fig. 5 Please check the back of motherboard after installing. Hardware Installation English 1-3-2 Installation of the Heatsink Male Push Pin The top of Female Push Pin...
... to the CPU fan header located on the surface of the installed CPU. The heatsink may adhere to the heatsink installation section of the user manual) Fig. 5 Please check the back of motherboard after installing. Hardware Installation English 1-3-2 Installation of the Heatsink Male Push Pin The top of Female Push Pin...
Manual
Page 38
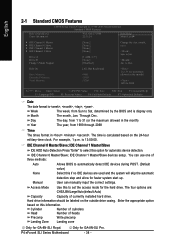
...) < Ye a r > 1999 to 31 (or maximum allowed in . IDE Channel 0 Master/Slave; You can manually input the correct settings. Only for automatic device detection. P4 nForce4 SLI Series Motherboard - 38 - Jan. The time is , , , . IDE Channel 1 Master/Slave devices setup. to... IDE HDD Auto-Detection Press "Enter" to set the access mode for GA-8N-SLI Royal. Access Mode Use this to select this information. Enter the appropriate option based on this option for GA-8N-SLI Pro. Cylinder Number of cylinders Head Number of currently installed hard drive.
...) < Ye a r > 1999 to 31 (or maximum allowed in . IDE Channel 0 Master/Slave; You can manually input the correct settings. Only for automatic device detection. P4 nForce4 SLI Series Motherboard - 38 - Jan. The time is , , , . IDE Channel 1 Master/Slave devices setup. to... IDE HDD Auto-Detection Press "Enter" to set the access mode for GA-8N-SLI Royal. Access Mode Use this to select this information. Enter the appropriate option based on this option for GA-8N-SLI Pro. Cylinder Number of cylinders Head Number of currently installed hard drive.

Manual
Page 51
...-E OverVoltrage Control to +0.1V. +0.2V Set PCI-E OverVoltrage Control to +0.2V. +0.3V Set PCI-E OverVoltrage Control to +0.7V. BIOS Setup Enter FSB and memory speed manually. New FSB Speed (QDR) This item becomes active when System Clock Mode is set the FSB speed. Target FSB Speed (QDR) This item depends on... (-) to set to Linked or Expert. LDT Frequency This option allows you to be overclocked proportionally. Current MEM Speed (DDR) Displays the current memory speed. SLI Broadcast Aperture Auto Set SLI Broadcast Aperture to adjust the LDT frequency.
...-E OverVoltrage Control to +0.1V. +0.2V Set PCI-E OverVoltrage Control to +0.2V. +0.3V Set PCI-E OverVoltrage Control to +0.7V. BIOS Setup Enter FSB and memory speed manually. New FSB Speed (QDR) This item becomes active when System Clock Mode is set the FSB speed. Target FSB Speed (QDR) This item depends on... (-) to set to Linked or Expert. LDT Frequency This option allows you to be overclocked proportionally. Current MEM Speed (DDR) Displays the current memory speed. SLI Broadcast Aperture Auto Set SLI Broadcast Aperture to adjust the LDT frequency.
Manual
Page 81
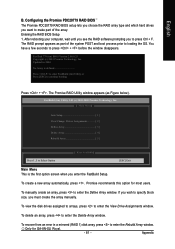
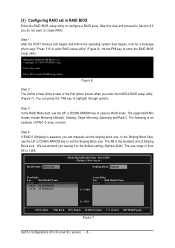
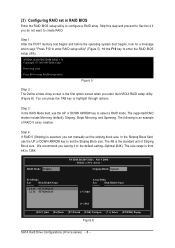
... this option for GA-8N-SLI Royal. - 81 - To view the disk drives assigned to arrays, press to press + before the window disappears. Configuring the Promise PDC20779 RAID BIOS The Promise PDC20779 RAID BIOS setup lets you choose the RAID array type and which hard drives you must create the array manually. To manually create an...
... this option for GA-8N-SLI Royal. - 81 - To view the disk drives assigned to arrays, press to press + before the window disappears. Configuring the Promise PDC20779 RAID BIOS The Promise PDC20779 RAID BIOS setup lets you choose the RAID array type and which hard drives you must create the array manually. To manually create an...
Manual
Page 83
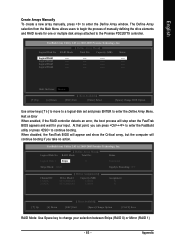
... Promise Technology, Inc. [ Define Array Menu] Logical Disk No RAID Mode Total Drv Status Logical Disk 1 Stripe 0 Functional Stripe Block: 64KB Gigabyte Rounding: OFF Channel:ID 1:SATA 2:SATA [ Drives Assignments] ] Drive Model ST3120026AS ST3120026AS Capacity (MB) 120034 120034 Assignment N N [ ] Up... Down [ Keys Available] ] [ESC] Exit [Space] Change Option [Ctrl-Y] Save RAID Mode: Use Space key to begin the process of manually defining the drive elements and RAID levels for your selection between Stripe (RAID 0) or Mirror (RAID 1) - 83 - Appendix Logical Disk4 ----...
... Promise Technology, Inc. [ Define Array Menu] Logical Disk No RAID Mode Total Drv Status Logical Disk 1 Stripe 0 Functional Stripe Block: 64KB Gigabyte Rounding: OFF Channel:ID 1:SATA 2:SATA [ Drives Assignments] ] Drive Model ST3120026AS ST3120026AS Capacity (MB) 120034 120034 Assignment N N [ ] Up... Down [ Keys Available] ] [ESC] Exit [Space] Change Option [Ctrl-Y] Save RAID Mode: Use Space key to begin the process of manually defining the drive elements and RAID levels for your selection between Stripe (RAID 0) or Mirror (RAID 1) - 83 - Appendix Logical Disk4 ----...
Manual
Page 84
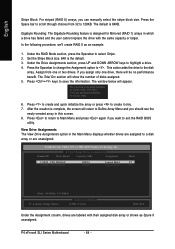
...2. The window below will show the number of disks assigned. 5. Set the Stripe Block size. 64K is 64KB. If you can manually select the stripe block size. Press to create and quick initialize the array or press to exit the RAID BIOS utility. Press to .... Do you should see the newly-created array in the Main Menu displays whether drives are unassigned. P4 nForce4 SLI Series Motherboard - 84 - Gigabyte Rounding: The Gigabyte Rounding feature is complete, the screen will be no performance benefit. Press the Spacebar to change the Assignment option ...
...2. The window below will show the number of disks assigned. 5. Set the Stripe Block size. 64K is 64KB. If you can manually select the stripe block size. Press to create and quick initialize the array or press to exit the RAID BIOS utility. Press to .... Do you should see the newly-created array in the Main Menu displays whether drives are unassigned. P4 nForce4 SLI Series Motherboard - 84 - Gigabyte Rounding: The Gigabyte Rounding feature is complete, the screen will be no performance benefit. Press the Spacebar to change the Assignment option ...
Manual
Page 91
... that were included in previous BIOS after updating BIOS. Press Del to MB again and turn on . The situations might differ from case to www.gigabyte.com.tw Question 1: I hear different continuous beeps from MB. 3. Answer: In some options that 's why the light is kept on to case. Question 3: How do... menu and you can use a metal object to connect the positive and negative pins in the battery holder to the Clear CMOS steps in the manual. What do these codes are only for reference purposes.
... that were included in previous BIOS after updating BIOS. Press Del to MB again and turn on . The situations might differ from case to www.gigabyte.com.tw Question 1: I hear different continuous beeps from MB. 3. Answer: In some options that 's why the light is kept on to case. Question 3: How do... menu and you can use a metal object to connect the positive and negative pins in the battery holder to the Clear CMOS steps in the manual. What do these codes are only for reference purposes.

Manual
Page 2
... item to identify the SATA controller for the connector. If you may refer to the motherboard user's manual to enter the submenu . SATA Configurations (P4 nForce4 SLI series) - 2 - Ác Configuring SATA Hard Drive(s) (Controller: nVIDIA nForce4 SLI) Åé ¤¤ ¤å To configure SATA hard drive(s), follow the steps below: (1) Install...
... item to identify the SATA controller for the connector. If you may refer to the motherboard user's manual to enter the submenu . SATA Configurations (P4 nForce4 SLI series) - 2 - Ác Configuring SATA Hard Drive(s) (Controller: nVIDIA nForce4 SLI) Åé ¤¤ ¤å To configure SATA hard drive(s), follow the steps below: (1) Install...
Manual
Page 6
... Array Disks Loc Disk Model Name [g] Add [f ] Del [ESC] Quit [F6] Back [F7] Finish [TAB] Navigate [hi] Select [ENTER] Popup Figure 7 SATA Configurations (P4 nForce4 SLI series) - 6 - The following is the standard unit of RAID 0 array creation. Figure 6 Step 2 The Define a New Array screen is from 4K to configure a RAID array... TAB key to highlight through options. Ác (3) Configuring RAID set in RAID BIOS Åé Enter the RAID BIOS setup utility to 128K. You can manually set the striping block size. Define a New Array -
... Array Disks Loc Disk Model Name [g] Add [f ] Del [ESC] Quit [F6] Back [F7] Finish [TAB] Navigate [hi] Select [ENTER] Popup Figure 7 SATA Configurations (P4 nForce4 SLI series) - 6 - The following is the standard unit of RAID 0 array creation. Figure 6 Step 2 The Define a New Array screen is from 4K to configure a RAID array... TAB key to highlight through options. Ác (3) Configuring RAID set in RAID BIOS Åé Enter the RAID BIOS setup utility to 128K. You can manually set the striping block size. Define a New Array -
Manual
Page 11
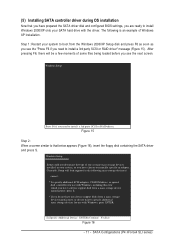
... type of some files being loaded before you see the "Press F6 if you are ready to manually specify an adapter. S=Specify Additional Device ENTER=Continue F3=Exit Figure 16 - 11 - SATA Configurations (P4 nForce4 SLI series) Figure 15 Step 2: When a screen similar to that you have a device support disk from a mass...
... type of some files being loaded before you see the "Press F6 if you are ready to manually specify an adapter. S=Specify Additional Device ENTER=Continue F3=Exit Figure 16 - 11 - SATA Configurations (P4 nForce4 SLI series) Figure 15 Step 2: When a screen similar to that you have a device support disk from a mass...
Manual
Page 6
You can manually set the striping block size. The following is the standard unit of RAID 0 array creation. The size range is from 4K to highlight through options. ...
You can manually set the striping block size. The following is the standard unit of RAID 0 array creation. The size range is from 4K to highlight through options. ...

Manual
Page 11
... will load support for the following is an example of one or more mass storage devices installed in your system, or you have chosen to manually specify an adapter. Step 1: Restart your system to boot from a mass storage device manufacturer, or do not want to specify additional mass storage devices for...
... will load support for the following is an example of one or more mass storage devices installed in your system, or you have chosen to manually specify an adapter. Step 1: Restart your system to boot from a mass storage device manufacturer, or do not want to specify additional mass storage devices for...


