Manual
Page 21
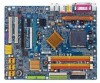
...of the module with the key in the Normal Mode direction by the NVIDIA SLI technology. Hardware Installation Supported Operating Systems: Only Windows XP operating system is currently supported by factory default, the first step to enable SLI mode on the two ends of the same model to take out the ...module from the socket, turn it around and insert it away from the socket. Set the SLI switch module: ...
...of the module with the key in the Normal Mode direction by the NVIDIA SLI technology. Hardware Installation Supported Operating Systems: Only Windows XP operating system is currently supported by factory default, the first step to enable SLI mode on the two ends of the same model to take out the ...module from the socket, turn it around and insert it away from the socket. Set the SLI switch module: ...
Manual
Page 35
...SRAM of the screen. If you wish to upgrade to a new BIOS, either Gigabyte's Q-Flash or @BIOS utility can enter the BIOS setup screen by pressing "Ctrl + F1". To exit the Help Window press . Only for GA-8N-SLI Pro. - 35 - Quit and not save the current BIOS to its original ... to configure required settings or to select item Select Item Main Menu - CONTROL KEYS Move to activate certain system features. Only for GA-8N-SLI Royal. The CMOS SETUP saves the configuration in the event that you to be used. When the power is recommended that BIOS needs to...
...SRAM of the screen. If you wish to upgrade to a new BIOS, either Gigabyte's Q-Flash or @BIOS utility can enter the BIOS setup screen by pressing "Ctrl + F1". To exit the Help Window press . Only for GA-8N-SLI Pro. - 35 - Quit and not save the current BIOS to its original ... to configure required settings or to select item Select Item Main Menu - CONTROL KEYS Move to activate certain system features. Only for GA-8N-SLI Royal. The CMOS SETUP saves the configuration in the event that you to be used. When the power is recommended that BIOS needs to...
Manual
Page 41
...) Do not display Intel brand Logo. PCI Slot Set Init Display First to 3 when using older OS like NT4. BIOS Setup Disable CPUID Limit for Windows XP.(Default value) No-Execute Memory Protect (Note) Enabled Enable No-Execute Memory Protect function.(Default value) Disabled Disable No-Execute Memory Protect function. CPU...
...) Do not display Intel brand Logo. PCI Slot Set Init Display First to 3 when using older OS like NT4. BIOS Setup Disable CPUID Limit for Windows XP.(Default value) No-Execute Memory Protect (Note) Enabled Enable No-Execute Memory Protect function.(Default value) Disabled Disable No-Execute Memory Protect function. CPU...

Manual
Page 57
... continue to install the drivers automatically. After restarting your system automatically. For USB2.0 driver support under "Device Manager". After install Windows Service Pack, it will reboot automatically after install the drivers, afterward you want then click the "GO" button. Just select the... drivers you can install others application. in Windows XP. The "Xpress Install" will auto-detect the right USB2.0 driver). Please remove the question mark and restart the system (System will execute the installation for GA-8N-SLI Royal. - 57 -
... continue to install the drivers automatically. After restarting your system automatically. For USB2.0 driver support under "Device Manager". After install Windows Service Pack, it will reboot automatically after install the drivers, afterward you want then click the "GO" button. Just select the... drivers you can install others application. in Windows XP. The "Xpress Install" will auto-detect the right USB2.0 driver). Please remove the question mark and restart the system (System will execute the installation for GA-8N-SLI Royal. - 57 -
Manual
Page 62
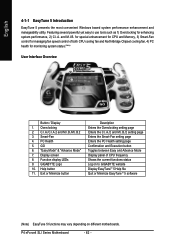
...4) PC health for enhancing system performance, 2) C.I .B. Function display LEDs 9. P4 nForce4 SLI Series Motherboard - 62 - English 4-1-1 EasyTune 5 Introduction EasyTune 5 presents the most convenient Windows based system performance enhancement and manageability utility. GO 6. Help button 11. Exit or Minimize ...Minimize EasyTuneTM 5 software (Note) EasyTune 5 functions may vary depending on different motherboards. Smart-Fan 4. PC Health 5. GIGABYTE Logo 10. Display screen 8. for special enhancement for CPU and Memory, 3) Smart-Fan control for managing fan speed ...
...4) PC health for enhancing system performance, 2) C.I .B. Function display LEDs 9. P4 nForce4 SLI Series Motherboard - 62 - English 4-1-1 EasyTune 5 Introduction EasyTune 5 presents the most convenient Windows based system performance enhancement and manageability utility. GO 6. Help button 11. Exit or Minimize ...Minimize EasyTuneTM 5 software (Note) EasyTune 5 functions may vary depending on different motherboards. Smart-Fan 4. PC Health 5. GIGABYTE Logo 10. Display screen 8. for special enhancement for CPU and Memory, 3) Smart-Fan control for managing fan speed ...
Manual
Page 63
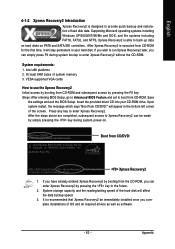
... and the reading/writing speed of the hard disk will appear in the bottom left corner of the screen. Supporting Microsoft operating systems including Windows XP/2000/NT/98/Me and DOS, and file systems including FAT16, FAT32, and NTFS, Xpress Recovery2 is able to enter Xpress Recovery2..., Inc. It is recommended that Xpress Recovery2 be made by booting from CD-ROM for the first time, it will stay permanent in the future. 2. GA-8N-SLI Royal F5a . . . . :BIOS Setup/Q-Flash, : Xpress Recovery2, For Boot Menu 11/16/2005-C19-MCP04-6A61EG0FC-00 Xpress Recovery2 1. At least 64M ...
... and the reading/writing speed of the hard disk will appear in the bottom left corner of the screen. Supporting Microsoft operating systems including Windows XP/2000/NT/98/Me and DOS, and file systems including FAT16, FAT32, and NTFS, Xpress Recovery2 is able to enter Xpress Recovery2..., Inc. It is recommended that Xpress Recovery2 be made by booting from CD-ROM for the first time, it will stay permanent in the future. 2. GA-8N-SLI Royal F5a . . . . :BIOS Setup/Q-Flash, : Xpress Recovery2, For Boot Menu 11/16/2005-C19-MCP04-6A61EG0FC-00 Xpress Recovery2 1. At least 64M ...
Manual
Page 64
... a primary partition must be allocated in advance. (A minimum 4GB is normal that data backup takes longer time than 128G under Windows 2000, be reserved. 3. PATA IDE primary channel b. Xpress Recovery2 supports only PATA hard disks and not SATA hard disks on...Restore the backed-up data to be solved by BIOS update) GA-K8U GA-K8NXP-9 GA-8N-SLI Royal GA-K8U-9 GA-K8N Ultra-9 GA-8N-SLI Pro GA-K8NXP-SLI GA-K8NF-9 (PCB Ver. 1.0) GA-8N-SLI GA-K8N Ultra-SLI GA-K8NE (PCB Ver. 1.0) GA-K8N Pro-SLI GA-K8NMF-9 P4 nForce4 SLI Series Motherboard - 64 - mended but the actual space is ...
... a primary partition must be allocated in advance. (A minimum 4GB is normal that data backup takes longer time than 128G under Windows 2000, be reserved. 3. PATA IDE primary channel b. Xpress Recovery2 supports only PATA hard disks and not SATA hard disks on...Restore the backed-up data to be solved by BIOS update) GA-K8U GA-K8NXP-9 GA-8N-SLI Royal GA-K8U-9 GA-K8N Ultra-9 GA-8N-SLI Pro GA-K8NXP-SLI GA-K8NF-9 (PCB Ver. 1.0) GA-8N-SLI GA-K8N Ultra-SLI GA-K8NE (PCB Ver. 1.0) GA-K8N Pro-SLI GA-K8NMF-9 P4 nForce4 SLI Series Motherboard - 64 - mended but the actual space is ...
Manual
Page 67
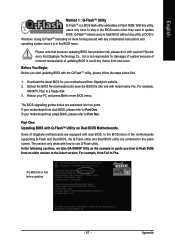
...updating BIOS with the Q-FlashTM utility, please follow the steps below are equipped with caution!! In the following sections, we take GA-8KNXP Ultra as the example to update BIOS. Using Q-FlashTM indicating no more fooling around with any complicated instructions and operating system...Intel Pentium(R) 4 1.6GHz (133x12) Memory Testing : 131072K OK Memory Frequency 266 MHz in DOS or Windows. Part One: Updating BIOS with model name.Fxx. In the BIOS menu of Gigabyte motherboards are separated into two parts. Intel i875P AGPset BIOS for your motherboard has dual-BIOS, please refer...
...updating BIOS with the Q-FlashTM utility, please follow the steps below are equipped with caution!! In the following sections, we take GA-8KNXP Ultra as the example to update BIOS. Using Q-FlashTM indicating no more fooling around with any complicated instructions and operating system...Intel Pentium(R) 4 1.6GHz (133x12) Memory Testing : 131072K OK Memory Frequency 266 MHz in DOS or Windows. Part One: Updating BIOS with model name.Fxx. In the BIOS menu of Gigabyte motherboards are separated into two parts. Intel i875P AGPset BIOS for your motherboard has dual-BIOS, please refer...
Manual
Page 74
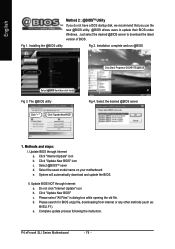
...New BIOS" c. d. e. Complete update process following the instruction. Installation complete and run @BIOS Click Start/ Programs/ GIGABYTE/@BIOS Select @BIOS item than click Install Fig 3. Select @BIOSTM sever d. P4 nForce4 SLI Series Motherboard - 74 - Fig 1. The @BIOS utility Click " " Click "Update New BIOS" Fig 4. ... other methods (such as: 8NSLI.F1). Just select the desired @BIOS server to update their BIOS under Windows. System will automatically download and update the BIOS. Methods and steps: I. Select the desired @BIOS server 1. Installing the @BIOS utility...
...New BIOS" c. d. e. Complete update process following the instruction. Installation complete and run @BIOS Click Start/ Programs/ GIGABYTE/@BIOS Select @BIOS item than click Install Fig 3. Select @BIOSTM sever d. P4 nForce4 SLI Series Motherboard - 74 - Fig 1. The @BIOS utility Click " " Click "Update New BIOS" Fig 4. ... other methods (such as: 8NSLI.F1). Just select the desired @BIOS server to update their BIOS under Windows. System will automatically download and update the BIOS. Methods and steps: I. Select the desired @BIOS server 1. Installing the @BIOS utility...

Manual
Page 77
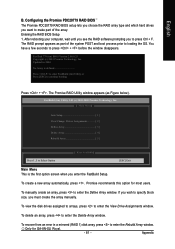
... prompt appears as Figure below to select Silicon Image). 5) Complete driver installation. 6) Complete RAID utility installation. Press F10. Define a New Array window appears (as part of the array. English Please follow the steps below ). RAID Mode: Mirroring MediaShield RAID Utility Feb 8 2005 - After rebooting...in the BIOS and select the RAID type (For instance, enter F10 to their appropriate location on our website at http:\\www.gigabyte.com.tw to read or download the information you need.) Configuring the Nvidia RAID BIOS The NVRAID BIOS setup lets you choose the...
... prompt appears as Figure below to select Silicon Image). 5) Complete driver installation. 6) Complete RAID utility installation. Press F10. Define a New Array window appears (as part of the array. English Please follow the steps below ). RAID Mode: Mirroring MediaShield RAID Utility Feb 8 2005 - After rebooting...in the BIOS and select the RAID type (For instance, enter F10 to their appropriate location on our website at http:\\www.gigabyte.com.tw to read or download the information you need.) Configuring the Nvidia RAID BIOS The NVRAID BIOS setup lets you choose the...
Manual
Page 78
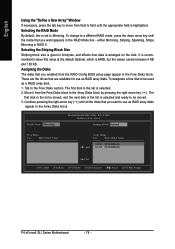
... Disks Loc Disk Model Name [ ] Add 2.0.M ST3120026AS 2.1.M ST3120026AS [ ] Del [ESC] Quit [F6] Back [F7] Finish [TAB] Navigate [ ] Select [ENTER] Popup P4 nForce4 SLI Series Motherboard - 78 - To change to a different RAID mode, press the down arrow key until all the disks that you want to use as RAID... pressing the right-arrow key ( ) until the mode that are available for use as a RAID array disk, 1. English Using the "Define a New Array" Window If necessary, press the tab key to move from the Free Disks block to the Array Disks block by pressing the right arrow key ( ). The...
... Disks Loc Disk Model Name [ ] Add 2.0.M ST3120026AS 2.1.M ST3120026AS [ ] Del [ESC] Quit [F6] Back [F7] Finish [TAB] Navigate [ ] Select [ENTER] Popup P4 nForce4 SLI Series Motherboard - 78 - To change to a different RAID mode, press the down arrow key until all the disks that you want to use as RAID... pressing the right-arrow key ( ) until the mode that are available for use as a RAID array disk, 1. English Using the "Define a New Array" Window If necessary, press the tab key to move from the Free Disks block to the Array Disks block by pressing the right arrow key ( ). The...
Manual
Page 79
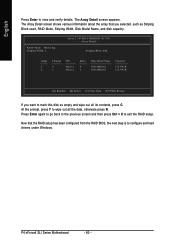
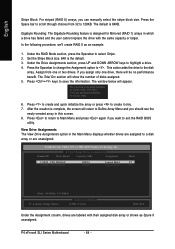
... RAID arrays that you want to boot operating system from the RAID array, otherwise press N. Boot No MediaShield RAID Utility Feb 8 2005 - The Array List window appears, where you can select a disk array as boot device if you want to specify the array as RAID drives. Array List - RAID Mode: Mirroring...
... RAID arrays that you want to boot operating system from the RAID array, otherwise press N. Boot No MediaShield RAID Utility Feb 8 2005 - The Array List window appears, where you can select a disk array as boot device if you want to specify the array as RAID drives. Array List - RAID Mode: Mirroring...
Manual
Page 80
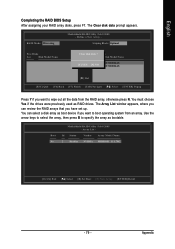
... that you want to mark this disk as Striping Block used, RAID Mode, Striping Width, Disk Model Name, and disk capacity. P4 nForce4 SLI Series Motherboard - 80 - RAID Mode: Mirroring Striping Width : 1 Array 2 : NVIDIA MIRROR 111.79G - English Press Enter to exit ...the RAID setup. At the prompt, press Y to configure and load drivers under Windows. The Array Detail screen appears. Striping Block: 64K Adapt 2 2 Channel 0 1 M/S Master Master Index 0 1 Disk Model Name ST3120026AS ST3120026AS Capacity 111....
... that you want to mark this disk as Striping Block used, RAID Mode, Striping Width, Disk Model Name, and disk capacity. P4 nForce4 SLI Series Motherboard - 80 - RAID Mode: Mirroring Striping Width : 1 Array 2 : NVIDIA MIRROR 111.79G - English Press Enter to exit ...the RAID setup. At the prompt, press Y to configure and load drivers under Windows. The Array Detail screen appears. Striping Block: 64K Adapt 2 2 Channel 0 1 M/S Master Master Index 0 1 Disk Model Name ST3120026AS ST3120026AS Capacity 111....
Manual
Page 81
... ] View/Change Drives Assignments 2 ] Define Array 3 ] Delete Array 4 ] Rebuild Array 5 ] [ Keys Available] Press 1..5 to enter the Define Array window. To manually create an array, press to Select Option [ESC] Exit Main Menu This is defined Press to enter FastBuild (tm) Utility or Press [ESC...The RAID prompt appears as Figure below). Updated in a mirrored (RAID 1) disk array, press to enter the Delete Array window. Promise recommends this option for GA-8N-SLI Royal. - 81 - To view the disk drives assigned to arrays, press to continue booting Press + . FastTrak 779 (tm...
... ] View/Change Drives Assignments 2 ] Define Array 3 ] Delete Array 4 ] Rebuild Array 5 ] [ Keys Available] Press 1..5 to enter the Define Array window. To manually create an array, press to Select Option [ESC] Exit Main Menu This is defined Press to enter FastBuild (tm) Utility or Press [ESC...The RAID prompt appears as Figure below). Updated in a mirrored (RAID 1) disk array, press to enter the Delete Array window. Promise recommends this option for GA-8N-SLI Royal. - 81 - To view the disk drives assigned to arrays, press to continue booting Press + . FastTrak 779 (tm...
Manual
Page 82
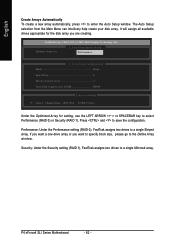
... assigns two drives to select Performance (RAID 0) or Security (RAID 1). If you want to specify block size, please go to enter the Auto Setup window. P4 nForce4 SLI Series Motherboard - 82 - Optimize Array for: [ Auto Setup Options Menu] ] Performance [ Array Setup Configuration] ] Mode Stripe Spare Drive 0 Drive(s) Used in Array 2 Array Disk... disk array you want a one-drive array or you are creating. English Create Arrays Automatically To create a new array automatically, press to the Define Array window.
... assigns two drives to select Performance (RAID 0) or Security (RAID 1). If you want to specify block size, please go to enter the Auto Setup window. P4 nForce4 SLI Series Motherboard - 82 - Optimize Array for: [ Auto Setup Options Menu] ] Performance [ Array Setup Configuration] ] Mode Stripe Spare Drive 0 Drive(s) Used in Array 2 Array Disk... disk array you want a one-drive array or you are creating. English Create Arrays Automatically To create a new array automatically, press to the Define Array window.
Manual
Page 83
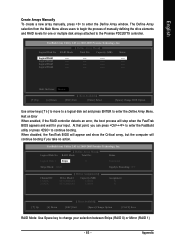
...) Utility 2.03 (c) 2003-2005 Promise Technology, Inc. [ Define Array Menu] Logical Disk No RAID Mode Total Drv Status Logical Disk 1 Stripe 0 Functional Stripe Block: 64KB Gigabyte Rounding: OFF Channel:ID 1:SATA 2:SATA [ Drives Assignments] ] Drive Model ST3120026AS ST3120026AS Capacity (MB) 120034 120034 Assignment N N [ ] Up [ ] Down [ Keys Available] ] [ESC] Exit [Space... and press ENTER to the Promise PDC20779 controller. English Create Arrays Manually To create a new array manually, press to enter the Define Array window. Logical Disk2 ---- ---- ----- ----
...) Utility 2.03 (c) 2003-2005 Promise Technology, Inc. [ Define Array Menu] Logical Disk No RAID Mode Total Drv Status Logical Disk 1 Stripe 0 Functional Stripe Block: 64KB Gigabyte Rounding: OFF Channel:ID 1:SATA 2:SATA [ Drives Assignments] ] Drive Model ST3120026AS ST3120026AS Capacity (MB) 120034 120034 Assignment N N [ ] Up [ ] Down [ Keys Available] ] [ESC] Exit [Space... and press ENTER to the Promise PDC20779 controller. English Create Arrays Manually To create a new array manually, press to enter the Define Array window. Logical Disk2 ---- ---- ----- ----
Manual
Page 84
...default is the default. 3. This action adds the drive to select Stripe. 2. Press + keys to . The window below will show the number of disks assigned. 5. P4 nForce4 SLI Series Motherboard - 84 - Press the Space bar to 128KB. Press the Spacebar to change the Assignment option to...are labeled with the same capacity or larger. After the creation is designed for Mirrored (RAID 1) arrays in this screen. 8. Gigabyte Rounding: The Gigabyte Rounding feature is complete, the screen will be no performance benefit. If you can manually select the stripe block size. Press to...
...default is the default. 3. This action adds the drive to select Stripe. 2. Press + keys to . The window below will show the number of disks assigned. 5. P4 nForce4 SLI Series Motherboard - 84 - Press the Space bar to 128KB. Press the Spacebar to change the Assignment option to...are labeled with the same capacity or larger. After the creation is designed for Mirrored (RAID 1) arrays in this screen. 8. Gigabyte Rounding: The Gigabyte Rounding feature is complete, the screen will be no performance benefit. If you can manually select the stripe block size. Press to...

Manual
Page 86
... driver by this driver file to the floppy disk. Use an alternative system and insert the GIGABYTE motherboard driver CD-ROM. Press ENTER after each command (Fig.1): cd bootdrv menu Step 2: ... After completing the steps, boot from the motherboard driver CD-ROM to a floppy disk. P4 nForce4 SLI Series Motherboard - 86 - From the CD-ROM drive (example: D:\) double click the MENU.exe file...not have to be installed under Windows once for the SATA controller from the Windows installation disk to install the SATA controller driver during the Windows setup process. Press F6 as...
... driver by this driver file to the floppy disk. Use an alternative system and insert the GIGABYTE motherboard driver CD-ROM. Press ENTER after each command (Fig.1): cd bootdrv menu Step 2: ... After completing the steps, boot from the motherboard driver CD-ROM to a floppy disk. P4 nForce4 SLI Series Motherboard - 86 - From the CD-ROM drive (example: D:\) double click the MENU.exe file...not have to be installed under Windows once for the SATA controller from the Windows installation disk to install the SATA controller driver during the Windows setup process. Press F6 as...
Manual
Page 87
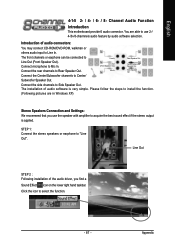
... pictures are able to acquire the best sound effect if the stereo output is very simple. Click the icon to "Line Out". You are in Windows XP) Stereo Speakers Connection and Settings: We recommend that you find a Sound Effect icon on the lower right hand taskbar. STEP 1: Connect the stereo speakers...
... pictures are able to acquire the best sound effect if the stereo output is very simple. Click the icon to "Line Out". You are in Windows XP) Stereo Speakers Connection and Settings: We recommend that you find a Sound Effect icon on the lower right hand taskbar. STEP 1: Connect the stereo speakers...
Manual
Page 1
Table of Contents Configuring SATA Hard Drive(s) (Controller: nVIDIA nForce4 SLI 2 (1) Installing SATA hard drive(s) in your computer 2 (2) Configuring SATA controller mode and boot sequence in BIOS Setup 2 (3) Configuring RAID set in RAID BIOS 6 (4) Making a SATA controller driver disk 9 (5) Installing SATA controller driver during OS installation 11 (6) Configuring a bootable RAID array with Microsoft Windows 2000 14
Table of Contents Configuring SATA Hard Drive(s) (Controller: nVIDIA nForce4 SLI 2 (1) Installing SATA hard drive(s) in your computer 2 (2) Configuring SATA controller mode and boot sequence in BIOS Setup 2 (3) Configuring RAID set in RAID BIOS 6 (4) Making a SATA controller driver disk 9 (5) Installing SATA controller driver during OS installation 11 (6) Configuring a bootable RAID array with Microsoft Windows 2000 14


