Manual
Page 10
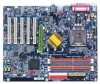
English On-Board LAN On-Board IEEE1394 On-Board Sound Serial ATA Hardware Monitor I/O Control PS/2 Connector BIOS Additional Features Overclocking Form Factor y Build in Marvell 8001 Chipset (10/100/1000 Mbit) y 1 RJ45 port y Ti ... y Over Voltage (DDR/AGP/CPU) by BIOS y Over Clock (DDR/AGP/CPU/PCI) by BIOS y ATX size form factor; 30.5cm x 24.4cm Only for GA-8IPE775-G. Only for GA-8IPE775 Pro. GA-8IPE775 Series Motherboard - 6 -
English On-Board LAN On-Board IEEE1394 On-Board Sound Serial ATA Hardware Monitor I/O Control PS/2 Connector BIOS Additional Features Overclocking Form Factor y Build in Marvell 8001 Chipset (10/100/1000 Mbit) y 1 RJ45 port y Ti ... y Over Voltage (DDR/AGP/CPU) by BIOS y Over Clock (DDR/AGP/CPU/PCI) by BIOS y ATX size form factor; 30.5cm x 24.4cm Only for GA-8IPE775-G. Only for GA-8IPE775 Pro. GA-8IPE775 Series Motherboard - 6 -
Manual
Page 28
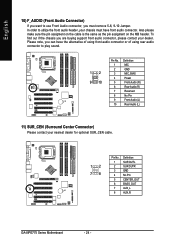
... on the MB header. To find out if the chassis you are buying support front audio connector, please contact your dealer. In order to play sound. 12 9 10 Pin No. 1 2 3 4 5 6 7 8 9 10 Definition MIC GND MIC_BIAS Power Front Audio (R) Rear Audio (R) Reserved No Pin Front Audio (L) Rear ...for optional SUR_CEN cable. 12 78 Pin No. 1 2 3 4 5 6 7 8 Definition SUR OUTL SUR OUTR GND No Pin CENTER_OUT BASS_OUT AUX_L AUX_R GA-8IPE775 Series Motherboard - 24 - English 10) F_AUDIO (Front Audio Connector) If you want to use Front Audio connector, you must have the alternative of using front...
... on the MB header. To find out if the chassis you are buying support front audio connector, please contact your dealer. In order to play sound. 12 9 10 Pin No. 1 2 3 4 5 6 7 8 9 10 Definition MIC GND MIC_BIAS Power Front Audio (R) Rear Audio (R) Reserved No Pin Front Audio (L) Rear ...for optional SUR_CEN cable. 12 78 Pin No. 1 2 3 4 5 6 7 8 Definition SUR OUTL SUR OUTR GND No Pin CENTER_OUT BASS_OUT AUX_L AUX_R GA-8IPE775 Series Motherboard - 24 - English 10) F_AUDIO (Front Audio Connector) If you want to use Front Audio connector, you must have the alternative of using front...
Manual
Page 71
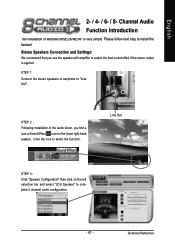
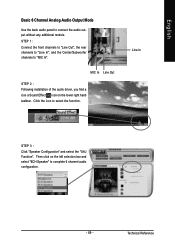
STEP 1: Connect the stereo speakers or earphone to install the function! Stereo Speakers Connection and Settings: We recommend that you find a icon a Sound Effect icon on the left selection bar and select "2CH Speaker" to complete 2 channel audio configuration. - 67 - English 2- / 4- / ...6- / 8- Please follow next step to "Line Out". Technical Reference Click the icon to acqiire the best sound effect if the stereo output is very simple. Line Out STEP 3: Click "Speaker Configuration" then click on the lower right hand taskbar. STEP 2 : ...
STEP 1: Connect the stereo speakers or earphone to install the function! Stereo Speakers Connection and Settings: We recommend that you find a icon a Sound Effect icon on the left selection bar and select "2CH Speaker" to complete 2 channel audio configuration. - 67 - English 2- / 4- / ...6- / 8- Please follow next step to "Line Out". Technical Reference Click the icon to acqiire the best sound effect if the stereo output is very simple. Line Out STEP 3: Click "Speaker Configuration" then click on the lower right hand taskbar. STEP 2 : ...
Manual
Page 72
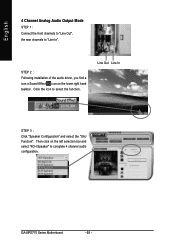
GA-8IPE775 Series Motherboard - 68 - Line Out Line In STEP 3 : Click "Speaker Configuration" and select the "UAJ Function". Click the icon to "Line In". English 4 Channel Analog Audio Output Mode STEP 1 : Connect the front channels to "Line Out", the rear channels to select the function. Then click on the lower right hand taskbar. STEP 2 : Following installation of the audio driver, you find a icon a Sound Effect icon on the left selection bar and select "4CH Speaker" to complete 4 channel audio configuration.
GA-8IPE775 Series Motherboard - 68 - Line Out Line In STEP 3 : Click "Speaker Configuration" and select the "UAJ Function". Click the icon to "Line In". English 4 Channel Analog Audio Output Mode STEP 1 : Connect the front channels to "Line Out", the rear channels to select the function. Then click on the lower right hand taskbar. STEP 2 : Following installation of the audio driver, you find a icon a Sound Effect icon on the left selection bar and select "4CH Speaker" to complete 4 channel audio configuration.
Manual
Page 73
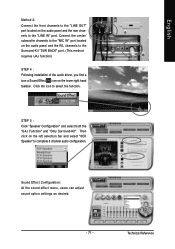
... the icon to connect the audio output without any additional module. MIC In Line Out STEP 2 : Following installation of the audio driver, you find a icon a Sound Effect icon on the left selection bar and select "6CH Speaker" to "MIC In". Technical Reference
... the icon to connect the audio output without any additional module. MIC In Line Out STEP 2 : Following installation of the audio driver, you find a icon a Sound Effect icon on the left selection bar and select "6CH Speaker" to "MIC In". Technical Reference
Manual
Page 75
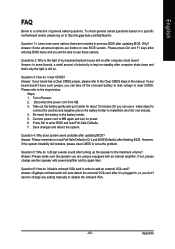
... the center/ subwoofer channels to the "MIC IN" port located on the audio panel and the R/L channels to select the function. Sound Effect Configuration: At the sound effect menu, users can adjust sound option settings as desired. - 71 - Click the icon to the Surround-Kit "SUR BACK" port. (This method requires UAJ function...
... the center/ subwoofer channels to the "MIC IN" port located on the audio panel and the R/L channels to select the function. Sound Effect Configuration: At the sound effect menu, users can adjust sound option settings as desired. - 71 - Click the icon to the Surround-Kit "SUR BACK" port. (This method requires UAJ function...
Manual
Page 87
... card? Answer: Please make sure the speaker you are hidden in , so you can take off power. 2. Question 6: How do I still get a weak sound after turning up the speaker to load Fail-Safe Defaults (Or Load BIOS Defaults) after it aside for one minute). 4. Question 3: How do I cannot see... BIOS menu and you can use a metal object to connect the positive and negative pins in order to MB again and turn on power. 6. Answer: Gigabyte motherboards will be able to the steps below: Steps: 1. Turn off the on . Disconnect the power cord from MB. 3. To check general asked questions...
... card? Answer: Please make sure the speaker you are hidden in , so you can take off power. 2. Question 6: How do I still get a weak sound after turning up the speaker to load Fail-Safe Defaults (Or Load BIOS Defaults) after it aside for one minute). 4. Question 3: How do I cannot see... BIOS menu and you can use a metal object to connect the positive and negative pins in order to MB again and turn on power. 6. Answer: Gigabyte motherboards will be able to the steps below: Steps: 1. Turn off the on . Disconnect the power cord from MB. 3. To check general asked questions...

