Manual
Page 5
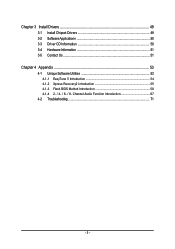
Chapter 3 Install Drivers 49 3-1 Install Chipset Drivers 49 3-2 SoftwareApplications 50 3-3 Driver CD Information 50 3-4 Hardware Information 51 3-5 Contact Us ...51 Chapter 4 Appendix 53 4-1 Unique Software Utilities 53 4-1-1 EasyTune 5 Introduction 54 4-1-2 Xpress Recovery2 Introduction 55 4-1-3 Flash BIOS Method Introduction 58 4-1-4 2- / 4- / 6- / 8- Channel Audio Function Introduction 67 4-2 Troubleshooting 71 - 5 -
Chapter 3 Install Drivers 49 3-1 Install Chipset Drivers 49 3-2 SoftwareApplications 50 3-3 Driver CD Information 50 3-4 Hardware Information 51 3-5 Contact Us ...51 Chapter 4 Appendix 53 4-1 Unique Software Utilities 53 4-1-1 EasyTune 5 Introduction 54 4-1-2 Xpress Recovery2 Introduction 55 4-1-3 Flash BIOS Method Introduction 58 4-1-4 2- / 4- / 6- / 8- Channel Audio Function Introduction 67 4-2 Troubleshooting 71 - 5 -

Manual
Page 16
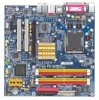
...expansion card from BIOS. 8. Read the related expansion card's instruction document before install the expansion card into expansion slot in the slot. 5. GA-8I945PMF Motherboard - 16 - Remove your computer's chassis cover, screws and slot bracket from the operating system. Please align the VGA card to ... BIOS utility of the PCI Express x 16 slot when you try to secure the slot bracket of the expansion card. 6. Install related driver from the computer. 3. Replace the screw to install/Uninstall the VGA card. Press the expansion card firmly into the computer. 2. Replace ...
...expansion card from BIOS. 8. Read the related expansion card's instruction document before install the expansion card into expansion slot in the slot. 5. GA-8I945PMF Motherboard - 16 - Remove your computer's chassis cover, screws and slot bracket from the operating system. Please align the VGA card to ... BIOS utility of the PCI Express x 16 slot when you try to secure the slot bracket of the expansion card. 6. Install related driver from the computer. 3. Replace the screw to install/Uninstall the VGA card. Press the expansion card firmly into the computer. 2. Replace ...
Manual
Page 17
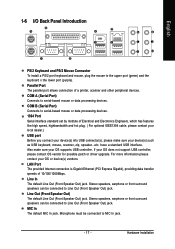
.... - 17 - have a standard USB interface. For more information please contact your OS does not support USB controller, please contact OS vendor for possible patch or driver upgrade. Stereo speakers, earphone or front surround speakers can be connected to serial-based mouse or data processing devices. 1394 Port Serial interface standard set...
.... - 17 - have a standard USB interface. For more information please contact your OS does not support USB controller, please contact OS vendor for possible patch or driver upgrade. Stereo speakers, earphone or front surround speakers can be connected to serial-based mouse or data processing devices. 1394 Port Serial interface standard set...

Manual
Page 21
... drive). One IDE connector can connect to one IDE device as Master and the other as Slave (for the Serial ATA and install the proper driver in order to 300MB/s transfer rate. Please refer to the BIOS setting for information on settings, please refer to the instructions located on one IDE...
... drive). One IDE connector can connect to one IDE device as Master and the other as Slave (for the Serial ATA and install the proper driver in order to 300MB/s transfer rate. Please refer to the BIOS setting for information on settings, please refer to the instructions located on one IDE...
Manual
Page 23
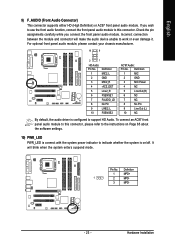
... the system enters suspend mode. Definition 1 MIC 2 GND 3 MIC Power 4 NC 5 Line Out (R) 6 NC 7 NC 8 No Pin 9 Line Out (L) 10 NC By default, the audio driver is connect with the system power indicator to work or even damage it. To connect an AC97 front panel audio module to support HD Audio...
... the system enters suspend mode. Definition 1 MIC 2 GND 3 MIC Power 4 NC 5 Line Out (R) 6 NC 7 NC 8 No Pin 9 Line Out (L) 10 NC By default, the audio driver is connect with the system power indicator to work or even damage it. To connect an AC97 front panel audio module to support HD Audio...
Manual
Page 49
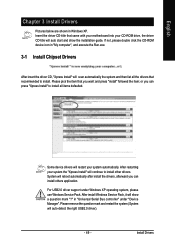
...can press "Xpress Install" to install. For USB2.0 driver support under "Device Manager". English Chapter 3 Install Drivers Pictures below are shown in "My computer", and execute the Run.exe. 3-1 Install Chipset Drivers After insert the driver CD, "Xpress Install" will scan automatically the system and...Serial Bus controller" under Windows XP operating system, please use Windows Service Pack. Install Drivers After restarting your system the "Xpress Install" will restart your CD-ROM drive, the driver CD-title will auto start and show a question mark "?" Please remove the question ...
...can press "Xpress Install" to install. For USB2.0 driver support under "Device Manager". English Chapter 3 Install Drivers Pictures below are shown in "My computer", and execute the Run.exe. 3-1 Install Chipset Drivers After insert the driver CD, "Xpress Install" will scan automatically the system and...Serial Bus controller" under Windows XP operating system, please use Windows Service Pack. Install Drivers After restarting your system the "Xpress Install" will restart your CD-ROM drive, the driver CD-title will auto start and show a question mark "?" Please remove the question ...

Manual
Page 50
GA-8I945PMF Motherboard - 50 - English 3-2 Software Applications This page displays all the tools that Gigabyte developed and some free software, you can choose anyone you want and press "install" to install them. 3-3 Driver CD Information This page lists the contents of software and drivers in this CD-title.
GA-8I945PMF Motherboard - 50 - English 3-2 Software Applications This page displays all the tools that Gigabyte developed and some free software, you can choose anyone you want and press "install" to install them. 3-3 Driver CD Information This page lists the contents of software and drivers in this CD-title.
Manual
Page 51
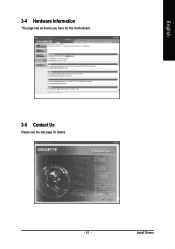
English 3-4 Hardware Information This page lists all device you have for this motherboard. 8I945PMF F2 3-5 Contact Us Please see the last page for details. - 51 - Install Drivers
English 3-4 Hardware Information This page lists all device you have for this motherboard. 8I945PMF F2 3-5 Contact Us Please see the last page for details. - 51 - Install Drivers

Manual
Page 53
...to switch into a single mode now gives any user the ability to control and enhance their factory defaults to -date drivers and BIOS.(Do not use C.O.M. provides an immensely durable and stable power circuit to maximize memory performance and boost memory bandwidth...it the ideal companion with relative speed and ease. As well, 4 blue LED's are able to maximize system performance. for their system. Through GIGABYTE M.I .A. 2) is returned to the desired level. M.I.B.2 (Memory Intelligent Booster 2) Built on the U-Plus D.P.S. Instead, S.O.S. Download Center Download ...
...to switch into a single mode now gives any user the ability to control and enhance their factory defaults to -date drivers and BIOS.(Do not use C.O.M. provides an immensely durable and stable power circuit to maximize memory performance and boost memory bandwidth...it the ideal companion with relative speed and ease. As well, 4 blue LED's are able to maximize system performance. for their system. Through GIGABYTE M.I .A. 2) is returned to the desired level. M.I.B.2 (Memory Intelligent Booster 2) Built on the U-Plus D.P.S. Instead, S.O.S. Download Center Download ...

Manual
Page 55
Intel x86 platforms 2. Save the settings and exit the BIOS Setup. Insert the provided driver CD into your hard disk. After the steps above are completed, subsequent access to back up data on hard disks on . . . Intel 945 BIOS for ... subsequent access by pressing the key in the future. 2. After Xpress Recovery2 is designed to provide quick backup and restoration of OS and all required drivers as well as software. - 55 - English 4-1-2 Xpress Recovery2 Introduction Xpress Recovery2 is executed from CD-ROM for 8I945GME E7 . . . . :BIOS Setup/Q-Flash, : Xpress Recovery2, For...
Intel x86 platforms 2. Save the settings and exit the BIOS Setup. Insert the provided driver CD into your hard disk. After the steps above are completed, subsequent access to back up data on hard disks on . . . Intel 945 BIOS for ... subsequent access by pressing the key in the future. 2. After Xpress Recovery2 is designed to provide quick backup and restoration of OS and all required drivers as well as software. - 55 - English 4-1-2 Xpress Recovery2 Introduction Xpress Recovery2 is executed from CD-ROM for 8I945GME E7 . . . . :BIOS Setup/Q-Flash, : Xpress Recovery2, For...
Manual
Page 56
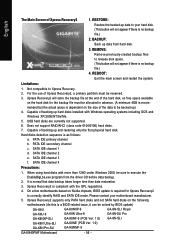
... store the backup file at the end of the hard disk, so free space available on the size of backing up data from the driver CD before data backup. 2. BACKUP: Back up and restoring only the first physical hard disk. SATA IDE channel 2 e. The Main Screen... Recovery2, a primary partition must be solved by BIOS update) GA-K8U GA-K8U-9 GA-K8NXP-SLI GA-K8N Ultra-SLI GA-K8N Pro-SLI GA-K8NXP-9 GA-K8N Ultra-9 GA-K8NF-9 (PCB Ver. 1.0) GA-K8NE (PCB Ver. 1.0) GA-K8NMF-9 GA-8N-SLI Royal GA-8N-SLI Pro GA-8N-SLI GA-8I945PMF Motherboard - 56 - Limitations: 1. For the use of Xpress...
... store the backup file at the end of the hard disk, so free space available on the size of backing up data from the driver CD before data backup. 2. BACKUP: Back up and restoring only the first physical hard disk. SATA IDE channel 2 e. The Main Screen... Recovery2, a primary partition must be solved by BIOS update) GA-K8U GA-K8U-9 GA-K8NXP-SLI GA-K8N Ultra-SLI GA-K8N Pro-SLI GA-K8NXP-9 GA-K8N Ultra-9 GA-K8NF-9 (PCB Ver. 1.0) GA-K8NE (PCB Ver. 1.0) GA-K8NMF-9 GA-8N-SLI Royal GA-8N-SLI Pro GA-8N-SLI GA-8I945PMF Motherboard - 56 - Limitations: 1. For the use of Xpress...
Manual
Page 66
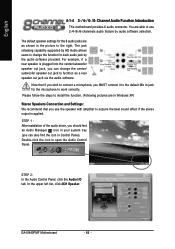
STEP 1 : After installation of the audio driver, you should find the icon in Control Panel). The default speaker settings for the 6 audio jacks are able to work correctly. In the upper left ...) Mic In Rear Speaker Out Center/Subwoofer Speaker Out Side Speaker Out Note that you use 2-/4-/6-/8-channnels audio feature by the audio software provided. English 4-1-4 2- / 4- / 6- / 8- GA-8I945PMF Motherboard - 66 - You are as a rear speaker out jack via the audio software. For example, if a rear speaker is applied.
STEP 1 : After installation of the audio driver, you should find the icon in Control Panel). The default speaker settings for the 6 audio jacks are able to work correctly. In the upper left ...) Mic In Rear Speaker Out Center/Subwoofer Speaker Out Side Speaker Out Note that you use 2-/4-/6-/8-channnels audio feature by the audio software provided. English 4-1-4 2- / 4- / 6- / 8- GA-8I945PMF Motherboard - 66 - You are as a rear speaker out jack via the audio software. For example, if a rear speaker is applied.
Manual
Page 67
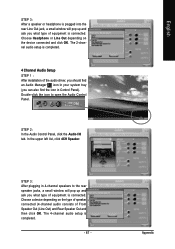
The 4-channel audio setup is completed. 4 Channel Audio Setup STEP 1 : After installation of the audio driver, you should find an Audio Manager icon in your system tray (you can also find the icon in 4-channel speakers to open the Audio Control ...
The 4-channel audio setup is completed. 4 Channel Audio Setup STEP 1 : After installation of the audio driver, you should find an Audio Manager icon in your system tray (you can also find the icon in 4-channel speakers to open the Audio Control ...

Manual
Page 68
... open the Audio Control Panel. STEP 3: After plugging in Control Panel). GA-8I945PMF Motherboard - 68 - STEP 2: In the Audio Control Panel, click the Audio I/O tab. The 6-channel audio setup is completed. 8 Channel Audio Setup STEP 1 : After installation of the audio driver, you should find an Audio Manager icon in your system tray (you... Center/Subwoofer Speaker Out) then click OK. In the upper left list, click 6CH Speaker. English 6 Channel Audio Setup STEP 1 : After installation of the audio driver, you should find the icon in Control Panel).
... open the Audio Control Panel. STEP 3: After plugging in Control Panel). GA-8I945PMF Motherboard - 68 - STEP 2: In the Audio Control Panel, click the Audio I/O tab. The 6-channel audio setup is completed. 8 Channel Audio Setup STEP 1 : After installation of the audio driver, you should find an Audio Manager icon in your system tray (you... Center/Subwoofer Speaker Out) then click OK. In the upper left list, click 6CH Speaker. English 6 Channel Audio Setup STEP 1 : After installation of the audio driver, you should find the icon in Control Panel).


