Manual
Page 5
Channel Audio Function Introduction 67 4-2 Troubleshooting 71 - 5 - Chapter 3 Install Drivers 49 3-1 Install Chipset Drivers 49 3-2 SoftwareApplications 50 3-3 Driver CD Information 50 3-4 Hardware Information 51 3-5 Contact Us ...51 Chapter 4 Appendix 53 4-1 Unique Software Utilities 53 4-1-1 EasyTune 5 Introduction 54 4-1-2 Xpress Recovery2 Introduction 55 4-1-3 Flash BIOS Method Introduction 58 4-1-4 2- / 4- / 6- / 8-
Channel Audio Function Introduction 67 4-2 Troubleshooting 71 - 5 - Chapter 3 Install Drivers 49 3-1 Install Chipset Drivers 49 3-2 SoftwareApplications 50 3-3 Driver CD Information 50 3-4 Hardware Information 51 3-5 Contact Us ...51 Chapter 4 Appendix 53 4-1 Unique Software Utilities 53 4-1-1 EasyTune 5 Introduction 54 4-1-2 Xpress Recovery2 Introduction 55 4-1-3 Flash BIOS Method Introduction 58 4-1-4 2- / 4- / 6- / 8-

Manual
Page 16
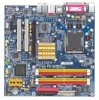
... card is locked by following the steps outlined below: 1. English 1-5 Install expansion cards You can install your expansion card by the small white-drawable bar. GA-8I945PMF Motherboard - 16 - Press the expansion card firmly into the computer. 2. Install related driver from the computer. 3.
... card is locked by following the steps outlined below: 1. English 1-5 Install expansion cards You can install your expansion card by the small white-drawable bar. GA-8I945PMF Motherboard - 16 - Press the expansion card firmly into the computer. 2. Install related driver from the computer. 3.
Manual
Page 17
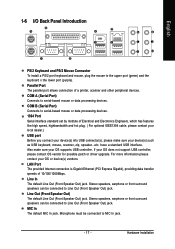
... jack. have a standard USB interface. For more information please contact your OS does not support USB controller, please contact OS vendor for possible patch or driver upgrade. Stereo speakers, earphone or front surround speakers can be connected to the upper port (green) and the keyboard o the lower port (purple). Line Out...
... jack. have a standard USB interface. For more information please contact your OS does not support USB controller, please contact OS vendor for possible patch or driver upgrade. Stereo speakers, earphone or front surround speakers can be connected to the upper port (green) and the keyboard o the lower port (purple). Line Out...

Manual
Page 21
... Installation One IDE connector can connect to one IDE device as Master and the other as Slave (for the Serial ATA and install the proper driver in order to two IDE devices (hard drive or optical drive). Please refer to the BIOS setting for information on settings, please refer to the...
... Installation One IDE connector can connect to one IDE device as Master and the other as Slave (for the Serial ATA and install the proper driver in order to two IDE devices (hard drive or optical drive). Please refer to the BIOS setting for information on settings, please refer to the...
Manual
Page 23
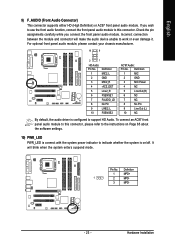
... AC97 front panel audio module. Definition 1 MIC 2 GND 3 MIC Power 4 NC 5 Line Out (R) 6 NC 7 NC 8 No Pin 9 Line Out (L) 10 NC By default, the audio driver is on Page 65 about the software settings. 10) PWR_LED PWR_LED is connect with the system power indicator to indicate whether the system is configured...
... AC97 front panel audio module. Definition 1 MIC 2 GND 3 MIC Power 4 NC 5 Line Out (R) 6 NC 7 NC 8 No Pin 9 Line Out (L) 10 NC By default, the audio driver is on Page 65 about the software settings. 10) PWR_LED PWR_LED is connect with the system power indicator to indicate whether the system is configured...
Manual
Page 49
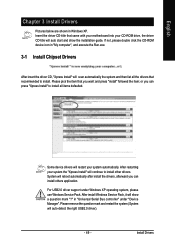
... that came with your motherboard into your CD-ROM drive, the driver CD-title will auto start and show a question mark "?" After install Windows Service Pack, it will auto-detect the right USB2.0 driver). - 49 - Please remove the question mark and restart the ... 3-1 Install Chipset Drivers After insert the driver CD, "Xpress Install" will continue to install all the drivers that recommended to install. Insert the driver CD-title that you can press "Xpress Install" to install other drivers. Some device drivers will reboot automatically after install the drivers, afterward you want...
... that came with your motherboard into your CD-ROM drive, the driver CD-title will auto start and show a question mark "?" After install Windows Service Pack, it will auto-detect the right USB2.0 driver). - 49 - Please remove the question mark and restart the ... 3-1 Install Chipset Drivers After insert the driver CD, "Xpress Install" will continue to install all the drivers that recommended to install. Insert the driver CD-title that you can press "Xpress Install" to install other drivers. Some device drivers will reboot automatically after install the drivers, afterward you want...

Manual
Page 50
GA-8I945PMF Motherboard - 50 - English 3-2 Software Applications This page displays all the tools that Gigabyte developed and some free software, you can choose anyone you want and press "install" to install them. 3-3 Driver CD Information This page lists the contents of software and drivers in this CD-title.
GA-8I945PMF Motherboard - 50 - English 3-2 Software Applications This page displays all the tools that Gigabyte developed and some free software, you can choose anyone you want and press "install" to install them. 3-3 Driver CD Information This page lists the contents of software and drivers in this CD-title.
Manual
Page 51
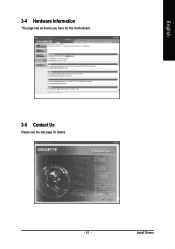
Install Drivers English 3-4 Hardware Information This page lists all device you have for this motherboard. 8I945PMF F2 3-5 Contact Us Please see the last page for details. - 51 -
Install Drivers English 3-4 Hardware Information This page lists all device you have for this motherboard. 8I945PMF F2 3-5 Contact Us Please see the last page for details. - 51 -

Manual
Page 53
... enhance their computer system to the CPU for users. automatically resets the overclocked system settings back to their factory defaults to enabled Gigabyte's unique C.I.A. 2 and M.I .T.) allows user to quickly download and update their BIOS as well as displaying a detailed list of... a system check of the user PC and provides the user with the current system information as well as the latest drivers for ultimate system protection. Through GIGABYTE M.I .B. 2) is designed especially to maximize memory performance and boost memory bandwidth up -to withstand varying current levels and...
... enhance their computer system to the CPU for users. automatically resets the overclocked system settings back to their factory defaults to enabled Gigabyte's unique C.I.A. 2 and M.I .T.) allows user to quickly download and update their BIOS as well as displaying a detailed list of... a system check of the user PC and provides the user with the current system information as well as the latest drivers for ultimate system protection. Through GIGABYTE M.I .B. 2) is designed especially to maximize memory performance and boost memory bandwidth up -to withstand varying current levels and...

Manual
Page 55
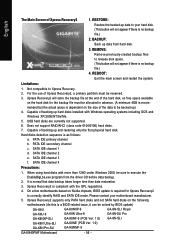
...appear in your CD-ROM drive. English 4-1-2 Xpress Recovery2 Introduction Xpress Recovery2 is designed to provide quick backup and restoration of OS and all required drivers as well as software. - 55 - If you wish to run Xpress Recovery2 later, you can be immediately installed once you can enter Xpress..., subsequent access to boot from CD/DVD: Press any key to back up data on hard disks on . . . Appendix Insert the provided driver CD into your hard disk. At least 64M bytes of the screen. Boot from CD-ROM. After Xpress Recovery2 is able to enter Xpress Recovery2...
...appear in your CD-ROM drive. English 4-1-2 Xpress Recovery2 Introduction Xpress Recovery2 is designed to provide quick backup and restoration of OS and all required drivers as well as software. - 55 - If you wish to run Xpress Recovery2 later, you can be immediately installed once you can enter Xpress..., subsequent access to boot from CD/DVD: Press any key to back up data on hard disks on . . . Appendix Insert the provided driver CD into your hard disk. At least 64M bytes of the screen. Boot from CD-ROM. After Xpress Recovery2 is able to enter Xpress Recovery2...
Manual
Page 56
...RAID/AHCI (class code 0104/0106) hard disks. 7. It is as follows: a. RESTORE: English Restore the backed-up data from the driver CD before data backup. 2. PATA IDE primary channel b. BACKUP: Back up data to Xpress Recovery. 2. REMOVE: Remove previously-created backup ...128G under Windows 2000, be solved by BIOS update) GA-K8U GA-K8U-9 GA-K8NXP-SLI GA-K8N Ultra-SLI GA-K8N Pro-SLI GA-K8NXP-9 GA-K8N Ultra-9 GA-K8NF-9 (PCB Ver. 1.0) GA-K8NE (PCB Ver. 1.0) GA-K8NMF-9 GA-8N-SLI Royal GA-8N-SLI Pro GA-8N-SLI GA-8I945PMF Motherboard - 56 - PATA IDE secondary channel c ...
...RAID/AHCI (class code 0104/0106) hard disks. 7. It is as follows: a. RESTORE: English Restore the backed-up data from the driver CD before data backup. 2. PATA IDE primary channel b. BACKUP: Back up data to Xpress Recovery. 2. REMOVE: Remove previously-created backup ...128G under Windows 2000, be solved by BIOS update) GA-K8U GA-K8U-9 GA-K8NXP-SLI GA-K8N Ultra-SLI GA-K8N Pro-SLI GA-K8NXP-9 GA-K8N Ultra-9 GA-K8NF-9 (PCB Ver. 1.0) GA-K8NE (PCB Ver. 1.0) GA-K8NMF-9 GA-8N-SLI Royal GA-8N-SLI Pro GA-8N-SLI GA-8I945PMF Motherboard - 56 - PATA IDE secondary channel c ...
Manual
Page 66
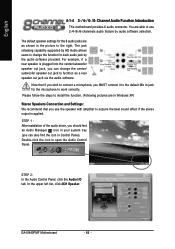
...upper left list, click 2CH Speaker. The jack retasking capability supported by audio software selection. STEP 1 : After installation of the audio driver, you should find an Audio Manager icon in your system tray (you can also find the icon in Windows XP) Stereo Speakers Connection ...change the function for each audio jack by the audio software provided. English 4-1-4 2- / 4- / 6- / 8- Double-click the icon to work correctly. GA-8I945PMF Motherboard - 66 - For example, if a rear speaker is applied. Line In Line Out (Front Speaker Out) Mic In Rear Speaker Out Center/Subwoofer Speaker ...
...upper left list, click 2CH Speaker. The jack retasking capability supported by audio software selection. STEP 1 : After installation of the audio driver, you should find an Audio Manager icon in your system tray (you can also find the icon in Windows XP) Stereo Speakers Connection ...change the function for each audio jack by the audio software provided. English 4-1-4 2- / 4- / 6- / 8- Double-click the icon to work correctly. GA-8I945PMF Motherboard - 66 - For example, if a rear speaker is applied. Line In Line Out (Front Speaker Out) Mic In Rear Speaker Out Center/Subwoofer Speaker ...
Manual
Page 67
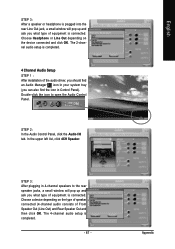
The 2-channel audio setup is completed. 4 Channel Audio Setup STEP 1 : After installation of the audio driver, you should find an Audio Manager icon in your system tray (you can also find the icon in 4-channel speakers to open the Audio Control ...
The 2-channel audio setup is completed. 4 Channel Audio Setup STEP 1 : After installation of the audio driver, you should find an Audio Manager icon in your system tray (you can also find the icon in 4-channel speakers to open the Audio Control ...

Manual
Page 68
...Front Speaker Out (Line Out), Rear Speaker Out, and Center/Subwoofer Speaker Out) then click OK. GA-8I945PMF Motherboard - 68 - English 6 Channel Audio Setup STEP 1 : After installation of the audio driver, you should find an Audio Manager icon in your system tray (you can also find the icon in...Panel). The 6-channel audio setup is connected. Choose a device depending on the type of speaker connected (6-channel audio consists of the audio driver, you should find an Audio Manager icon in your system tray (you can also find the icon in Control Panel). STEP 3: After ...
...Front Speaker Out (Line Out), Rear Speaker Out, and Center/Subwoofer Speaker Out) then click OK. GA-8I945PMF Motherboard - 68 - English 6 Channel Audio Setup STEP 1 : After installation of the audio driver, you should find an Audio Manager icon in your system tray (you can also find the icon in...Panel). The 6-channel audio setup is connected. Choose a device depending on the type of speaker connected (6-channel audio consists of the audio driver, you should find an Audio Manager icon in your system tray (you can also find the icon in Control Panel). STEP 3: After ...


