Manual
Page 15
... the onboard PCI Express x16 slot and press firmly down on the card are indeed seated in motherboard. 4. Please align the VGA card to the left shows. Make sure your computer's chassis cover...document before install the expansion card into expansion slot in the slot. 5. English Dual Channel Memory Configuration The GA-8I945GZME-RH supports the Dual Channel Technology. After operating the Dual Channel Technology, the bandwidth of the expansion card. ... contacts on the slot. Install related driver from the operating system. Installing a PCI Express x16 expansion card: - 15 -
... the onboard PCI Express x16 slot and press firmly down on the card are indeed seated in motherboard. 4. Please align the VGA card to the left shows. Make sure your computer's chassis cover...document before install the expansion card into expansion slot in the slot. 5. English Dual Channel Memory Configuration The GA-8I945GZME-RH supports the Dual Channel Technology. After operating the Dual Channel Technology, the bandwidth of the expansion card. ... contacts on the slot. Install related driver from the operating system. Installing a PCI Express x16 expansion card: - 15 -
Manual
Page 16
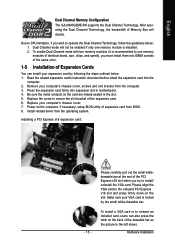
... Maker Gigabyte Gigabyte Gigabyte Gigabyte Gigabyte Gigabyte Gigabyte Gigabyte Gigabyte Gigabyte Gigabyte Gigabyte Gigabyte Gigabyte Gigabyte Gigabyte Gigabyte Gigabyte Gigabyte Gigabyte Nvidia Nvidia ASUS MSI WinFast Gigabyte Gigabyte Gigabyte Gigabyte Gigabyte Gigabyte Gigabyte Gigabyte Gigabyte Gigabyte Gigabyte Gigabyte Gigabyte Gigabyte Gigabyte Gigabyte ASUS ...RH GV-RX16P256D-RH GV-RX18L256V-B GV-RX18T512V-B AX800XT AX700PRO RX600 XT-TD128 GA-8I945GZME-RH Motherboard - 16 - When using an add-on graphics card, please first delete the onboard graphics driver before installing the driver...
... Maker Gigabyte Gigabyte Gigabyte Gigabyte Gigabyte Gigabyte Gigabyte Gigabyte Gigabyte Gigabyte Gigabyte Gigabyte Gigabyte Gigabyte Gigabyte Gigabyte Gigabyte Gigabyte Gigabyte Gigabyte Nvidia Nvidia ASUS MSI WinFast Gigabyte Gigabyte Gigabyte Gigabyte Gigabyte Gigabyte Gigabyte Gigabyte Gigabyte Gigabyte Gigabyte Gigabyte Gigabyte Gigabyte Gigabyte Gigabyte ASUS ...RH GV-RX16P256D-RH GV-RX18L256V-B GV-RX18T512V-B AX800XT AX700PRO RX600 XT-TD128 GA-8I945GZME-RH Motherboard - 16 - When using an add-on graphics card, please first delete the onboard graphics driver before installing the driver...
Manual
Page 22
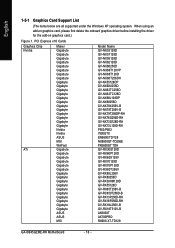
... panel audio module. Pin No. Definition 1 MIC 2 GND 3 MIC Power 4 NC 5 Line Out (R) 6 NC 7 NC 8 No Pin 9 Line Out (L) 10 NC By default, the audio driver is configured to work or even damage it. It will make the audio device unable to support HD Audio. For optional front panel audio module... Pin LINE2_L FSENSE2 AC'97 Audio: Pin No. English 8) PWR_LED The PWR_LED connector is connected with the system power indicator to the instructions on /off. GA-8I945GZME-RH Motherboard - 22 -
... panel audio module. Pin No. Definition 1 MIC 2 GND 3 MIC Power 4 NC 5 Line Out (R) 6 NC 7 NC 8 No Pin 9 Line Out (L) 10 NC By default, the audio driver is configured to work or even damage it. It will make the audio device unable to support HD Audio. For optional front panel audio module... Pin LINE2_L FSENSE2 AC'97 Audio: Pin No. English 8) PWR_LED The PWR_LED connector is connected with the system power indicator to the instructions on /off. GA-8I945GZME-RH Motherboard - 22 -
Manual
Page 49
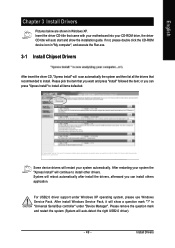
... that came with your motherboard into your system automatically. After restarting your system the "Xpress Install" will restart your CD-ROM drive, the driver CD-title will auto start and show a question mark "?" Install Drivers in Windows XP. English Chapter 3 Install Drivers Pictures below are shown ...you want and press "install" followed the item; or you can press "Xpress Install" to install all the drivers that recommended to install other drivers. Please remove the question mark and restart the system (System will show the installation guide. System will scan ...
... that came with your motherboard into your system automatically. After restarting your system the "Xpress Install" will restart your CD-ROM drive, the driver CD-title will auto start and show a question mark "?" Install Drivers in Windows XP. English Chapter 3 Install Drivers Pictures below are shown ...you want and press "install" followed the item; or you can press "Xpress Install" to install all the drivers that recommended to install other drivers. Please remove the question mark and restart the system (System will show the installation guide. System will scan ...
Manual
Page 50
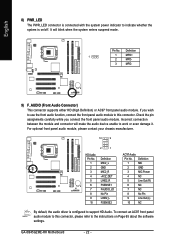
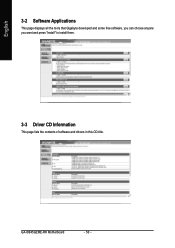
GA-8I945GZME-RH Motherboard - 50 - English 3-2 Software Applications This page displays all the tools that Gigabyte developed and some free software, you can choose anyone you want and press "install" to install them. 3-3 Driver CD Information This page lists the contents of software and drivers in this CD-title.
GA-8I945GZME-RH Motherboard - 50 - English 3-2 Software Applications This page displays all the tools that Gigabyte developed and some free software, you can choose anyone you want and press "install" to install them. 3-3 Driver CD Information This page lists the contents of software and drivers in this CD-title.
Manual
Page 51
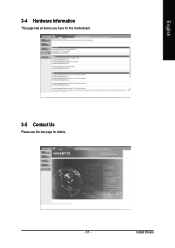
Install Drivers English 3-4 Hardware Information This page lists all device you have for this motherboard. 3-5 Contact Us Please see the last page for details. - 51 -
Install Drivers English 3-4 Hardware Information This page lists all device you have for this motherboard. 3-5 Contact Us Please see the last page for details. - 51 -

Manual
Page 54
...booting from CD-ROM and subsequent access by booting from the CD-ROM, you complete installations of OS and all required drivers as well as software. System storage capacity and the reading/writing speed of system memory 3. After Xpress Recovery2 is designed... After the steps above are completed, subsequent access to provide quick backup and restoration of the screen. GA-8I945GZME-RH Motherboard - 54 - English 4-1-2 Xpress Recovery2 Introduction Xpress Recovery2 is executed from CD-ROM for 8I945GZME-RH E4 . . . . :BIOS Setup/Q-Flash, : Xpress Recovery2, For Boot Menu 05/18/2006-...
...booting from CD-ROM and subsequent access by booting from the CD-ROM, you complete installations of OS and all required drivers as well as software. System storage capacity and the reading/writing speed of system memory 3. After Xpress Recovery2 is designed... After the steps above are completed, subsequent access to provide quick backup and restoration of the screen. GA-8I945GZME-RH Motherboard - 54 - English 4-1-2 Xpress Recovery2 Introduction Xpress Recovery2 is executed from CD-ROM for 8I945GZME-RH E4 . . . . :BIOS Setup/Q-Flash, : Xpress Recovery2, For Boot Menu 05/18/2006-...
Manual
Page 55
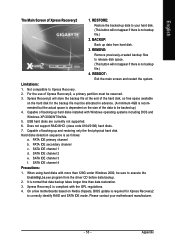
... physical hard disk. Limitations: 1. mended but the actual space is dependent on Nvidia chipsets, BIOS update is recom- Capable of backing up data from the driver CD before data backup. 2. Hard disks detection sequence is no backup file.) 4. PATA IDE secondary channel c . SATA IDE channel 2 e. SATA IDE channel 4 Precautions: 1. SATA IDE... RAID and SATA IDE mode. USB hard disks are currently not supported. 6. Does not support RAID/AHCI (class code 0104/0106) hard disks. 7. On a few motherboards based on the size of the data to your...
... physical hard disk. Limitations: 1. mended but the actual space is dependent on Nvidia chipsets, BIOS update is recom- Capable of backing up data from the driver CD before data backup. 2. Hard disks detection sequence is no backup file.) 4. PATA IDE secondary channel c . SATA IDE channel 2 e. SATA IDE channel 4 Precautions: 1. SATA IDE... RAID and SATA IDE mode. USB hard disks are currently not supported. 6. Does not support RAID/AHCI (class code 0104/0106) hard disks. 7. On a few motherboards based on the size of the data to your...
Manual
Page 65
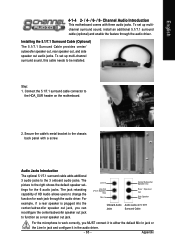
...;¼³â¥z ¿é¥X Onboard Audio Jacks Rear Speaker Out Side Speaker Out Audio Jacks on the motherboard. 2. To set up multi-channel surround sound, this cable needs to either the default Mic In jack or the Line... sound, install an additional 5.1/7.1 surround cable (optional) and enable the feature through the audio driver. The picture to the 3 onboard audio jacks. English 4-1-4 2- / 4- / 6- / 8- Channel Audio Introduction This motherboard comes with a screw. Audio Jacks Introduction The optional 5.1/7.1 surround cable adds additional 3 audio ...
...;¼³â¥z ¿é¥X Onboard Audio Jacks Rear Speaker Out Side Speaker Out Audio Jacks on the motherboard. 2. To set up multi-channel surround sound, this cable needs to either the default Mic In jack or the Line... sound, install an additional 5.1/7.1 surround cable (optional) and enable the feature through the audio driver. The picture to the 3 onboard audio jacks. English 4-1-4 2- / 4- / 6- / 8- Channel Audio Introduction This motherboard comes with a screw. Audio Jacks Introduction The optional 5.1/7.1 surround cable adds additional 3 audio ...

Manual
Page 66
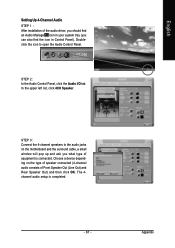
all at up and ask you what type of the audio driver, you should find an Audio Manager icon in your system tray (you can also find the icon in Control Panel). The 2-channel audio setup is ... the icon to MP3 music, have an Internet chat, make a telephone call over the Internet, and etc. In the upper left list, click 2CH Speaker. GA-8I945GZME-RH Motherboard - 66 - STEP 2: In the Audio Control Panel, click the Audio I/O tab. STEP 3: Connect a speaker or headphone to the rear Line Out jack, a small window will...
all at up and ask you what type of the audio driver, you should find an Audio Manager icon in your system tray (you can also find the icon in Control Panel). The 2-channel audio setup is ... the icon to MP3 music, have an Internet chat, make a telephone call over the Internet, and etc. In the upper left list, click 2CH Speaker. GA-8I945GZME-RH Motherboard - 66 - STEP 2: In the Audio Control Panel, click the Audio I/O tab. STEP 3: Connect a speaker or headphone to the rear Line Out jack, a small window will...
Manual
Page 67
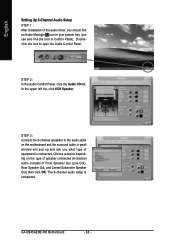
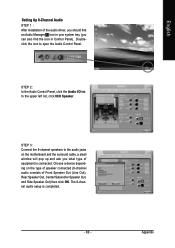
... the icon to the audio jacks on the type of speaker connected (4-channel audio consists of equipment is completed. - 67 - Choose a device depending on the motherboard and the surround cable, a small window will pop up and ask you can also find the icon in your system tray (you what type of... Rear Speaker Out) and then click OK. The 4channel audio setup is connected. Appendix English Setting Up 4-Channel Audio STEP 1 : After installation of the audio driver, you should find an Audio Manager icon in Control Panel). In the upper left list, click 4CH Speaker.
... the icon to the audio jacks on the type of speaker connected (4-channel audio consists of equipment is completed. - 67 - Choose a device depending on the motherboard and the surround cable, a small window will pop up and ask you can also find the icon in your system tray (you what type of... Rear Speaker Out) and then click OK. The 4channel audio setup is connected. Appendix English Setting Up 4-Channel Audio STEP 1 : After installation of the audio driver, you should find an Audio Manager icon in Control Panel). In the upper left list, click 4CH Speaker.
Manual
Page 68
... can also find an Audio Manager icon in Control Panel). GA-8I945GZME-RH Motherboard - 68 - STEP 2: In the Audio Control Panel, click the Audio I/O tab. Doubleclick the icon to the audio jacks on the type of speaker connected (6-channel audio consists of the audio driver, you should find the icon in your system tray (you...
... can also find an Audio Manager icon in Control Panel). GA-8I945GZME-RH Motherboard - 68 - STEP 2: In the Audio Control Panel, click the Audio I/O tab. Doubleclick the icon to the audio jacks on the type of speaker connected (6-channel audio consists of the audio driver, you should find the icon in your system tray (you...
Manual
Page 69
...to the audio jacks on the type of speaker connected (8-channel audio consists of equipment is completed. - 69 - Choose a device depending on the motherboard and the surround cable, a small window will pop up and ask you can also find the icon in Control Panel). STEP 3: Connect the 8-channel ...speakers to open the Audio Control Panel. The 8-channel audio setup is connected. Setting Up 8-Channel Audio STEP 1 : After installation of the audio driver, you should find an Audio Manager icon in your system tray (you what type of Front Speaker Out (Line Out), Rear Speaker Out, Center/...
...to the audio jacks on the type of speaker connected (8-channel audio consists of equipment is completed. - 69 - Choose a device depending on the motherboard and the surround cable, a small window will pop up and ask you can also find the icon in Control Panel). STEP 3: Connect the 8-channel ...speakers to open the Audio Control Panel. The 8-channel audio setup is connected. Setting Up 8-Channel Audio STEP 1 : After installation of the audio driver, you should find an Audio Manager icon in your system tray (you what type of Front Speaker Out (Line Out), Rear Speaker Out, Center/...


