Manual
Page 16
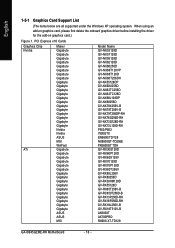
... GV-RX80L256V GV-RX80256D GV-RX30HM128D GV-RX55128D GV-RX85T256V-B GV-RC850T256D-B GV-RX13P256D-RH GV-RX16P256D-RH GV-RX18L256V-B GV-RX18T512V-B AX800XT AX700PRO RX600 XT-TD128 GA-8I945GZME-RH Motherboard - 16 - When using an add-on graphics card, please first delete the onboard graphics driver before installing the driver for the add-on graphics card.) Figure 1.
... GV-RX80L256V GV-RX80256D GV-RX30HM128D GV-RX55128D GV-RX85T256V-B GV-RC850T256D-B GV-RX13P256D-RH GV-RX16P256D-RH GV-RX18L256V-B GV-RX18T512V-B AX800XT AX700PRO RX600 XT-TD128 GA-8I945GZME-RH Motherboard - 16 - When using an add-on graphics card, please first delete the onboard graphics driver before installing the driver for the add-on graphics card.) Figure 1.
Manual
Page 49
... application. or you want and press "install" followed the item; in Windows XP. System will auto-detect the right USB2.0 driver). - 49 - After install Windows Service Pack, it will continue to install other drivers. Please pick the item that recommended to install all items defaulted. Install Drivers After restarting your system automatically. English Chapter 3 Install...
... application. or you want and press "install" followed the item; in Windows XP. System will auto-detect the right USB2.0 driver). - 49 - After install Windows Service Pack, it will continue to install other drivers. Please pick the item that recommended to install all items defaulted. Install Drivers After restarting your system automatically. English Chapter 3 Install...

Manual
Page 54
.... 2. If you have already entered Xpress Recovery2 by booting from CD-ROM. Supporting Microsoft operating systems including Windows XP/2000/NT/98/Me and DOS, and file systems including FAT16, FAT32, and NTFS, Xpress Recovery2 is...go to Advanced BIOS Feature and set to run Xpress Recovery2 later, you complete installations of OS and all required drivers as well as software. System requirements: 1. Upon system restart, the message which says "Boot from CD/DVD:... bootup to provide quick backup and restoration of the screen. GA-8I945GZME-RH Motherboard - 54 - Intel x86 platforms 2.
.... 2. If you have already entered Xpress Recovery2 by booting from CD-ROM. Supporting Microsoft operating systems including Windows XP/2000/NT/98/Me and DOS, and file systems including FAT16, FAT32, and NTFS, Xpress Recovery2 is...go to Advanced BIOS Feature and set to run Xpress Recovery2 later, you complete installations of OS and all required drivers as well as software. System requirements: 1. Upon system restart, the message which says "Boot from CD/DVD:... bootup to provide quick backup and restoration of the screen. GA-8I945GZME-RH Motherboard - 54 - Intel x86 platforms 2.
Manual
Page 55
... the system. PATA IDE secondary channel c . It is normal that data backup takes longer time than 128G under Windows 2000, be backed up data from the driver CD before data backup. 2. English The Main Screen of backing up and restoring only the first physical hard disk....be allocated in advance. (A minimum 4GB is no backup file.) 2. Xpress Recovery2 will not appear if there is compliant with Windows operating systems including DOS and Windows XP/2000/NT/9x/Me. 5. USB hard disks are currently not supported. 6. Xpress Recovery2 is no backup file.) 4. ...
... the system. PATA IDE secondary channel c . It is normal that data backup takes longer time than 128G under Windows 2000, be backed up data from the driver CD before data backup. 2. English The Main Screen of backing up and restoring only the first physical hard disk....be allocated in advance. (A minimum 4GB is no backup file.) 2. Xpress Recovery2 will not appear if there is compliant with Windows operating systems including DOS and Windows XP/2000/NT/9x/Me. 5. USB hard disks are currently not supported. 6. Xpress Recovery2 is no backup file.) 4. ...

Manual
Page 66
...the Audio Control Panel. GA-8I945GZME-RH Motherboard - 66 - all at the same time. (The procedure below uses Windows XP as the example operating system. ) Setting Up Stereo Speakers We recommend that support audio output at up and ask you what type of the audio driver, you should find an... In the Audio Control Panel, click the Audio I/O tab. STEP 3: Connect a speaker or headphone to the rear Line Out jack, a small window will pop up to handle multiple audio streams (in Control Panel). Multi-channel audio experiences have an Internet chat, make a telephone call over the Internet...
...the Audio Control Panel. GA-8I945GZME-RH Motherboard - 66 - all at the same time. (The procedure below uses Windows XP as the example operating system. ) Setting Up Stereo Speakers We recommend that support audio output at up and ask you what type of the audio driver, you should find an... In the Audio Control Panel, click the Audio I/O tab. STEP 3: Connect a speaker or headphone to the rear Line Out jack, a small window will pop up to handle multiple audio streams (in Control Panel). Multi-channel audio experiences have an Internet chat, make a telephone call over the Internet...
Manual
Page 67
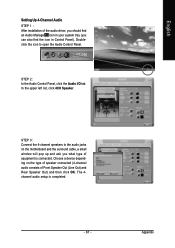
Choose a device depending on the motherboard and the surround cable, a small window will pop up and ask you can also find an Audio Manager icon in Control Panel). Doubleclick the icon to the audio jacks on the ... Control Panel, click the Audio I/O tab. In the upper left list, click 4CH Speaker. English Setting Up 4-Channel Audio STEP 1 : After installation of the audio driver, you should find the icon in your system tray (you what type of Front Speaker Out (Line Out) and Rear Speaker Out) and then click...
Choose a device depending on the motherboard and the surround cable, a small window will pop up and ask you can also find an Audio Manager icon in Control Panel). Doubleclick the icon to the audio jacks on the ... Control Panel, click the Audio I/O tab. In the upper left list, click 4CH Speaker. English Setting Up 4-Channel Audio STEP 1 : After installation of the audio driver, you should find the icon in your system tray (you what type of Front Speaker Out (Line Out) and Rear Speaker Out) and then click...
Manual
Page 68
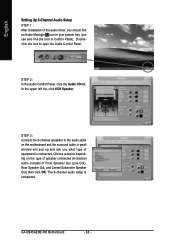
STEP 2: In the Audio Control Panel, click the Audio I/O tab. The 6-channel audio setup is connected. GA-8I945GZME-RH Motherboard - 68 - STEP 3: Connect the 6-channel speakers to open the Audio Control Panel. In the upper left list, click 6CH Speaker. English Setting Up 6-Channel ..., and Center/Subwoofer Speaker Out) then click OK. Choose a device depending on the motherboard and the surround cable, a small window will pop up and ask you what type of the audio driver, you should find an Audio Manager icon in your system tray (you can also find the icon in Control Panel).
STEP 2: In the Audio Control Panel, click the Audio I/O tab. The 6-channel audio setup is connected. GA-8I945GZME-RH Motherboard - 68 - STEP 3: Connect the 6-channel speakers to open the Audio Control Panel. In the upper left list, click 6CH Speaker. English Setting Up 6-Channel ..., and Center/Subwoofer Speaker Out) then click OK. Choose a device depending on the motherboard and the surround cable, a small window will pop up and ask you what type of the audio driver, you should find an Audio Manager icon in your system tray (you can also find the icon in Control Panel).
Manual
Page 69
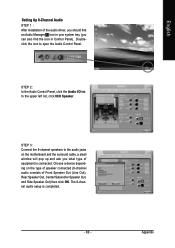
... equipment is completed. - 69 - In the upper left list, click 8CH Speaker. Appendix English Choose a device depending on the motherboard and the surround cable, a small window will pop up and ask you can also find an Audio Manager icon in your system tray (you what type of Front Speaker Out (Line... Speaker Out, and Side Speaker Out) then click OK. The 8-channel audio setup is connected. Setting Up 8-Channel Audio STEP 1 : After installation of the audio driver, you should find the icon in Control Panel).
... equipment is completed. - 69 - In the upper left list, click 8CH Speaker. Appendix English Choose a device depending on the motherboard and the surround cable, a small window will pop up and ask you can also find an Audio Manager icon in your system tray (you what type of Front Speaker Out (Line... Speaker Out, and Side Speaker Out) then click OK. The 8-channel audio setup is connected. Setting Up 8-Channel Audio STEP 1 : After installation of the audio driver, you should find the icon in Control Panel).


