Manual
Page 2
Then connect the power connector from your power supply to create RAID array on the motherboard. (To ensure that your IDE CD-ROM drive can work properly, please connect it to IDE port(s) controlled by the Southbridge, not...hard drive. (b) An empty formatted floppy disk. (c) Windows XP/2000 setup disk. (d) Driver CD for your motherboard. (1) Installing IDE hard drive(s) in RAID BIOS. (4) Make a floppy disk containing the IDE RAID controller driver (5) Install the IDE RAID controller driver during OS installation. Ác Configuring IDE RAID Hard Drive(s) (Controller GigaRAID (IT8212)) ...
Then connect the power connector from your power supply to create RAID array on the motherboard. (To ensure that your IDE CD-ROM drive can work properly, please connect it to IDE port(s) controlled by the Southbridge, not...hard drive. (b) An empty formatted floppy disk. (c) Windows XP/2000 setup disk. (d) Driver CD for your motherboard. (1) Installing IDE hard drive(s) in RAID BIOS. (4) Make a floppy disk containing the IDE RAID controller driver (5) Install the IDE RAID controller driver during OS installation. Ác Configuring IDE RAID Hard Drive(s) (Controller GigaRAID (IT8212)) ...
Manual
Page 14
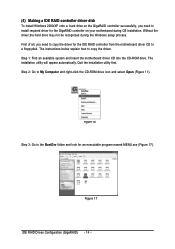
...the GigaRAID controller successfully, you need to install required driver for the GigaRAID controller on your motherboard during OS installation. The instructions below explain how to the BootDrv folder and look for the IDE RAID controller from the motherboard driver CD to My Computer and right-click the CD...-ROM drive icon and select Open (Figure 11). Step 2: Go to a floppydisk. Without the ¤¤ driver,the hard drive may not be recognized during the ...
...the GigaRAID controller successfully, you need to install required driver for the GigaRAID controller on your motherboard during OS installation. The instructions below explain how to the BootDrv folder and look for the IDE RAID controller from the motherboard driver CD to My Computer and right-click the CD...-ROM drive icon and select Open (Figure 11). Step 2: Go to a floppydisk. Without the ¤¤ driver,the hard drive may not be recognized during the ...
Manual
Page 15
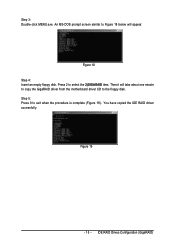
Figure 19 - 15 - Figure 18 Step 4: Insert an empty floppy disk. Press 2 to exit when the procedure is complete (Figure 19). Step 5: Press 0 to select the 2)GIGARAID item. An MS-DOS prompt screen similar to the floppy disk. IDE RAID Drives Configuration (GigaRAID) Step 3: Double-click MENU.exe. You have copied the IDE RAID driver sucessfully. Then it will take about one minute to copy the GigaRAID driver from the motherboard driver CD to Figure 18 below will appear.
Figure 19 - 15 - Figure 18 Step 4: Insert an empty floppy disk. Press 2 to exit when the procedure is complete (Figure 19). Step 5: Press 0 to select the 2)GIGARAID item. An MS-DOS prompt screen similar to the floppy disk. IDE RAID Drives Configuration (GigaRAID) Step 3: Double-click MENU.exe. You have copied the IDE RAID driver sucessfully. Then it will take about one minute to copy the GigaRAID driver from the motherboard driver CD to Figure 18 below will appear.
Manual
Page 17
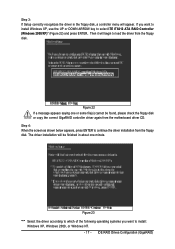
...XP, Windows 2000, or Windows NT. - 17 - The driver installation will be finished in the floppy disk, a controller menu will begin to continue the driver installation from the floppy disk. Figure 23 "*" Select the driver according to which of the following operating systems you want to ...(GigaRAID) Then it will appear. Figure 22 If a message appears saying one minute. Step 3: If Setup correctly recognizes the driver in about one or some file(s) cannot be found, please check the floppy disk or copy the correct GigaRAID controller driver again from the motherboard driver CD.
...XP, Windows 2000, or Windows NT. - 17 - The driver installation will be finished in the floppy disk, a controller menu will begin to continue the driver installation from the floppy disk. Figure 23 "*" Select the driver according to which of the following operating systems you want to ...(GigaRAID) Then it will appear. Figure 22 If a message appears saying one minute. Step 3: If Setup correctly recognizes the driver in about one or some file(s) cannot be found, please check the floppy disk or copy the correct GigaRAID controller driver again from the motherboard driver CD.

Manual
Page 72
GigaRAID (IT8212) ATA RAID Controller USER'S MANUAL Application Installation Pictures below are shown in "My computer", and execute the setup.exe. 1. If not, please double click the CD-ROM device icon in Windows XP (CD ver. 2.2) Insert the driver CD-title that came with your motherboard into your CD-ROM drive, the driver CD-title will auto start and show the installation guide. Click "GigaRAID Utility. 72
GigaRAID (IT8212) ATA RAID Controller USER'S MANUAL Application Installation Pictures below are shown in "My computer", and execute the setup.exe. 1. If not, please double click the CD-ROM device icon in Windows XP (CD ver. 2.2) Insert the driver CD-title that came with your motherboard into your CD-ROM drive, the driver CD-title will auto start and show the installation guide. Click "GigaRAID Utility. 72

Manual
Page 16
... ake sure your computer's chassis cover, screws and slot bracket from the operating system. Install related driver from the computer. 3. Please align the VGA card to the onboard PCI Express x 16 slot ...and press firmly down on the card are indeed seated in motherboard. 4. Read the related expansion card's instruction document before install the expansion card into expansion slot in ... bracket of expansion card from BIOS. 8. GA-8I915P Series Motherboard - 16 - English 1-5 Install expansion cards You can install your computer's chassis cover. 7.
... ake sure your computer's chassis cover, screws and slot bracket from the operating system. Install related driver from the computer. 3. Please align the VGA card to the onboard PCI Express x 16 slot ...and press firmly down on the card are indeed seated in motherboard. 4. Read the related expansion card's instruction document before install the expansion card into expansion slot in ... bracket of expansion card from BIOS. 8. GA-8I915P Series Motherboard - 16 - English 1-5 Install expansion cards You can install your computer's chassis cover. 7.

Manual
Page 22
It will blink when the system enters suspend mode. GA-8I915P Series Motherboard - 22 - Pin No. Definition 1 MPD+ 1 2 MPD- 3 MPD- Definition 7 1 1 GND 2 TXP 3 TXN 4 GND 5 RXN 6 RXP 7 GND 11) PWR_LED PWR_LED is on/off. Please refer to the BIOS setting for the Serial ATA and install the proper driver in order to indicate whether the system is connect with the system power indicator to work properly. Pin No. English 10) S_ATA1/S_ATA2/S_ATA3/S_ATA4(SerialATA Connector,Controlled by ICH6) Serial ATA can provide 150M B/s transfer r ate.
It will blink when the system enters suspend mode. GA-8I915P Series Motherboard - 22 - Pin No. Definition 1 MPD+ 1 2 MPD- 3 MPD- Definition 7 1 1 GND 2 TXP 3 TXN 4 GND 5 RXN 6 RXP 7 GND 11) PWR_LED PWR_LED is on/off. Please refer to the BIOS setting for the Serial ATA and install the proper driver in order to indicate whether the system is connect with the system power indicator to work properly. Pin No. English 10) S_ATA1/S_ATA2/S_ATA3/S_ATA4(SerialATA Connector,Controlled by ICH6) Serial ATA can provide 150M B/s transfer r ate.

Manual
Page 49
... Service Pack. Please remove the question mark and restart the system (System will reboot automatically after install the drivers, afterward you can press "Xpress Install" to install all the drivers that came with your motherboard into your system the "Xpress Install" will continue to install. Please pick the item that you can install...
... Service Pack. Please remove the question mark and restart the system (System will reboot automatically after install the drivers, afterward you can press "Xpress Install" to install all the drivers that came with your motherboard into your system the "Xpress Install" will continue to install. Please pick the item that you can install...

Manual
Page 50
GA-8I915P Series Motherboard - 50 - English 3-2 Software Applications This page displays all the tools that Gigabyte developed and some free software, you can choose anyone you want and press "install" to install them. 3-3 Driver CD Information This page lists the contents of software and drivers in this CD-title.
GA-8I915P Series Motherboard - 50 - English 3-2 Software Applications This page displays all the tools that Gigabyte developed and some free software, you can choose anyone you want and press "install" to install them. 3-3 Driver CD Information This page lists the contents of software and drivers in this CD-title.

Manual
Page 51
Install Drivers English 3-4 Hardware Information This page lists all device you have for this motherboard. 3-5 Contact Us Please see the last page for details. - 51 -
Install Drivers English 3-4 Hardware Information This page lists all device you have for this motherboard. 3-5 Contact Us Please see the last page for details. - 51 -
Manual
Page 53
... Center Download Center allows users to factory default settings. allows corporate MIS engineers to easily maintain corporate computers such as the latest drivers for solid system stability. Appendix for ultimate system protection. M.I .T.) allows user to withstand varying current levels and changes, the...allow for download. With added branded memory module information, users are mounted on the motherboard to reset the system back to quickly download and update their system. With GIGABYTE's proprietary S.O.S. Instead, S.O.S. Download Center automatically runs a system check of the ...
... Center Download Center allows users to factory default settings. allows corporate MIS engineers to easily maintain corporate computers such as the latest drivers for solid system stability. Appendix for ultimate system protection. M.I .T.) allows user to withstand varying current levels and changes, the...allow for download. With added branded memory module information, users are mounted on the motherboard to reset the system back to quickly download and update their system. With GIGABYTE's proprietary S.O.S. Instead, S.O.S. Download Center automatically runs a system check of the ...

Manual
Page 54
.... When "Boot from CD:" appears, press any key to use the Xpress Recovery 1. GIGABYTE Technology CO. , Ltd. 1. Execute Restore Utility 3. Must be used to the IDE1 Master 3. Exit and Restart Build 2011 GA-8I915P Series Motherboard - 54 - Execute Backup Utility 2. Remove Backup Image 4. If the hard drive is ...Recovery is not working properly, the user can also function by pressing the F9 key during computer power on. . . Insert the provided driver CD into your CD drive, then save and exit the BIOS menu. Verifying DMI Pool Data Boot from CD: Boot from CD:" will...
.... When "Boot from CD:" appears, press any key to use the Xpress Recovery 1. GIGABYTE Technology CO. , Ltd. 1. Execute Restore Utility 3. Must be used to the IDE1 Master 3. Exit and Restart Build 2011 GA-8I915P Series Motherboard - 54 - Execute Backup Utility 2. Remove Backup Image 4. If the hard drive is ...Recovery is not working properly, the user can also function by pressing the F9 key during computer power on. . . Insert the provided driver CD into your CD drive, then save and exit the BIOS menu. Verifying DMI Pool Data Boot from CD: Boot from CD:" will...

Manual
Page 68
... the system. 2 Channel Output Mode -- There are 5 kinds of the audio driver, you'll find an icon in the system tray" is configured on the system. 7.1 Channel Output Mode -- Earphone Output Mode -- if back surround speakers are configured.) GA-8I915P Series Motherboard - 68 - Open "CMI Audio Config" and then go to select the function...
... the system. 2 Channel Output Mode -- There are 5 kinds of the audio driver, you'll find an icon in the system tray" is configured on the system. 7.1 Channel Output Mode -- Earphone Output Mode -- if back surround speakers are configured.) GA-8I915P Series Motherboard - 68 - Open "CMI Audio Config" and then go to select the function...

Manual
Page 70
...icon to "Surround speaker out". Front Speaker Out Surround speaker out STEP 3: Click "C-Media 3D Audio Configuration" and then select "Main Setting". GA-8I915P Series Motherboard - 70 - "Smart Jack" would auto-detect the speaker type you connect and gives you 'll find an icon in "Audio System ...Status". The current audio mode is display in the system area. STEP 2: After installation of the audio driver, you the functions to manually modify ...
...icon to "Surround speaker out". Front Speaker Out Surround speaker out STEP 3: Click "C-Media 3D Audio Configuration" and then select "Main Setting". GA-8I915P Series Motherboard - 70 - "Smart Jack" would auto-detect the speaker type you connect and gives you 'll find an icon in "Audio System ...Status". The current audio mode is display in the system area. STEP 2: After installation of the audio driver, you the functions to manually modify ...

Manual
Page 72
The current audio mode is display in the system area. GA-8I915P Series Motherboard - 72 - "Smart Jack" would auto-detect the speaker type you connect and gives you find an icon in "Audio System Status". Double click the icon ... speaker out STEP 3: Click "C-Media 3D Audio Configuration" and then select "Main Setting". The function to select the function. STEP 2: After installation of the audio driver, you the functions to manually modify speaker the settings. The function to "Back surround speaker out". English 7.1 Channel Audio Setup STEP 1 : Connect the front speaker...
The current audio mode is display in the system area. GA-8I915P Series Motherboard - 72 - "Smart Jack" would auto-detect the speaker type you connect and gives you find an icon in "Audio System Status". Double click the icon ... speaker out STEP 3: Click "C-Media 3D Audio Configuration" and then select "Main Setting". The function to select the function. STEP 2: After installation of the audio driver, you the functions to manually modify speaker the settings. The function to "Back surround speaker out". English 7.1 Channel Audio Setup STEP 1 : Connect the front speaker...
Manual
Page 74
...GA-8I915P Series Motherboard - 74 - Answer: The availability of general asked questions based on a specific motherboard model, please log on after computer shuts down and that support RAID function after updating BIOS. Answer: First of all functions in order to clear CMOS. Press Del to the maximum volume? Answer: Gigabyte motherboards... How do I cannot see these functions will be locked automatically and you don't need to a floppy disk before installing drivers. If your board has a Clear CMOS jumper, please refer to makethem short for about 10 minutes (Or you can ...
...GA-8I915P Series Motherboard - 74 - Answer: The availability of general asked questions based on a specific motherboard model, please log on after computer shuts down and that support RAID function after updating BIOS. Answer: First of all functions in order to clear CMOS. Press Del to the maximum volume? Answer: Gigabyte motherboards... How do I cannot see these functions will be locked automatically and you don't need to a floppy disk before installing drivers. If your board has a Clear CMOS jumper, please refer to makethem short for about 10 minutes (Or you can ...


