Manual
Page 1
Table of Contents Configuring IDE RAID Hard Drive(s) (Controller GigaRAID (IT8212 2 (1) Installing IDE hard drive(s) in your system 2 (2) Configuring GigaRAID controller mode and boot sequence in BIOS Setup 3 (3) Configuring RAID set in RAID BIOS 5 (4) Making a IDE RAID controller driver disk 14 (5) Installing IDE RAID controller driver during OS installation 16
Table of Contents Configuring IDE RAID Hard Drive(s) (Controller GigaRAID (IT8212 2 (1) Installing IDE hard drive(s) in your system 2 (2) Configuring GigaRAID controller mode and boot sequence in BIOS Setup 3 (3) Configuring RAID set in RAID BIOS 5 (4) Making a IDE RAID controller driver disk 14 (5) Installing IDE RAID controller driver during OS installation 16
Manual
Page 2
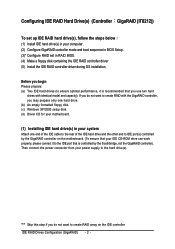
... Setup. (3)* Configure RAID set in your system Attach one hard drive. (b) An empty formatted floppy disk. (c) Windows XP/2000 setup disk. (d) Driver CD for your motherboard. (1) Installing IDE hard drive(s) in RAID BIOS. (4) Make a floppy disk containing the IDE RAID controller... driver (5) Install the IDE RAID controller driver during OS installation. Then connect the power connector from your power supply to create RAID array on the motherboard. (To ensure ...
... Setup. (3)* Configure RAID set in your system Attach one hard drive. (b) An empty formatted floppy disk. (c) Windows XP/2000 setup disk. (d) Driver CD for your motherboard. (1) Installing IDE hard drive(s) in RAID BIOS. (4) Make a floppy disk containing the IDE RAID controller... driver (5) Install the IDE RAID controller driver during OS installation. Then connect the power connector from your power supply to create RAID array on the motherboard. (To ensure ...
Manual
Page 13
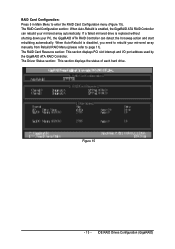
... the GigaRAID ATA RAID Controller. IDE RAID Drives Configuration (GigaRAID) If a failed mirrored drive is disabled, you need to rebuild your mirrored array automatically. The Driver Status section: This section displays the status of each hard drive. RAID Card Configuration: Press 5 in Main Menu to page 11). Figure 15 - 13 - When...
... the GigaRAID ATA RAID Controller. IDE RAID Drives Configuration (GigaRAID) If a failed mirrored drive is disabled, you need to rebuild your mirrored array automatically. The Driver Status section: This section displays the status of each hard drive. RAID Card Configuration: Press 5 in Main Menu to page 11). Figure 15 - 13 - When...
Manual
Page 14
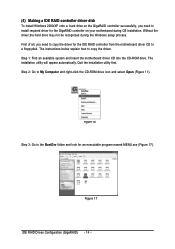
...icon and select Open (Figure 11). Step 1: Find an available system and insert the motherboard driver CD into the CD-ROM drive. Step 2: Go to copy the driver. Ác (4) Making a IDE RAID controller driver disk Åé To install Windows 2000/XP onto a hard drive on your motherboard ...process. ¤å First of all, you need to copy the driver for the GigaRAID controller on the GigaRAID controller successfully, you need to install required driver for the IDE RAID controller from the motherboard driver CD to the BootDrv folder and look for an executable program named ...
...icon and select Open (Figure 11). Step 1: Find an available system and insert the motherboard driver CD into the CD-ROM drive. Step 2: Go to copy the driver. Ác (4) Making a IDE RAID controller driver disk Åé To install Windows 2000/XP onto a hard drive on your motherboard ...process. ¤å First of all, you need to copy the driver for the GigaRAID controller on the GigaRAID controller successfully, you need to install required driver for the IDE RAID controller from the motherboard driver CD to the BootDrv folder and look for an executable program named ...
Manual
Page 15
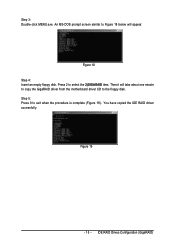
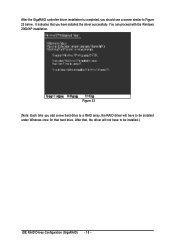
Press 2 to exit when the procedure is complete (Figure 19). Step 5: Press 0 to select the 2)GIGARAID item. Then it will take about one minute to copy the GigaRAID driver from the motherboard driver CD to Figure 18 below will appear. Figure 19 - 15 - Figure 18 Step 4: Insert an empty floppy disk. You have copied the IDE RAID driver sucessfully. Step 3: Double-click MENU.exe. IDE RAID Drives Configuration (GigaRAID) An MS-DOS prompt screen similar to the floppy disk.
Press 2 to exit when the procedure is complete (Figure 19). Step 5: Press 0 to select the 2)GIGARAID item. Then it will take about one minute to copy the GigaRAID driver from the motherboard driver CD to Figure 18 below will appear. Figure 19 - 15 - Figure 18 Step 4: Insert an empty floppy disk. You have copied the IDE RAID driver sucessfully. Step 3: Double-click MENU.exe. IDE RAID Drives Configuration (GigaRAID) An MS-DOS prompt screen similar to the floppy disk.
Manual
Page 16
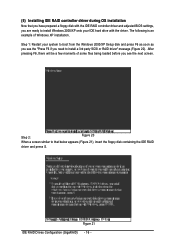
... a screen similar to that you have prepared a floppy disk with the driver. Ác (5) Installing IDE RAID controller driver during OS installation Åé Now that below appears (Figure 21), insert the floppy disk containing the IDE RAID driver and press S. After pressing F6, there will be a few moments of... Windows XP installation. ¤å Step 1: Restart your IDE hard drive with the IDE RAID controller driver and adjusted BIOS settings, you see the "Press F6 if you need to boot from the Windows 2000/XP Setup disk and press F6 as...
... a screen similar to that you have prepared a floppy disk with the driver. Ác (5) Installing IDE RAID controller driver during OS installation Åé Now that below appears (Figure 21), insert the floppy disk containing the IDE RAID driver and press S. After pressing F6, there will be a few moments of... Windows XP installation. ¤å Step 1: Restart your IDE hard drive with the IDE RAID controller driver and adjusted BIOS settings, you see the "Press F6 if you need to boot from the Windows 2000/XP Setup disk and press F6 as...
Manual
Page 17
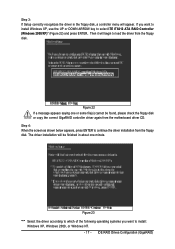
... systems you want to select ITE IT8212 ATA RAID Controller (Windows 2000/XP)* (Figure 22) and press ENTER. Step 3: If Setup correctly recognizes the driver in about one minute. Figure 22 If a message appears saying one or some file(s) cannot be finished in the floppy disk, a controller menu will ...be found, please check the floppy disk or copy the correct GigaRAID controller driver again from the floppy disk. If you want to install Windows XP, use the UP or DOWN ARROW key to install: Windows XP, Windows ...
... systems you want to select ITE IT8212 ATA RAID Controller (Windows 2000/XP)* (Figure 22) and press ENTER. Step 3: If Setup correctly recognizes the driver in about one minute. Figure 22 If a message appears saying one or some file(s) cannot be finished in the floppy disk, a controller menu will ...be found, please check the floppy disk or copy the correct GigaRAID controller driver again from the floppy disk. If you want to install Windows XP, use the UP or DOWN ARROW key to install: Windows XP, Windows ...
Manual
Page 18
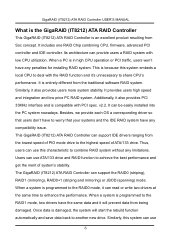
You can proceed with the Windows Åé 2000/XP installation. ¤¤ ¤å Figure 23 (Note: Each time you add a new hard drive to a RAID array, the RAID driver will not have to be installed under Windows once for that you should see a screen similar to be installed.) IDE RAID Drives Configuration (GigaRAID) - 18 - Ác After the GigaRAID controller driver installation is completed, you have to Figure 23 below. It indicates that hard drive. After that, the driver will have installed the driver successfully.
You can proceed with the Windows Åé 2000/XP installation. ¤¤ ¤å Figure 23 (Note: Each time you add a new hard drive to a RAID array, the RAID driver will not have to be installed under Windows once for that you should see a screen similar to be installed.) IDE RAID Drives Configuration (GigaRAID) - 18 - Ác After the GigaRAID controller driver installation is completed, you have to Figure 23 below. It indicates that hard drive. After that, the driver will have installed the driver successfully.

Manual
Page 3
Contents Introduction ...4 Features ...5 What is the GigaRAID (IT8212) ATA RAID Controller 6 Quick Start ...7 Create Your Disk Array 9 Setup Utility...15 Using the GigaRAID (IT8212) ATA RAID Controller Setup Utility 15 Auto Configuration 17 Define RAID...22 Delete RAID...28 Rebuild RAID 31 RAID Card Configuration 36 Driver Installation ...38 Windows XP 39 Windows 2000 45 Windows SE/ME 53 Windows NT 61 Linux ...69 Install the GigaRAID (IT8212) ATA RAID Controller on Red Hat 7.3 69 Application ...72 Installation ...72 Functions Description 75 How to...86 Q&A ...88
Contents Introduction ...4 Features ...5 What is the GigaRAID (IT8212) ATA RAID Controller 6 Quick Start ...7 Create Your Disk Array 9 Setup Utility...15 Using the GigaRAID (IT8212) ATA RAID Controller Setup Utility 15 Auto Configuration 17 Define RAID...22 Delete RAID...28 Rebuild RAID 31 RAID Card Configuration 36 Driver Installation ...38 Windows XP 39 Windows 2000 45 Windows SE/ME 53 Windows NT 61 Linux ...69 Install the GigaRAID (IT8212) ATA RAID Controller on Red Hat 7.3 69 Application ...72 Installation ...72 Functions Description 75 How to...86 Q&A ...88

Manual
Page 5
... of system CPU and improve the system's ability. Supports the drivers for the DMA/UDMA function Includes one embedded CPU and firmware on a local processor architecture Compatible with 4 drives. Low CPU utilization based on system to ...
... of system CPU and improve the system's ability. Supports the drivers for the DMA/UDMA function Includes one embedded CPU and firmware on a local processor architecture Compatible with 4 drives. Low CPU utilization based on system to ...
Manual
Page 6
... mode, it also provides users more system stability. Thus, users can use ATA/133 drive and RAID function to the RAID1 mode, two drivers have any limitations. When a PC is compatible with low CPU utilization. It provides users high speed and integration and low price PC RAID ...combine RAID system without any penalties for installing RAID system. Similarly, it can use this system can support IDE drivers ranging from Soc concept. Users can read or write two drivers at the same time to the highest speed of system's stability. When a system is damaged, the system ...
... mode, it also provides users more system stability. Thus, users can use ATA/133 drive and RAID function to the RAID1 mode, two drivers have any limitations. When a PC is compatible with low CPU utilization. It provides users high speed and integration and low price PC RAID ...combine RAID system without any penalties for installing RAID system. Similarly, it can use this system can support IDE drivers ranging from Soc concept. Users can read or write two drivers at the same time to the highest speed of system's stability. When a system is damaged, the system ...

Manual
Page 7
The RAID0+1 mode uses four drivers to prevent any data loss resulting from ! The default settings can meet most people's requirements. Warning: In order to get the merits of RAID0 and .... inappropriate operation, please backup data before you to achieve your goal. GigaRAID (IT8212) ATA RAID Controller USER'S MANUAL this data-copying characteristic to let two drivers transmit at the same time and balance the performance to install your system. 7 This mode does not have the RAID function and its merit.
The RAID0+1 mode uses four drivers to prevent any data loss resulting from ! The default settings can meet most people's requirements. Warning: In order to get the merits of RAID0 and .... inappropriate operation, please backup data before you to achieve your goal. GigaRAID (IT8212) ATA RAID Controller USER'S MANUAL this data-copying characteristic to let two drivers transmit at the same time and balance the performance to install your system. 7 This mode does not have the RAID function and its merit.
Manual
Page 38
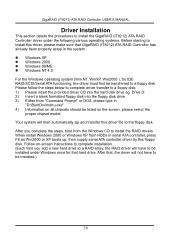
...the Windows CD to the floppy disk. After you add a new hard drive to a RAID array, the RAID driver will then automatically zip and transfer this driver file to install the RAID drivers. After that hard drive. Your system will have to a floppy disk. Follow on the screen, please select the... eg. Windows XP Windows 2000 Windows 98/ME Windows NT 4.0 For the Windows operating system (Win NT, WinXP, Win2000 ), for that , the driver will not have to be installed under the following various operating systems. Before starting to a floppy disk: 1) Please insert the provided...
...the Windows CD to the floppy disk. After you add a new hard drive to a RAID array, the RAID driver will then automatically zip and transfer this driver file to install the RAID drivers. After that hard drive. Your system will have to a floppy disk. Follow on the screen, please select the... eg. Windows XP Windows 2000 Windows 98/ME Windows NT 4.0 For the Windows operating system (Win NT, WinXP, Win2000 ), for that , the driver will not have to be installed under the following various operating systems. Before starting to a floppy disk: 1) Please insert the provided...

Manual
Page 39
... on the window then press the key to continue. 5. When the message "Press F6 if you need to install third party SCSI or RAID driver" appears on the next window. If you want to the next step. 7. Warning: Because of the different selections of the screen, please press... instruction of Windows XP. 39 Press the key to continue the installation of the installation program to insert the GigaRAID (IT8212) ATA RAID Controller Driver diskette into the floppy disk drive then press the key to continue. 6. Boot from floppy with un-installable diskette. When a message appears to...
... on the window then press the key to continue. 5. When the message "Press F6 if you need to install third party SCSI or RAID driver" appears on the next window. If you want to the next step. 7. Warning: Because of the different selections of the screen, please press... instruction of Windows XP. 39 Press the key to continue the installation of the installation program to insert the GigaRAID (IT8212) ATA RAID Controller Driver diskette into the floppy disk drive then press the key to continue. 6. Boot from floppy with un-installable diskette. When a message appears to...

Manual
Page 40
When Windows detects GigaRAID (IT8212) ATA RAID Controller in the system, a dialog box named Found New Hardware Wizard will show on the screen. GigaRAID (IT8212) ATA RAID Controller USER'S MANUAL Install the driver under existing Windows XP 1. Start Windows. 2. Select the Install from a list or specific location (Advanced) option then click "Next" to continue to setup. 40
When Windows detects GigaRAID (IT8212) ATA RAID Controller in the system, a dialog box named Found New Hardware Wizard will show on the screen. GigaRAID (IT8212) ATA RAID Controller USER'S MANUAL Install the driver under existing Windows XP 1. Start Windows. 2. Select the Install from a list or specific location (Advanced) option then click "Next" to continue to setup. 40
Manual
Page 41
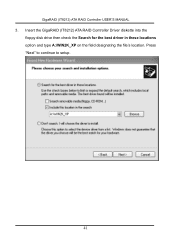
Press "Next" to continue to setup. 41 Insert the GigaRAID (IT8212) ATA RAID Controller Driver diskette into the floppy disk drive then check the Search for the best driver in these locations option and type A:\WIN2K_XP on the field designating the file's location. GigaRAID (IT8212) ATA RAID Controller USER'S MANUAL 3.
Press "Next" to continue to setup. 41 Insert the GigaRAID (IT8212) ATA RAID Controller Driver diskette into the floppy disk drive then check the Search for the best driver in these locations option and type A:\WIN2K_XP on the field designating the file's location. GigaRAID (IT8212) ATA RAID Controller USER'S MANUAL 3.

Manual
Page 42
GigaRAID (IT8212) ATA RAID Controller USER'S MANUAL 4. Follow the instruction to continue. 5. Press "Finish" to restart the computer then the driver will take effect. 42 The driver installation has finished.
GigaRAID (IT8212) ATA RAID Controller USER'S MANUAL 4. Follow the instruction to continue. 5. Press "Finish" to restart the computer then the driver will take effect. 42 The driver installation has finished.
Manual
Page 43
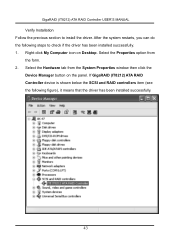
GigaRAID (IT8212) ATA RAID Controller USER'S MANUAL Verify Installation Follow the previous section to check if the driver has been installed successfully. 1. Select the Properties option from the System Properties window then click the Device Manager button on Desktop. If GigaRAID (...Controller device is shown below the SCSI and RAID controllers item (see the following steps to install the driver. After the system restarts, you can do the following figure), it means that the driver has been installed successfully. 43 Select the Hardware tab from the form. 2. Right-click My Computer ...
GigaRAID (IT8212) ATA RAID Controller USER'S MANUAL Verify Installation Follow the previous section to check if the driver has been installed successfully. 1. Select the Properties option from the System Properties window then click the Device Manager button on Desktop. If GigaRAID (...Controller device is shown below the SCSI and RAID controllers item (see the following steps to install the driver. After the system restarts, you can do the following figure), it means that the driver has been installed successfully. 43 Select the Hardware tab from the form. 2. Right-click My Computer ...
Manual
Page 44
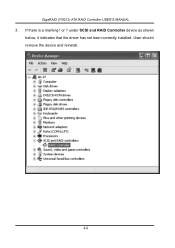
under SCSI and RAID Controller device as shown below, it indicates that the driver has not been correctly installed. User should remove the device and reinstall. 44 If there is a marking ! GigaRAID (IT8212) ATA RAID Controller USER'S MANUAL 3. or ?
under SCSI and RAID Controller device as shown below, it indicates that the driver has not been correctly installed. User should remove the device and reinstall. 44 If there is a marking ! GigaRAID (IT8212) ATA RAID Controller USER'S MANUAL 3. or ?

Manual
Page 45
... going to continue. 5. Press the key to continue the installation of the installation program to insert the GigaRAID (IT8212) ATA RAID Controller Driver diskette into the floppy disk drive then press the key to be installed will continue. When a message appears to ask you to designate ...installation diskette. Follow the instruction of Windows 2000. 45 When the message "Press F6 if you need to install third party SCSI or RAID driver" appears on the window then press the key to continue. 6. Start Windows 2000 installation. Warning: Because of the different selections of the ...
... going to continue. 5. Press the key to continue the installation of the installation program to insert the GigaRAID (IT8212) ATA RAID Controller Driver diskette into the floppy disk drive then press the key to be installed will continue. When a message appears to ask you to designate ...installation diskette. Follow the instruction of Windows 2000. 45 When the message "Press F6 if you need to install third party SCSI or RAID driver" appears on the window then press the key to continue. 6. Start Windows 2000 installation. Warning: Because of the different selections of the ...


