
Manual
Page 5
Channel Audio Function Introduction 69 4-1-5 Jack-Sensing Introduction 75 4-2 Troubleshooting 77 - 5 - Chapter 3 Install Drivers 51 3-1 Install Chipset Drivers 51 3-2 SoftwareApplications 52 3-3 Driver CD Information 52 3-4 Hardware Information 53 3-5 Contact Us ...53 Chapter 4 Appendix ...55 4-1 Unique Software Utilities 55 4-1-1 EasyTune 5 Introduction 56 4-1-2 Xpress Recovery2 Introduction 57 4-1-3 Flash BIOS Method Introduction 60 4-1-4 2- / 4- / 6-
Channel Audio Function Introduction 69 4-1-5 Jack-Sensing Introduction 75 4-2 Troubleshooting 77 - 5 - Chapter 3 Install Drivers 51 3-1 Install Chipset Drivers 51 3-2 SoftwareApplications 52 3-3 Driver CD Information 52 3-4 Hardware Information 53 3-5 Contact Us ...53 Chapter 4 Appendix ...55 4-1 Unique Software Utilities 55 4-1-1 EasyTune 5 Introduction 56 4-1-2 Xpress Recovery2 Introduction 57 4-1-3 Flash BIOS Method Introduction 60 4-1-4 2- / 4- / 6-
Manual
Page 16
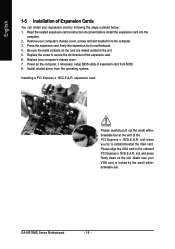
Install related driver from the computer. 3. Be sure the metal contacts on the computer, if necessary, setup BIOS utility of expansion card from BIOS. 8. slot and press firmly .... 7. Press the expansion card firmly into the computer. 2. expansion card: Please carefully pull out the small whitedrawable bar at the end of the expansion card. 6. GA-8I915ME Series Motherboard - 16 - Power on the card are indeed seated in motherboard. 4. English 1-5 Installation of Expansion Cards You can install your VGA card is locked...
Install related driver from the computer. 3. Be sure the metal contacts on the computer, if necessary, setup BIOS utility of expansion card from BIOS. 8. slot and press firmly .... 7. Press the expansion card firmly into the computer. 2. expansion card: Please carefully pull out the small whitedrawable bar at the end of the expansion card. 6. GA-8I915ME Series Motherboard - 16 - Power on the card are indeed seated in motherboard. 4. English 1-5 Installation of Expansion Cards You can install your VGA card is locked...
Manual
Page 17
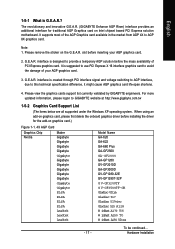
... card, please first delete the onboard graphics driver before inserting your AGP graphics card. 3. Please remove the sticker on graphics card.) Figure 1-1. 4X AGP Card Graphics Chip Nvidia Maker Gigabyte Gigabyte Gigabyte Gigabyte Model Name GA-620 GA-622 GA-660 Plus GA-GF2560 Gigabyte Gigabyte Gigabyte Gigabyte Gigabyte Gigabyte GA-GF2000 GA-GF1280 GV-GF2010D GA-GF3000D GV-GF1280-32E GV-GF1280T-32P Gigabyte Gigabyte ELSA G V-GF3200TF G V-GF3500TF-GH Gladiac Ultra ELSA...
... card, please first delete the onboard graphics driver before inserting your AGP graphics card. 3. Please remove the sticker on graphics card.) Figure 1-1. 4X AGP Card Graphics Chip Nvidia Maker Gigabyte Gigabyte Gigabyte Gigabyte Model Name GA-620 GA-622 GA-660 Plus GA-GF2560 Gigabyte Gigabyte Gigabyte Gigabyte Gigabyte Gigabyte GA-GF2000 GA-GF1280 GV-GF2010D GA-GF3000D GV-GF1280-32E GV-GF1280T-32P Gigabyte Gigabyte ELSA G V-GF3200TF G V-GF3500TF-GH Gladiac Ultra ELSA...
Manual
Page 20
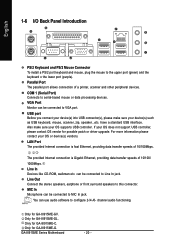
...please contact OS vendor for possible patch or driver upgrade. can be connected to configure 2-/4-/6- Line Out Connect the stereo speakers, earphone or front surround speakers to serial-based mouse or data processing devices. channel audio functioning. GA-8I915ME Series Motherboard - 20 - The provided ...PS/2 Keyboard and PS/2 Mouse Connector To install a PS/2 port keyboard and mouse, plug the mouse to VGA port. Only for GA-8I915ME-GV. Parallel Port The parallel port allows connection of 10/100/ 1000Mbps. VGA Port Monitor can use audio software to Line In jack. ...
...please contact OS vendor for possible patch or driver upgrade. can be connected to configure 2-/4-/6- Line Out Connect the stereo speakers, earphone or front surround speakers to serial-based mouse or data processing devices. channel audio functioning. GA-8I915ME Series Motherboard - 20 - The provided ...PS/2 Keyboard and PS/2 Mouse Connector To install a PS/2 port keyboard and mouse, plug the mouse to VGA port. Only for GA-8I915ME-GV. Parallel Port The parallel port allows connection of 10/100/ 1000Mbps. VGA Port Monitor can use audio software to Line In jack. ...
Manual
Page 24
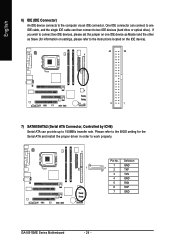
Definition 1 GND 1 7 2 TXP 3 TXN 4 GND 5 RXN 6 RXP 7 GND GA-8I915ME Series Motherboard - 24 - Pin No. Please refer to the BIOS setting for information on settings, please refer to the instructions located on one IDE cable, ... properly. One IDE connector can connect to one IDE device as Master and the other as Slave (for the Serial ATA and install the proper driver in order to the computer via an IDE connector. If you wish to connect two IDE devices, please set the jumper on the IDE device...
Definition 1 GND 1 7 2 TXP 3 TXN 4 GND 5 RXN 6 RXP 7 GND GA-8I915ME Series Motherboard - 24 - Pin No. Please refer to the BIOS setting for information on settings, please refer to the instructions located on one IDE cable, ... properly. One IDE connector can connect to one IDE device as Master and the other as Slave (for the Serial ATA and install the proper driver in order to the computer via an IDE connector. If you wish to connect two IDE devices, please set the jumper on the IDE device...
Manual
Page 51
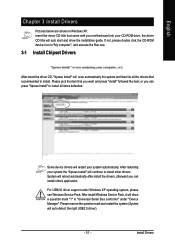
...restart the system (System will show the installation guide. System will reboot automatically after install the drivers, afterward you can press "Xpress Install" to install. English Chapter 3 Install Drivers Pictures below are shown in "Universal Serial Bus controller" under Windows XP operating system, please ... Service Pack, it will auto-detect the right USB2.0 driver). - 51 - Insert the driver CD-title that recommended to install all the drivers that came with your motherboard into your CD-ROM drive, the driver CD-title will scan automatically the system and then list all...
...restart the system (System will show the installation guide. System will reboot automatically after install the drivers, afterward you can press "Xpress Install" to install. English Chapter 3 Install Drivers Pictures below are shown in "Universal Serial Bus controller" under Windows XP operating system, please ... Service Pack, it will auto-detect the right USB2.0 driver). - 51 - Insert the driver CD-title that recommended to install all the drivers that came with your motherboard into your CD-ROM drive, the driver CD-title will scan automatically the system and then list all...
Manual
Page 52
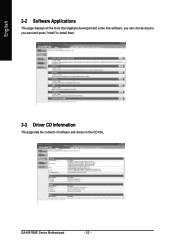
GA-8I915ME Series Motherboard - 52 - English 3-2 Software Applications This page displays all the tools that Gigabyte developed and some free software, you can choose anyone you want and press "install" to install them. 3-3 Driver CD Information This page lists the contents of software and drivers in this CD-title.
GA-8I915ME Series Motherboard - 52 - English 3-2 Software Applications This page displays all the tools that Gigabyte developed and some free software, you can choose anyone you want and press "install" to install them. 3-3 Driver CD Information This page lists the contents of software and drivers in this CD-title.
Manual
Page 53
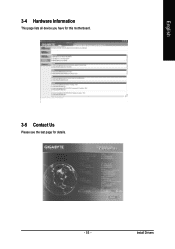
Install Drivers English 3-4 Hardware Information This page lists all device you have for this motherboard. 3-5 Contact Us Please see the last page for details. - 53 -
Install Drivers English 3-4 Hardware Information This page lists all device you have for this motherboard. 3-5 Contact Us Please see the last page for details. - 53 -
Manual
Page 55
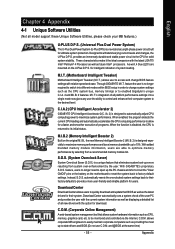
... S.O.S. (System Overclock Saver) System Overclock Saver (S.O.S.) is a unique feature that allows system hardware information such as the latest drivers for intelligent indication of system loading. automatically resets the overclocked system settings back to their computer system to the desired level....PC chassis and short-circuit the "Clear CMOS" pins or the battery on the U-Plus D.P.S. C.I.A.2 (CPU Intelligent Accelerator 2) GIGABYTE CPU Intelligent Accelerator 2(C.I .T.'s integration of all platform performance settings into different modes within BIOS setup in order to change BIOS ...
... S.O.S. (System Overclock Saver) System Overclock Saver (S.O.S.) is a unique feature that allows system hardware information such as the latest drivers for intelligent indication of system loading. automatically resets the overclocked system settings back to their computer system to the desired level....PC chassis and short-circuit the "Clear CMOS" pins or the battery on the U-Plus D.P.S. C.I.A.2 (CPU Intelligent Accelerator 2) GIGABYTE CPU Intelligent Accelerator 2(C.I .T.'s integration of all platform performance settings into different modes within BIOS setup in order to change BIOS ...
Manual
Page 57
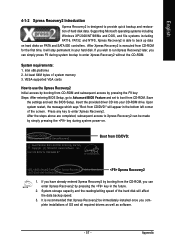
English 4-1-2 Xpress Recovery2 Introduction Xpress Recovery2 is designed to provide quick backup and restoration of OS and all required drivers as well as software. - 57 - Save the settings and exit the BIOS Setup. Press any key to back up data on hard disks on . . . Intel... 945 BIOS for the first time, it will appear in the bottom left corner of the screen. Appendix Intel x86 platforms 2. Insert the provided driver CD into your hard disk. It is recommended that Xpress Recovery2 be made by simply pressing the key during system bootup to run Xpress Recovery2...
English 4-1-2 Xpress Recovery2 Introduction Xpress Recovery2 is designed to provide quick backup and restoration of OS and all required drivers as well as software. - 57 - Save the settings and exit the BIOS Setup. Press any key to back up data on hard disks on . . . Intel... 945 BIOS for the first time, it will appear in the bottom left corner of the screen. Appendix Intel x86 platforms 2. Insert the provided driver CD into your hard disk. It is recommended that Xpress Recovery2 be made by simply pressing the key during system bootup to run Xpress Recovery2...
Manual
Page 58
... 1. On a few motherboards based on Nvidia chipsets, BIOS update is required for the backup file must be backed up data from the driver CD before data backup. 2. REBOOT: Exit the main screen and restart the system. Limitations: 1. For the use of the data to... Recovery2, a primary partition must be solved by BIOS update) GA-K8U GA-K8U-9 GA-K8NXP-SLI GA-K8N Ultra-SLI GA-K8N Pro-SLI GA-K8NXP-9 GA-K8N Ultra-9 GA-K8NF-9 (PCB Ver. 1.0) GA-K8NE (PCB Ver. 1.0) GA-K8NMF-9 GA-8N-SLI Royal GA-8N-SLI Pro GA-8N-SLI GA-8I915ME Series Motherboard - 58 - SATA IDE channel 2 e. BACKUP:...
... 1. On a few motherboards based on Nvidia chipsets, BIOS update is required for the backup file must be backed up data from the driver CD before data backup. 2. REBOOT: Exit the main screen and restart the system. Limitations: 1. For the use of the data to... Recovery2, a primary partition must be solved by BIOS update) GA-K8U GA-K8U-9 GA-K8NXP-SLI GA-K8N Ultra-SLI GA-K8N Pro-SLI GA-K8NXP-9 GA-K8N Ultra-9 GA-K8NF-9 (PCB Ver. 1.0) GA-K8NE (PCB Ver. 1.0) GA-K8NMF-9 GA-8N-SLI Royal GA-8N-SLI Pro GA-8N-SLI GA-8I915ME Series Motherboard - 58 - SATA IDE channel 2 e. BACKUP:...
Manual
Page 68
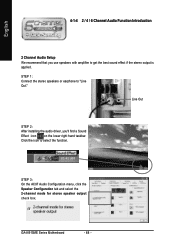
STEP 1: Connect the stereo speakers or earphone to select the function. GA-8I915ME Series Motherboard - 68 - English 4-1-4 2 / 4 / 6 Channel Audio Function Introduction 2 Channel Audio Setup We recommend that you 'll find a Sound Effect icon on the lower right hand ... Configuration menu, click the Speaker Configuration tab and select the 2-channel mode for stereo speaker output check box. Line Out STEP 2: After installing the audio driver, you use speakers with amplifier to get the best sound effect if the stereo output is applied. Click the icon to "Line Out."
STEP 1: Connect the stereo speakers or earphone to select the function. GA-8I915ME Series Motherboard - 68 - English 4-1-4 2 / 4 / 6 Channel Audio Function Introduction 2 Channel Audio Setup We recommend that you 'll find a Sound Effect icon on the lower right hand ... Configuration menu, click the Speaker Configuration tab and select the 2-channel mode for stereo speaker output check box. Line Out STEP 2: After installing the audio driver, you use speakers with amplifier to get the best sound effect if the stereo output is applied. Click the icon to "Line Out."
Manual
Page 69
Clear the Only SURROUND-KIT check box and press OK. STEP 2: After installing the audio driver, you'll find a Sound Effect icon on the lower right hand taskbar. When the Environment setting is None, the sound would be performed as stereo ...
Clear the Only SURROUND-KIT check box and press OK. STEP 2: After installing the audio driver, you'll find a Sound Effect icon on the lower right hand taskbar. When the Environment setting is None, the sound would be performed as stereo ...

Manual
Page 70
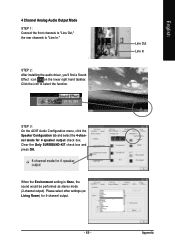
GA-8I915ME Series Motherboard - 70 - Line In STEP 3: On the AC97 Audio Configuration menu, click the Speaker Configuration tab and select the 6-channel mode for 5.1 speaker output .../Subwoofer channels to select the function. Clear the Only SURROUND-KIT check box and press OK. MIC In Line Out STEP 2: After installing the audio driver, you'll find a Sound Effect icon on the lower right hand taskbar. English Basic 6 Channel Analog Audio Output Mode Use the back audio panel to...
GA-8I915ME Series Motherboard - 70 - Line In STEP 3: On the AC97 Audio Configuration menu, click the Speaker Configuration tab and select the 6-channel mode for 5.1 speaker output .../Subwoofer channels to select the function. Clear the Only SURROUND-KIT check box and press OK. MIC In Line Out STEP 2: After installing the audio driver, you'll find a Sound Effect icon on the lower right hand taskbar. English Basic 6 Channel Analog Audio Output Mode Use the back audio panel to...
Manual
Page 72
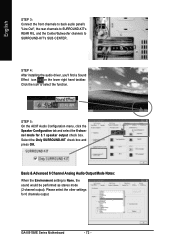
STEP 4: After installing the audio driver, you'll find a Sound Effect icon on the lower right hand taskbar. GA-8I915ME Series Motherboard - 72 - Basic & Advanced 6 Channel Analog Audio Output Mode Notes: When the Environment setting is None, the sound would be performed as stereo mode (2-...
STEP 4: After installing the audio driver, you'll find a Sound Effect icon on the lower right hand taskbar. GA-8I915ME Series Motherboard - 72 - Basic & Advanced 6 Channel Analog Audio Output Mode Notes: When the Environment setting is None, the sound would be performed as stereo mode (2-...


