
User Manual
Page 6
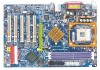
... Summary 5 GA-8I848P(-G) Motherboard Layout 7 Block Diagram 8 Chapter 2 Hardware Installation Process 10 Step 1: Install the Central Processing Unit (CPU 11 Step 1-1: CPU Installation 11 Step 1-2 : CPU Cooling Fan Installation 12 Step 2: Install memory modules 13 Step 3: Install expansion cards 15 Step 4: Connect ribbon cables, cabinet wires, and power supply 16 Step 4-1: I/O Back Panel Introduction 16 Step 4-2: Connectors & Jumper Setting Introduction 18 Chapter 3 BIOS Setup 31 The Main Menu (For example: BIOS Ver. : E1 32 Standard CMOS Features 34 Advanced BIOS Features 37...
... Summary 5 GA-8I848P(-G) Motherboard Layout 7 Block Diagram 8 Chapter 2 Hardware Installation Process 10 Step 1: Install the Central Processing Unit (CPU 11 Step 1-1: CPU Installation 11 Step 1-2 : CPU Cooling Fan Installation 12 Step 2: Install memory modules 13 Step 3: Install expansion cards 15 Step 4: Connect ribbon cables, cabinet wires, and power supply 16 Step 4-1: I/O Back Panel Introduction 16 Step 4-2: Connectors & Jumper Setting Introduction 18 Chapter 3 BIOS Setup 31 The Main Menu (For example: BIOS Ver. : E1 32 Standard CMOS Features 34 Advanced BIOS Features 37...

User Manual
Page 8
... on the bag that the ATX power supply is switched off , so be a little hard to attach the spacers, do not have one, touch both of your computer when working on the motherboard. Sometimes you plug in or remove the ATX power connector on the inside. 2. English Item Checklist The GA-8I848P or GA-8I848P-G motherboard IDE cable x 2 / Floppy cable x 1 CD for motherboard driver & utility GA-8I848P(-G) user's manual I/O Shield Quick PC Installation Guide RAID Manual GC-SATA Card (Optional) (Manual; Unplug your hands). Just cut...
... on the bag that the ATX power supply is switched off , so be a little hard to attach the spacers, do not have one, touch both of your computer when working on the motherboard. Sometimes you plug in or remove the ATX power connector on the inside. 2. English Item Checklist The GA-8I848P or GA-8I848P-G motherboard IDE cable x 2 / Floppy cable x 1 CD for motherboard driver & utility GA-8I848P(-G) user's manual I/O Shield Quick PC Installation Guide RAID Manual GC-SATA Card (Optional) (Manual; Unplug your hands). Just cut...
User Manual
Page 10
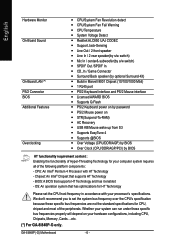
... Technology - GA-8I848P(-G) Motherboard - 6 - OS: An operation system that has optimizations for HT Technology Please set the system bus frequency over the CPU's specification because these specific bus frequencies properly will depend on y STR(Suspend-To-RAM) y AC Recovery y USB KB/Mouse wake up from S3 y Supports EasyTune 4 y Supports @BIOS y Over Voltage (CPU/DDR/AGP) by BIOS y Over Clock (CPU/DDR/AGP/PCI) by optional Surround-Kit) y Build in accordance with HT Technology - English Hardware Monitor On-Board Sound On-Board LAN (*) PS/2 Connector BIOS...
... Technology - GA-8I848P(-G) Motherboard - 6 - OS: An operation system that has optimizations for HT Technology Please set the system bus frequency over the CPU's specification because these specific bus frequencies properly will depend on y STR(Suspend-To-RAM) y AC Recovery y USB KB/Mouse wake up from S3 y Supports EasyTune 4 y Supports @BIOS y Over Voltage (CPU/DDR/AGP) by BIOS y Over Clock (CPU/DDR/AGP/PCI) by optional Surround-Kit) y Build in accordance with HT Technology - English Hardware Monitor On-Board Sound On-Board LAN (*) PS/2 Connector BIOS...
User Manual
Page 14
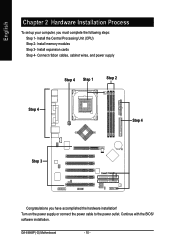
Continue with the BIOS/ software installation. Connect ribbon cables, cabinet wires, and power supply Step 4 Step 1 Step 2 Step 4 Step 4 Step 3 Congratulations you must complete the following steps: Step 1- GA-8I848P(-G) Motherboard - 10 - Install the Central Processing Unit (CPU) Step 2- Install memory modules Step 3- Turn on the power supply or connect the power cable to the power outlet. English Chapter 2 Hardware Installation Process To set up your computer, you have accomplished the hardware installation! Install expansion cards Step 4-
Continue with the BIOS/ software installation. Connect ribbon cables, cabinet wires, and power supply Step 4 Step 1 Step 2 Step 4 Step 4 Step 3 Congratulations you must complete the following steps: Step 1- GA-8I848P(-G) Motherboard - 10 - Install the Central Processing Unit (CPU) Step 2- Install memory modules Step 3- Turn on the power supply or connect the power cable to the power outlet. English Chapter 2 Hardware Installation Process To set up your computer, you have accomplished the hardware installation! Install expansion cards Step 4-
User Manual
Page 21
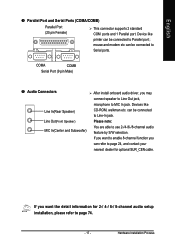
... optional SUR_CEN cable. Hardware Installation Process If you want to enable 8-channel function you may connect speaker to Line Out jack, microphone to Parallel port ; Please note: You are able to Serial ports. Devices like printer can be connected to use 2-/4-/6-/8-channel audio feature by S/W selection. Device like CD-ROM, walkman etc. mouse and modem etc can refer to page 24, and contact your nearest dealer for 2-/ 4-/ 6-/ 8-channel audio setup installation...
... optional SUR_CEN cable. Hardware Installation Process If you want to enable 8-channel function you may connect speaker to Line Out jack, microphone to Parallel port ; Please note: You are able to Serial ports. Devices like printer can be connected to use 2-/4-/6-/8-channel audio feature by S/W selection. Device like CD-ROM, walkman etc. mouse and modem etc can refer to page 24, and contact your nearest dealer for 2-/ 4-/ 6-/ 8-channel audio setup installation...
User Manual
Page 39
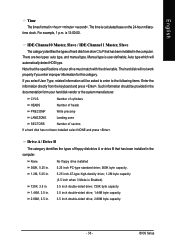
There are two types: auto type, and manual type. Auto type which will not work properly if you select User Type, related information will be provided in . 3.5 inch double-sided drive; 2.88M byte capacity. - 35 - BIOS Setup is user-definable; Drive A / Drive B The category identifies the types of floppy disk drive A or drive B that the specifications of your hard disk vendor or the system manufacturer. English Time The times format in the computer. Manual type is 13...
There are two types: auto type, and manual type. Auto type which will not work properly if you select User Type, related information will be provided in . 3.5 inch double-sided drive; 2.88M byte capacity. - 35 - BIOS Setup is user-definable; Drive A / Drive B The category identifies the types of floppy disk drive A or drive B that the specifications of your hard disk vendor or the system manufacturer. English Time The times format in the computer. Manual type is 13...
User Manual
Page 41
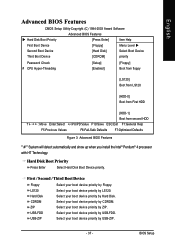
... Disk Boot Device priority. ZIP Select your boot device priority by USB-ZIP. - 37 - USB-FDD Select your boot device priority by CDROM. English Advanced BIOS Features CMOS Setup Utility-Copyright (C) 1984-2003 Award Software Advanced BIOS Features Hard Disk Boot Priority [Press Enter] Item Help First Boot Device [Floppy] Menu Level Second Boot Device [Hard Disk] Select Boot Device Third Boot Device [CDROM] priority Password Check # CPU Hyper-Threading [Setup] [Enabled] [Floppy] Boot from floppy [LS120] Boot from LS120 [HDD-0] Boot from First HDD [HDD-1] Boot...
... Disk Boot Device priority. ZIP Select your boot device priority by USB-ZIP. - 37 - USB-FDD Select your boot device priority by CDROM. English Advanced BIOS Features CMOS Setup Utility-Copyright (C) 1984-2003 Award Software Advanced BIOS Features Hard Disk Boot Priority [Press Enter] Item Help First Boot Device [Floppy] Menu Level Second Boot Device [Hard Disk] Select Boot Device Third Boot Device [CDROM] priority Password Check # CPU Hyper-Threading [Setup] [Enabled] [Floppy] Boot from floppy [LS120] Boot from LS120 [HDD-0] Boot from First HDD [HDD-1] Boot...

User Manual
Page 48
... Enter:Select +/-/PU/PD:Value F10:Save ESC:Exit F1:General Help F5:Previous Values F6:Fail-Safe Defaults F7:Optimized Defaults Figure 5: Power Management Setup ACPI Suspend Type S1(POS) Set ACPI suspend type to S1. (Default value) S3(STR) Set ACPI suspend type to another color. If use single color LED, power LED will blink. (Default value) Dual/OFF In standby mode(S1): a. GA-8I848P(-G) Motherboard - 44 - English Power Management Setup CMOS Setup Utility-Copyright (C) 1984-2004 Award Software Power Management Setup ACPI...
... Enter:Select +/-/PU/PD:Value F10:Save ESC:Exit F1:General Help F5:Previous Values F6:Fail-Safe Defaults F7:Optimized Defaults Figure 5: Power Management Setup ACPI Suspend Type S1(POS) Set ACPI suspend type to S1. (Default value) S3(STR) Set ACPI suspend type to another color. If use single color LED, power LED will blink. (Default value) Dual/OFF In standby mode(S1): a. GA-8I848P(-G) Motherboard - 44 - English Power Management Setup CMOS Setup Utility-Copyright (C) 1984-2004 Award Software Power Management Setup ACPI...
User Manual
Page 58
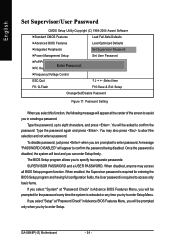
..., and press . GA-8I848P(-G) Motherboard - 54 - To disable password, just press when you are prompted to enter Setup. If you select "Setup" at "Password Check" in creating a password. Type the password again and press . English Set Supervisor/User Password CMOS Setup Utility-Copyright (C) 1984-2004 Award Software Standard CMOS Features Load Fail-Safe Defaults Advanced BIOS Features Load Optimized Defaults Integrated Peripherals Set Supervisor Password Power Management Setup Set User Password PnP/PCI Configurations PC Health Status Enter Password: Save & Exit Setup Exit...
..., and press . GA-8I848P(-G) Motherboard - 54 - To disable password, just press when you are prompted to enter Setup. If you select "Setup" at "Password Check" in creating a password. Type the password again and press . English Set Supervisor/User Password CMOS Setup Utility-Copyright (C) 1984-2004 Award Software Standard CMOS Features Load Fail-Safe Defaults Advanced BIOS Features Load Optimized Defaults Integrated Peripherals Set Supervisor Password Power Management Setup Set User Password PnP/PCI Configurations PC Health Status Enter Password: Save & Exit Setup Exit...

User Manual
Page 62
... supported list in the control panel. Users can choose either "Easy Mode" or "Advanced Mode" for "Overclock" as nothing is a safer way for overclocking at user's risk, Gigabyte Technology will then overdrive CPU speed automatically with Gigabyte motherboards. Therefore, this setting and "Load" it 's quite a risk because the safety and stability of a Windows based overclocking utility "EasyTune 4" --announced by them, there is only to the experts in driver CD. GA-8I848P(-G) Motherboard - 58 - Click "Advanced Mode...
... supported list in the control panel. Users can choose either "Easy Mode" or "Advanced Mode" for "Overclock" as nothing is a safer way for overclocking at user's risk, Gigabyte Technology will then overdrive CPU speed automatically with Gigabyte motherboards. Therefore, this setting and "Load" it 's quite a risk because the safety and stability of a Windows based overclocking utility "EasyTune 4" --announced by them, there is only to the experts in driver CD. GA-8I848P(-G) Motherboard - 58 - Click "Advanced Mode...

User Manual
Page 65
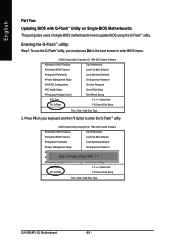
...Boot From Main Bios Auto Recovery Enable Halt On Error Disable Copy Main ROM Data to Backup Load Default Settings Save Settings to CMOS Q-Flash Utility Load Main BIOS from Floppy Load Backup BIOS from Floppy Save Main BIOS to Floppy Save Backup BIOS to enter the Q-Flash™ utility. AMIBIOS SIMPLE SETUP UTILITY - Technical Reference VERSION 2.00 (C) 2001 American Megatrends, Inc. All Rights Reserved STANDARD CMOS SETUP INTEGRATED PERIPHERALS BIOS FEATURES SETUP HARDWARE MONITOR & MISC SETUP CHIPSET FEATURES SETUP SUPERVISOR PASSWORD POWER MANAGEMENT SETUP USER...
...Boot From Main Bios Auto Recovery Enable Halt On Error Disable Copy Main ROM Data to Backup Load Default Settings Save Settings to CMOS Q-Flash Utility Load Main BIOS from Floppy Load Backup BIOS from Floppy Save Main BIOS to Floppy Save Backup BIOS to enter the Q-Flash™ utility. AMIBIOS SIMPLE SETUP UTILITY - Technical Reference VERSION 2.00 (C) 2001 American Megatrends, Inc. All Rights Reserved STANDARD CMOS SETUP INTEGRATED PERIPHERALS BIOS FEATURES SETUP HARDWARE MONITOR & MISC SETUP CHIPSET FEATURES SETUP SUPERVISOR PASSWORD POWER MANAGEMENT SETUP USER...
User Manual
Page 66
...BIOS Utility Boot From Main Bios Main ROM Type/Size SST 49LF003A Backup ROM Type/Size SST 49LF003A 256K 256K Wide Range Protection Disable Boot From Main Bios Auto Recovery Enable Halt On Error Disable Copy Main ROM Data to Backup Load Default Settings Save Settings to CMOS Q-Flash Utility Load Main BIOS from Floppy Load Backup BIOS from Floppy" item in the "Before you must prepare a floppy disk having the BIOS file for your motherboard and insert it to enable execution of four actions needed to Floppy Enter : Run :Move ESC:Reset F10:Power Off GA-8I848P(-G) Motherboard...
...BIOS Utility Boot From Main Bios Main ROM Type/Size SST 49LF003A Backup ROM Type/Size SST 49LF003A 256K 256K Wide Range Protection Disable Boot From Main Bios Auto Recovery Enable Halt On Error Disable Copy Main ROM Data to Backup Load Default Settings Save Settings to CMOS Q-Flash Utility Load Main BIOS from Floppy Load Backup BIOS from Floppy" item in the "Before you must prepare a floppy disk having the BIOS file for your motherboard and insert it to enable execution of four actions needed to Floppy Enter : Run :Move ESC:Reset F10:Power Off GA-8I848P(-G) Motherboard...
User Manual
Page 67
... Halt On Error Disable 256K Total size: 1.39M Copy Main ROM Data to Backup Free size:1.14M F5 : Refresh Load Default Settings DEL : Delete Save Settings to Floppy Enter : Run :Move ESC:Reset F10:Power Off BIOS file in the floppy disk. In this stage!! Please do not take out the floppy disk when it begins flashing BIOS. - 63 - Dual BIOS Utility Boot From Main Bios Main ROM Type/Size SST 49LF003A Backup ROM Type/Size SST 49LF003A 256K 256K Wide Range Protection Disable Boot From Main Bios Auto Recovery Enable ReadinHgaBltIOOSn EfilrerofrromDfisloapbpley...
... Halt On Error Disable 256K Total size: 1.39M Copy Main ROM Data to Backup Free size:1.14M F5 : Refresh Load Default Settings DEL : Delete Save Settings to Floppy Enter : Run :Move ESC:Reset F10:Power Off BIOS file in the floppy disk. In this stage!! Please do not take out the floppy disk when it begins flashing BIOS. - 63 - Dual BIOS Utility Boot From Main Bios Main ROM Type/Size SST 49LF003A Backup ROM Type/Size SST 49LF003A 256K 256K Wide Range Protection Disable Boot From Main Bios Auto Recovery Enable ReadinHgaBltIOOSn EfilrerofrromDfisloapbpley...

User Manual
Page 68
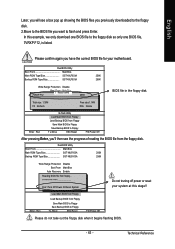
...Disable Boot From Main Bios Auto Recovery Enable ProgramHmalitnOg nNEowrro..r.....Disable >>>>>>C>>op>y>>M>a..in...R...O..M....D..a..t.a...to Backup Load Default Settings Don't Turn OffSPavoeweSreOttirnRgsestoetCSMyOstSem Q-Flash Utility Load Main BIOS from Floppy Load Backup BIOS from Floppy Save Main BIOS to Floppy Save Backup BIOS to Floppy Enter : Run :Move ESC:Reset F10:Power Off You can press "Enter" to continue updating BIOS or "ESC" to abort. 3. Press Y button on your BIOS rom!! Do not turning off power or reset your system at this stage to avoid damaging your keyboard...
...Disable Boot From Main Bios Auto Recovery Enable ProgramHmalitnOg nNEowrro..r.....Disable >>>>>>C>>op>y>>M>a..in...R...O..M....D..a..t.a...to Backup Load Default Settings Don't Turn OffSPavoeweSreOttirnRgsestoetCSMyOstSem Q-Flash Utility Load Main BIOS from Floppy Load Backup BIOS from Floppy Save Main BIOS to Floppy Save Backup BIOS to Floppy Enter : Run :Move ESC:Reset F10:Power Off You can press "Enter" to continue updating BIOS or "ESC" to abort. 3. Press Y button on your BIOS rom!! Do not turning off power or reset your system at this stage to avoid damaging your keyboard...

User Manual
Page 69
... 4 to Floppy Enter : Run :Move ESC:Reset F10:Power Off - 65 - English 4. The computer will restart automatically after you exit Q-Flash™. Dual BIOS Utility Boot From Main Bios Main ROM Type/Size SST 49LF003A Backup ROM Type/Size SST 49LF003A 256K 256K Wide Range Protection Disable Boot From Main Bios Auto Recovery Enable Halt On Error Disable CAoprey yMoauinsuRreOMto RDEatSaEtTo B?ackup Load Default Settings [Enter]StaovceoSnetitntiunegsorto[ECsMc]OtSo abort... Dual BIOS Utility Boot From Main Bios Main ROM Type/Size SST 49LF003A Backup ROM Type/Size SST 49LF003A...
... 4 to Floppy Enter : Run :Move ESC:Reset F10:Power Off - 65 - English 4. The computer will restart automatically after you exit Q-Flash™. Dual BIOS Utility Boot From Main Bios Main ROM Type/Size SST 49LF003A Backup ROM Type/Size SST 49LF003A 256K 256K Wide Range Protection Disable Boot From Main Bios Auto Recovery Enable Halt On Error Disable CAoprey yMoauinsuRreOMto RDEatSaEtTo B?ackup Load Default Settings [Enter]StaovceoSnetitntiunegsorto[ECsMc]OtSo abort... Dual BIOS Utility Boot From Main Bios Main ROM Type/Size SST 49LF003A Backup ROM Type/Size SST 49LF003A...
User Manual
Page 72
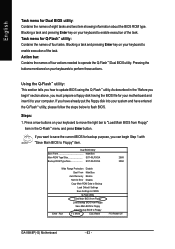
... the boot screen to enter the Q-Flash™ utility. CMOS Setup Utility-Copyright (C) 1984-2002 Award Software Standard CMOS Features Top Performance Advanced BIOS Features Load Fail-Safe Defaults Integrated Peripherals Load Optimized Defaults Power Management Setup Set Supervisor Password PnP/PCI Configurations Set User Password PC Health Status Save & Exit Setup Frequency/Voltage Control Exit Without Saving ESC:Quit :Select Item F8: Q-Flash F10:Save & Exit Setup Time, Date, Hard Disk Type... 2. This part guides users of single-BIOS motherboards how to update BIOS using...
... the boot screen to enter the Q-Flash™ utility. CMOS Setup Utility-Copyright (C) 1984-2002 Award Software Standard CMOS Features Top Performance Advanced BIOS Features Load Fail-Safe Defaults Integrated Peripherals Load Optimized Defaults Power Management Setup Set Supervisor Password PnP/PCI Configurations Set User Password PC Health Status Save & Exit Setup Frequency/Voltage Control Exit Without Saving ESC:Quit :Select Item F8: Q-Flash F10:Save & Exit Setup Time, Date, Hard Disk Type... 2. This part guides users of single-BIOS motherboards how to update BIOS using...
User Manual
Page 76
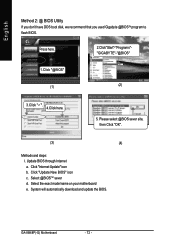
... sever d. System will automatically download and update the BIOS. Please select @BIOS sever site, then Click "OK". (3) (4) Methods and steps: I. Click "Update New BIOS" icon c. Select the exact model name on your motherboard e. Press here. 2.Click"Start"-"Programs""GIGABYTE"-"@BIOS" 1.Click "@BIOS" (1) (2) 3.Click "3". 4.Click here. 5. Update BIOS through Internet a. GA-8I848P(-G) Motherboard - 72 - English Method 2: @ BIOS Utility If you don't have DOS boot disk, we recommend that you used Gigabyte @BIOSTM program to flash BIOS.
... sever d. System will automatically download and update the BIOS. Please select @BIOS sever site, then Click "OK". (3) (4) Methods and steps: I. Click "Update New BIOS" icon c. Select the exact model name on your motherboard e. Press here. 2.Click"Start"-"Programs""GIGABYTE"-"@BIOS" 1.Click "@BIOS" (1) (2) 3.Click "3". 4.Click here. 5. Update BIOS through Internet a. GA-8I848P(-G) Motherboard - 72 - English Method 2: @ BIOS Utility If you don't have DOS boot disk, we recommend that you used Gigabyte @BIOSTM program to flash BIOS.

User Manual
Page 86
... set to use the Xpress Recovery2 Initial access by booting from CD-ROM. Boot from the CD-ROM, you can be immediately installed once you wish to enter Xpress Recovery2 without the CD-ROM. If you can simply press F9 during system power-on PATA and SATA IDE controllers. System storage capacity and the reading/writing speed of the hard disk will stay permanent in the future. 2. GA-8I848P(-G) Motherboard - 82 - Supporting...
... set to use the Xpress Recovery2 Initial access by booting from CD-ROM. Boot from the CD-ROM, you can be immediately installed once you wish to enter Xpress Recovery2 without the CD-ROM. If you can simply press F9 during system power-on PATA and SATA IDE controllers. System storage capacity and the reading/writing speed of the hard disk will stay permanent in the future. 2. GA-8I848P(-G) Motherboard - 82 - Supporting...
User Manual
Page 90
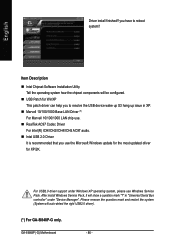
... USB device wake up S3 hang up issue in "Universal Serial Bus controller" under Windows XP operating system, please use the Microsoft Windows update for the most updated driver for XP/2K. you use Windows Service Pack. Item Description „ Intel Chipset Software Installation Utility Tell the operating system how the chipset components will show a question mark "?" GA-8I848P(-G) Motherboard - 86 - For USB2.0 driver support under "Device Manager". in XP. „ Marvell 10/100/1000 Base LAN Driver...
... USB device wake up S3 hang up issue in "Universal Serial Bus controller" under Windows XP operating system, please use the Microsoft Windows update for the most updated driver for XP/2K. you use Windows Service Pack. Item Description „ Intel Chipset Software Installation Utility Tell the operating system how the chipset components will show a question mark "?" GA-8I848P(-G) Motherboard - 86 - For USB2.0 driver support under "Device Manager". in XP. „ Marvell 10/100/1000 Base LAN Driver...
User Manual
Page 94
... I clear CMOS? Re-insert the battery to solve the problem. Press Del to enter BIOS and load Fail-Safe Defaults. 7. Question 8: How do I still get a weak sound after it . Answer: Please refer to the user manual and check whether you have such jumper, you don't need to change another speaker with an internal amplifier. GA-8I848P(-G) Motherboard - 90 - If your board doesn't have connected any setting manually to disable the onboard VGA. English Question 5: How do I use...
... I clear CMOS? Re-insert the battery to solve the problem. Press Del to enter BIOS and load Fail-Safe Defaults. 7. Question 8: How do I still get a weak sound after it . Answer: Please refer to the user manual and check whether you have such jumper, you don't need to change another speaker with an internal amplifier. GA-8I848P(-G) Motherboard - 90 - If your board doesn't have connected any setting manually to disable the onboard VGA. English Question 5: How do I use...


