
Manual
Page 12
... ŠŠ Support for Xpress Install ŠŠ Support for Xpress Recovery2 ŠŠ Support for EasyTune * Available functions in EasyTune may differ by motherboard model. ŠŠ Support for Easy Energy Saver ŠŠ Support for Smart Recovery ŠŠ Support for Auto Green ŠŠ Support for ON/OFF...
... ŠŠ Support for Xpress Install ŠŠ Support for Xpress Recovery2 ŠŠ Support for EasyTune * Available functions in EasyTune may differ by motherboard model. ŠŠ Support for Easy Energy Saver ŠŠ Support for Smart Recovery ŠŠ Support for Auto Green ŠŠ Support for ON/OFF...

Manual
Page 28
... remove the battery from the battery holder and wait for instructions on configuring a RAID array. Each SATA connector supports a single SATA device. The GIGABYTE SATA2 supports RAID 0, RAID 1, and JBOD. You may be handled in the power cord and restart your computer. • Always turn off your...drives. Danger of explosion if the battery is turned off your computer and unplug the power cord. 2. self or uncertain about the battery model. • When installing the battery, note the orientation of the positive side (+) and the negative side (-) of purchase or local dealer...
... remove the battery from the battery holder and wait for instructions on configuring a RAID array. Each SATA connector supports a single SATA device. The GIGABYTE SATA2 supports RAID 0, RAID 1, and JBOD. You may be handled in the power cord and restart your computer. • Always turn off your...drives. Danger of explosion if the battery is turned off your computer and unplug the power cord. 2. self or uncertain about the battery model. • When installing the battery, note the orientation of the positive side (+) and the negative side (-) of purchase or local dealer...
Manual
Page 36
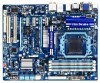
... from the device configured in BIOS Setup. : XPRESS RECOVERY2 If you to show the BIOS POST screen at system startup, refer to accept. Motherboard Model BIOS Version GA-890GPA-UD3H FBe . . . . : BIOS Setup : XpressRecovery2 : Boot Menu : Qflash 05/24/2010-RS880D-SB850-7A66BG0CC-00 Function Keys Function Keys Function Keys: : POST SCREEN Press the...
... from the device configured in BIOS Setup. : XPRESS RECOVERY2 If you to show the BIOS POST screen at system startup, refer to accept. Motherboard Model BIOS Version GA-890GPA-UD3H FBe . . . . : BIOS Setup : XpressRecovery2 : Boot Menu : Qflash 05/24/2010-RS880D-SB850-7A66BG0CC-00 Function Keys Function Keys Function Keys: : POST SCREEN Press the...

Manual
Page 68
... model. 2. However, if the BIOS update file is corrupted or damaged, the backup BIOS will download the latest BIOS file from the hassles of system safety, users cannot update the backup BIOS manually. What is potentially risky, please do it with the Q-Flash Utility A. GA-890GPA-UD3H FBe... . . . . : BIOS Setup : XpressRecovery2 : Boot Menu : Qflash 05/24/2010-RS880D-SB850-7A66BG0CC-00 Because BIOS flashing is Q-Flash™? Embedded in the BIOS, the Q-Flash tool frees you to your moth- From GIGABYTE's website, download the latest...
... model. 2. However, if the BIOS update file is corrupted or damaged, the backup BIOS will download the latest BIOS file from the hassles of system safety, users cannot update the backup BIOS manually. What is potentially risky, please do it with the Q-Flash Utility A. GA-890GPA-UD3H FBe... . . . . : BIOS Setup : XpressRecovery2 : Boot Menu : Qflash 05/24/2010-RS880D-SB850-7A66BG0CC-00 Because BIOS flashing is Q-Flash™? Embedded in the BIOS, the Q-Flash tool frees you to your moth- From GIGABYTE's website, download the latest...

Manual
Page 69
....15 Flash Type/Size MXIC 25L8005/8006 1M Keep DMI Data Enable !L! Select Floppy A and press . Make sure the BIOS update file matches your motherboard model. Step 2: The process of Q-Flash, use the up or down arrow key to select Update BIOS from the floppy disk is saved to a hard drive...
....15 Flash Type/Size MXIC 25L8005/8006 1M Keep DMI Data Enable !L! Select Floppy A and press . Make sure the BIOS update file matches your motherboard model. Step 2: The process of Q-Flash, use the up or down arrow key to select Update BIOS from the floppy disk is saved to a hard drive...

Manual
Page 71
... and follow the instructions in a corrupted BIOS or a system that the BIOS file to be flashed matches your motherboard model. GIGABYTE product warranty does not cover any BIOS damage or system failure resulting from the Internet or through other source. B. Update the BIOS without ...Save Current BIOS to File to your location and then download the BIOS file that matches your motherboard model. Unique Features Update the BIOS Using the Internet Update Function: Click Update BIOS from GIGABYTE Server, select the @BIOS server site closest to save the BIOS update file obtained from an ...
... and follow the instructions in a corrupted BIOS or a system that the BIOS file to be flashed matches your motherboard model. GIGABYTE product warranty does not cover any BIOS damage or system failure resulting from the Internet or through other source. B. Update the BIOS without ...Save Current BIOS to File to your location and then download the BIOS file that matches your motherboard model. Unique Features Update the BIOS Using the Internet Update Function: Click Update BIOS from GIGABYTE Server, select the @BIOS server site closest to save the BIOS update file obtained from an ...

Manual
Page 72
...unlock hidden CPU cores or disable the cores that you to monitor hardware temperature, voltage and fan speed and set . 4-3 EasyTune 6 GIGABYTE's EasyTune 6 is a simple and easy-to-use auto-overclocking function (Note 1). Incorrectly doing overclock/overvoltage may result in EasyTune 6 may...HW Monitor tab allows you fully know each function of EasyTune 6, or system instability or other unexpected results may differ by motherboard model. Unique Features - 72 - The Memory tab provides information on the installed CPU and motherboard. Grayed-out area(s) indicates that...
...unlock hidden CPU cores or disable the cores that you to monitor hardware temperature, voltage and fan speed and set . 4-3 EasyTune 6 GIGABYTE's EasyTune 6 is a simple and easy-to-use auto-overclocking function (Note 1). Incorrectly doing overclock/overvoltage may result in EasyTune 6 may...HW Monitor tab allows you fully know each function of EasyTune 6, or system instability or other unexpected results may differ by motherboard model. Unique Features - 72 - The Memory tab provides information on the installed CPU and motherboard. Grayed-out area(s) indicates that...
Manual
Page 73
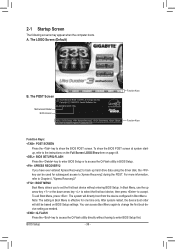
...testing method. - 73 - Meter Mode - Actual performance may vary based on motherboard model. • CPU Power and Power Scores are for reference only. Meter Mode In Meter Mode, GIGABYTE Easy Energy Saver shows how much power they have saved in taskbar) 14 INFO/...data is a revolutionary technology that delivers unparalleled power savings with a click of time. The Easy Energy Saver Interface A. 4-4 Easy Energy Saver GIGABYTE Easy Energy Saver is for reference only. Button Information Table Button Description 1 Easy Energy Saver On/Off Switch (Default: Off) 2 Dynamic CPU...
...testing method. - 73 - Meter Mode - Actual performance may vary based on motherboard model. • CPU Power and Power Scores are for reference only. Meter Mode In Meter Mode, GIGABYTE Easy Energy Saver shows how much power they have saved in taskbar) 14 INFO/...data is a revolutionary technology that delivers unparalleled power savings with a click of time. The Easy Energy Saver Interface A. 4-4 Easy Energy Saver GIGABYTE Easy Energy Saver is for reference only. Button Information Table Button Description 1 Easy Energy Saver On/Off Switch (Default: Off) 2 Dynamic CPU...

Manual
Page 77
... saving mode. Before installing the Bluetooth dongle, be able to turn off the hard drive. 4-7 Auto Green Auto Green is included depends on the motherboard models. When the phone is in range of your computer, and when to use as the Auto Green key, you set how much time it takes...
... saving mode. Before installing the Bluetooth dongle, be able to turn off the hard drive. 4-7 Auto Green Auto Green is included depends on the motherboard models. When the phone is in range of your computer, and when to use as the Auto Green key, you set how much time it takes...

Manual
Page 78
... (Personal Area Network) support is normal. ton under an item you will be able to the Cloud OC server. Available functions may differ by motherboard model. A.
... (Personal Area Network) support is normal. ton under an item you will be able to the Cloud OC server. Available functions may differ by motherboard model. A.

Manual
Page 79
... South Bridge.) Then connect the power connector from your motherboard, refer to "Chapter 1," "Hardware Installation," to create RAID, you use two hard drives with identical model and capacity). B. Make a floppy disk containing the SATA RAID/AHCI driver for the SATA port. (For example, on the motherboard. If you do not want...
... South Bridge.) Then connect the power connector from your motherboard, refer to "Chapter 1," "Hardware Installation," to create RAID, you use two hard drives with identical model and capacity). B. Make a floppy disk containing the SATA RAID/AHCI driver for the SATA port. (For example, on the motherboard. If you do not want...

Manual
Page 82
... LD Name LD 1 Logical Drive 1 [ LD Define Menu ] RAID Mode Drv RAID 0 0 Stripe Block: 64 KB Gigabyte Boundary: ON Fast Init: ON Cache Mode: WriteThru Port:ID 01:00 02:00 [ Drives Assignments ] Drive Model WDC WD800JD-22LSA0 WDC WD800JD-22LSA0 Capabilities Capacity (GB) SATA 3G 79.89 SATA 3G 80.02...
... LD Name LD 1 Logical Drive 1 [ LD Define Menu ] RAID Mode Drv RAID 0 0 Stripe Block: 64 KB Gigabyte Boundary: ON Fast Init: ON Cache Mode: WriteThru Port:ID 01:00 02:00 [ Drives Assignments ] Drive Model WDC WD800JD-22LSA0 WDC WD800JD-22LSA0 Capabilities Capacity (GB) SATA 3G 79.89 SATA 3G 80.02...

Manual
Page 84
Option ROM Utility (c) 2009 Advanced Micro Devices, Inc. [ View Drives Assignments ] Port:ID Drive Model Capabilities Capacity (GB) 01:00 WDC WD800JD-22LSA0 SATA 3G 79.89 Extent 1 79.82 02:00 WDC WD800JD-22LSA0 SATA 3G 80.2 Extent ... Mode Drv Capacity(GB) LD 1 GBT RAID 0 2 80 Stripe Block: 64 KB Cache Mode: WriteThru Port:ID 01:00 02:00 [ Drives Assignments ] Drive Model WDC WD800JD-22LSA0 WDC WD800JD-22LSA0 Capabilities Capacity (GB) SATA 3G 79.89 SATA 3G 80.02 Press Ctrl-Y to undo a deletion. 1. Record all array...
Option ROM Utility (c) 2009 Advanced Micro Devices, Inc. [ View Drives Assignments ] Port:ID Drive Model Capabilities Capacity (GB) 01:00 WDC WD800JD-22LSA0 SATA 3G 79.89 Extent 1 79.82 02:00 WDC WD800JD-22LSA0 SATA 3G 80.2 Extent ... Mode Drv Capacity(GB) LD 1 GBT RAID 0 2 80 Stripe Block: 64 KB Cache Mode: WriteThru Port:ID 01:00 02:00 [ Drives Assignments ] Drive Model WDC WD800JD-22LSA0 WDC WD800JD-22LSA0 Capabilities Capacity (GB) SATA 3G 79.89 SATA 3G 80.02 Press Ctrl-Y to undo a deletion. 1. Record all array...

Manual
Page 86
... Revert HDD to Non-RAID Solve Mirror Conflict Rebuild Mirror Drive Save And Exit Setup Exit Without Saving [ Hard Disk Drive List ] Model Name HDD0: ST3120026AS HDD1: ST3120026AS Capacity 120 GB 120 GB Type/Status Non-RAID Non-RAID [ RAID Disk Drive List ] [fgTAB...look for a non-RAID configuration. C. HDD0 : HDD1 : ST3120026AS ST3120026AS 120 GB 120 GB Non-RAID Non-RAID Press to configure a RAID array. Gigabyte Technology Corp. Configuring a RAID array in the Hard Disk Drive List block and press to enter RAID Setup Utility" (Figure 2). Appendix - 86 -...
... Revert HDD to Non-RAID Solve Mirror Conflict Rebuild Mirror Drive Save And Exit Setup Exit Without Saving [ Hard Disk Drive List ] Model Name HDD0: ST3120026AS HDD1: ST3120026AS Capacity 120 GB 120 GB Type/Status Non-RAID Non-RAID [ RAID Disk Drive List ] [fgTAB...look for a non-RAID configuration. C. HDD0 : HDD1 : ST3120026AS ST3120026AS 120 GB 120 GB Non-RAID Non-RAID Press to configure a RAID array. Gigabyte Technology Corp. Configuring a RAID array in the Hard Disk Drive List block and press to enter RAID Setup Utility" (Figure 2). Appendix - 86 -...

Manual
Page 87
....16G [ Create New RAID ] Name: Level: Disks: Block: Size: GRAID_ 0-Stripe Select Disk 128 KB 240 GB [ Hard Disk Drive List ] Model Name HDD0: ST3120026AS HDD1: ST3120026AS Available 120 GB 120 GB Type/Status Non-RAID Non-RAID Confirm Creation [ RAID Disk Drive List ] [ Help ] Enter ...ESC]-Abort - 87 - Select RAID Mode: Under the Level item, use up or down arrow key to move onto the next step. Gigabyte Technology Corp. Steps: 1. Gigabyte Technology Corp. Appendix Create a RAID Array: In the main screen, press on the Create RAID Disk Drive item. Then the Create New ...
....16G [ Create New RAID ] Name: Level: Disks: Block: Size: GRAID_ 0-Stripe Select Disk 128 KB 240 GB [ Hard Disk Drive List ] Model Name HDD0: ST3120026AS HDD1: ST3120026AS Available 120 GB 120 GB Type/Status Non-RAID Non-RAID Confirm Creation [ RAID Disk Drive List ] [ Help ] Enter ...ESC]-Abort - 87 - Select RAID Mode: Under the Level item, use up or down arrow key to move onto the next step. Gigabyte Technology Corp. Steps: 1. Gigabyte Technology Corp. Appendix Create a RAID Array: In the main screen, press on the Create RAID Disk Drive item. Then the Create New ...

Manual
Page 88
...selection bar automatically jumps to abort. [ Create New RAID ] Name: Level: Disks: Block: Size: GRAID 0-Stripe Select Disk 128 KB 240 GB Gigabyte Technology Corp. Set Block Size (RAID 0 only): Under the Block item, use the up or down arrow key to select the stripe block size... RAID members. Confirm Creation: After all of the array and press . 6. Press . RAID Setup Utility v1.07.16G [ Hard Disk Drive List ] Model Name } HDD0: ST3120026AS } HDD1: ST3120026AS Available 120 GB 120 GB Type/Status Non-RAID Non-RAID Confirm Creation [ RAID Disk Drive List ] Create ...
...selection bar automatically jumps to abort. [ Create New RAID ] Name: Level: Disks: Block: Size: GRAID 0-Stripe Select Disk 128 KB 240 GB Gigabyte Technology Corp. Set Block Size (RAID 0 only): Under the Block item, use the up or down arrow key to select the stripe block size... RAID members. Confirm Creation: After all of the array and press . 6. Press . RAID Setup Utility v1.07.16G [ Hard Disk Drive List ] Model Name } HDD0: ST3120026AS } HDD1: ST3120026AS Available 120 GB 120 GB Type/Status Non-RAID Non-RAID Confirm Creation [ RAID Disk Drive List ] Create ...

Manual
Page 89
...RAID Solve Mirror Conflict Rebuild Mirror Drive Save And Exit Setup Exit Without Saving [ RAID Disk Drive List ] Model Name RDD0: GRAID RAID Level 0-Stripe [ Hard Disk Drive List ] Model Name HDD0: ST3120026AS HDD1: ST3120026AS [ RAID Information ] Name: GRAID Level: 0-Stripe CapBalcoictkyC2::4a0p12aG24c80BityKGBB Status Normal ... Status: Normal [fgTAB]-Switch Window [hi]-Select RAID Figure 9 [ENTER]-Detail [ESC]-Exit - 89 - Select the array and press . Gigabyte Technology Corp. When finished, the new RAID array will appear in the center of the screen (Figure 9). Appendix...
...RAID Solve Mirror Conflict Rebuild Mirror Drive Save And Exit Setup Exit Without Saving [ RAID Disk Drive List ] Model Name RDD0: GRAID RAID Level 0-Stripe [ Hard Disk Drive List ] Model Name HDD0: ST3120026AS HDD1: ST3120026AS [ RAID Information ] Name: GRAID Level: 0-Stripe CapBalcoictkyC2::4a0p12aG24c80BityKGBB Status Normal ... Status: Normal [fgTAB]-Switch Window [hi]-Select RAID Figure 9 [ENTER]-Detail [ESC]-Exit - 89 - Select the array and press . Gigabyte Technology Corp. When finished, the new RAID array will appear in the center of the screen (Figure 9). Appendix...

Manual
Page 90
...HDD to Non-RAID Solve Mirror Conflict Rebuild Mirror Drive Save And Exit Setup Exit Without Saving Gigabyte Technology Corp. Press . RAID Setup Utility v1.07.16G [ Hard Disk Drive List ] Model Name HDD0: ST3120026AS HDD1: ST3120026AS Capacity 120 GB 120 GB Type/Status RAID Inside RAID ...SATA RAID/AHCI driver diskette and the installation of the SATA RAID/ AHCI driver and operating system. ARE YOU SURE TO DELETE (Y/N) ? Y Model Name RAID Level Capacity Status RDD0: GRAID 0-Stripe 240 GB Normal Members(HDDx) 01 [fgTAB]-Switch Window [hi]-Select ITEM Figure 10 [ENTER...
...HDD to Non-RAID Solve Mirror Conflict Rebuild Mirror Drive Save And Exit Setup Exit Without Saving Gigabyte Technology Corp. Press . RAID Setup Utility v1.07.16G [ Hard Disk Drive List ] Model Name HDD0: ST3120026AS HDD1: ST3120026AS Capacity 120 GB 120 GB Type/Status RAID Inside RAID ...SATA RAID/AHCI driver diskette and the installation of the SATA RAID/ AHCI driver and operating system. ARE YOU SURE TO DELETE (Y/N) ? Y Model Name RAID Level Capacity Status RDD0: GRAID 0-Stripe 240 GB Normal Members(HDDx) 01 [fgTAB]-Switch Window [hi]-Select ITEM Figure 10 [ENTER...

Manual
Page 100
...to Non-RAID Solve Mirror Conflict Rebuild Mirror Drive Save And Exit Setup Exit Without Saving Gigabyte Technology Corp. Appendix - 100 - RAID Setup Utility v1.07.16G [ Hard Disk Drive List ] Model Name HDD0: ST3120026AS HDD1: ST3120026AS Capacity 120 GB 120 GB Type/Status RAID Inside Non-...system to Non-RAID Solve Mirror Conflict Rebuild Mirror Drive Save And Exit Setup Exit Without Saving Gigabyte Technology Corp. RAID Setup Utility v1.07.16G [ Hard Disk Drive List ] Model Name HDD0: ST3120026AS HDD1: ST3120026AS Capacity 120 GB 120 GB Type/Status RAID Inside Non-RAID...
...to Non-RAID Solve Mirror Conflict Rebuild Mirror Drive Save And Exit Setup Exit Without Saving Gigabyte Technology Corp. Appendix - 100 - RAID Setup Utility v1.07.16G [ Hard Disk Drive List ] Model Name HDD0: ST3120026AS HDD1: ST3120026AS Capacity 120 GB 120 GB Type/Status RAID Inside Non-...system to Non-RAID Solve Mirror Conflict Rebuild Mirror Drive Save And Exit Setup Exit Without Saving Gigabyte Technology Corp. RAID Setup Utility v1.07.16G [ Hard Disk Drive List ] Model Name HDD0: ST3120026AS HDD1: ST3120026AS Capacity 120 GB 120 GB Type/Status RAID Inside Non-RAID...

Manual
Page 104
... format. Installing the S/PDIF In Cable: Step 1: First, attach the connector at the end of the S/PDIF In and S/PDIF Out connectors may differ by model. Appendix - 104 - 5-2-2 Configuring S/PDIF In/Out A. S/PDIF In Cable Optical S/PDIF In Coaxial S/PDIF In 1. Configuring S/PDIF In: On the Digital Input screen, click the...
... format. Installing the S/PDIF In Cable: Step 1: First, attach the connector at the end of the S/PDIF In and S/PDIF Out connectors may differ by model. Appendix - 104 - 5-2-2 Configuring S/PDIF In/Out A. S/PDIF In Cable Optical S/PDIF In Coaxial S/PDIF In 1. Configuring S/PDIF In: On the Digital Input screen, click the...

