Manual
Page 5
... and Operating System 81 5-2 Configuring Audio Input and Output 85 5-2-1 Configuring 2/4/5.1/7.1-Channel Audio 85 5-2-2 Configuring S/PDIF In/Out 88 5-2-3 Configuring Microphone Recording 90 5-2-4 Using the Sound Recorder 92 5-3 Troubleshooting 93 5-3-1 Frequently Asked Questions 93 5-3-2 Troubleshooting Procedure 94 5-4 Regulatory Statements 96 - 5 -
... and Operating System 81 5-2 Configuring Audio Input and Output 85 5-2-1 Configuring 2/4/5.1/7.1-Channel Audio 85 5-2-2 Configuring S/PDIF In/Out 88 5-2-3 Configuring Microphone Recording 90 5-2-4 Using the Sound Recorder 92 5-3 Troubleshooting 93 5-3-1 Frequently Asked Questions 93 5-3-2 Troubleshooting Procedure 94 5-4 Regulatory Statements 96 - 5 -

Manual
Page 19
...transmit the uncompressed audio/video signals and is not supported. - 19 - Connect a monitor that supports DVI-D connection to this port for sound playback is the HDMI device. (The item name may differ from operating system. The HDMI Technology can support a maximum resolution of 1920x1200 ... Display Mode to the DVI-D specification and supports a maximum resolution of an external decoder for decoding.) In Windows Vista, select Start>Control Panel>Sound, select Realtek HDMI Output and then click Set Default. (Note 1) The DVI-D port does not support D-Sub connection by adapter. (Note ...
...transmit the uncompressed audio/video signals and is not supported. - 19 - Connect a monitor that supports DVI-D connection to this port for sound playback is the HDMI device. (The item name may differ from operating system. The HDMI Technology can support a maximum resolution of 1920x1200 ... Display Mode to the DVI-D specification and supports a maximum resolution of an external decoder for decoding.) In Windows Vista, select Start>Control Panel>Sound, select Realtek HDMI Output and then click Set Default. (Note 1) The DVI-D port does not support D-Sub connection by adapter. (Note ...

Manual
Page 52
Enabled clears the record of previous chassis intrusion status and the Case Opened field will emit warning sound. Current Voltage(V) Vcore/DDR3 1.5V/+3.3V/+12V Displays the current system voltages. When CPU temperature exceeds the threshold, BIOS will show "No" at next boot. (...
Enabled clears the record of previous chassis intrusion status and the Case Opened field will emit warning sound. Current Voltage(V) Vcore/DDR3 1.5V/+3.3V/+12V Displays the current system voltages. When CPU temperature exceeds the threshold, BIOS will show "No" at next boot. (...

Manual
Page 53
... speed. (Default: Enabled) CPU Smart FAN Mode Specifies how to control CPU fan speed. CPU/SYSTEM FAN Fail Warning Allows the system to emit warning sound if the CPU/system fan is set to Enabled. This item is configurable only if CPU Smart FAN Control is not connected or fails.
... speed. (Default: Enabled) CPU Smart FAN Mode Specifies how to control CPU fan speed. CPU/SYSTEM FAN Fail Warning Allows the system to emit warning sound if the CPU/system fan is set to Enabled. This item is configurable only if CPU Smart FAN Control is not connected or fails.
Manual
Page 68
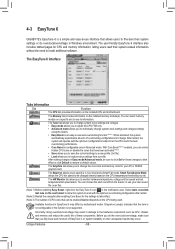
... sure that the item is not configurable or the function is not supported. Available functions in the notification area. 4-3 EasyTune 6 GIGABYTE's EasyTune 6 is a simple and easy-to-use interface that allows users to take effect or click Default to restore to be... settings and voltages settings using the sliders. • Easy Boost is configurable only in Windows environment. You can choose the alert sound from a profile. Grayed-out area(s) indicates that you do overclock/overvoltage in Advanced mode. When activated, the system automatically experiments...
... sure that the item is not configurable or the function is not supported. Available functions in the notification area. 4-3 EasyTune 6 GIGABYTE's EasyTune 6 is a simple and easy-to-use interface that allows users to take effect or click Default to restore to be... settings and voltages settings using the sliders. • Easy Boost is configurable only in Windows environment. You can choose the alert sound from a profile. Grayed-out area(s) indicates that you do overclock/overvoltage in Advanced mode. When activated, the system automatically experiments...

Manual
Page 86
... device is completed. In the Speaker Configuration list, select Stereo, Quadraphonic, 5.1 Speaker, or 7.1 Speaker according to an audio jack. Configuring Sound Effect You may configure an audio environment on the Sound Effects tab. Then the speaker setup is dialog box appears. Step 3: On the Speakers screen, click the Speaker Configuration tab. B. Then...
... device is completed. In the Speaker Configuration list, select Stereo, Quadraphonic, 5.1 Speaker, or 7.1 Speaker according to an audio jack. Configuring Sound Effect You may configure an audio environment on the Sound Effects tab. Then the speaker setup is dialog box appears. Step 3: On the Speakers screen, click the Speaker Configuration tab. B. Then...

Manual
Page 90
...middle level. Appendix - 90 - Note: The microphone functions on the front panel and back panel cannot be able to record the sound. To hear the sound being recorded during the recording process, do not mute the playback volume. If you set the volumes at the same time. Then ...2: Connect your microphone to microphone, right-click on Microphone and select Set Default Device. It is recommended that you want to change the current sound input default device to the Mic in jack (pink) on the back panel or the Mic in the notification area. 5-2-3 Configuring Microphone Recording ...
...middle level. Appendix - 90 - Note: The microphone functions on the front panel and back panel cannot be able to record the sound. To hear the sound being recorded during the recording process, do not mute the playback volume. If you set the volumes at the same time. Then ...2: Connect your microphone to microphone, right-click on Microphone and select Set Default Device. It is recommended that you want to change the current sound input default device to the Mic in jack (pink) on the back panel or the Mic in the notification area. 5-2-3 Configuring Microphone Recording ...

Manual
Page 91
The following steps explain how to enable Stereo Mix (which may be needed when you wish to use, refer to record sound from your computer). Step 2: On the Recording tab, right-click on the right of the Recording Volume slider and set the Microphone Boost level. ...Appendix Step 5: After completing the settings above, click Start, point to All Programs, point to Accessories, and then click Sound Recorder to begin the sound recording. * Enabling Stereo Mix If the HD Audio Manager does not display the recording device you want to the steps below. Step 4: To...
The following steps explain how to enable Stereo Mix (which may be needed when you wish to use, refer to record sound from your computer). Step 2: On the Recording tab, right-click on the right of the Recording Volume slider and set the Microphone Boost level. ...Appendix Step 5: After completing the settings above, click Start, point to All Programs, point to Accessories, and then click Sound Recorder to begin the sound recording. * Enabling Stereo Mix If the HD Audio Manager does not display the recording device you want to the steps below. Step 4: To...

Manual
Page 92
... this item and select Enable. Recording Sound 1. To stop recording audio, click the Stop Recording button . Playing the Recorded Sound You can access the HD Audio Manager to configure Stereo Mix and use Sound Recorder to record the sound. 5-2-4 Using the Sound Recorder A. Appendix - 92 - To... record the audio, click the Start Recording button . 3. Step 4: Now you have connected the sound input device (e.g. Then set it as the default ...
... this item and select Enable. Recording Sound 1. To stop recording audio, click the Stop Recording button . Playing the Recorded Sound You can access the HD Audio Manager to configure Stereo Mix and use Sound Recorder to record the sound. 5-2-4 Using the Sound Recorder A. Appendix - 92 - To... record the audio, click the Start Recording button . 3. Step 4: Now you have connected the sound input device (e.g. Then set it as the default ...

Manual
Page 93
... speaker is present in My Computer > Properties > Gen- If not, please update it from GIGABYTE's website to install. Then make sure Service Pack 1 or Service Pack 2 has been installed (check in Device Manager or Sound, video, and game controllers. If yes, please disable this device. (If not, skip this... step.) Step 3: Then go to the CMOS, which will clear the CMOS values after the computer shuts down and that's why the light is still on GIGABYTE's website. Then install ...
... speaker is present in My Computer > Properties > Gen- If not, please update it from GIGABYTE's website to install. Then make sure Service Pack 1 or Service Pack 2 has been installed (check in Device Manager or Sound, video, and game controllers. If yes, please disable this device. (If not, skip this... step.) Step 3: Then go to the CMOS, which will clear the CMOS values after the computer shuts down and that's why the light is still on GIGABYTE's website. Then install ...

