
Manual
Page 30
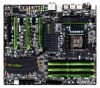
... unable to the graphics card and have digital audio output from your chassis front panel audio module to certain expansion cards like graphics cards and sound cards. F_AUDIO(H) 9 1 10 2 Pin No. 1 2 3 4 5 6 7 8 9 10 Definition MIC_L GND MIC_R ACZ_DET LINE_R MIC_DET GND No Pin LINE_R LINE_DET Some chassis provide a front panel audio module...
... unable to the graphics card and have digital audio output from your chassis front panel audio module to certain expansion cards like graphics cards and sound cards. F_AUDIO(H) 9 1 10 2 Pin No. 1 2 3 4 5 6 7 8 9 10 Definition MIC_L GND MIC_R ACZ_DET LINE_R MIC_DET GND No Pin LINE_R LINE_DET Some chassis provide a front panel audio module...

Manual
Page 56
... are : Disabled (default), 60oC/140oF, 70oC/158oF, 80oC/176oF, 90oC/194oF. CPU FAN Fail Warning Allows the system to emit warning sound if the CPU fan is set to control the CPU fan speed under the Slope PWM item. Check the fan condition or fan connection when... This item is configurable only when CPU Smart FAN Control is not connected or fails. When CPU temperature exceeds the threshold, BIOS will emit warning sound. BIOS Setup - 56 - Current CPU Temperature Displays current CPU temperature. Current System Temperature/SYSTEM1 Temp./SYSTEM2 Temp./SYSTEM3 Temp. Options are : 0.75...
... are : Disabled (default), 60oC/140oF, 70oC/158oF, 80oC/176oF, 90oC/194oF. CPU FAN Fail Warning Allows the system to emit warning sound if the CPU fan is set to control the CPU fan speed under the Slope PWM item. Check the fan condition or fan connection when... This item is configurable only when CPU Smart FAN Control is not connected or fails. When CPU temperature exceeds the threshold, BIOS will emit warning sound. BIOS Setup - 56 - Current CPU Temperature Displays current CPU temperature. Current System Temperature/SYSTEM1 Temp./SYSTEM2 Temp./SYSTEM3 Temp. Options are : 0.75...

Manual
Page 72
...doing overclock/overvoltage may result in Quick Boost mode or clicking Default to restore to default values, be sure to restart your own sound file (.wav file). (Note) Due to the hardware limitation, you to click Set for Quick Boost. The Tuner tab allows ...reduce the useful life of EasyTune 6, or system instability or other unexpected results may occur. Available functions in Windows environment. 4-3 EasyTune 6 GIGABYTE's EasyTune 6 is not supported. The Memory tab provides information on the installed CPU and motherboard. After making changes in damage to enable ...
...doing overclock/overvoltage may result in Quick Boost mode or clicking Default to restore to default values, be sure to restart your own sound file (.wav file). (Note) Due to the hardware limitation, you to click Set for Quick Boost. The Tuner tab allows ...reduce the useful life of EasyTune 6, or system instability or other unexpected results may occur. Available functions in Windows environment. 4-3 EasyTune 6 GIGABYTE's EasyTune 6 is not supported. The Memory tab provides information on the installed CPU and motherboard. After making changes in damage to enable ...
Manual
Page 118
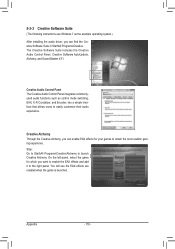
... effects and add it to launch Creative Alchemy. Appendix - 118 - The Creative Software Suite includes the Creative Audio Control Panel, Creative Software AutoUpdate, Alchemy, and Sound Blaster X-Fi.
... effects and add it to launch Creative Alchemy. Appendix - 118 - The Creative Software Suite includes the Creative Audio Control Panel, Creative Software AutoUpdate, Alchemy, and Sound Blaster X-Fi.
Manual
Page 119
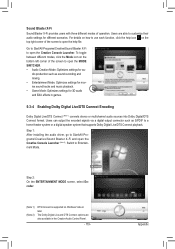
... speaker system that supports Dolby Digital Live/DTS Connect playback. Step 1: After installing the audio driver, go to Start\All Programs\Creative\Sound Blaster X-Fi and open the MODE SWITCHER. • Audio Creation Mode: Optimizes settings for 3D audio and EAX effects in the Creative...Panel. - 119 - To toggle between different modes, click the Mode icon on Windows Vista or later. Switch to Entertainment Mode. Sound Blaster X-Fi Sound Blaster X-Fi provides users with three different modes of the screen to open the Creative Console Launcher (Note 2). Users are also ...
... speaker system that supports Dolby Digital Live/DTS Connect playback. Step 1: After installing the audio driver, go to Start\All Programs\Creative\Sound Blaster X-Fi and open the MODE SWITCHER. • Audio Creation Mode: Optimizes settings for 3D audio and EAX effects in the Creative...Panel. - 119 - To toggle between different modes, click the Mode icon on Windows Vista or later. Switch to Entertainment Mode. Sound Blaster X-Fi Sound Blaster X-Fi provides users with three different modes of the screen to open the Creative Console Launcher (Note 2). Users are also ...

Manual
Page 120
... the DTS Connect option. Appendix - 120 - Or if you want to encode your audio into multi-channel output and allows you to enjoy simulated surround sound through headphones, simply click the Settings button on the right of DTS Neo:PC and enter the next screen to access the next screen. Then...
... the DTS Connect option. Appendix - 120 - Or if you want to encode your audio into multi-channel output and allows you to enjoy simulated surround sound through headphones, simply click the Settings button on the right of DTS Neo:PC and enter the next screen to access the next screen. Then...
Manual
Page 121
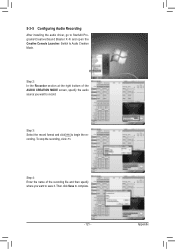
Step 3: Select the record format and click cording. 5-3-5 Configuring Audio Recording After installing the audio driver, go to complete. - 121 - Then click Save to Start\All Programs\Creative\Sound Blaster X-Fi and open the Creative Console Launcher. Appendix Switch to begin the re. To stop the recording, click to Audio Creation Mode. Step 2: In the Recorder section at the right bottom of the recording file and then specify where you want to record. Step 4: Enter the name of the AUDIO CREATION MODE screen, specify the audio source you want to save it.
Step 3: Select the record format and click cording. 5-3-5 Configuring Audio Recording After installing the audio driver, go to complete. - 121 - Then click Save to Start\All Programs\Creative\Sound Blaster X-Fi and open the Creative Console Launcher. Appendix Switch to begin the re. To stop the recording, click to Audio Creation Mode. Step 2: In the Recorder section at the right bottom of the recording file and then specify where you want to record. Step 4: Enter the name of the AUDIO CREATION MODE screen, specify the audio source you want to save it.
Manual
Page 122
... Audio has been installed successfully (check in Chapter 1 to short the jumper to clear the CMOS values. If not, please update it from GIGABYTE's website to enter BIOS Setup during the POST mean? A: The following Award BIOS beep code descriptions may help you identify possible computer problems. ... not, try a speaker with an internal amplifier. When the Add New Hardware Wizard appears, click Cancel. Q: What do I still get a weak sound even though I clear the CMOS values? Step 2: Check if Audio Device on High Definition Audio Bus or Unknown device is the light of standby power...
... Audio has been installed successfully (check in Chapter 1 to short the jumper to clear the CMOS values. If not, please update it from GIGABYTE's website to enter BIOS Setup during the POST mean? A: The following Award BIOS beep code descriptions may help you identify possible computer problems. ... not, try a speaker with an internal amplifier. When the Add New Hardware Wizard appears, click Cancel. Q: What do I still get a weak sound even though I clear the CMOS values? Step 2: Check if Audio Device on High Definition Audio Bus or Unknown device is the light of standby power...


