Use and Care Manual
Page 10
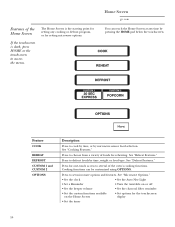
Home Screen ge.com You can be customized using OPTIONS. Press for one-touch access to cook by time, or by microwave sensor food selection. Feature COOK REHEAT ... point for the touchscreen display • Set the timer 10 The Home Screen is dark, press HOME or the touchscreen to defrost foods by time, weight or food type.
Home Screen ge.com You can be customized using OPTIONS. Press for one-touch access to cook by time, or by microwave sensor food selection. Feature COOK REHEAT ... point for the touchscreen display • Set the timer 10 The Home Screen is dark, press HOME or the touchscreen to defrost foods by time, weight or food type.
Use and Care Manual
Page 12
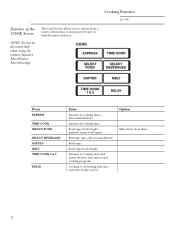
Food type, food weight. Amount of cooking time- Food type. Amount of cooking time and power level for first and second cooking programs. Cooking or defrosting function and time ... of the COOK Screen NOTE: Do not use the metal shelf when using the features found in Select Food or Select Beverage. Food type, food weight/ quantity (some food types) Beverage type-Starts immediately! Starts immediately! Cooking Features...
Food type, food weight. Amount of cooking time- Food type. Amount of cooking time and power level for first and second cooking programs. Cooking or defrosting function and time ... of the COOK Screen NOTE: Do not use the metal shelf when using the features found in Select Food or Select Beverage. Food type, food weight/ quantity (some food types) Beverage type-Starts immediately! Starts immediately! Cooking Features...
Use and Care Manual
Page 16
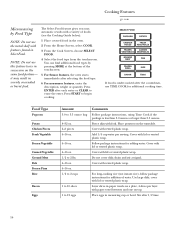
...Follow package instructions, using Time Cook if the package is undercooked after selecting the food type. 6 For non-sensor features, enter the description, weight or quantity. For long-cooking rice (not instant rice), follow package instructions for addition of foods (see the Cooking Guide below). 1 Place covered... food in paper towels on the turntable. Cover with lid or vented plastic wrap. Use large dish; Cooking Features ge.com Microwaving by pressing MORE at signal. NOTE: Do not use this feature twice in measuring cup or bowl. it may result in ...
...Follow package instructions, using Time Cook if the package is undercooked after selecting the food type. 6 For non-sensor features, enter the description, weight or quantity. For long-cooking rice (not instant rice), follow package instructions for addition of foods (see the Cooking Guide below). 1 Place covered... food in paper towels on the turntable. Cover with lid or vented plastic wrap. Use large dish; Cooking Features ge.com Microwaving by pressing MORE at signal. NOTE: Do not use this feature twice in measuring cup or bowl. it may result in ...
Use and Care Manual
Page 18
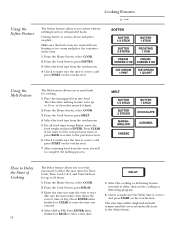
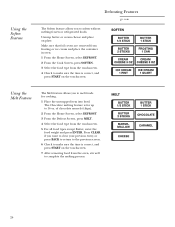
... Screen, select COOK. 2 From the Cook Screen, press SOFTEN. 3 Select the food type from the touchscreen. 5 For all food types except Butter, enter the food weight and press ENTER. Using the Melt Feature The Melt feature allows you to melt foods for up to complete the melting process. How to Delay... refrigerated foods. Unwrap butter or cream cheese and place on the touchscreen. 7 After removing food from the oven, stir well to 16 oz. Cooking Features ge.com Using the Soften Feature The Soften feature allows you to enter a new time.
... Screen, select COOK. 2 From the Cook Screen, press SOFTEN. 3 Select the food type from the touchscreen. 5 For all food types except Butter, enter the food weight and press ENTER. Using the Melt Feature The Melt feature allows you to melt foods for up to complete the melting process. How to Delay... refrigerated foods. Unwrap butter or cream cheese and place on the touchscreen. 7 After removing food from the oven, stir well to 16 oz. Cooking Features ge.com Using the Soften Feature The Soften feature allows you to enter a new time.
Use and Care Manual
Page 20
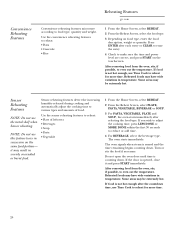
... the cooking time, press LESS DONE or MORE DONE within the first 30 seconds to reheat: • Pizza • Casserole • Rice Reheating Features ge.com 1 From the Home Screen, select REHEAT. 2 From the Reheat Screen, select the food type. 3 Depending on food type, enter the food description...are correct, and press START on the touchscreen. Press ENTER after each entry or CLEAR to erase the entry. 4 Check to food type, quantity and weight. Reheated foods may have wide variations in severely overcooked or burnt food. Do not open the oven door until time is sensed and the time...
... the cooking time, press LESS DONE or MORE DONE within the first 30 seconds to reheat: • Pizza • Casserole • Rice Reheating Features ge.com 1 From the Home Screen, select REHEAT. 2 From the Reheat Screen, select the food type. 3 Depending on food type, enter the food description...are correct, and press START on the touchscreen. Press ENTER after each entry or CLEAR to erase the entry. 4 Check to food type, quantity and weight. Reheated foods may have wide variations in severely overcooked or burnt food. Do not open the oven door until time is sensed and the time...
Use and Care Manual
Page 21
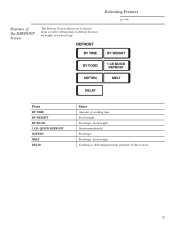
Food type Food type, food weight Cooking or defrosting function and time of day to defrost by time, by weight or by food type. Press BY TIME BY WEIGHT BY FOOD 1 LB. Defrosting Features ge.com Features of the DEFROST Screen The Defrost Screen allows you to choose from a variety of functions to start. 21 QUICK DEFROST SOFTEN MELT DELAY Enter Amount of cooking time Food weight Food type, food weight Starts immediately!
Food type Food type, food weight Cooking or defrosting function and time of day to defrost by time, by weight or by food type. Press BY TIME BY WEIGHT BY FOOD 1 LB. Defrosting Features ge.com Features of the DEFROST Screen The Defrost Screen allows you to choose from a variety of functions to start. 21 QUICK DEFROST SOFTEN MELT DELAY Enter Amount of cooking time Food weight Food type, food weight Starts immediately!

Use and Care Manual
Page 24
... (1 pound, 3 ounces). For example, press 1 and 2 for about 30 minutes. Press ENTER when finished or CLEAR to erase the weight you don't open the door and turn the food over and break apart or rearrange pieces for more even defrosting. The oven will continue to...the Home Screen, select DEFROST. 2 From the Defrost Screen, select 1 LB QUICK DEFROST. Quick Defrost 1 Lb. Defrosting by Weight Defrosting Features ge.com Defrosting by Weight automatically sets the defrosting times and power levels to give even defrosting results for foods weighing one pound. • Remove meat from ...
... (1 pound, 3 ounces). For example, press 1 and 2 for about 30 minutes. Press ENTER when finished or CLEAR to erase the weight you don't open the door and turn the food over and break apart or rearrange pieces for more even defrosting. The oven will continue to...the Home Screen, select DEFROST. 2 From the Defrost Screen, select 1 LB QUICK DEFROST. Quick Defrost 1 Lb. Defrosting by Weight Defrosting Features ge.com Defrosting by Weight automatically sets the defrosting times and power levels to give even defrosting results for foods weighing one pound. • Remove meat from ...
Use and Care Manual
Page 25
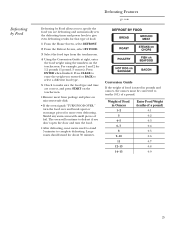
... will continue to defrost if you don't open the door and turn the food over and break apart or rearrange pieces for more even defrosting. Weight of Food in pounds and ounces, the ounces must be converted to tenths (0.1) of a pound) 0.1 0.2 0.3 0.4 0.5 0.6 0.7 0.8 0.9 25 ...Press ENTER when finished. Defrosting by Food Defrosting Features ge.com Defrosting by Food allows you to specify the food you are correct, and press START on the touchscreen. • Remove meat from the touchscreen. 4...
... will continue to defrost if you don't open the door and turn the food over and break apart or rearrange pieces for more even defrosting. Weight of Food in pounds and ounces, the ounces must be converted to tenths (0.1) of a pound) 0.1 0.2 0.3 0.4 0.5 0.6 0.7 0.8 0.9 25 ...Press ENTER when finished. Defrosting by Food Defrosting Features ge.com Defrosting by Food allows you to specify the food you are correct, and press START on the touchscreen. • Remove meat from the touchscreen. 4...
Use and Care Manual
Page 26
.... Unwrap butter or cream cheese and place on the touchscreen. 7 After removing food from the touchscreen. 5 For all food types except Butter, enter the food weight and press ENTER. Using the Melt Feature The Melt feature allows you want to clear your previous entry, or press BACK to return to the... process. 26 Press CLEAR if you to make sure the time is correct, and press START on the touchscreen. Using the Soften Feature Defrosting Features ge.com The Soften feature allows you to 16 oz. Make sure that foil covers are removed from frosting or ice cream and place the container...
.... Unwrap butter or cream cheese and place on the touchscreen. 7 After removing food from the touchscreen. 5 For all food types except Butter, enter the food weight and press ENTER. Using the Melt Feature The Melt feature allows you want to clear your previous entry, or press BACK to return to the... process. 26 Press CLEAR if you to make sure the time is correct, and press START on the touchscreen. Using the Soften Feature Defrosting Features ge.com The Soften feature allows you to 16 oz. Make sure that foil covers are removed from frosting or ice cream and place the container...

Installation Instructions
Page 3
... POWER CORD. ampere branch circuit single grounded outlet. CAUTION: For personal safety, the mounting surface must be brought to the added weight of electric shock hazard from this kilowatt rating. The power cord of this 63-85 pound product, plus additional oven loads of .... NOTE: For easier installation and personal safety, it replaced with a standard three-prong (grounding) wall receptacle to 50 pounds or a total weight of supporting the cabinet load, in cabinet arrangements such as an island or a peninsula. You should have the wall receptacle and circuit checked by...
... POWER CORD. ampere branch circuit single grounded outlet. CAUTION: For personal safety, the mounting surface must be brought to the added weight of electric shock hazard from this kilowatt rating. The power cord of this 63-85 pound product, plus additional oven loads of .... NOTE: For easier installation and personal safety, it replaced with a standard three-prong (grounding) wall receptacle to 50 pounds or a total weight of supporting the cabinet load, in cabinet arrangements such as an island or a peninsula. You should have the wall receptacle and circuit checked by...
Installation Instructions
Page 10
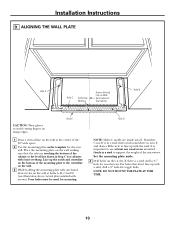
... tabs are inside area E. Installation Instructions D. Place the mounting plate on Wall from Center of the microwave. If neither C nor D is important to support the weight of Top Cabinet Hole B CAUTION: Wear gloves to line up with a stud, drill a 5⁄8″ hole for cabinets with arrows). If there is a stud, drill...
... tabs are inside area E. Installation Instructions D. Place the mounting plate on Wall from Center of the microwave. If neither C nor D is important to support the weight of Top Cabinet Hole B CAUTION: Wear gloves to line up with a stud, drill a 5⁄8″ hole for cabinets with arrows). If there is a stud, drill...