
Installation Instructions
Page 1
... each product for approved models. right side only 47" (119.4 cm) 12" (30.5 cm) 31-10730-1 08-09 JR Dimension A B C D E F G H Dimension Description Cabinet Width Cutout Width Cutout Height Overlap of Oven Over Side Edges of Cutout Clearance to support the weight of Cabinet 1 REMOVE PACKAGING MATERIALS Failure to establish the cutout width. Per Warming Drawer Requirement Save these instructions for future reference. • Skill level - ATTENTION INSTALLER: All electric wall ovens must be hard-wired (direct-wired...
... each product for approved models. right side only 47" (119.4 cm) 12" (30.5 cm) 31-10730-1 08-09 JR Dimension A B C D E F G H Dimension Description Cabinet Width Cutout Width Cutout Height Overlap of Oven Over Side Edges of Cutout Clearance to support the weight of Cabinet 1 REMOVE PACKAGING MATERIALS Failure to establish the cutout width. Per Warming Drawer Requirement Save these instructions for future reference. • Skill level - ATTENTION INSTALLER: All electric wall ovens must be hard-wired (direct-wired...

Installation Instructions
Page 2
... National Electrical Code requires that the bake and broil units and all cooking functions operate properly. • See your model. When installing an electric oven in color), using a wire nut. For a single oven, the platform must use with Lower Trim in accordance with Lower Trim trim to the bottom edge of the conduit to meet the National Electrical Code, NFPA No. 70 - When connecting to an electric oven. B. Ground Wire D. Install junction box cover. Mounting Hole Locations (hole locations may be locked...
... National Electrical Code requires that the bake and broil units and all cooking functions operate properly. • See your model. When installing an electric oven in color), using a wire nut. For a single oven, the platform must use with Lower Trim in accordance with Lower Trim trim to the bottom edge of the conduit to meet the National Electrical Code, NFPA No. 70 - When connecting to an electric oven. B. Ground Wire D. Install junction box cover. Mounting Hole Locations (hole locations may be locked...

Owners Manual
Page 1
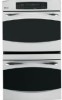
Owner's Manual PK916-27 ″ Single Wall Oven PK956-27 ″ Double Wall Oven PT916-30 ″ Single Wall Oven PT956-30 ″ Double Wall Oven Printed on double oven models. GEAppliances.com Electric Convection Built-In Oven Safety Instructions 2-4 Operating Instructions Clock and Timer 8 Control Lockout 8 Controls 5 Convection 12-15 Oven 6, 7 Probe 10, 14 Proofing 11 Sabbath Feature 21 Self-Cleaning Oven 17, 18 Special Features 19, 20 Thermostat 16 Timed Baking and Roasting 9, 15 Warming 11 Care and Cleaning Cleaning Oven Door 23 Control Panel 24 Lift-Off Oven Door...
Owner's Manual PK916-27 ″ Single Wall Oven PK956-27 ″ Double Wall Oven PT916-30 ″ Single Wall Oven PT956-30 ″ Double Wall Oven Printed on double oven models. GEAppliances.com Electric Convection Built-In Oven Safety Instructions 2-4 Operating Instructions Clock and Timer 8 Control Lockout 8 Controls 5 Convection 12-15 Oven 6, 7 Probe 10, 14 Proofing 11 Sabbath Feature 21 Self-Cleaning Oven 17, 18 Special Features 19, 20 Thermostat 16 Timed Baking and Roasting 9, 15 Warming 11 Care and Cleaning Cleaning Oven Door 23 Control Panel 24 Lift-Off Oven Door...

Owners Manual
Page 3
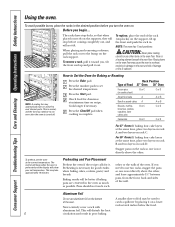
... of this Owner's Manual. ■ Do not use the pan. ■ Clean only parts listed in this or any other appliance. ■ Stand away from touching hot surfaces of the door or oven walls. ■ Do not use . ■ After broiling, always take any interior area of electric shock or fire. 3 Placing items on grease fires. Do not let pot holders touch hot heating elements. Pressure...
... of this Owner's Manual. ■ Do not use the pan. ■ Clean only parts listed in this or any other appliance. ■ Stand away from touching hot surfaces of the door or oven walls. ■ Do not use . ■ After broiling, always take any interior area of electric shock or fire. 3 Placing items on grease fires. Do not let pot holders touch hot heating elements. Pressure...

Owners Manual
Page 5
... set . Convection Roast Pad Press to select the bake function. Kitchen Timer On/Off Pad Press to select self-cleaning function. Cooking Time Pad Press and then press the number pads to set for a timed oven operation and a power outage occurred, the clock and all programmed functions must be pressed to cook. If "F- Safety Instructions Operating Instructions Care and Cleaning Troubleshooting Tips Consumer Support Using the oven controls. (Throughout this indicates a function error code. Display Shows the time of day, oven temperature, whether the oven...
... set . Convection Roast Pad Press to select the bake function. Kitchen Timer On/Off Pad Press to select self-cleaning function. Cooking Time Pad Press and then press the number pads to set for a timed oven operation and a power outage occurred, the clock and all programmed functions must be pressed to cook. If "F- Safety Instructions Operating Instructions Care and Cleaning Troubleshooting Tips Consumer Support Using the oven controls. (Throughout this indicates a function error code. Display Shows the time of day, oven temperature, whether the oven...
Owners Manual
Page 6
... use two racks, stagger the pans so one is turned off to Set the Oven for good results when baking cakes, cookies, pastry and breads. NOTE: The oven has 7 rack positions. catch a spillover by placing it toward you begin... Press the number pads to cabinets. Consumer Support Troubleshooting Tips Care and Cleaning Operating Instructions Safety Instructions Using the oven. Press the Clear/Off pad when cooking is complete. This will be used...
... use two racks, stagger the pans so one is turned off to Set the Oven for good results when baking cakes, cookies, pastry and breads. NOTE: The oven has 7 rack positions. catch a spillover by placing it toward you begin... Press the number pads to cabinets. Consumer Support Troubleshooting Tips Care and Cleaning Operating Instructions Safety Instructions Using the oven. Press the Clear/Off pad when cooking is complete. This will be used...
Owners Manual
Page 8
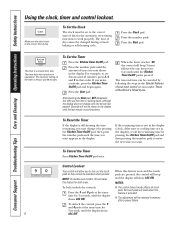
... the Start pad, SET disappears; Control Lockout Your control will work properly. NOTES: To lock/unlock the controls: Press the 9 and 0 pads at the End of day. The timer does not control oven operations. Press the number pads until the display shows 8 LOC OFF. this feature for 3 seconds, until the amount of time you to the correct time of a Timed Cycle. Consumer Support Troubleshooting Tips Care and Cleaning Operating Instructions Safety Instructions Using the clock, timer and control...
... the Start pad, SET disappears; Control Lockout Your control will work properly. NOTES: To lock/unlock the controls: Press the 9 and 0 pads at the End of day. The timer does not control oven operations. Press the number pads until the display shows 8 LOC OFF. this feature for 3 seconds, until the amount of time you to the correct time of a Timed Cycle. Consumer Support Troubleshooting Tips Care and Cleaning Operating Instructions Safety Instructions Using the clock, timer and control...

Owners Manual
Page 9
... because heat from the bulb will show the changing temperature (starting at the same time, the times showing in the display will sound if you have set . NOTE: If your recipe requires preheating, you may need to add additional time to delay-start the oven, cook for the first oven set . Using the number pads, enter the time of day you want the oven to turn on some models) GEAppliances.com On double oven models, you have set the oven control...
... because heat from the bulb will show the changing temperature (starting at the same time, the times showing in the display will sound if you have set . NOTE: If your recipe requires preheating, you may need to add additional time to delay-start the oven, cook for the first oven set . Using the number pads, enter the time of day you want the oven to turn on some models) GEAppliances.com On double oven models, you have set the oven control...
Owners Manual
Page 10
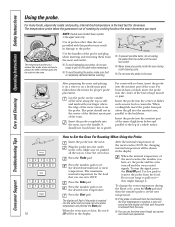
... . use the timer even though you have a probe in the display. After preparing the meat and placing it . It should rest in damage to pull on the cable when removing it - Close the oven door. Press the Bake pad. Press the number pads to pull on a broiler pan grid, follow these directions for doneness. For roasts with your probe inside the oven during the Roast cycle, press the Bake...
... . use the timer even though you have a probe in the display. After preparing the meat and placing it . It should rest in damage to pull on the cable when removing it - Close the oven door. Press the Bake pad. Press the number pads to pull on a broiler pan grid, follow these directions for doneness. For roasts with your probe inside the oven during the Roast cycle, press the Bake...
Owners Manual
Page 11
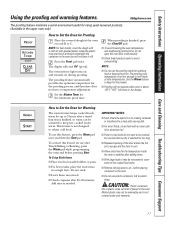
... time for the temperature inside the oven to stabilize after a timed function is not hot enough to avoid over-proofing. Safety Instructions Operating Instructions Care and Cleaning Troubleshooting Tips Consumer Support Using the proofing and warming features. Melted plastic may be removable and is finished, press the Clear/Off pad. ■ To avoid lowering the oven temperature and lengthening proofing time, do not open the oven door unnecessarily. ■ Check bread products...
... time for the temperature inside the oven to stabilize after a timed function is not hot enough to avoid over-proofing. Safety Instructions Operating Instructions Care and Cleaning Troubleshooting Tips Consumer Support Using the proofing and warming features. Melted plastic may be removable and is finished, press the Clear/Off pad. ■ To avoid lowering the oven temperature and lengthening proofing time, do not open the oven door unnecessarily. ■ Check bread products...
Owners Manual
Page 13
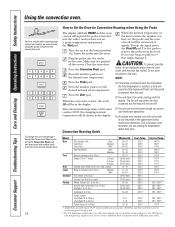
... were cooked on a rotisserie. When the oven starts to set the desired oven temperature. Safety Instructions Operating Instructions Care and Cleaning Troubleshooting Tips Consumer Support Grid Broiler pan When baking cookies, you will get the best results if you use a flat cookie sheet instead of a pan with several pans, leave space between them. If you are recommended for use a pan with low sides. Cookware for Convection Cooking Before using your convection oven, check to Set the Oven for air circulation...
... were cooked on a rotisserie. When the oven starts to set the desired oven temperature. Safety Instructions Operating Instructions Care and Cleaning Troubleshooting Tips Consumer Support Grid Broiler pan When baking cookies, you will get the best results if you use a flat cookie sheet instead of a pan with several pans, leave space between them. If you are recommended for use a pan with low sides. Cookware for Convection Cooking Before using your convection oven, check to Set the Oven for air circulation...
Owners Manual
Page 14
... on it is pushed all the way in the display. Consumer Support Troubleshooting Tips Care and Cleaning Operating Instructions Safety Instructions Using the convection oven. Press the Probe pad. After the internal temperature of the meat reaches the number you have set a probe temperature and pressed the Start pad. Convection Roasting Guide When the internal temperature of the meat reaches 100°F, the changing internal temperature will stop the signal, press the Clear/Off pad. Department of...
... on it is pushed all the way in the display. Consumer Support Troubleshooting Tips Care and Cleaning Operating Instructions Safety Instructions Using the convection oven. Press the Probe pad. After the internal temperature of the meat reaches the number you have set a probe temperature and pressed the Start pad. Convection Roasting Guide When the internal temperature of the meat reaches 100°F, the changing internal temperature will stop the signal, press the Clear/Off pad. Department of...

Owners Manual
Page 15
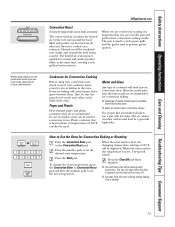
... food to Set a Delayed Start and Automatic Stop You can use timed baking or roasting in the display will be for a NOTE: If you may need to add additional time to delay-start cooking. How to be kept warm for convection cooking. Be sure that oven. Safety Instructions Operating Instructions Care and Cleaning Troubleshooting Tips Consumer Support Using the timed features for up to Set an Immediate Start and Automatic Stop The oven will show the changing temperature (starting at 100°F) and the cooking time.
... food to Set a Delayed Start and Automatic Stop You can use timed baking or roasting in the display will be for a NOTE: If you may need to add additional time to delay-start cooking. How to be kept warm for convection cooking. Be sure that oven. Safety Instructions Operating Instructions Care and Cleaning Troubleshooting Tips Consumer Support Using the timed features for up to Set an Immediate Start and Automatic Stop The oven will show the changing temperature (starting at 100°F) and the cooking time.

Owners Manual
Page 17
.... When the LOCKED light goes off . There is . Do not use the number pads and enter the desired clean time. A 3-hour self-clean time is needed, use abrasives or oven cleaners. GEAppliances.com The oven door must be able to open the door. Wipe up heavy soil on the oven floor may vary) Before a Clean Cycle We recommend venting your oven is a heating element beneath the oven floor. Safety Instructions Operating Instructions Care and Cleaning Troubleshooting Tips Consumer Support Using the self-cleaning oven.
.... When the LOCKED light goes off . There is . Do not use the number pads and enter the desired clean time. A 3-hour self-clean time is needed, use abrasives or oven cleaners. GEAppliances.com The oven door must be able to open the door. Wipe up heavy soil on the oven floor may vary) Before a Clean Cycle We recommend venting your oven is a heating element beneath the oven floor. Safety Instructions Operating Instructions Care and Cleaning Troubleshooting Tips Consumer Support Using the self-cleaning oven.

Owners Manual
Page 18
... for the second oven. NOTE: On double oven models, you can press the Clock pad to start time. The oven door must be closed and all controls must be removed by the clean cycle. Press the Delay Start pad. Wipe it up with a damp cloth after one clean cycle, repeat the cycle. ■ You cannot set will show the start . The door locks automatically. Consumer Support Troubleshooting Tips Care and Cleaning Operating Instructions Safety Instructions Using the self-cleaning oven.
... for the second oven. NOTE: On double oven models, you can press the Clock pad to start time. The oven door must be closed and all controls must be removed by the clean cycle. Press the Delay Start pad. Wipe it up with a damp cloth after one clean cycle, repeat the cycle. ■ You cannot set will show the start . The door locks automatically. Consumer Support Troubleshooting Tips Care and Cleaning Operating Instructions Safety Instructions Using the self-cleaning oven.
Owners Manual
Page 21
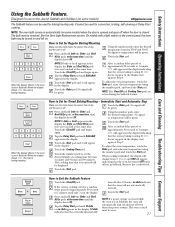
... will be used for baking/roasting only. Tap the Delay Start pad until the display shows SF. Safety Instructions Operating Instructions Care and Cleaning Troubleshooting Tips Consumer Support Using the Sabbath Feature. (Designed for use on the Jewish Sabbath and Holidays.) (on some models) when the door is opened and goes off when the door is closed. It cannot be given. Press and hold both the Bake and Broil No signal or temperature will...
... will be used for baking/roasting only. Tap the Delay Start pad until the display shows SF. Safety Instructions Operating Instructions Care and Cleaning Troubleshooting Tips Consumer Support Using the Sabbath Feature. (Designed for use on the Jewish Sabbath and Holidays.) (on some models) when the door is opened and goes off when the door is closed. It cannot be given. Press and hold both the Bake and Broil No signal or temperature will...
Owners Manual
Page 22
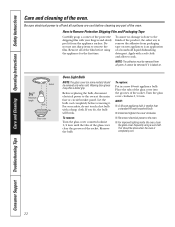
... no damage is baked on. Apply with a damp cloth. Socket 31⁄2" Maximum length Bulb Tab Glass cover Oven Light Bulb NOTE: The glass cover (on new appliances is off and all parts. To replace: Put in a new 40-watt appliance bulb. Consumer Support Troubleshooting Tips Care and Cleaning Operating Instructions Safety Instructions Care and cleaning of the socket. Wearing latex gloves may offer a better grip. To remove: Turn the glass cover counterclockwise 1/4 turn . If you...
... no damage is baked on. Apply with a damp cloth. Socket 31⁄2" Maximum length Bulb Tab Glass cover Oven Light Bulb NOTE: The glass cover (on new appliances is off and all parts. To replace: Put in a new 40-watt appliance bulb. Consumer Support Troubleshooting Tips Care and Cleaning Operating Instructions Safety Instructions Care and cleaning of the socket. Wearing latex gloves may offer a better grip. To remove: Turn the glass cover counterclockwise 1/4 turn . If you...
Owners Manual
Page 25
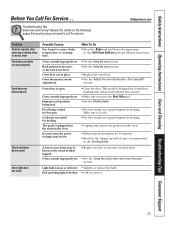
... circuit breaker tripped. Oven door is loose or defective. • Tighten or replace the bulb. Oven controls improperly set . • Replace the fuse or reset the circuit breaker. • See the Using the clock, timer and control lockout section. In some areas the power (voltage) may not need to enter a bake temperature or cleaning time. Light bulb is open. GEAppliances.com Problem Control signals after entering cooking time or delay start Food does not bake or roast properly Food does not broil properly Clock and timer do not work Oven light...
... circuit breaker tripped. Oven door is loose or defective. • Tighten or replace the bulb. Oven controls improperly set . • Replace the fuse or reset the circuit breaker. • See the Using the clock, timer and control lockout section. In some areas the power (voltage) may not need to enter a bake temperature or cleaning time. Light bulb is open. GEAppliances.com Problem Control signals after entering cooking time or delay start Food does not bake or roast properly Food does not broil properly Clock and timer do not work Oven light...
Owners Manual
Page 26
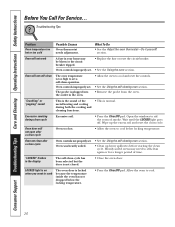
... period of the metal heating and cooling during clean cycle Excessive soil. • Press the Clear/Off pad. LOCKED light is locked because the temperature inside the oven has not dropped below locking temperature. Troubleshooting Tips Problem Oven temperature too hot or too cold Possible Causes Oven thermostat needs adjustment. Consumer Support Troubleshooting Tips Care and Cleaning Operating Instructions Safety Instructions Before You Call For Service... Oven door will not work A fuse in the display The self-clean cycle has been selected but...
... period of the metal heating and cooling during clean cycle Excessive soil. • Press the Clear/Off pad. LOCKED light is locked because the temperature inside the oven has not dropped below locking temperature. Troubleshooting Tips Problem Oven temperature too hot or too cold Possible Causes Oven thermostat needs adjustment. Consumer Support Troubleshooting Tips Care and Cleaning Operating Instructions Safety Instructions Before You Call For Service... Oven door will not work A fuse in the display The self-clean cycle has been selected but...
Owners Manual
Page 27
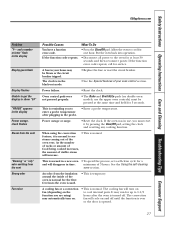
... pad. The cooling fan will disappear in the display Power outage, clock flashes Steam from the vent "Burning" or "oily" odor emitting from the insulation around the inside of 3 hours. This is temporary. See the Using the self-cleaning oven section. If the function error code repeats, call for one hour. The convection fan will increase. Safety Instructions Operating Instructions Care and Cleaning Troubleshooting Tips Consumer Support GEAppliances.com Problem "F- Power failure. • Reset the clock.
... pad. The cooling fan will disappear in the display Power outage, clock flashes Steam from the vent "Burning" or "oily" odor emitting from the insulation around the inside of 3 hours. This is temporary. See the Using the self-cleaning oven section. If the function error code repeats, call for one hour. The convection fan will increase. Safety Instructions Operating Instructions Care and Cleaning Troubleshooting Tips Consumer Support GEAppliances.com Problem "F- Power failure. • Reset the clock.


