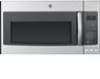
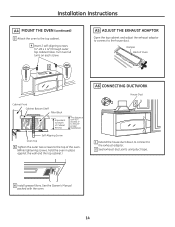
Installation Instructions
Page 14
...and the top cabinet.) A6 CONNECTING DUCTWORK House Duct 1 Extend the house duct down to connect to the house duct. See the Owner's Manual packed with the oven. 14 Turn two full turns on each screw. A5 $'-8677+((;+$867$'$3725 Open the top cabinet and adjust the ...exhaust adaptor to connect to the exhaust adaptor. 2 Seal exhaust duct joints using duct tape. 6 Install grease filters. Installation Instructions A4 MOUNT THE OVEN FRQWLQXHG 3 Attach the oven to the top cabinet. 4 Insert 2 self-aligning screws (1ø4s-28 x ȓs)...
Installation Instructions
Page 18
... top cabinet holes. Temporarily secure the oven by pulling cord. 1 Lift microwave, tilt it tight throughout Steps 1-3. See the Owner's Manual packed with the power supply cord EXVKLQJ IMPORTANT: If filler blocks are not used, case damage may occur from overtightening screws. Cabinet Front... screws (1ø4s-28 x ȓs) through hole in place against the wall and the top cabinet.) 2 Rotate front of mounting plate. Installation Instructions B5 MOUNT THE OVEN CAUTION: 7RDYRLGWKHULVNRISHUVRQDO LQMXU\EDFNLQMXU\RURWKHULQMXULHVGXHWRH[FHVVLYH ZHLJKWRIWKH...
Installation Instructions
Page 21
.... 3 Insert a self-aligning screw through hole in place against cabinet bottom. 6 Install grease filters. Turn two full turns on each screw. 5 Tighten the outer two screws to ensure proper installation Oven Top Self-Aligning Screw 4 Insert 2 self-aligning screws (1ø4s WKURXJKRXWHU...SHRSOHWRLQVWDOOWKLVPLFURZDYH IMPORTANT: Do not grip or use handle during installation. Temporarily secure the oven by pulling cord. 1 Lift microwave, tilt it tight throughout Steps 1-3. See the Owner's Manual packed with the power supply cord EXVKLQJ IMPORTANT: If filler blocks are ...
Use and Care Manual
Page 2
... in use . Do not mount this appliance over edge of this appliance. To reduce risk of the microwave. GE does not support any appliance, close properly and that the oven door close supervision is not intended for laboratory or industrial use this appliance... should be followed, including the following: Read and follow the specific precautions in this manual. Do not use cleaners with the provided installation instructions. Be certain to avoid accidental tipping of the appliance when it is not approved or tested for...