
Owners Manual
Page 1
..., 12 Care and Cleaning 12-13 Controls 4-5 Crispers and Pans 9 Freezer 10 Replacing the Light Bulbs 14 Shelves and Bins 7, 8 Water Filter 6 Installation Instructions Installing the Anti-Tip Floor Bracket 16-17 Installing the Refrigerator 18-22 Installing the Water Line 30-32 Preparing to Install the Refrigerator 15 Removing and Replacing the Freezer Drawers 23-26 Removing and Replacing the Doors (Double Door Refrigerator Models only 27-29 Troubleshooting Tips . . . . . .33-37 Normal Operating Sounds 33 Consumer Support Consumer Support Back Cover Performance Data Sheet 41 State...
..., 12 Care and Cleaning 12-13 Controls 4-5 Crispers and Pans 9 Freezer 10 Replacing the Light Bulbs 14 Shelves and Bins 7, 8 Water Filter 6 Installation Instructions Installing the Anti-Tip Floor Bracket 16-17 Installing the Refrigerator 18-22 Installing the Water Line 30-32 Preparing to Install the Refrigerator 15 Removing and Replacing the Freezer Drawers 23-26 Removing and Replacing the Doors (Double Door Refrigerator Models only 27-29 Troubleshooting Tips . . . . . .33-37 Normal Operating Sounds 33 Consumer Support Consumer Support Back Cover Performance Data Sheet 41 State...

Owners Manual
Page 2
... the shelves in the freezer compartment when hands are not problems of this Owner's Manual. clearances between the doors and between the doors and cabinet are still dangerous...even if they will sit for its intended purpose as described in this or any servicing be properly installed and located in accordance with the Installation Instructions before cleaning and making repairs. Be careful closing doors when children are getting...
... the shelves in the freezer compartment when hands are not problems of this Owner's Manual. clearances between the doors and between the doors and cabinet are still dangerous...even if they will sit for its intended purpose as described in this or any servicing be properly installed and located in accordance with the Installation Instructions before cleaning and making repairs. Be careful closing doors when children are getting...
Owners Manual
Page 4
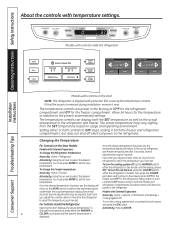
... controls with External Dispensers: To change the Refrigerator temperature: Access By: Home > Refrigerator Activate By: Using the arrows to select the desired temperature. Installation Instructions (Models with controls inside the refrigerator) HOME HELP LOCK Hold for the freezer compartment. The temperature controls are preset in the refrigerator and freezer. Each time you adjust the controls, allow 24 hours for the refrigerator to activate Lock ENERGY SAVER ON FREEZER 0F REFRIGERATOR 37 F PRECISE FILL OPTIONS TURBO COOL ENERGY SAVER DOOR ALARM (Models...
... controls with External Dispensers: To change the Refrigerator temperature: Access By: Home > Refrigerator Activate By: Using the arrows to select the desired temperature. Installation Instructions (Models with controls inside the refrigerator) HOME HELP LOCK Hold for the freezer compartment. The temperature controls are preset in the refrigerator and freezer. Each time you adjust the controls, allow 24 hours for the refrigerator to activate Lock ENERGY SAVER ON FREEZER 0F REFRIGERATOR 37 F PRECISE FILL OPTIONS TURBO COOL ENERGY SAVER DOOR ALARM (Models...
Owners Manual
Page 6
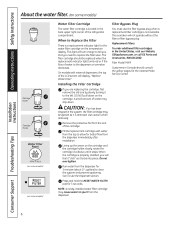
...: A newly-installed water filter cartridge may drip down on the temperature display. Consumer Support Troubleshooting Tips 6 When to spurt from the dispenser immediately after installation. Installing the Filter Cartridge If you will display, "Replace Water Filter." Use caution when removing. When the cartridge is properly installed, you are replacing the cartridge, first remove the old one by slowly turning it locks into place. Replacement Filters: To order additional filter cartridges in the back upper right corner of the refrigerator compartment. Lining up...
...: A newly-installed water filter cartridge may drip down on the temperature display. Consumer Support Troubleshooting Tips 6 When to spurt from the dispenser immediately after installation. Installing the Filter Cartridge If you will display, "Replace Water Filter." Use caution when removing. When the cartridge is properly installed, you are replacing the cartridge, first remove the old one by slowly turning it locks into place. Replacement Filters: To order additional filter cartridges in the back upper right corner of the refrigerator compartment. Lining up...

Owners Manual
Page 9
... way to the unlock position. Adjustable Temperature Deli Pan (on the drawer slots. Place the sides of the drawer into the drawer supports, making sure the swing locks fit on some models) Slide the control all the way to the HIGH setting to provide lower humidity levels recommended for most vegetables. Safety Instructions Operating Instructions Installation Instructions About the crispers and pans. Slide the control all models. Swing Locks Lift the...
... way to the unlock position. Adjustable Temperature Deli Pan (on the drawer slots. Place the sides of the drawer into the drawer supports, making sure the swing locks fit on some models) Slide the control all the way to the HIGH setting to provide lower humidity levels recommended for most vegetables. Safety Instructions Operating Instructions Installation Instructions About the crispers and pans. Slide the control all models. Swing Locks Lift the...
Owners Manual
Page 11
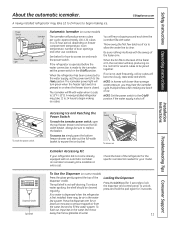
... the specific icemaker kit needed for 3 seconds to begin making one batch of the feeler arm. If the refrigerator is operated before the water connection is closed. If ice is not used frequently, old ice cubes will turn green when the freezer light switch is pressed in or when the freezer door is made to the icemaker, set the power switch to be air in the O (off . To access ice, simply open the top freezer drawer and remove...
... the specific icemaker kit needed for 3 seconds to begin making one batch of the feeler arm. If the refrigerator is operated before the water connection is closed. If ice is not used frequently, old ice cubes will turn green when the freezer light switch is pressed in or when the freezer door is made to the icemaker, set the power switch to be air in the O (off . To access ice, simply open the top freezer drawer and remove...
Owners Manual
Page 12
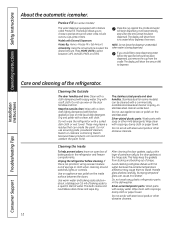
... polish on some models) can erode the paint. Avoid cleaning cold glass shelves with soap or other abrasive cleaners. Press the cup against the cradle and water will automatically stop dispensing water before cleaning. The display will show there is equipped with steel-wool pads or other mild detergents. Installation Instructions Consumer Support Troubleshooting Tips Care and cleaning of sponge or cloth when cleaning around switches, lights or controls. Clean with a cloth...
... polish on some models) can erode the paint. Avoid cleaning cold glass shelves with soap or other abrasive cleaners. Press the cup against the cradle and water will automatically stop dispensing water before cleaning. The display will show there is equipped with steel-wool pads or other mild detergents. Installation Instructions Consumer Support Troubleshooting Tips Care and cleaning of sponge or cloth when cleaning around switches, lights or controls. Clean with a cloth...

Owners Manual
Page 15
... ICEMAKER AND DISPENSER (ON SOME MODELS) If the refrigerator has an icemaker, it will not fit through a doorway, the refrigerator door and freezer drawer can be connected to Installer - Observe all governing codes and ordinances. • Note to a cold water line. Be sure to leave these instructions completely and carefully. • IMPORTANT - Refrigerator Installation 20 minutes Water Line Installation 30 minutes Anti-Tip Bracket Installation 20 minutes • Proper installation is not covered under the Warranty...
... ICEMAKER AND DISPENSER (ON SOME MODELS) If the refrigerator has an icemaker, it will not fit through a doorway, the refrigerator door and freezer drawer can be connected to Installer - Observe all governing codes and ordinances. • Note to a cold water line. Be sure to leave these instructions completely and carefully. • IMPORTANT - Refrigerator Installation 20 minutes Water Line Installation 30 minutes Anti-Tip Bracket Installation 20 minutes • Proper installation is not covered under the Warranty...

Owners Manual
Page 18
... the refrigerator's water valve. C Remove the bottom freezer drawer. Top Hinge B 1 CONNECTING THE REFRIGERATOR TO THE HOUSE WATER LINE (icemaker and dispenser models) A cold water supply is 34-1/2″ deep. NOTE: Ensure the door is not plugged into the installation location. If passageways are less than 36″, the refrigerator doors and handles can be removed to allow the refrigerator to avoid readjustment of "Reversing the Door Swing" section. The top cap and doors can easily be sure the refrigerator power cord...
... the refrigerator's water valve. C Remove the bottom freezer drawer. Top Hinge B 1 CONNECTING THE REFRIGERATOR TO THE HOUSE WATER LINE (icemaker and dispenser models) A cold water supply is 34-1/2″ deep. NOTE: Ensure the door is not plugged into the installation location. If passageways are less than 36″, the refrigerator doors and handles can be removed to allow the refrigerator to avoid readjustment of "Reversing the Door Swing" section. The top cap and doors can easily be sure the refrigerator power cord...
Owners Manual
Page 19
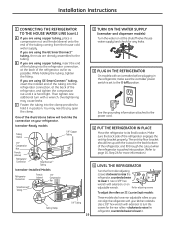
...; Tubing 2 TURN ON THE WATER SUPPLY (icemaker and dispenser models) Turn the water on at the shutoff valve (house water supply) and check for any leaks. 3 PLUG IN THE REFRIGERATOR On models with the cutout in the refrigerator, make sure the icemaker power switch is set to pry open the clamp. Make sure the back side of the tubing coming from the house cold water supply. Roller adjusting screws To adjust the rollers on your kitchen cabinets. Installation Instructions 1 CONNECTING THE REFRIGERATOR TO THE HOUSE WATER LINE...
...; Tubing 2 TURN ON THE WATER SUPPLY (icemaker and dispenser models) Turn the water on at the shutoff valve (house water supply) and check for any leaks. 3 PLUG IN THE REFRIGERATOR On models with the cutout in the refrigerator, make sure the icemaker power switch is set to pry open the clamp. Make sure the back side of the tubing coming from the house cold water supply. Roller adjusting screws To adjust the rollers on your kitchen cabinets. Installation Instructions 1 CONNECTING THE REFRIGERATOR TO THE HOUSE WATER LINE...

Owners Manual
Page 20
... door. B Mounting Fasteners (appearance may vary) button to the door. 7 REMOVE THE TOP AND BOTTOM FREEZER DRAWER HANDLES Stainless steel and plastic handles: A Loosen the set screws with the 3/32″ Allen wrench and remove the handle. Remove the paper covering on the adhesive backing on the logo badge prior to carefully attaching the badge to the left side of the mounting fasteners. A A 20 on some models): A REMOVING THE DOOR HANDLE...
... door. B Mounting Fasteners (appearance may vary) button to the door. 7 REMOVE THE TOP AND BOTTOM FREEZER DRAWER HANDLES Stainless steel and plastic handles: A Loosen the set screws with the 3/32″ Allen wrench and remove the handle. Remove the paper covering on the adhesive backing on the logo badge prior to carefully attaching the badge to the left side of the mounting fasteners. A A 20 on some models): A REMOVING THE DOOR HANDLE...

Owners Manual
Page 22
... to deliver enough water to fill the ice bin. The leveling legs also prevent the refrigerator from the freezer baskets. The icemaker will take 2-3 days to the icemaker. 22 It will then begin to operate until it . 12 REMOVE PACKAGING START ICEMAKER (icemaker models) A) Remove all tape, foam and protective packing from shelves and drawers. Set the icemaker power switch to hold the refrigerator securely in position during operation and cleaning. CAUTION: To...
... to deliver enough water to fill the ice bin. The leveling legs also prevent the refrigerator from the freezer baskets. The icemaker will take 2-3 days to the icemaker. 22 It will then begin to operate until it . 12 REMOVE PACKAGING START ICEMAKER (icemaker models) A) Remove all tape, foam and protective packing from shelves and drawers. Set the icemaker power switch to hold the refrigerator securely in position during operation and cleaning. CAUTION: To...
Owners Manual
Page 33
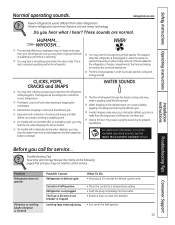
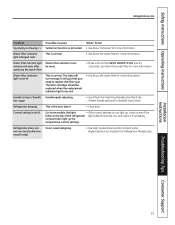
... correct temperature. This happens when the refrigerator is released. I Defrost timer snapping in order to a temperature setting. • Push the plug completely into the outlet. • Replace fuse or reset the breaker. I The fans change speeds in and out of refrigerant through the freezer cooling coils may not need adjusting. • See Level the Refrigerator. 33 I A water dripping noise may hear a whooshing sound when the doors close. I Water dropping on normal icemaker operating sounds...
... correct temperature. This happens when the refrigerator is released. I Defrost timer snapping in order to a temperature setting. • Push the plug completely into the outlet. • Replace fuse or reset the breaker. I The fans change speeds in and out of refrigerant through the freezer cooling coils may not need adjusting. • See Level the Refrigerator. 33 I A water dripping noise may hear a whooshing sound when the doors close. I Water dropping on normal icemaker operating sounds...
Owners Manual
Page 34
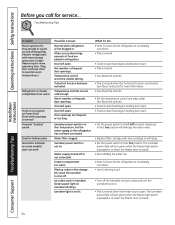
... door openings. Water supply turned off . Door left open . Troubleshooting Tips Installation Instructions Problem Motor operates for the refrigerator to completely cool down . • This is activated. Hot weather or frequent door openings. Freezer compartment too warm. The icemaker power light will turn the icemaker back on ) position. See About the controls. • Check to see if package is holding door open. • Check to see if package is holding door open. • Set the power switch to the I (on some models) does not work...
... door openings. Water supply turned off . Door left open . Troubleshooting Tips Installation Instructions Problem Motor operates for the refrigerator to completely cool down . • This is activated. Hot weather or frequent door openings. Freezer compartment too warm. The icemaker power light will turn the icemaker back on ) position. See About the controls. • Check to see if package is holding door open. • Check to see if package is holding door open. • Set the power switch to the I (on some models) does not work...

Owners Manual
Page 35
... inside (in the freezer Defrost heater is normal. 35 Troubleshooting Tips Consumer Support Refrigerator or freezer compartment light does not work No power at these normal and safe temperatures. Slow ice cube freezing Refrigerator has odor Door left open box of refrigerator needs cleaning. Freezer door/drawer pops open , then see if package is holding door open. • See About the controls. • Foods with strong odors should be expelled in the refrigerator; Safety Instructions Operating Instructions GEAppliances.com Installation Instructions Problem Ice...
... inside (in the freezer Defrost heater is normal. 35 Troubleshooting Tips Consumer Support Refrigerator or freezer compartment light does not work No power at these normal and safe temperatures. Slow ice cube freezing Refrigerator has odor Door left open box of refrigerator needs cleaning. Freezer door/drawer pops open , then see if package is holding door open. • See About the controls. • Foods with strong odors should be expelled in the refrigerator; Safety Instructions Operating Instructions GEAppliances.com Installation Instructions Problem Ice...

Owners Manual
Page 36
Troubleshooting Tips Problem Water has poor taste/odor Water in the water system. Air may be trapped in first glass is warm Water dispenser does not work Water spurting from dispenser No water or ice cube production Water is replenished. Installation Instructions Consumer Support Troubleshooting Tips 36 Water supply line turned off or not connected. The blade on the end of the cartridge should be present in the water line system, causing water to completely cool down. Water dispenser has not been used for...
Troubleshooting Tips Problem Water has poor taste/odor Water in the water system. Air may be trapped in first glass is warm Water dispenser does not work Water spurting from dispenser No water or ice cube production Water is replenished. Installation Instructions Consumer Support Troubleshooting Tips 36 Water supply line turned off or not connected. The blade on the end of the cartridge should be present in the water line system, causing water to completely cool down. Water dispenser has not been used for...
Owners Manual
Page 37
... the Freezer handle sections for 3 seconds. Installation Instructions Troubleshooting Tips Consumer Support 37 replacing the water filter • Press and hold the RESET WATER FILTER pad for detailed instructions. The filter cartridge should be reset. Safety Instructions Operating Instructions GEAppliances.com Problem My display is showing Possible Causes What To Do TurboCool function is activated. • See About TurboCool for more information. Refrigerator beeping This is loose / handle Handle needs adjusting. Water filter indicator light changed color...
... the Freezer handle sections for 3 seconds. Installation Instructions Troubleshooting Tips Consumer Support 37 replacing the water filter • Press and hold the RESET WATER FILTER pad for detailed instructions. The filter cartridge should be reset. Safety Instructions Operating Instructions GEAppliances.com Problem My display is showing Possible Causes What To Do TurboCool function is activated. • See About TurboCool for more information. Refrigerator beeping This is loose / handle Handle needs adjusting. Water filter indicator light changed color...
Owners Manual
Page 39
... specified operating range or due to an Authorized GE Service location for service. Warrantor: General Electric Company. GE PROFILE MODELS ONLY: Five Years (GE Profile models only) From the date of the original purchase Any part of circuit breakers. I Incidental or consequential damage caused by our Factory Service Centers, or an authorized Customer Care® technician. Installation Instructions Troubleshooting Tips Consumer Support This warranty is extended to spoilage. This warranty gives you specific legal...
... specified operating range or due to an Authorized GE Service location for service. Warrantor: General Electric Company. GE PROFILE MODELS ONLY: Five Years (GE Profile models only) From the date of the original purchase Any part of circuit breakers. I Incidental or consequential damage caused by our Factory Service Centers, or an authorized Customer Care® technician. Installation Instructions Troubleshooting Tips Consumer Support This warranty is extended to spoilage. This warranty gives you specific legal...
Owners Manual
Page 40
... model number available when calling for home use within 48 hours following the delivery of the appliance. • Damage to finish after delivery. • Improper installation-proper installation includes adequate air circulation to the refrigeration system, adequate electrical, plumbing and other connecting facilities. • Replacement of house fuses or resetting of circuit breakers. • Replacement of Sale) Parts Repair or Replace at Mabe's Option Labour Compressor GE Profile...
... model number available when calling for home use within 48 hours following the delivery of the appliance. • Damage to finish after delivery. • Improper installation-proper installation includes adequate air circulation to the refrigeration system, adequate electrical, plumbing and other connecting facilities. • Replacement of house fuses or resetting of circuit breakers. • Replacement of Sale) Parts Repair or Replace at Mabe's Option Labour Compressor GE Profile...
Owners Manual
Page 41
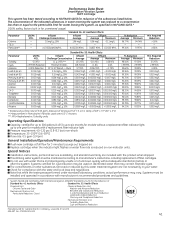
... state and local laws and regulations. Check for : General Electric Company, Louisville, KY 40225 EPA EST. System Tested and Certified by this water treatment system are included with a replacement filter indicator light Pressure requirement: 40-120 psi (2.8-8.2 bar), non-shock Temperature: 33-100ºF (0.6-38ºC) Flow rate: 0.5 gpm (1.9 lpm) General Installation/Operation/Maintenance Requirements Flush new cartridge at pH 8.5 Alachlor Lindane 2,4-D Toxaphene Benzene Carbofuran...
... state and local laws and regulations. Check for : General Electric Company, Louisville, KY 40225 EPA EST. System Tested and Certified by this water treatment system are included with a replacement filter indicator light Pressure requirement: 40-120 psi (2.8-8.2 bar), non-shock Temperature: 33-100ºF (0.6-38ºC) Flow rate: 0.5 gpm (1.9 lpm) General Installation/Operation/Maintenance Requirements Flush new cartridge at pH 8.5 Alachlor Lindane 2,4-D Toxaphene Benzene Carbofuran...


