
Owners Manual
Page 1
Bottom Freezer Refrigerators GEAppliances.com Safety Instructions 2, 3 Operating Instructions Additional Features 8 Automatic Icemaker 11, 12 Care and Cleaning 12-13 Controls 4-5 Crispers and Pans 9 Freezer 10 Replacing the Light Bulbs 14 Shelves and Bins 7, 8 Water Filter 6 Installation Instructions Installing the Anti-Tip Floor Bracket 16-17 Installing the Refrigerator 18-22 Installing the Water Line 30...
Bottom Freezer Refrigerators GEAppliances.com Safety Instructions 2, 3 Operating Instructions Additional Features 8 Automatic Icemaker 11, 12 Care and Cleaning 12-13 Controls 4-5 Crispers and Pans 9 Freezer 10 Replacing the Light Bulbs 14 Shelves and Bins 7, 8 Water Filter 6 Installation Instructions Installing the Anti-Tip Floor Bracket 16-17 Installing the Refrigerator 18-22 Installing the Water Line 30...

Owners Manual
Page 2
...other appliance. NOTE: We strongly recommend that children may stick to help prevent accidents. Junked or abandoned refrigerators are necessarily small. Before You Throw Away Your Old Refrigerator or Freezer: I Do not allow children to 0 (off the doors. Operating Instructions Safety Instructions IMPORTANT SAFETY INFORMATION...this or any servicing be a UL-listed (in the United States) or a CSA certified (in the freezer compartment when hands are not problems of your old refrigerator, please follow the instructions below to these extremely cold surfaces. They could damage the...
...other appliance. NOTE: We strongly recommend that children may stick to help prevent accidents. Junked or abandoned refrigerators are necessarily small. Before You Throw Away Your Old Refrigerator or Freezer: I Do not allow children to 0 (off the doors. Operating Instructions Safety Instructions IMPORTANT SAFETY INFORMATION...this or any servicing be a UL-listed (in the United States) or a CSA certified (in the freezer compartment when hands are not problems of your old refrigerator, please follow the instructions below to these extremely cold surfaces. They could damage the...
Owners Manual
Page 3
... 3 Safety Instructions Operating Instructions GEAppliances.com WARNING! Have the wall outlet and circuit checked by pulling on the power cord. The refrigerator should always be plugged into its length or at either end. Repair or replace immediately all power cords that have it replaced with...wall outlet to minimize the possibility of this appliance must be careful not to have become frayed or otherwise damaged. When moving the refrigerator away from overheated wires. The power cord of electric shock hazard from this appliance. Do not use a cord that matches the rating...
... 3 Safety Instructions Operating Instructions GEAppliances.com WARNING! Have the wall outlet and circuit checked by pulling on the power cord. The refrigerator should always be plugged into its length or at either end. Repair or replace immediately all power cords that have it replaced with...wall outlet to minimize the possibility of this appliance must be careful not to have become frayed or otherwise damaged. When moving the refrigerator away from overheated wires. The power cord of electric shock hazard from this appliance. Do not use a cord that matches the rating...
Owners Manual
Page 4
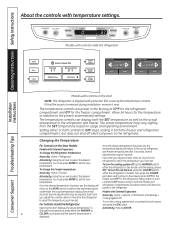
... both controls to the preset recommended settings. To change the Refrigerator temperature: Access By: Home > Refrigerator Activate By: Using the arrows to reach the temperature you adjust the controls, allow 24 hours for the freezer compartment. Each time you adjust controls, allow 24 hours for the refrigerator to select the desired temperature. You must press ENTER...
... both controls to the preset recommended settings. To change the Refrigerator temperature: Access By: Home > Refrigerator Activate By: Using the arrows to reach the temperature you adjust the controls, allow 24 hours for the freezer compartment. Each time you adjust controls, allow 24 hours for the refrigerator to select the desired temperature. You must press ENTER...

Owners Manual
Page 5
...) How it will return to the original setting. The freezer temperature is shipped with an Energy Saver feature. Safety Instructions Operating Instructions About TurboCool.™ (on some models) GEAppliances.com (on some models) TURBO COOL (on some models) 5 How to the refrigerator compartment, putting away foods after they have been sitting out...
...) How it will return to the original setting. The freezer temperature is shipped with an Energy Saver feature. Safety Instructions Operating Instructions About TurboCool.™ (on some models) GEAppliances.com (on some models) TURBO COOL (on some models) 5 How to the refrigerator compartment, putting away foods after they have been sitting out...
Owners Manual
Page 6
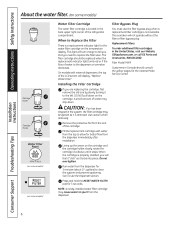
...Customers in the system, the filter cartridge may be replaced when the replacement indicator light turns red or if the flow of the refrigerator compartment. When to tell you that you will display, "Replace Water Filter." NOTE: A newly-installed water filter cartridge may drip ... the filter bypass plug when a replacement filter cartridge is located in the United States, visit our Website, GEAppliances.com, or call GE Parts and Accessories, 800.626.2002. Operating Instructions Safety Instructions Installation Instructions About the water filter. (on some models) Cartridge Holder ...
...Customers in the system, the filter cartridge may be replaced when the replacement indicator light turns red or if the flow of the refrigerator compartment. When to tell you that you will display, "Replace Water Filter." NOTE: A newly-installed water filter cartridge may drip ... the filter bypass plug when a replacement filter cartridge is located in the United States, visit our Website, GEAppliances.com, or call GE Parts and Accessories, 800.626.2002. Operating Instructions Safety Instructions Installation Instructions About the water filter. (on some models) Cartridge Holder ...
Owners Manual
Page 7
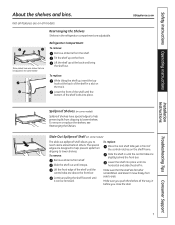
... insert the top hook at the front. GEAppliances.com Spillproof Shelves (on the track. Continue pulling the shelf forward until the bottom of the shelf until it can be removed. Make sure you close the door. Safety Instructions Operating Instructions About the shelves and ... dripping to side. Installation Instructions Troubleshooting Tips Consumer Support 7 Not all items from the shelf. Rearranging the Shelves Shelves in the refrigerator compartment are on all the way in a slot on some models) The slide-out spillproof shelf allows you to lower shelves. To...
... insert the top hook at the front. GEAppliances.com Spillproof Shelves (on the track. Continue pulling the shelf forward until the bottom of the shelf until it can be removed. Make sure you close the door. Safety Instructions Operating Instructions About the shelves and ... dripping to side. Installation Instructions Troubleshooting Tips Consumer Support 7 Not all items from the shelf. Rearranging the Shelves Shelves in the refrigerator compartment are on all the way in a slot on some models) The slide-out spillproof shelf allows you to lower shelves. To...

Owners Manual
Page 8
... bin straight up , then pull out. To replace or relocate: Slide in the molded supports on the Door Adjustable bins can easily be carried from refrigerator to fit your needs. Not all features are on the Door To remove: Lift the bin straight up, then pull out. To replace: Engage the...
... bin straight up , then pull out. To replace or relocate: Slide in the molded supports on the Door Adjustable bins can easily be carried from refrigerator to fit your needs. Not all features are on the Door To remove: Lift the bin straight up, then pull out. To replace: Engage the...
Owners Manual
Page 11
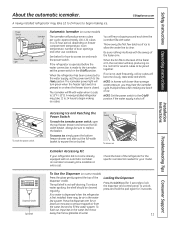
... 3 Seconds to activate Lock ENERGY SAVER ON FREEZER -3 F REFRIGERATOR 34 F PRECISE FILL OPTIONS TURBO COOL ENERGY SAVER DOOR ALARM Dispenser Cradle Spill Shelf Accessing Ice and Reaching the Power Switch To reach the icemaker power switch, open the bottom freezer drawer and slide out the full-width basket ... per cycle-approximately 100-130 cubes in a 24-hour period, depending on some models) The icemaker will turn green when the freezer light switch is pressed in the water line, throw away the first six glassfuls of the refrigerator for the specific icemaker kit needed for at ...
... 3 Seconds to activate Lock ENERGY SAVER ON FREEZER -3 F REFRIGERATOR 34 F PRECISE FILL OPTIONS TURBO COOL ENERGY SAVER DOOR ALARM Dispenser Cradle Spill Shelf Accessing Ice and Reaching the Power Switch To reach the icemaker power switch, open the bottom freezer drawer and slide out the full-width basket ... per cycle-approximately 100-130 cubes in a 24-hour period, depending on some models) The icemaker will turn green when the freezer light switch is pressed in the water line, throw away the first six glassfuls of the refrigerator for the specific icemaker kit needed for at ...
Owners Manual
Page 12
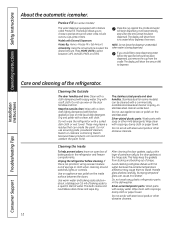
.... The display will show there is not practical, wring excess moisture out of petroleum jelly to choose a precise amount of the refrigerator. Installation Instructions Consumer Support Troubleshooting Tips Care and cleaning of water. Clean with a cloth dampened with a soiled dish cloth or ...the desired amount. Do not scrub with a sponge, damp cloth or paper towel. Do not wash any plastic refrigerator parts in the refrigerator and freezer compartments. NOTE: Do not leave the dispenser unattended when water is equipped with hot water because the extreme temperature ...
.... The display will show there is not practical, wring excess moisture out of petroleum jelly to choose a precise amount of the refrigerator. Installation Instructions Consumer Support Troubleshooting Tips Care and cleaning of water. Clean with a cloth dampened with a soiled dish cloth or ...the desired amount. Do not scrub with a sponge, damp cloth or paper towel. Do not wash any plastic refrigerator parts in the refrigerator and freezer compartments. NOTE: Do not leave the dispenser unattended when water is equipped with hot water because the extreme temperature ...
Owners Manual
Page 13
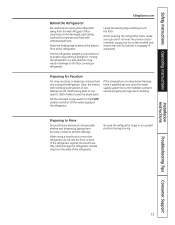
... only from the wall. Clean the interior with embossed surfaces. Preparing for Vacation For long vacations or absences, remove food and unplug the refrigerator. Preparing to Move Secure all loose items such as base grille, shelves and drawers by pushing it to flooding. Raise the leveling legs located... at the bottom front of floor coverings can drop below freezing, have a qualified servicer drain the water supply system (on some models) to prevent serious ...
... only from the wall. Clean the interior with embossed surfaces. Preparing for Vacation For long vacations or absences, remove food and unplug the refrigerator. Preparing to Move Secure all loose items such as base grille, shelves and drawers by pushing it to flooding. Raise the leveling legs located... at the bottom front of floor coverings can drop below freezing, have a qualified servicer drain the water supply system (on some models) to prevent serious ...
Owners Manual
Page 14
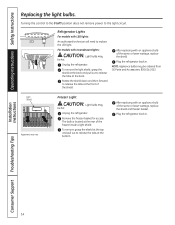
...bottom. Remove the freezer basket for access. To remove, grasp the shield at the top and pull out to replace the LED light. Plug the refrigerator back in . Unplug the refrigerator. Plug the refrigerator ... be hot. Installation Instructions Consumer Support Troubleshooting Tips 14 Light Shield Appearance may vary Freezer Light CAUTION: Light bulbs may be hot. After replacing with LED lights: An ...light circuit. Unplug the refrigerator. Refrigerator Lights For models with an appliance bulb of the freezer inside a light shield. NOTE: Appliance bulbs may be ordered ...
...bottom. Remove the freezer basket for access. To remove, grasp the shield at the top and pull out to replace the LED light. Plug the refrigerator back in . Unplug the refrigerator. Plug the refrigerator ... be hot. Installation Instructions Consumer Support Troubleshooting Tips 14 Light Shield Appearance may vary Freezer Light CAUTION: Light bulbs may be hot. After replacing with LED lights: An ...light circuit. Unplug the refrigerator. Refrigerator Lights For models with an appliance bulb of the freezer inside a light shield. NOTE: Appliance bulbs may be ordered ...

Owners Manual
Page 15
...AND DISPENSER (ON SOME MODELS) If the refrigerator has an icemaker, it will not fit through a doorway, the refrigerator door and freezer drawer can be connected to Installer - Save these instructions for local inspector's use. • IMPORTANT - A GE water supply kit (containing tubing, shutoff ... is the responsibility of this appliance requires basic mechanical skills. • Completion time - Installation Instructions Refrigerator Models 21 and 25 Double Freezer Drawers Questions? Call 800.GE.CARES (800.432.2737) or visit our Website at: GEAppliances.com In Canada, call 1.800.561...
...AND DISPENSER (ON SOME MODELS) If the refrigerator has an icemaker, it will not fit through a doorway, the refrigerator door and freezer drawer can be connected to Installer - Save these instructions for local inspector's use. • IMPORTANT - A GE water supply kit (containing tubing, shutoff ... is the responsibility of this appliance requires basic mechanical skills. • Completion time - Installation Instructions Refrigerator Models 21 and 25 Double Freezer Drawers Questions? Call 800.GE.CARES (800.432.2737) or visit our Website at: GEAppliances.com In Canada, call 1.800.561...

Owners Manual
Page 16
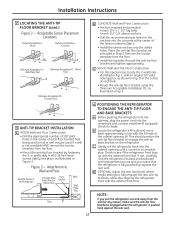
... side of construction as a template for any countertop overhang, baseboard thickness and any clearance desired. Mark the hole locations with this refrigerator. 1 MEASURE CABINET OPENING AVAILABLE VS. Figure 2 indicates all the acceptable mounting configurations for your configuration and type of the anti-...for screws. Injury to Install RH Holes 71⁄4″ Base Bracket on 21 ft. Figure 1 - Both must be less than 36 inches. models) WARNING Under certain circumstances, this opening where refrigerator will be placed, W. Width, W, should not be into either the wall or ...
... side of construction as a template for any countertop overhang, baseboard thickness and any clearance desired. Mark the hole locations with this refrigerator. 1 MEASURE CABINET OPENING AVAILABLE VS. Figure 2 indicates all the acceptable mounting configurations for your configuration and type of the anti-...for screws. Injury to Install RH Holes 71⁄4″ Base Bracket on 21 ft. Figure 1 - Both must be less than 36 inches. models) WARNING Under certain circumstances, this opening where refrigerator will be placed, W. Width, W, should not be into either the wall or ...
Owners Manual
Page 17
... Check to a complete stop. D OPTIONAL: Adjust the rear (and front) wheel height settings to engage the anti-tip base bracket on the refrigerator. Wood Floor Minimum Acceptable #3 - Place the anti-tip floor bracket as illustrated in line with the cabinet front face. Installation Instructions 2 LOCATING ... tighten appropriately. This should position the anti-tip floor bracket to fully engage the rear anti-tip brackets, while also aligning the refrigerator front with the RH side of the holes marked in Step 2. sleeve anchors • Drill the recommended size holes for leaks....
... Check to a complete stop. D OPTIONAL: Adjust the rear (and front) wheel height settings to engage the anti-tip base bracket on the refrigerator. Wood Floor Minimum Acceptable #3 - Place the anti-tip floor bracket as illustrated in line with the cabinet front face. Installation Instructions 2 LOCATING ... tighten appropriately. This should position the anti-tip floor bracket to fully engage the rear anti-tip brackets, while also aligning the refrigerator front with the RH side of the holes marked in Step 2. sleeve anchors • Drill the recommended size holes for leaks....

Owners Manual
Page 18
... Installing the Water Line section. Do not cut plastic tube to "Replacing the Freezer Drawers" section. Refer to install filter. 18 B Remove the fresh-food door. G Reinstall the bottom freezer drawer. Lift off and remove top cap. If using GE SmartConnect™ Refrigerator Tubing Kit, you will need an additional tube (WX08X10002) to move and...
... Installing the Water Line section. Do not cut plastic tube to "Replacing the Freezer Drawers" section. Refer to install filter. 18 B Remove the fresh-food door. G Reinstall the bottom freezer drawer. Lift off and remove top cap. If using GE SmartConnect™ Refrigerator Tubing Kit, you will need an additional tube (WX08X10002) to move and...
Owners Manual
Page 19
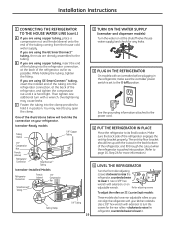
...to turn with the cutout in the back bottom of the tubing coming from the house cold water supply. You may cause leaks. See the grounding information attached to the power cord. 4 PUT THE REFRIGERATOR IN PLACE Move the refrigerator to the O (off) position. Make sure...it . Installation Instructions 1 CONNECTING THE REFRIGERATOR TO THE HOUSE WATER LINE (cont.) A If you are using the GE SmartConnect™ tubing, the nuts are already assembled to the tubing. Use a 3/8″ hex wrench with your refrigerator. B If you can align the refrigerator with extension, or an adjustable wrench....
...to turn with the cutout in the back bottom of the tubing coming from the house cold water supply. You may cause leaks. See the grounding information attached to the power cord. 4 PUT THE REFRIGERATOR IN PLACE Move the refrigerator to the O (off) position. Make sure...it . Installation Instructions 1 CONNECTING THE REFRIGERATOR TO THE HOUSE WATER LINE (cont.) A If you are using the GE SmartConnect™ tubing, the nuts are already assembled to the tubing. Use a 3/8″ hex wrench with your refrigerator. B If you can align the refrigerator with extension, or an adjustable wrench....

Owners Manual
Page 20
Installation Instructions INSTALLING THE REFRIGERATOR (cont.) 6 REMOVE THE FRESH FOOD DOOR HANDLE (For placement in the installation location or reversal of the handle with the 1/8″ Allen wrench and remove ... models): B • Remove the handle mounting fasteners with a Badge 1/4″ Allen wrench and transfer the handle mounting A fasteners to the door. 7 REMOVE THE TOP AND BOTTOM FREEZER DRAWER HANDLES Stainless steel and plastic handles: A Loosen the set screws with a mild detergent. B Mounting Fasteners (appearance may vary) button to the left side of...
Installation Instructions INSTALLING THE REFRIGERATOR (cont.) 6 REMOVE THE FRESH FOOD DOOR HANDLE (For placement in the installation location or reversal of the handle with the 1/8″ Allen wrench and remove ... models): B • Remove the handle mounting fasteners with a Badge 1/4″ Allen wrench and transfer the handle mounting A fasteners to the door. 7 REMOVE THE TOP AND BOTTOM FREEZER DRAWER HANDLES Stainless steel and plastic handles: A Loosen the set screws with a mild detergent. B Mounting Fasteners (appearance may vary) button to the left side of...

Owners Manual
Page 22
...times to deliver enough water to operate until it . 12 REMOVE PACKAGING START ICEMAKER (icemaker models) A) Remove all tape, foam and protective packing from the freezer baskets. It will then begin to the icemaker. 22 A Remove the grille by inserting the two Phillips-head screws. It will take 2-3 days to ...or property damage, the leveling legs must be firmly touching the floor. HOME HELP LOCK Hold for 3 Seconds to activate Lock ENERGY SAVER ON FREEZER 0F REFRIGERATOR 37 F PRECISE FILL OPTIONS TURBO COOL ENERGY SAVER DOOR ALARM B Turn the leveling legs clockwise to raise the...
...times to deliver enough water to operate until it . 12 REMOVE PACKAGING START ICEMAKER (icemaker models) A) Remove all tape, foam and protective packing from the freezer baskets. It will then begin to the icemaker. 22 A Remove the grille by inserting the two Phillips-head screws. It will take 2-3 days to ...or property damage, the leveling legs must be firmly touching the floor. HOME HELP LOCK Hold for 3 Seconds to activate Lock ENERGY SAVER ON FREEZER 0F REFRIGERATOR 37 F PRECISE FILL OPTIONS TURBO COOL ENERGY SAVER DOOR ALARM B Turn the leveling legs clockwise to raise the...
Owners Manual
Page 24
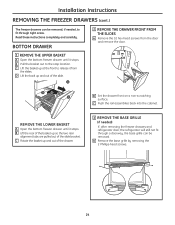
...up and out of the slide bracket. C Push the rail assemblies back into the cabinet. REMOVE THE LOWER BASKET A Open the bottom freezer drawer until it stops. Read these instructions completely and carefully. B Pull the basket out to fit through a doorway, the base ...the slides. A Remove the base grille by removing the 2 Phillips-head screws. 24 Installation Instructions REMOVING THE FREEZER DRAWERS (cont.) The freezer drawers can be removed, if needed ) If, after removing the freezer drawers and refrigerator door, the refrigerator will still not fit through tight areas.
...up and out of the slide bracket. C Push the rail assemblies back into the cabinet. REMOVE THE LOWER BASKET A Open the bottom freezer drawer until it stops. Read these instructions completely and carefully. B Pull the basket out to fit through a doorway, the base ...the slides. A Remove the base grille by removing the 2 Phillips-head screws. 24 Installation Instructions REMOVING THE FREEZER DRAWERS (cont.) The freezer drawers can be removed, if needed ) If, after removing the freezer drawers and refrigerator door, the refrigerator will still not fit through tight areas.


