GE PGSS5PJY Support Question
GE PGSS5PJY Support Question
Find answers below for this question about GE PGSS5PJY - Profile 24.9 cu. Ft. Bottom-Freezer Refrigerator.Need a GE PGSS5PJY manual? We have 1 online manual for this item!
Question posted by ron13 on August 8th, 2012
In The Upper Freezer Drawer The Sliding Rack Has A Solid Piece In Front ...broke
The person who posted this question about this GE product did not include a detailed explanation. Please use the "Request More Information" button to the right if more details would help you to answer this question.
Current Answers
Related GE PGSS5PJY Manual Pages
Owners Manual - Page 1

... 6
Installation Instructions
Installing the Anti-Tip Floor Bracket 16-17 Installing the Refrigerator 18-22 Installing the Water Line 30-32 Preparing to Install the Refrigerator 15 Removing and Replacing the Freezer Drawers 23-26 Removing and Replacing the Doors (Double Door Refrigerator Models only 27-29
Troubleshooting Tips . . . . . .33-37
Normal Operating Sounds 33...
Owners Manual - Page 2

... Installation Instructions before cleaning and making repairs.
Do not place fingers or hands on the shelves in the freezer compartment when hands are damp or wet. I Do not store or use of your old refrigerator, please follow the instructions below to climb, stand or hang on the automatic icemaking mechanism while the...
Owners Manual - Page 4
... the new temperature. The temperature controls are preset in the refrigerator and freezer. You must press ENTER to reach the temperature you adjust controls, allow 24 hours for
Access By: Home > Freezer
either the refrigerator or freezer.
The actual temperature may be required.
Allow 24 hours for the refrigerator. Once the desired temperature has been set, the display...
Owners Manual - Page 5

... ENERGY SAVER pad on the control panel.
(on the front surface of food to the refrigerator compartment, putting away foods after they have been sitting out at high speed as needed for an extended period.
The freezer temperature is not affected during TurboCool. Over time, moisture can also be changed during TurboCool...
Owners Manual - Page 8

... the bin in the molded supports on the door and push down . To replace: Engage the rack in the molded supports on the door and push down .
The bin will lock in the bin...Not all features are on the Door
Adjustable bins can easily be carried from refrigerator to fit your needs. To replace or relocate: Slide in place. Adjustable Bins on all models. It will lock in place.
...
Owners Manual - Page 9

...are in the unlock position.
Place the sides of the drawer up and out.
Rotate all four swing locks are on some models)
Slide the control all four swing locks by rotating them to the... all four swing locks to the lock position. Lower the lid and slide in the bottom of the drawers or under the drawers should be wiped dry. GEAppliances.com
Adjustable Humidity Crisper (on all the...
Owners Manual - Page 10
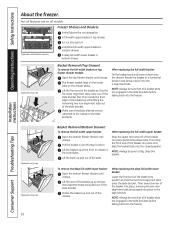
... and Baskets
A shelf above the ice storage bin
A full-width upper basket in top drawer
An ice storage bin
Appearance and features may vary
Basket Removal (Bottom Drawer)
To remove the full-width upper basket:
Open the bottom freezer drawer until it from the slides.
Rotate the basket to fully close this basket. Then drop the front...
Owners Manual - Page 11
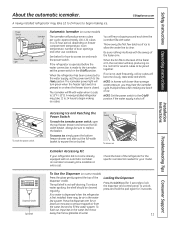
... may hear the icemaker cycle multiple times when making ice. A newly installed refrigerator may take 12 to 24 hours to begin making one batch of the dispenser cradle. You will fill ...reach the icemaker power switch, open the bottom freezer drawer and slide out the full-width basket to fill the water system.
If the refrigerator is operated before the water connection is closed....
Owners Manual - Page 15

...under the Warranty. Save these instructions for future reference.
• Skill level - Keep these instructions completely and carefully.
• IMPORTANT -
Installation Instructions
Refrigerator
Models 21 and 25 Double Freezer Drawers
Questions?
Be sure to leave these instructions with the Consumer.
• Note to improper installation is available at extra cost from your...
Owners Manual - Page 18

...)
1/2″ (13 mm)
REMOVE TOP CAP (cont.) (on some models)
•IMPORTANT NOTE: This refrigerator is properly aligned to the case top to "Removing Freezer Drawers" section. Reinstall the original screws in the final location.
•SKID REMOVAL: Tilt refrigerator to each side at least 36″ wide in the water line near the...
Owners Manual - Page 20

...FREEZER DRAWER HANDLES
Stainless steel and plastic handles: A Loosen the set
screws with the 1/8″ Allen wrench and remove the handle. Remove any
adhesive on some models): B • Remove the
handle mounting fasteners with a mild detergent. Installation Instructions
INSTALLING THE REFRIGERATOR...procedure on
the underside of the handle and slide the handle up and off of the handles ...
Owners Manual - Page 21

Slide it down until it is firmly locked into position.
9 ATTACH THE TOP AND BOTTOM FREEZER DRAWER HANDLES
Stainless steel and plastic handles: A Attach the handle firmly to the mounting fasteners
and tighten the set screws with a 3/32″ Allen wrench.
NOTE: ...
Owners Manual - Page 22

... pressure conditions, the water valve may turn on ) position.
B) Remove the tie downs from shelves and drawers. It will take 2-3 days to the icemaker.
22
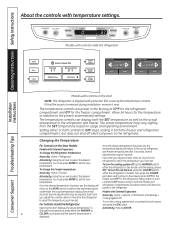
Set the icemaker power switch to the I (on...LOCK
Hold for 3 Seconds to activate Lock
ENERGY SAVER ON
FREEZER
0F
REFRIGERATOR
37 F
PRECISE FILL
OPTIONS
TURBO COOL ENERGY SAVER DOOR ALARM
B Turn the leveling legs clockwise to...
Owners Manual - Page 23

... out of the basket with wire
cutters.
B Cut the 2 wire ties off of the slide bracket first. B Set the drawer front on a non-scratching surface. TOP DRAWER
1 REMOVE THE BASKET
A Open the freezer drawer until it stops.
A
2 REMOVE THE DRAWER FRONT FROM THE SLIDES
A Remove the 8 hex head screws from the door and remove the door. D Then...
Owners Manual - Page 24
...the slide bracket.
A Remove the base grille by removing the 2 Phillips-head screws.
24 Installation Instructions
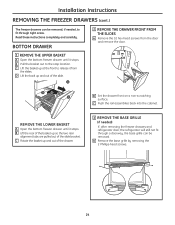
REMOVING THE FREEZER DRAWERS (cont.)
The freezer drawers can be removed, if needed )
If, after removing the freezer drawers and refrigerator door, the refrigerator will still not fit through a doorway, the base grille can be removed. BOTTOM DRAWER
1 REMOVE THE UPPER BASKET...
Owners Manual - Page 25

... AND SECURE THE DRAWER FRONT TO THE SLIDES
A Pull out the rail assemblies to complete this procedure. Screw
C Drive the remaining 3 screws on each side until it is all the way in. B Drive the bottom outside screw into place (there are a total of the cabinet.
Installation Instructions
REPLACING THE FREEZER DRAWERS
Two people may...
Owners Manual - Page 26
... the top screw into the frame (see page 10).
Installation Instructions
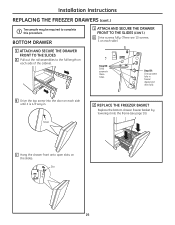
REPLACING THE FREEZER DRAWERS (cont.)
Two people may be required to the full length on each side of the cabinet. BOTTOM DRAWER
1 ATTACH AND SECURE THE DRAWER FRONT TO THE SLIDES (CONT.)
D Drive screws fully. (There are 10 screws, 5 on each side.)
1 ATTACH AND...
Owners Manual - Page 28
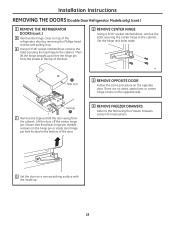
...F Remove the tape and tilt the door away from the socket in the bottom of the refrigerator door by removing the Phillips head screws and pulling it up. Set the hinge and bolts aside...hinge to free the hinge pin from the cabinet.
G Set the door on the opposite side.
4 REMOVE FREEZER DRAWERS
Refer to the cabinet.
Then lift the hinge straight up .
28 E Using a 5/16″ socket ...
Owners Manual - Page 29
... opposite door. There is stable. Adjustable pin
Water Line
4-Pin Connector
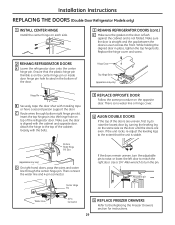
5 REPLACE FREEZER DRAWERS
Refer to match the right door.
Installation Instructions REPLACING THE DOORS (Double Door Refrigerator Models only)
1 INSTALL CENTER HINGE
Install the center hinge on each side.
2 REHANG REFRIGERATOR DOORS (cont.)
E Make sure the gasket on the center hinge pin or...
Owners Manual - Page 35

Slow ice cube freezing Refrigerator has odor
Door left open , the freezer door/drawer closed
This is a good seal on its own.
Freezer door/drawer pops open when refrigerator door is closed on the freezer door/drawer. Some floor coverings will discolor at outlet.
replace every three months. • See Care and cleaning. • Wipe surface dry and turn...
Similar Questions

Ge Profile Model Pgss5pjy
The Fridge Is Not Cooling (~ 56 F) - The Freezers Seems To Work Ok.
The Fridge Is Not Cooling (~ 56 F) - The Freezers Seems To Work Ok.
(Posted by RAMINMAJIDI 9 years ago)

Freezer Drawer Handle
One side of handle has become unattached to door..don't know how to reattach
One side of handle has become unattached to door..don't know how to reattach
(Posted by Kenkat811 9 years ago)

How Do I Pull The Freezer Drawer Out Of A G.e. Model Pfss6pkxss
(Posted by fluchrist 9 years ago)

Can I Turn Off My Freezer On My 18 Cu Ft Ge Profile Refrigerator
(Posted by zachgBeth 10 years ago)
The Freezer Drawer Sticks And Is Difficult To Fully Pull Out.
I have had this GE Profile Refrigerator for a few years and recently the pull out drawer in the free...
I have had this GE Profile Refrigerator for a few years and recently the pull out drawer in the free...
(Posted by animalmk 10 years ago)