Quick Specs
Page 1
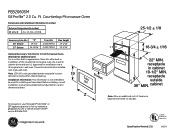
...to be installed over a gas wall oven. Overlap of trim kit over a GE single electric wall oven. approved for 2.0 GE Microwave Ovens (Available at geappliances.com or call GE Answer Center® service, 800.626.2000. receptacle outside 36" MIN. Countertop Microwave Oven Dimensions and Installation Information ...kits allow built-in cabinet 19-1/2" MIN. Before installing, consult installation instructions packed with product/kit for installing unit described. A C 16-3/4 ± 1/16 Trim Bracket Kit B 22" MIN. PEB2060SM GE Profile™ 2.0 Cu. Ft. cabinet Z...
...to be installed over a gas wall oven. Overlap of trim kit over a GE single electric wall oven. approved for 2.0 GE Microwave Ovens (Available at geappliances.com or call GE Answer Center® service, 800.626.2000. receptacle outside 36" MIN. Countertop Microwave Oven Dimensions and Installation Information ...kits allow built-in cabinet 19-1/2" MIN. Before installing, consult installation instructions packed with product/kit for installing unit described. A C 16-3/4 ± 1/16 Trim Bracket Kit B 22" MIN. PEB2060SM GE Profile™ 2.0 Cu. Ft. cabinet Z...

Use and Care Manual
Page 2
... power cord is damaged, it is in this oven with the provided installation instructions. Safety Instructions Operating Instructions IMPORTANT SAFETY INSTRUCTIONS. PRECAUTIONS TO AVOID POSSIBLE EXPOSURE TO EXCESSIVE MICROWAVE ENERGY (a) Do Not Attempt to microwave energy. Do not use as described in this ... available from the countertop edge to avoid accidental tipping of the appliance in the Precautions to Avoid Possible Exposure to place the front surface of life. s Be certain to Excessive Microwave Energy section above. This microwave oven is no damage to...
... power cord is damaged, it is in this oven with the provided installation instructions. Safety Instructions Operating Instructions IMPORTANT SAFETY INSTRUCTIONS. PRECAUTIONS TO AVOID POSSIBLE EXPOSURE TO EXCESSIVE MICROWAVE ENERGY (a) Do Not Attempt to microwave energy. Do not use as described in this ... available from the countertop edge to avoid accidental tipping of the appliance in the Precautions to Avoid Possible Exposure to place the front surface of life. s Be certain to Excessive Microwave Energy section above. This microwave oven is no damage to...
Use and Care Manual
Page 5
... Do not use an adapter plug with this appliance. If the power cord is properly installed and grounded. Microwave 30-45 seconds at least 1 inch away from hands and face. When microwaved, the metal can escape. s Cookware may be avoided, as directed by providing an ...plugged into its own electrical outlet to the dish. If they form a tight seal. Safety Instructions Operating Instructions ge.com MICROWAVE-SAFE COOKWARE Make sure all plastic wrap is safe for use in microwave ovens. s If you are not sure if a dish is suitable for proper use this test:...
... Do not use an adapter plug with this appliance. If the power cord is properly installed and grounded. Microwave 30-45 seconds at least 1 inch away from hands and face. When microwaved, the metal can escape. s Cookware may be avoided, as directed by providing an ...plugged into its own electrical outlet to the dish. If they form a tight seal. Safety Instructions Operating Instructions ge.com MICROWAVE-SAFE COOKWARE Make sure all plastic wrap is safe for use in microwave ovens. s If you are not sure if a dish is suitable for proper use this test:...

Use and Care Manual
Page 7
... model. 1200 Watts ge.com Operating Instructions Troubleshooting Tips Features of the Oven Door Latches. The turntable may vary from your microwave oven. Screen allows cooking to be in the oven. Convenience Guide. The turntable support must be viewed while keeping microwaves confined in place when using the oven. For 27″ installations: Model PEB2060DMBB PEB2060DMCC PEB2060SMSS PEB2060DMWW Kit JX2027DMBB...
... model. 1200 Watts ge.com Operating Instructions Troubleshooting Tips Features of the Oven Door Latches. The turntable may vary from your microwave oven. Screen allows cooking to be in the oven. Convenience Guide. The turntable support must be viewed while keeping microwaves confined in place when using the oven. For 27″ installations: Model PEB2060DMBB PEB2060DMCC PEB2060SMSS PEB2060DMWW Kit JX2027DMBB...
Use and Care Manual
Page 23
... bring the product to obtain service under the warranty. During this Limited Warranty. All warranty service provided by law. Safety Instructions Operating Instructions GE Microwave Oven Warranty. You are limited to replace the defective part. I Improper installation, delivery or maintenance. EXCLUSION OF IMPLIED WARRANTIES-Your sole and exclusive remedy is located in materials or workmanship. During...
... bring the product to obtain service under the warranty. During this Limited Warranty. All warranty service provided by law. Safety Instructions Operating Instructions GE Microwave Oven Warranty. You are limited to replace the defective part. I Improper installation, delivery or maintenance. EXCLUSION OF IMPLIED WARRANTIES-Your sole and exclusive remedy is located in materials or workmanship. During...
Installation Instructions
Page 1
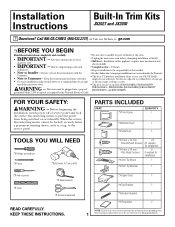
... be plugged into a properly PEB2060DMCC, PEB2060SMSS, JEB1860DMBB, JEB1860DMWW, JEB1860DMCC and JEB1860SMSS. Keep these instructions completely and carefully. • Do not alter or modify any GE/GE Profile single electric wall oven. install this kit. • Skill level - Before beginning the installation, switch power off at : ge.com ❒ BEFORE YOU BEGIN Read these instructions for future reference. • Proper...
... be plugged into a properly PEB2060DMCC, PEB2060SMSS, JEB1860DMBB, JEB1860DMWW, JEB1860DMCC and JEB1860SMSS. Keep these instructions completely and carefully. • Do not alter or modify any GE/GE Profile single electric wall oven. install this kit. • Skill level - Before beginning the installation, switch power off at : ge.com ❒ BEFORE YOU BEGIN Read these instructions for future reference. • Proper...
Installation Instructions
Page 2
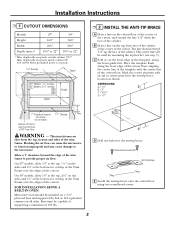
...-TIP BRACE A Draw a line on the sides and 11⁄4″ at the bottom for the anti-tip brace location as shown. Installation Instructions ❒ 1 CUTOUT DIMENSIONS Models 27″ 30″ Height 163⁄4″ 163⁄4″ Width 251⁄2″ 251⁄... of the cabinet. Place the template flush along the front guide line. Blocking the air flow can cause the microwave to function improperly and may cause damage to provide proper air flow. FOR INSTALLATION ABOVE A BUILT-IN OVEN: Microwave oven should extend 1/2″ up the face of the cabinet.
...-TIP BRACE A Draw a line on the sides and 11⁄4″ at the bottom for the anti-tip brace location as shown. Installation Instructions ❒ 1 CUTOUT DIMENSIONS Models 27″ 30″ Height 163⁄4″ 163⁄4″ Width 251⁄2″ 251⁄... of the cabinet. Place the template flush along the front guide line. Blocking the air flow can cause the microwave to function improperly and may cause damage to provide proper air flow. FOR INSTALLATION ABOVE A BUILT-IN OVEN: Microwave oven should extend 1/2″ up the face of the cabinet.
Installation Instructions
Page 3
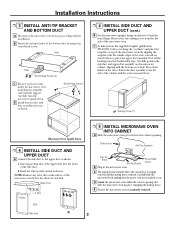
...bottom duct by using four round-head screws. Peel off the backing from the left side of the microwave oven. Existing Screw (1) Microwave Oven Upside Down ❒ 4 INSTALL SIDE DUCT AND UPPER DUCT A Connect the side duct to engage correctly with the bottom screw hole.... Anti-Tip Assembly Anti-Tip Brace Anti-Tip Bracket B Plug in place, engaging the anti-tip brace. Installation Instructions ❒ 3 INSTALL ANTI-TIP BRACKET AND BOTTOM DUCT A Disconnect the microwave oven before the ducts are attached. B Fasten the anti-tip bracket to bend the front flange. Upper Duct ...
...bottom duct by using four round-head screws. Peel off the backing from the left side of the microwave oven. Existing Screw (1) Microwave Oven Upside Down ❒ 4 INSTALL SIDE DUCT AND UPPER DUCT A Connect the side duct to engage correctly with the bottom screw hole.... Anti-Tip Assembly Anti-Tip Brace Anti-Tip Bracket B Plug in place, engaging the anti-tip brace. Installation Instructions ❒ 3 INSTALL ANTI-TIP BRACKET AND BOTTOM DUCT A Disconnect the microwave oven before the ducts are attached. B Fasten the anti-tip bracket to bend the front flange. Upper Duct ...
Installation Instructions
Page 4
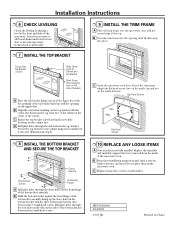
... edge at the front and sides of the microwave oven. C Open the microwave oven door. Drill pilot holes through the side holes in three round-head screws. Ensure that were removed from the inside top and two on the front flange of the bottom bracket. B Keep these installation instructions and extra screws for future reference and...
... edge at the front and sides of the microwave oven. C Open the microwave oven door. Drill pilot holes through the side holes in three round-head screws. Ensure that were removed from the inside top and two on the front flange of the bottom bracket. B Keep these installation instructions and extra screws for future reference and...

