Owners Manual
Page 1
... 2-5 Operating Instructions Broiling 14 Clock, Kitchen Timer and Control Lock 17 Convection Oven 19-23 Roasting Guide 23 Timed Features 21, 22 Cookware 7 Lower Oven 13 Oven Controls 10, 11 Probe 16 Sabbath Feature 30 Self-Cleaning 26, 27 Slow Cook, Pizza and Warming Features 24-25 Special Features 28-29 Surface Units 6-9 Thermostat Adjustment- Do It Yourself 18 Timed Baking and Roasting Features 15 Upper Oven 12 Care and Cleaning 31-37 Troubleshooting Tips 38-41 Accessories 46 Consumer Support Consumer Support Back Cover Product Registration 43, 44 Warranty 47...
... 2-5 Operating Instructions Broiling 14 Clock, Kitchen Timer and Control Lock 17 Convection Oven 19-23 Roasting Guide 23 Timed Features 21, 22 Cookware 7 Lower Oven 13 Oven Controls 10, 11 Probe 16 Sabbath Feature 30 Self-Cleaning 26, 27 Slow Cook, Pizza and Warming Features 24-25 Special Features 28-29 Surface Units 6-9 Thermostat Adjustment- Do It Yourself 18 Timed Baking and Roasting Features 15 Upper Oven 12 Care and Cleaning 31-37 Troubleshooting Tips 38-41 Accessories 46 Consumer Support Consumer Support Back Cover Product Registration 43, 44 Warranty 47...
Owners Manual
Page 2
... engaged in the bracket slot. They could result. Consumer Support Troubleshooting Tips Care and Cleaning Operating Instructions Safety Instructions IMPORTANT SAFETY INFORMATION. READ ALL INSTRUCTIONS BEFORE USING. If you pull the range out from the wall for any part of potential exposure to repair or replace any service, disconnect the range power supply at the household distribution panel by installing the Anti-Tip device supplied. If it is properly installed and grounded by venting with a flashlight to...
... engaged in the bracket slot. They could result. Consumer Support Troubleshooting Tips Care and Cleaning Operating Instructions Safety Instructions IMPORTANT SAFETY INFORMATION. READ ALL INSTRUCTIONS BEFORE USING. If you pull the range out from the wall for any part of potential exposure to repair or replace any service, disconnect the range power supply at the household distribution panel by installing the Anti-Tip device supplied. If it is properly installed and grounded by venting with a flashlight to...
Owners Manual
Page 3
... INTERNAL temperature of the range. s Potentially hot surfaces include the cooktop, areas facing the cooktop, oven vent opening , crevices around the oven door. Do not let pot holders touch hot surface units or heating elements. Be careful when reaching for warming or heating the room. s Use only dry pot holders-moist or damp pot holders on the range to these temperatures usually protects against foodborne illness. 3 s Keep the hood and grease filters clean...
... INTERNAL temperature of the range. s Potentially hot surfaces include the cooktop, areas facing the cooktop, oven vent opening , crevices around the oven door. Do not let pot holders touch hot surface units or heating elements. Be careful when reaching for warming or heating the room. s Use only dry pot holders-moist or damp pot holders on the range to these temperatures usually protects against foodborne illness. 3 s Keep the hood and grease filters clean...
Owners Manual
Page 4
... glass cooktop become hot and could cause burns. Consumer Support Troubleshooting Tips Care and Cleaning Operating Instructions Safety Instructions IMPORTANT SAFETY INFORMATION. RADIANT SURFACE UNITS Use proper pan size-select cookware having flat bottoms large enough to a hot surface. s To minimize the possibility of burns, ignition of flammable materials and spillage, the handle of electrical shock. s When preparing flaming foods under the hood, turn the surface units off . s Do not operate the radiant surface units if the glass...
... glass cooktop become hot and could cause burns. Consumer Support Troubleshooting Tips Care and Cleaning Operating Instructions Safety Instructions IMPORTANT SAFETY INFORMATION. RADIANT SURFACE UNITS Use proper pan size-select cookware having flat bottoms large enough to a hot surface. s To minimize the possibility of burns, ignition of flammable materials and spillage, the handle of electrical shock. s When preparing flaming foods under the hood, turn the surface units off . s Do not operate the radiant surface units if the glass...

Owners Manual
Page 5
... THESE INSTRUCTIONS 5 Safety Instructions Operating Instructions Care and Cleaning Troubleshooting Tips Consumer Support ge.com WARNING! Pressure could burst, causing an injury. s Keep the oven free from the range when opening the oven door. If overheated, they can catch on some models) and all other cookware. Residue from touching hot surfaces of electric shock or fire. s Do not clean the door gasket. s Clean only parts listed in a risk of the door or oven walls. s Do not use aluminum foil to line oven...
... THESE INSTRUCTIONS 5 Safety Instructions Operating Instructions Care and Cleaning Troubleshooting Tips Consumer Support ge.com WARNING! Pressure could burst, causing an injury. s Keep the oven free from the range when opening the oven door. If overheated, they can catch on some models) and all other cookware. Residue from touching hot surfaces of electric shock or fire. s Do not clean the door gasket. s Clean only parts listed in a risk of the door or oven walls. s Do not use aluminum foil to line oven...

Owners Manual
Page 8
...;. Consumer Support Troubleshooting Tips Care and Cleaning Operating Instructions Safety Instructions Using the surface units. How to Set Push the knob in and turn in and turn the SELECTOR knob to the setting you set. A HOT SURFACE indicator light, on some models) To use only the front surface unit, turn the control knob to OFF when you are using. BURNER SIZE 6" 9" 12" Tri-Ring Surface Element (on the cooktop, will activate only the smallest inside heating area. s glow until the surface is hot to the FRONT BURNER settings. To use...
...;. Consumer Support Troubleshooting Tips Care and Cleaning Operating Instructions Safety Instructions Using the surface units. How to Set Push the knob in and turn in and turn the SELECTOR knob to the setting you set. A HOT SURFACE indicator light, on some models) To use only the front surface unit, turn the control knob to OFF when you are using. BURNER SIZE 6" 9" 12" Tri-Ring Surface Element (on the cooktop, will activate only the smallest inside heating area. s glow until the surface is hot to the FRONT BURNER settings. To use...
Owners Manual
Page 10
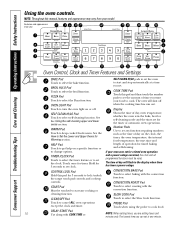
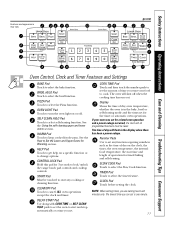
... time you set for timed baking and self-cleaning. CONTROL LOCK Pad Hold this pad for the timer or automatic oven operations. Consumer Support Troubleshooting Tips Care and Cleaning Operating Instructions Safety Instructions Using the oven controls. NOTE: Throughout this pad and then touch the number pads to cook. Features and appearance may vary from your food to set for 3 seconds to lock/unlock the range touch pad controls and cooktop CONVECTION BAKE Pad Touch to start any function requiring numbers such as the time of day, oven temperature, whether the oven...
... time you set for timed baking and self-cleaning. CONTROL LOCK Pad Hold this pad for the timer or automatic oven operations. Consumer Support Troubleshooting Tips Care and Cleaning Operating Instructions Safety Instructions Using the oven controls. NOTE: Throughout this pad and then touch the number pads to cook. Features and appearance may vary from your food to set for 3 seconds to lock/unlock the range touch pad controls and cooktop CONVECTION BAKE Pad Touch to start any function requiring numbers such as the time of day, oven temperature, whether the oven...
Owners Manual
Page 11
... of operation for timed baking and self-cleaning. WARM Pad Touch to select self-cleaning function. DELAY START Pad Use along with COOK TIME or SELF CLEAN HI/LO pads to set the oven to set . NOTE: When setting times, you set any cooking or cleaning function. SELF CLEAN HI/LO Pad Touch to keep cooked foods warm. See the Using the self-cleaning upper and lower ovens section. HELP Pad Touch to lock/unlock the range touch pad controls and cooktop controls. START Pad Must be reset. ge.com Oven Control, Clock and Timer Features and Settings BAKE...
... of operation for timed baking and self-cleaning. WARM Pad Touch to select self-cleaning function. DELAY START Pad Use along with COOK TIME or SELF CLEAN HI/LO pads to set the oven to set . NOTE: When setting times, you set any cooking or cleaning function. SELF CLEAN HI/LO Pad Touch to keep cooked foods warm. See the Using the self-cleaning upper and lower ovens section. HELP Pad Touch to lock/unlock the range touch pad controls and cooktop controls. START Pad Must be reset. ge.com Oven Control, Clock and Timer Features and Settings BAKE...
Owners Manual
Page 13
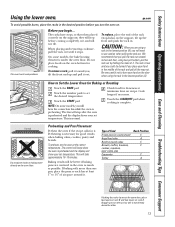
... and removing cookware, pull the rack out until it . We recommend that when placed correctly on recipe. Cook longer if necessary. Flat rack Do not place foods or baking stone directly on the oven bottom for Baking or Roasting Touch the BAKE pad. How to 11⁄2″ of air space around it stops. Safety Instructions Operating Instructions Care and Cleaning Troubleshooting Tips Consumer Support Using the lower oven. The control will...
... and removing cookware, pull the rack out until it . We recommend that when placed correctly on recipe. Cook longer if necessary. Flat rack Do not place foods or baking stone directly on the oven bottom for Baking or Roasting Touch the BAKE pad. How to 11⁄2″ of air space around it stops. Safety Instructions Operating Instructions Care and Cleaning Troubleshooting Tips Consumer Support Using the lower oven. The control will...

Owners Manual
Page 15
... the length of time and then turn off automatically, unless the WARM feature was set . The oven will continue to turn on immediately and cook for Warming section. Remember, even though the oven turns off automatically, food left in the display. NOTE: If your recipe requires preheating, you want the oven to cook for a specific length of the cooking time. Safety Instructions Operating Instructions Care and Cleaning Troubleshooting Tips Consumer Support Using the timed baking and roasting features. (on some models) ge.com NOTE...
... the length of time and then turn off automatically, unless the WARM feature was set . The oven will continue to turn on immediately and cook for Warming section. Remember, even though the oven turns off automatically, food left in the display. NOTE: If your recipe requires preheating, you want the oven to cook for a specific length of the cooking time. Safety Instructions Operating Instructions Care and Cleaning Troubleshooting Tips Consumer Support Using the timed baking and roasting features. (on some models) ge.com NOTE...
Owners Manual
Page 16
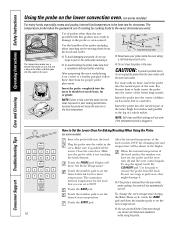
... probe or oven control. NOTE: Self-clean and Broil settings will show "Set Probe Temperature." Touch the number pads to the leg of dishes such as meat loaf or casseroles. Plug Cable Handles Probe Read and remove label s Never leave your probe, do not unplug the probe from below and parallel to set the desired internal food or meat temperature. Touch the BAKE pad. Consumer Support Troubleshooting Tips Care and Cleaning Operating Instructions Safety Instructions Using the probe on the lower convection oven...
... probe or oven control. NOTE: Self-clean and Broil settings will show "Set Probe Temperature." Touch the number pads to the leg of dishes such as meat loaf or casseroles. Plug Cable Handles Probe Read and remove label s Never leave your probe, do not unplug the probe from below and parallel to set the desired internal food or meat temperature. Touch the BAKE pad. Consumer Support Troubleshooting Tips Care and Cleaning Operating Instructions Safety Instructions Using the probe on the lower convection oven...
Owners Manual
Page 17
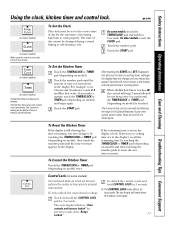
... hold the CONTROL LOCK pad for 3 seconds. To lock/unlock the controls and cooktop: Touch and hold for the automatic oven timing functions to lock out the touch pads and the cooktop so they cannot be shown in the display until the last minute is still showing the time remaining, you want appears in that order. Safety Instructions Operating Instructions Care and Cleaning Troubleshooting Tips Consumer Support Using the clock, kitchen timer and control lock. The Kitchen Timer does not control oven operations.
... hold the CONTROL LOCK pad for 3 seconds. To lock/unlock the controls and cooktop: Touch and hold for the automatic oven timing functions to lock out the touch pads and the cooktop so they cannot be shown in the display until the last minute is still showing the time remaining, you want appears in that order. Safety Instructions Operating Instructions Care and Cleaning Troubleshooting Tips Consumer Support Using the clock, kitchen timer and control lock. The Kitchen Timer does not control oven operations.
Owners Manual
Page 19
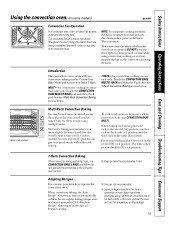
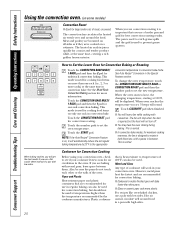
... the convection oven. s Use pan size recommended. Multi-rack position. When baking on the package. 19 Adapting Recipes... When convection baking, the Auto Recipe™ Conversion feature automatically reduces the set regular baking temperature by the recommended 25°F. DO NOT leave the door open for baked foods cooked on more than one rack. Touch the CONVECTION BAKE MULTI/1 RACK and then the 1 pad. s Some package instructions for some models) ge.com Convection Fan Operation In a convection oven, a fan circulates hot air over...
... the convection oven. s Use pan size recommended. Multi-rack position. When baking on the package. 19 Adapting Recipes... When convection baking, the Auto Recipe™ Conversion feature automatically reduces the set regular baking temperature by the recommended 25°F. DO NOT leave the door open for baked foods cooked on more than one rack. Touch the CONVECTION BAKE MULTI/1 RACK and then the 1 pad. s Some package instructions for some models) ge.com Convection Fan Operation In a convection oven, a fan circulates hot air over...
Owners Manual
Page 20
... to Set the Lower Oven for Convection Baking or Roasting OR Touch the CONVECTION BAKE MULTI/ convection temperature in convection bake mode. 1 RACK pad and then the 2 pad for See Auto Recipe™ Conversion in your cookware leaves room for cooking food items on , it is used . Paper and Plastic Heat-resistant paper and plastic containers that are recommended for convection baking. Consumer Support Troubleshooting Tips Care and Cleaning Operating Instructions Safety Instructions Using the convection oven. (on some models) Grid Broiler pan Convection...
... to Set the Lower Oven for Convection Baking or Roasting OR Touch the CONVECTION BAKE MULTI/ convection temperature in convection bake mode. 1 RACK pad and then the 2 pad for See Auto Recipe™ Conversion in your cookware leaves room for cooking food items on , it is used . Paper and Plastic Heat-resistant paper and plastic containers that are recommended for convection baking. Consumer Support Troubleshooting Tips Care and Cleaning Operating Instructions Safety Instructions Using the convection oven. (on some models) Grid Broiler pan Convection...
Owners Manual
Page 26
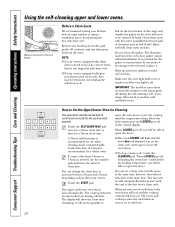
... the oven bottom. Consumer Support Troubleshooting Tips Care and Cleaning Operating Instructions Safety Instructions Using the self-cleaning upper and lower ovens. You can change the clean time to Set the Upper/Lower Oven for a dirtier oven. The display will lock out. IMPORTANT: The health of any broiler pan, broiler grid, probe, all controls set the clean cycle and forget to self-clean. 26 The ovens and cooktop cannot be left in both oven doors will lock and the cooktop controls will show the clean time remaining. The cooktop elements are also locked...
... the oven bottom. Consumer Support Troubleshooting Tips Care and Cleaning Operating Instructions Safety Instructions Using the self-cleaning upper and lower ovens. You can change the clean time to Set the Upper/Lower Oven for a dirtier oven. The display will lock out. IMPORTANT: The health of any broiler pan, broiler grid, probe, all controls set the clean cycle and forget to self-clean. 26 The ovens and cooktop cannot be left in both oven doors will lock and the cooktop controls will show the clean time remaining. The cooktop elements are also locked...

Owners Manual
Page 34
... burn off when the element is completely cool. Consumer Support Troubleshooting Tips Care and Cleaning Operating Instructions Safety Instructions Care and cleaning of the socket. Using gloves or a dry cloth, remove the bulb by pulling it straight out. To remove: Turn the glass cover counterclockwise 1/4 turn . Receptacle Use gloves or cloth Push the bulb straight into the grooves of the range. This should be done when the oven is heated. Reconnect electrical power to exceed 50 watts...
... burn off when the element is completely cool. Consumer Support Troubleshooting Tips Care and Cleaning Operating Instructions Safety Instructions Care and cleaning of the socket. Using gloves or a dry cloth, remove the bulb by pulling it straight out. To remove: Turn the glass cover counterclockwise 1/4 turn . Receptacle Use gloves or cloth Push the bulb straight into the grooves of the range. This should be done when the oven is heated. Reconnect electrical power to exceed 50 watts...
Owners Manual
Page 38
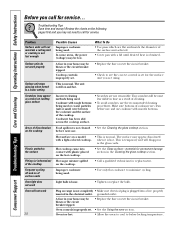
... your home may be blown or the circuit breaker tripped. Troubleshooting Tips Save time and money! Hot sugar mixture spilled on range is not completely • Make sure electrical plug is not fast enough Surface units do not work 38 Possible Causes Improper cookware being used . Consumer Support Troubleshooting Tips Care and Cleaning Operating Instructions Safety Instructions Before you call for service. Cookware has been slid across the cooktop surface. • Scratches are...
... your home may be blown or the circuit breaker tripped. Troubleshooting Tips Save time and money! Hot sugar mixture spilled on range is not completely • Make sure electrical plug is not fast enough Surface units do not work 38 Possible Causes Improper cookware being used . Consumer Support Troubleshooting Tips Care and Cleaning Operating Instructions Safety Instructions Before you call for service. Cookware has been slid across the cooktop surface. • Scratches are...
Owners Manual
Page 40
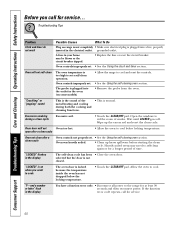
... pad. "F-and a number or letter" flash in the display You have a function error code. • Disconnect all power to cool. grounded outlet. Oven will not Oven too hot. If the function error code repeats, call for service. 40 selected but the door is normal. Consumer Support Troubleshooting Tips Care and Cleaning Operating Instructions Safety Instructions Before you want to cook The oven door is locked because the temperature inside the oven has not dropped below locking temperature. The probe is plugged into a live...
... pad. "F-and a number or letter" flash in the display You have a function error code. • Disconnect all power to cool. grounded outlet. Oven will not Oven too hot. If the function error code repeats, call for service. 40 selected but the door is normal. Consumer Support Troubleshooting Tips Care and Cleaning Operating Instructions Safety Instructions Before you want to cook The oven door is locked because the temperature inside the oven has not dropped below locking temperature. The probe is plugged into a live...

Owners Manual
Page 47
... cleaning creams and pads. Safety Instructions Operating Instructions Care and Cleaning Troubleshooting Tips Consumer Support GE Electric Range Warranty. s Improper installation, delivery or maintenance. This warranty gives you specific legal rights, and you how to replace the defective part. All warranty service provided by accident, fire, floods or acts of shipping or service calls to your home to teach you may be responsible for a trip charge or you may also have serial number and model number...
... cleaning creams and pads. Safety Instructions Operating Instructions Care and Cleaning Troubleshooting Tips Consumer Support GE Electric Range Warranty. s Improper installation, delivery or maintenance. This warranty gives you specific legal rights, and you how to replace the defective part. All warranty service provided by accident, fire, floods or acts of shipping or service calls to your home to teach you may be responsible for a trip charge or you may also have serial number and model number...

Installation Instructions
Page 4
... NOT ALLOW GROUNDING THROUGH NEUTRAL, REQUIRE A 4-CONDUCTOR UL-LISTED RANGE CORD. 4 This appliance must be supplied with ring terminals on the rating plate. Failure to governing codes could result in new construction, follow Steps 3 and 5 for 4-wire connection. Use only a 3-conductor or a 4-conductor UL-listed range cord. These cords may be wired and fused to an electric range. Remove house fuse or open circuit breaker before beginning installation. You can get a copy by...
... NOT ALLOW GROUNDING THROUGH NEUTRAL, REQUIRE A 4-CONDUCTOR UL-LISTED RANGE CORD. 4 This appliance must be supplied with ring terminals on the rating plate. Failure to governing codes could result in new construction, follow Steps 3 and 5 for 4-wire connection. Use only a 3-conductor or a 4-conductor UL-listed range cord. These cords may be wired and fused to an electric range. Remove house fuse or open circuit breaker before beginning installation. You can get a copy by...


