Quick Specs
Page 1
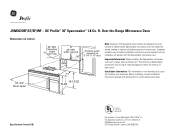
...Listed by Underwriters R Laboratories For answers to -follow installation instructions and convenient full-size templates are packed with product/kit for current dimensional data. GE Profile™ 36" Spacemaker® 1.8 Cu. Electrical...JVM3670BF/CF/SF/WF - Ft. Complete detailed, easy-to your Monogram,® GE Profile™ or GE appliance questions, visit our website at GEAppliances.com or call GE Answer Center® service, 800.626.2000. No additional wiring, venting or cabinet rebuilding necessary in inches) 21-3/4" Door open 66" MIN. Important Information: When installing...
...Listed by Underwriters R Laboratories For answers to -follow installation instructions and convenient full-size templates are packed with product/kit for current dimensional data. GE Profile™ 36" Spacemaker® 1.8 Cu. Electrical...JVM3670BF/CF/SF/WF - Ft. Complete detailed, easy-to your Monogram,® GE Profile™ or GE appliance questions, visit our website at GEAppliances.com or call GE Answer Center® service, 800.626.2000. No additional wiring, venting or cabinet rebuilding necessary in inches) 21-3/4" Door open 66" MIN. Important Information: When installing...
Quick Specs
Page 3
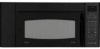
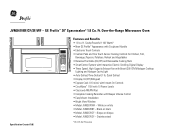
... Cooking Rack • SmartControl System with Interactive Electric Scrolling Digital Display • Three Speed, High-Capacity Exhaust Fan with Beeper Volume Control • Easy Mount Installation • Bright View Window • Model JVM3670WF - Bisque on black • Model JVM3670CF - Black on bisque • Model JVM3670SF - Quick Defrost •... HELP TIMER REMINDER VENT FAN VENT FAN BOOST SURFACE LIGHT Features and Benefits • 1.8 cu. Stainless steel *IEC-705 Test Procedure TM JVM3670BF/CF/SF/WF - GE Profile™ 36" Spacemaker® 1.8 Cu. Ft.
... Cooking Rack • SmartControl System with Interactive Electric Scrolling Digital Display • Three Speed, High-Capacity Exhaust Fan with Beeper Volume Control • Easy Mount Installation • Bright View Window • Model JVM3670WF - Bisque on black • Model JVM3670CF - Black on bisque • Model JVM3670SF - Quick Defrost •... HELP TIMER REMINDER VENT FAN VENT FAN BOOST SURFACE LIGHT Features and Benefits • 1.8 cu. Stainless steel *IEC-705 Test Procedure TM JVM3670BF/CF/SF/WF - GE Profile™ 36" Spacemaker® 1.8 Cu. Ft.
Use and Care Manual
Page 2
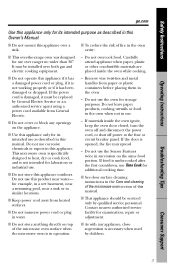
...soil or cleaner residue to microwave energy. s The Oven Should Not be followed, including the following: s Read and follow the s Install or locate this specific precautions in appliance only in harmful exposure to accumulate on page 8. Connect only and is damaged. IMPORTANT SAFETY INFORMATION.... the information in this oven with the door open since open-door operation can result in the Precautions to a properly grounded installation over electric outlet. It is particularly important that the oven door close properly and that there is not approved or tested for ...
...soil or cleaner residue to microwave energy. s The Oven Should Not be followed, including the following: s Read and follow the s Install or locate this specific precautions in appliance only in harmful exposure to accumulate on page 8. Connect only and is damaged. IMPORTANT SAFETY INFORMATION.... the information in this oven with the door open since open-door operation can result in the Precautions to a properly grounded installation over electric outlet. It is particularly important that the oven door close properly and that there is not approved or tested for ...
Use and Care Manual
Page 3
... appliance over ranges no wider than 36″. If materials inside the oven while cooking. If the door is opened, the fire may be installed over both gas and electric cooking equipment. - If food is in operation. s Do not store anything directly on top of fire in the... by children. Do not leave paper products, cooking utensils or food in the oven when not in use over a sink. Safety Instructions Operating Instructions ge.com Use this appliance only for example, in a wet basement, near a swimming pool, near water- Do not overcook food. Carefully attend appliance when...
... appliance over ranges no wider than 36″. If materials inside the oven while cooking. If the door is opened, the fire may be installed over both gas and electric cooking equipment. - If food is in operation. s Do not store anything directly on top of fire in the... by children. Do not leave paper products, cooking utensils or food in the oven when not in use over a sink. Safety Instructions Operating Instructions ge.com Use this appliance only for example, in a wet basement, near a swimming pool, near water- Do not overcook food. Carefully attend appliance when...
Use and Care Manual
Page 4
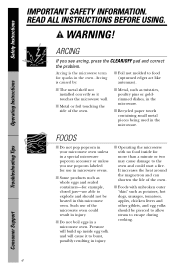
... If you use popcorn labeled for example, closed jars-are able to explode and should be heated in this microwave oven. s The metal shelf not installed correctly so it to food (upturned edges act like antennas). s Foods with no food inside egg yolk and will cause it touches the microwave wall...
... If you use popcorn labeled for example, closed jars-are able to explode and should be heated in this microwave oven. s The metal shelf not installed correctly so it to food (upturned edges act like antennas). s Foods with no food inside egg yolk and will cause it touches the microwave wall...

Use and Care Manual
Page 8
... breaker. Do not use . If the power cord is your personal responsibility and obligation to have a qualified electrician or service technician install an outlet near the appliance. Ensure proper ground exists before use an adapter plug with a properly grounded 3-prong wall outlet. If ...to whether the appliance is equipped with a power cord having a grounding wire with this appliance into an outlet that is properly installed and grounded. READ ALL INSTRUCTIONS BEFORE USING. Do not under any circumstances cut or remove the third (ground) prong from the ...
... breaker. Do not use . If the power cord is your personal responsibility and obligation to have a qualified electrician or service technician install an outlet near the appliance. Ensure proper ground exists before use an adapter plug with a properly grounded 3-prong wall outlet. If ...to whether the appliance is equipped with a power cord having a grounding wire with this appliance into an outlet that is properly installed and grounded. READ ALL INSTRUCTIONS BEFORE USING. Do not under any circumstances cut or remove the third (ground) prong from the ...
Use and Care Manual
Page 10
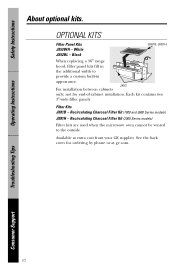
.... not for ordering by phone or at extra cost from your GE supplier. Filter Kits JX81B - Recirculating Charcoal Filter Kit (1800 and 3600 Series models) JX81H - See the back cover for end-of-cabinet installation. JX52 For installation between cabinets only; Each kit contains two 3″-wide filler panels. Recirculating Charcoal Filter Kit...
.... not for ordering by phone or at extra cost from your GE supplier. Filter Kits JX81B - Recirculating Charcoal Filter Kit (1800 and 3600 Series models) JX81H - See the back cover for end-of-cabinet installation. JX52 For installation between cabinets only; Each kit contains two 3″-wide filler panels. Recirculating Charcoal Filter Kit...
Use and Care Manual
Page 32
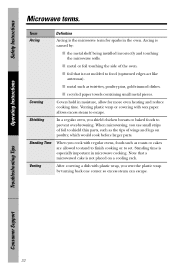
.... Standing Time When you use small strips of foil to escape. Shielding In a regular oven, you vent the plastic wrap by : s the metal shelf being installed incorrectly and touching the microwave walls. s foil that a microwaved cake is not molded to set. Safety Instructions Operating Instructions Microwave terms. Term Definition Arcing Arcing...
.... Standing Time When you use small strips of foil to escape. Shielding In a regular oven, you vent the plastic wrap by : s the metal shelf being installed incorrectly and touching the microwave walls. s foil that a microwaved cake is not molded to set. Safety Instructions Operating Instructions Microwave terms. Term Definition Arcing Arcing...
Use and Care Manual
Page 38
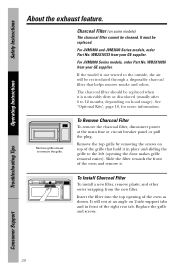
... when it is not vented to the left (opening of the grille that helps remove smoke and odors. WB2X10733 from your GE supplier. WB2X10956 from your GE supplier. Remove grille screws to 12 months, depending on some models) The charcoal filter cannot be replaced. Remove the top ... . To Remove Charcoal Filter To remove the charcoal filter, disconnect power at an angle on top of the oven as shown. To Install Charcoal Filter To install a new filter, remove plastic and other outer wrapping from the new filter. Charcoal Filter (on hood usage). For JVM1800 and JVM3600...
... when it is not vented to the left (opening of the grille that helps remove smoke and odors. WB2X10733 from your GE supplier. WB2X10956 from your GE supplier. Remove grille screws to 12 months, depending on some models) The charcoal filter cannot be replaced. Remove the top ... . To Remove Charcoal Filter To remove the charcoal filter, disconnect power at an angle on top of the oven as shown. To Install Charcoal Filter To install a new filter, remove plastic and other outer wrapping from the new filter. Charcoal Filter (on hood usage). For JVM1800 and JVM3600...

Use and Care Manual
Page 43
... or workmanship. If the product is located in materials or workmanship. Louisville, KY 40225 43 Safety Instructions Operating Instructions GE Microwave Oven Warranty. During this Limited Warranty. s Incidental or consequential damage caused by possible defects with this limited one...for example, cavity arcing from state to use within the USA. Warrantor: General Electric Company. During this appliance. s Improper installation, delivery or maintenance. Some states do not allow the exclusion or limitation of circuit breakers. This warranty gives you specific legal ...
... or workmanship. If the product is located in materials or workmanship. Louisville, KY 40225 43 Safety Instructions Operating Instructions GE Microwave Oven Warranty. During this Limited Warranty. s Incidental or consequential damage caused by possible defects with this limited one...for example, cavity arcing from state to use within the USA. Warrantor: General Electric Company. During this appliance. s Improper installation, delivery or maintenance. Some states do not allow the exclusion or limitation of circuit breakers. This warranty gives you specific legal ...
Installation Instructions
Page 1
...? KEEP THESE INSTRUCTIONS. For a Spanish version of the installer. • Product failure due to improper installation is the responsibility of this appliance requires basic mechanical and electrical skills. • Proper installation is not covered under the Warranty. Installation of this manual, visit our Website at : ge.com BEFORE YOU BEGIN Read these instructions with the...
...? KEEP THESE INSTRUCTIONS. For a Spanish version of the installer. • Product failure due to improper installation is the responsibility of this appliance requires basic mechanical and electrical skills. • Proper installation is not covered under the Warranty. Installation of this manual, visit our Website at : ge.com BEFORE YOU BEGIN Read these instructions with the...

Installation Instructions
Page 2
...Microwave Assembly 20 Adapting Microwave Blower for Recirculation 20, 21 Mount the Microwave Oven ..........21, 22 Installing the Charcoal Filter 22 Before You Use Your Microwave 23 Step-by-step installation guide Placement of Mounting Plate 8-10 Removing the Mounting Plate 8 Finding the Wall Studs 8 Determining... Wall Plate Location 9 Aligning the Wall Plate 10 Installation Types 11-22 A Outside Top Exhaust 12-14 Attach Mounting Plate to Wall 12 Preparation of Top Cabinet 13 Checking for Proper...
...Microwave Assembly 20 Adapting Microwave Blower for Recirculation 20, 21 Mount the Microwave Oven ..........21, 22 Installing the Charcoal Filter 22 Before You Use Your Microwave 23 Step-by-step installation guide Placement of Mounting Plate 8-10 Removing the Mounting Plate 8 Finding the Wall Studs 8 Determining... Wall Plate Location 9 Aligning the Wall Plate 10 Installation Types 11-22 A Outside Top Exhaust 12-14 Attach Mounting Plate to Wall 12 Preparation of Top Cabinet 13 Checking for Proper...

Installation Instructions
Page 3
... properly grounded, or if the outlet box does not meet electrical requirements noted (under ELECTRICAL REQUIREMENTS), a qualified electrician should be installed in the cabinet above the microwave oven. DO NOT USE WITH AN EXTENSION CORD. CAUTION: For personal safety, remove house fuse...is equipped with a three-prong (grounding) plug which mates with a properly grounded three-prong wall receptacle, installed by a qualified electrician to insure that two people install this appliance is very important to have the wall receptacle and circuit checked by a qualified electrician. Where a ...
... properly grounded, or if the outlet box does not meet electrical requirements noted (under ELECTRICAL REQUIREMENTS), a qualified electrician should be installed in the cabinet above the microwave oven. DO NOT USE WITH AN EXTENSION CORD. CAUTION: For personal safety, remove house fuse...is equipped with a three-prong (grounding) plug which mates with a properly grounded three-prong wall receptacle, installed by a qualified electrician to insure that two people install this appliance is very important to have the wall receptacle and circuit checked by a qualified electrician. Where a ...
Installation Instructions
Page 4
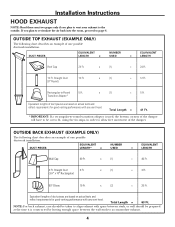
...8243; Round) 12 Ft. Transition Adaptor* x (1) = 5 Ft. OUTSIDE TOP EXHAUST (EXAMPLE ONLY) The following chart describes an example of one possible ductwork installation. x (1) = 24 Ft. 12 Ft. x (1) = 12 Ft. Total Length = 41 Ft. * IMPORTANT: If a rectangular-to-round transition adaptor...performance with any vent hood. OUTSIDE BACK EXHAUST (EXAMPLE ONLY) The following chart describes an example of one possible ductwork installation. Equivalent lengths of the damper. If you plan to vent your exhaust to the outside. DUCT PIECES EQUIVALENT NUMBER ...
...8243; Round) 12 Ft. Transition Adaptor* x (1) = 5 Ft. OUTSIDE TOP EXHAUST (EXAMPLE ONLY) The following chart describes an example of one possible ductwork installation. x (1) = 24 Ft. 12 Ft. x (1) = 12 Ft. Total Length = 41 Ft. * IMPORTANT: If a rectangular-to-round transition adaptor...performance with any vent hood. OUTSIDE BACK EXHAUST (EXAMPLE ONLY) The following chart describes an example of one possible ductwork installation. Equivalent lengths of the damper. If you plan to vent your exhaust to the outside. DUCT PIECES EQUIVALENT NUMBER ...

Installation Instructions
Page 5
...140 equivalent feet. When calculating the total duct length, add the equivalent lengths of all straight duct sections. The chart below shows you need to install ducts, note that venting be cut to fit, using the tin snips, in order to allow free movement of the damper. 5 Total Ductwork ...must be used , the bottom corners of the damper will have to be installed using the most direct route and with a standard 31⁄4″ x 10″ rectangular duct. x ( ) = Ft. Installation Instructions NOTE: If you how to calculate total equivalent ductwork length using the ...
...140 equivalent feet. When calculating the total duct length, add the equivalent lengths of all straight duct sections. The chart below shows you need to install ducts, note that venting be cut to fit, using the tin snips, in order to allow free movement of the damper. 5 Total Ductwork ...must be used , the bottom corners of the damper will have to be installed using the most direct route and with a standard 31⁄4″ x 10″ rectangular duct. x ( ) = Ft. Installation Instructions NOTE: If you how to calculate total equivalent ductwork length using the ...
Installation Instructions
Page 6
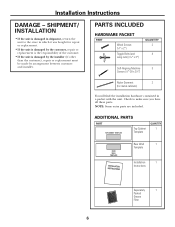
...Screws (1⁄4″-28 x 31⁄4″) Nylon Grommet 2 (for repair or replacement. • If the unit is damaged by arrangement between customer and installer. NOTE: Some extra parts are included. Check to the store in which it was bought for metal cabinets) You will find the... installation hardware contained in a packet with the unit. SHIPMENT/ INSTALLATION • If the unit is damaged by the installer (if other than the customer), repair or replacement must be made by the customer, repair ...
...Screws (1⁄4″-28 x 31⁄4″) Nylon Grommet 2 (for repair or replacement. • If the unit is damaged by arrangement between customer and installer. NOTE: Some extra parts are included. Check to the store in which it was bought for metal cabinets) You will find the... installation hardware contained in a packet with the unit. SHIPMENT/ INSTALLATION • If the unit is damaged by the installer (if other than the customer), repair or replacement must be made by the customer, repair ...

Installation Instructions
Page 7
...the cabinets must be 30″ wide and free of obstructions. • If the space between the microwave oven and the cabinets. Installation Instructions TOOLS YOU WILL NEED # 1 and #2 Phillips screwdriver Pencil Ruler or tape measure and straight edge Carpenter square (optional) Tin snips... (for exhaust duct preparation. • When installing the microwave oven beneath smooth, flat cabinets, be 30″ or More from the Cooking Surface 30″ min. Your Owner's Manual...
...the cabinets must be 30″ wide and free of obstructions. • If the space between the microwave oven and the cabinets. Installation Instructions TOOLS YOU WILL NEED # 1 and #2 Phillips screwdriver Pencil Ruler or tape measure and straight edge Carpenter square (optional) Tin snips... (for exhaust duct preparation. • When installing the microwave oven beneath smooth, flat cabinets, be 30″ or More from the Cooking Surface 30″ min. Your Owner's Manual...

Installation Instructions
Page 8
...studs, using one of the oven. 2 Fold back all 4 carton flaps fully against carton sides. Then place a mark halfway between the edges. Installation Instructions 1 PLACEMENT OF THE MOUNTING PLATE A. FINDING THE WALL STUDS Wall Studs Center Carton Styrofoam 3 Pull the carton up and off the oven. ... 16″ or 24″ from the mounting plate. REMOVING THE MICROWAVE OVEN FROM THE CARTON/ REMOVING THE MOUNTING PLATE 1 Remove the installation instructions, filters, glass tray and the small hardware bag. THE MICROWAVE MUST BE CONNECTED TO AT LEAST ONE WALL STUD. 5 Remove the ...
...studs, using one of the oven. 2 Fold back all 4 carton flaps fully against carton sides. Then place a mark halfway between the edges. Installation Instructions 1 PLACEMENT OF THE MOUNTING PLATE A. FINDING THE WALL STUDS Wall Studs Center Carton Styrofoam 3 Pull the carton up and off the oven. ... 16″ or 24″ from the mounting plate. REMOVING THE MICROWAVE OVEN FROM THE CARTON/ REMOVING THE MOUNTING PLATE 1 Remove the installation instructions, filters, glass tray and the small hardware bag. THE MICROWAVE MUST BE CONNECTED TO AT LEAST ONE WALL STUD. 5 Remove the ...

Installation Instructions
Page 9
DETERMINING WALL PLATE LOCATION UNDER YOUR CABINET Plate position - Remove the decorative trim to install the microwave properly and to make it level. Use a level to make sure the cabinet bottom is level. beneath flat bottom cabinet Plate position - ...THE MICROWAVE MUST BE LEVEL. If the cabinets have decorative trim that interferes with the microwave installation. beneath framed recessed cabinet bottom Mounting Plate Tabs Touching the Cabinet Bottom Mounting Plate Tabs Touching the Back Frame At least 30″, up to...
DETERMINING WALL PLATE LOCATION UNDER YOUR CABINET Plate position - Remove the decorative trim to install the microwave properly and to make it level. Use a level to make sure the cabinet bottom is level. beneath flat bottom cabinet Plate position - ...THE MICROWAVE MUST BE LEVEL. If the cabinets have decorative trim that interferes with the microwave installation. beneath framed recessed cabinet bottom Mounting Plate Tabs Touching the Cabinet Bottom Mounting Plate Tabs Touching the Back Frame At least 30″, up to...
Installation Instructions
Page 10
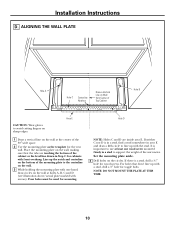
...;16″ hole for cabinets with arrows). NOTE: DO NOT MOUNT THE PLATE AT THIS TIME. 10 Four holes must be used for toggle bolts. Installation Instructions D. Place the mounting plate on sharp edges. Hole D NOTE: Holes C and D are touching the bottom of Top Cabinet Hole B CAUTION: Wear gloves to line...
...;16″ hole for cabinets with arrows). NOTE: DO NOT MOUNT THE PLATE AT THIS TIME. 10 Four holes must be used for toggle bolts. Installation Instructions D. Place the mounting plate on sharp edges. Hole D NOTE: Holes C and D are touching the bottom of Top Cabinet Hole B CAUTION: Wear gloves to line...


