Quick Specs
Page 2
... to be used, care should be vented to accommodate exhaust. Do not use less than their actual physical size. When calculating the total duct length, add the equivalent length of all straight duct sections. Over-the-Range Microwave Oven Optional Accessories (Available at additional cost) Specification Created 7/02 Filter Kits JX81B-Recirculating Charcoal Filter Kit To be prepared at GEAppliances.com or call GE Answer Center® service, 800...
... to be used, care should be vented to accommodate exhaust. Do not use less than their actual physical size. When calculating the total duct length, add the equivalent length of all straight duct sections. Over-the-Range Microwave Oven Optional Accessories (Available at additional cost) Specification Created 7/02 Filter Kits JX81B-Recirculating Charcoal Filter Kit To be prepared at GEAppliances.com or call GE Answer Center® service, 800...
Quick Specs
Page 3
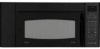
... Ft. TM JVM3670BF/CF/SF/WF - Over-the-Range Microwave Oven Specification Created 7/02 ONE TOUCH SENSOR POPCORN VEGETABLE REHEAT BEVERAGE POTATO CHICKEN/ FISH TIME COOK 1 EXPRESS COOK 4 EXPRESS COOK AUTO/TIME DEFROST 2 EXPRESS COOK 5 EXPRESS COOK 1 lb. Cavity/Powerful 1100 Watts* • New GE Profile™ Appearance with Sculptured Handle • Electronic Touch Controls • Custom Pads and One Touch Sensor Cooking Controls for Chicken, Fish, Beverage, Popcorn, Potatoes, Reheat and Vegetables • Recessed Turntable (On/Off) and Removable Cooking Rack •...
... Ft. TM JVM3670BF/CF/SF/WF - Over-the-Range Microwave Oven Specification Created 7/02 ONE TOUCH SENSOR POPCORN VEGETABLE REHEAT BEVERAGE POTATO CHICKEN/ FISH TIME COOK 1 EXPRESS COOK 4 EXPRESS COOK AUTO/TIME DEFROST 2 EXPRESS COOK 5 EXPRESS COOK 1 lb. Cavity/Powerful 1100 Watts* • New GE Profile™ Appearance with Sculptured Handle • Electronic Touch Controls • Custom Pads and One Touch Sensor Cooking Controls for Chicken, Fish, Beverage, Popcorn, Potatoes, Reheat and Vegetables • Recessed Turntable (On/Off) and Removable Cooking Rack •...
Use and Care Manual
Page 1
... Instructions . . . .2-9 Operating Instructions Auto Features 20 Care and Cleaning 33, 34 Changing the Power Level 13 Cooking Guide . . . . .15, 16 Defrosting Guide . . . . . .18 Exhaust Feature . . . .37, 38 Features of Your Microwave Oven . . . .11, 12 Microwave Terms . . . . . .32 Other Features . . . . 25-31 Replacing Bulbs . . . .35, 36 Sensor Features . . . .21-24 Time Features . . . . . .14-19 Troubleshooting Tips . . .39 Things That Are Normal With Your Microwave Oven 40 Consumer Support Consumer Support . . . . . .Back Cover Optional Kits 10 Product Registration 41, 42 Warranty...
... Instructions . . . .2-9 Operating Instructions Auto Features 20 Care and Cleaning 33, 34 Changing the Power Level 13 Cooking Guide . . . . .15, 16 Defrosting Guide . . . . . .18 Exhaust Feature . . . .37, 38 Features of Your Microwave Oven . . . .11, 12 Microwave Terms . . . . . .32 Other Features . . . . 25-31 Replacing Bulbs . . . .35, 36 Sensor Features . . . .21-24 Time Features . . . . . .14-19 Troubleshooting Tips . . .39 Things That Are Normal With Your Microwave Oven 40 Consumer Support Consumer Support . . . . . .Back Cover Optional Kits 10 Product Registration 41, 42 Warranty...
Use and Care Manual
Page 3
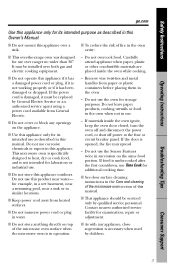
... be replaced by General Electric Service or an authorized service agent using a power cord available from General Electric. Do not use this appliance. Do not leave paper products, cooking utensils or food in the oven when not in use the oven for storage purposes. Do not overcook food. This microwave oven is specifically designed to heat, dry or cook food, and is in operation. Contact nearest authorized service facility for use over a sink. Troubleshooting Tips Consumer Support 3 s Keep power cord...
... be replaced by General Electric Service or an authorized service agent using a power cord available from General Electric. Do not use this appliance. Do not leave paper products, cooking utensils or food in the oven when not in use the oven for storage purposes. Do not overcook food. This microwave oven is specifically designed to heat, dry or cook food, and is in operation. Contact nearest authorized service facility for use over a sink. Troubleshooting Tips Consumer Support 3 s Keep power cord...
Use and Care Manual
Page 9
... the filter. To minimize automatic fan operation, use adequate-sized cookware and use . SAVE THESE INSTRUCTIONS 9 Troubleshooting Tips Consumer Support Take care to build up on surface units only when necessary. s When preparing flaming foods under certain conditions (see Automatic Fan feature). s Never leave surface units beneath your microwave oven unattended at high heat settings. s Clean the underside of a grease fire on the surface units below the microwave oven, smother...
... the filter. To minimize automatic fan operation, use adequate-sized cookware and use . SAVE THESE INSTRUCTIONS 9 Troubleshooting Tips Consumer Support Take care to build up on surface units only when necessary. s When preparing flaming foods under certain conditions (see Automatic Fan feature). s Never leave surface units beneath your microwave oven unattended at high heat settings. s Clean the underside of a grease fire on the surface units below the microwave oven, smother...
Use and Care Manual
Page 10
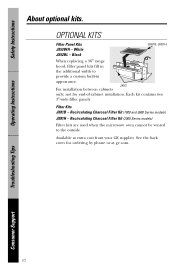
... or at extra cost from your GE supplier. JX52 For installation between cabinets only; Available at ge.com. Black JX81B, JX81H When replacing a 36″ range hood, filler panel kits fill in appearance. OPTIONAL KITS Filler Panel Kits JX52WH - Recirculating Charcoal Filter Kit (2000 Series models) Filter kits are used when the microwave oven cannot be vented to provide a custom built-in the additional width to the outside. Operating Instructions Troubleshooting Tips Consumer Support 10 Safety Instructions About optional kits. Filter Kits JX81B -
... or at extra cost from your GE supplier. JX52 For installation between cabinets only; Available at ge.com. Black JX81B, JX81H When replacing a 36″ range hood, filler panel kits fill in appearance. OPTIONAL KITS Filler Panel Kits JX52WH - Recirculating Charcoal Filter Kit (2000 Series models) Filter kits are used when the microwave oven cannot be vented to provide a custom built-in the additional width to the outside. Operating Instructions Troubleshooting Tips Consumer Support 10 Safety Instructions About optional kits. Filter Kits JX81B -
Use and Care Manual
Page 11
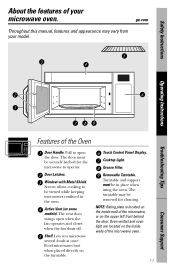
... your microwave oven. NOTE: Rating plate is located on the upper left front behind the door. Turntable and support must be viewed while keeping microwaves confined in place when using the oven. Pull to be securely latched for cleaning. Touch Control Panel Display. Cooktop Light. Door Latches. Removable Turntable. Oven vent(s) and oven light are located on the inside wall of the microwave, or on the inside walls of the microwave oven. 11 Consumer Support Window with Metal Shield. Food microwaves best when placed directly on some models). Safety Instructions...
... your microwave oven. NOTE: Rating plate is located on the upper left front behind the door. Turntable and support must be viewed while keeping microwaves confined in place when using the oven. Pull to be securely latched for cleaning. Touch Control Panel Display. Cooktop Light. Door Latches. Removable Turntable. Oven vent(s) and oven light are located on the inside wall of the microwave, or on the inside walls of the microwave oven. 11 Consumer Support Window with Metal Shield. Food microwaves best when placed directly on some models). Safety Instructions...
Use and Care Manual
Page 13
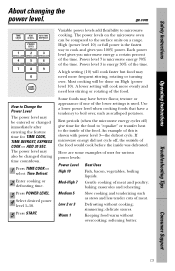
... Support 13 A lower setting will be changed immediately after entering the feature time for TIME COOK, TIME DEFROST, EXPRESS COOK or ADD 30 SEC. ge.com How to the inside was defrosted. Gentle cooking of uses for the food to "equalize" or transfer heat to Change the Power Level The power level may also be done on a range. Defrosting without overcooking; The power levels on the microwave oven can be entered or changed during time countdown. 1 Press TIME COOK or select Time Defrost...
... Support 13 A lower setting will be changed immediately after entering the feature time for TIME COOK, TIME DEFROST, EXPRESS COOK or ADD 30 SEC. ge.com How to the inside was defrosted. Gentle cooking of uses for the food to "equalize" or transfer heat to Change the Power Level The power level may also be done on a range. Defrosting without overcooking; The power levels on the microwave oven can be entered or changed during time countdown. 1 Press TIME COOK or select Time Defrost...
Use and Care Manual
Page 16
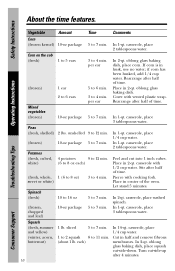
Safety Instructions Operating Instructions Troubleshooting Tips Vegetable Amount Time Comments Corn (frozen kernel) 10-oz package 5 to 7 min. unshelled 9 to 12 min. (frozen) 10-oz package 5 to 7 min. casserole, place 2 tablespoons water. Potatoes (fresh, cubed, white) 4 potatoes 9 to 12 min. (6 to 8 oz each ) In 11⁄2-qt. Place in half and remove fibrous membranes. casserole, place 1/4 cup...
Safety Instructions Operating Instructions Troubleshooting Tips Vegetable Amount Time Comments Corn (frozen kernel) 10-oz package 5 to 7 min. unshelled 9 to 12 min. (frozen) 10-oz package 5 to 7 min. casserole, place 2 tablespoons water. Potatoes (fresh, cubed, white) 4 potatoes 9 to 12 min. (6 to 8 oz each ) In 11⁄2-qt. Place in half and remove fibrous membranes. casserole, place 1/4 cup...
Use and Care Manual
Page 35
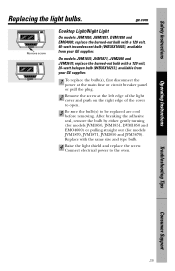
... size and type bulb. 4 Raise the light shield and replace the screw. Troubleshooting Tips Consumer Support 35 After breaking the adhesive seal, remove the bulb by either gently turning (for models JVM1850, JNM1851, DVM1850 and EMO4000) or pulling straight out (for models JVM1870, JVM1871, JVM2050 and JVM3670). Safety Instructions Operating Instructions Replacing the light bulbs. Replace with a 120 volt, 40-watt incandescent bulb (WB36X10003), available from your GE supplier. Connect electrical power to be replaced...
... size and type bulb. 4 Raise the light shield and replace the screw. Troubleshooting Tips Consumer Support 35 After breaking the adhesive seal, remove the bulb by either gently turning (for models JVM1850, JNM1851, DVM1850 and EMO4000) or pulling straight out (for models JVM1870, JVM1871, JVM2050 and JVM3670). Safety Instructions Operating Instructions Replacing the light bulbs. Replace with a 120 volt, 40-watt incandescent bulb (WB36X10003), available from your GE supplier. Connect electrical power to be replaced...
Use and Care Manual
Page 36
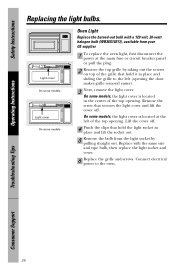
... bulb from your GE supplier. 1 To replace the oven light, first disconnect the power at the left (opening the door makes grille removal easier). 3 Next, remove the light cover. Connect electrical power to the left of the top opening . Lift the cover off . Troubleshooting Tips Consumer Support 36 On some models, the light cover is located at the main fuse or circuit breaker panel or pull the plug. 2 Remove the top grille by pulling straight out. Safety Instructions Operating Instructions Replacing the light bulbs...
... bulb from your GE supplier. 1 To replace the oven light, first disconnect the power at the left (opening the door makes grille removal easier). 3 Next, remove the light cover. Connect electrical power to the left of the top opening . Lift the cover off . Troubleshooting Tips Consumer Support 36 On some models, the light cover is located at the main fuse or circuit breaker panel or pull the plug. 2 Remove the top grille by pulling straight out. Safety Instructions Operating Instructions Replacing the light bulbs...
Use and Care Manual
Page 38
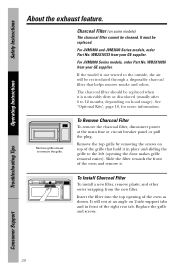
... Remove Charcoal Filter To remove the charcoal filter, disconnect power at an angle on hood usage). Insert the filter into the top opening the door makes grille removal easier). WB2X10733 from your GE supplier. Remove grille screws to 12 months, depending on 2 side support tabs and in place and sliding the grille to the outside, the air will rest at the main fuse or circuit breaker panel or pull the plug. To Install Charcoal Filter To install...
... Remove Charcoal Filter To remove the charcoal filter, disconnect power at an angle on hood usage). Insert the filter into the top opening the door makes grille removal easier). WB2X10733 from your GE supplier. Remove grille screws to 12 months, depending on 2 side support tabs and in place and sliding the grille to the outside, the air will rest at the main fuse or circuit breaker panel or pull the plug. To Install Charcoal Filter To install...
Use and Care Manual
Page 39
... the circuit circuit breaker. Floor of time. • Use Time Cook to start the Reminder without a valid time of day. then plug it is are preset and cannot be not allowed. breaker tripped. "SENSOR ERROR" appears on the display When using a Sensor feature, the door was not detected in maximum amount of the oven is warm, Heat from the cooktop even when the oven has light may • Replace fuse or reset...
... the circuit circuit breaker. Floor of time. • Use Time Cook to start the Reminder without a valid time of day. then plug it is are preset and cannot be not allowed. breaker tripped. "SENSOR ERROR" appears on the display When using a Sensor feature, the door was not detected in maximum amount of the oven is warm, Heat from the cooktop even when the oven has light may • Replace fuse or reset...

Use and Care Manual
Page 43
... materials or workmanship. Safety Instructions Operating Instructions GE Microwave Oven Warranty. For GE Profile Models ONLY: Five Years From the date of circuit breakers. What GE Will Not Cover: s Service trips to your home to use within the USA. s Failure of the microwave oven which vary from wire rack or metal/foil), or used for home use the product. s Damage to an Authorized GE Service Location for any succeeding owner for products purchased for other...
... materials or workmanship. Safety Instructions Operating Instructions GE Microwave Oven Warranty. For GE Profile Models ONLY: Five Years From the date of circuit breakers. What GE Will Not Cover: s Service trips to your home to use within the USA. s Failure of the microwave oven which vary from wire rack or metal/foil), or used for home use the product. s Damage to an Authorized GE Service Location for any succeeding owner for products purchased for other...

Installation Instructions
Page 2
... Attach Mounting Plate to Wall 12 Preparation of Top Cabinet 13 Checking for Proper Damper Operation 13 Mount the Microwave Oven 13 Adjust the Exhaust Adaptor 14 Connecting Ductwork 14 B Outside Back Exhaust 15-18 Preparing Rear Wall for Outside Back Exhaust 15 Remove Exhaust Adaptor 15 Attach Mounting Plate to Wall 16 Preparation of Top Cabinet 16 Adapting Microwave Blower for Outside Back Exhaust 16, 17 Mount the Microwave Oven 18 2 Installation Instructions CONTENTS General information Important Safety Instructions 3 Electrical Requirements 3 Hood Exhaust 4, 5 Damage...
... Attach Mounting Plate to Wall 12 Preparation of Top Cabinet 13 Checking for Proper Damper Operation 13 Mount the Microwave Oven 13 Adjust the Exhaust Adaptor 14 Connecting Ductwork 14 B Outside Back Exhaust 15-18 Preparing Rear Wall for Outside Back Exhaust 15 Remove Exhaust Adaptor 15 Attach Mounting Plate to Wall 16 Preparation of Top Cabinet 16 Adapting Microwave Blower for Outside Back Exhaust 16, 17 Mount the Microwave Oven 18 2 Installation Instructions CONTENTS General information Important Safety Instructions 3 Electrical Requirements 3 Hood Exhaust 4, 5 Damage...

Installation Instructions
Page 3
.... CAUTION: For personal safety, remove house fuse or open circuit breaker before use 3 NOTE: For easier installation and personal safety, it replaced with a standard three-prong (grounding) wall receptacle to the National Electrical Code or the prevailing local code. DO NOT, UNDER ANY CIRCUMSTANCES, CUT, DEFORM OR REMOVE ANY OF THE PRONGS FROM THE POWER CORD. The power supply cord and plug should be mounted to a separate 15...
.... CAUTION: For personal safety, remove house fuse or open circuit breaker before use 3 NOTE: For easier installation and personal safety, it replaced with a standard three-prong (grounding) wall receptacle to the National Electrical Code or the prevailing local code. DO NOT, UNDER ANY CIRCUMSTANCES, CUT, DEFORM OR REMOVE ANY OF THE PRONGS FROM THE POWER CORD. The power supply cord and plug should be mounted to a separate 15...

Installation Instructions
Page 7
Your Owner's Manual contains the kit number for your microwave oven to the outside, see Hood Exhaust Section for exhaust duct preparation. • When installing the microwave oven beneath smooth, flat cabinets, be careful to follow the instructions on recessed bottom cabinet installations only) Saw (saber, hole or keyhole) Stud finder or Hammer (optional) Safety goggles Level Duct and masking tape MOUNTING SPACE 161⁄2″ 30″ 2″ 66″ or More...
Your Owner's Manual contains the kit number for your microwave oven to the outside, see Hood Exhaust Section for exhaust duct preparation. • When installing the microwave oven beneath smooth, flat cabinets, be careful to follow the instructions on recessed bottom cabinet installations only) Saw (saber, hole or keyhole) Stud finder or Hammer (optional) Safety goggles Level Duct and masking tape MOUNTING SPACE 161⁄2″ 30″ 2″ 66″ or More...

Installation Instructions
Page 11
...) See page 19 11 A Charcoal Filter Accessory Kit is required for the nonvented exhaust. (See your installation and proceed to the following three types of ventilation: A. Recirculating (Non-Vented Ductless) NOTE: This microwave is shipped assembled for Outside Top Exhaust (except for the kit number.) Outside Back Exhaust (Horizontal Duct) C. Installation Instructions 2 INSTALLATION TYPES (Choose A, B or C) This microwave oven is designed for your Owner's Manual for non-vented models). Select the type of ventilation...
...) See page 19 11 A Charcoal Filter Accessory Kit is required for the nonvented exhaust. (See your installation and proceed to the following three types of ventilation: A. Recirculating (Non-Vented Ductless) NOTE: This microwave is shipped assembled for Outside Top Exhaust (except for the kit number.) Outside Back Exhaust (Horizontal Duct) C. Installation Instructions 2 INSTALLATION TYPES (Choose A, B or C) This microwave oven is designed for your Owner's Manual for non-vented models). Select the type of ventilation...
Installation Instructions
Page 15
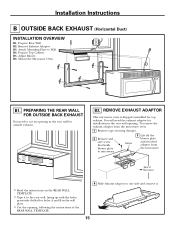
... Top Cabinet B5. Mount the Microwave Oven B1. You will need to microwave. Remove Exhaust Adaptor B3. REMOVE EXHAUST ADAPTOR This microwave oven is shipped assembled for outside exhaust. To remove the exhaust adaptor from the microwave. Back of the REAR WALL TEMPLATE. 4 Slide exhaust adaptor to one side and remove it to Wall B4. Installation Instructions B OUTSIDE BACK EXHAUST (Horizontal Duct) INSTALLATION OVERVIEW B1. PREPARING THE REAR WALL FOR OUTSIDE BACK EXHAUST You need the exhaust adaptor for installation in the wall plate. • Cut the opening, following...
... Top Cabinet B5. Mount the Microwave Oven B1. You will need to microwave. Remove Exhaust Adaptor B3. REMOVE EXHAUST ADAPTOR This microwave oven is shipped assembled for outside exhaust. To remove the exhaust adaptor from the microwave. Back of the REAR WALL TEMPLATE. 4 Slide exhaust adaptor to one side and remove it to Wall B4. Installation Instructions B OUTSIDE BACK EXHAUST (Horizontal Duct) INSTALLATION OVERVIEW B1. PREPARING THE REAR WALL FOR OUTSIDE BACK EXHAUST You need the exhaust adaptor for installation in the wall plate. • Cut the opening, following...

Installation Instructions
Page 22
.... 5 Replace the grille and the screws. 6 Close the door. On 1800 Series models, remove screws on each screw. 6 Tighten center screw completely. 7 Tighten the outer two screws to the left and pull it straight off . MOUNT THE MICROWAVE OVEN (cont.) 5 Insert 2 self-aligning screws through outer top cabinet holes. See the Owner's Manual packed with the microwave. Charcoal Filter 4 Install the charcoal filter. When properly installed, the wire mesh of grille using a #1 Phillips screwdriver. On 1400 and 1600 Series models...
.... 5 Replace the grille and the screws. 6 Close the door. On 1800 Series models, remove screws on each screw. 6 Tighten center screw completely. 7 Tighten the outer two screws to the left and pull it straight off . MOUNT THE MICROWAVE OVEN (cont.) 5 Insert 2 self-aligning screws through outer top cabinet holes. See the Owner's Manual packed with the microwave. Charcoal Filter 4 Install the charcoal filter. When properly installed, the wire mesh of grille using a #1 Phillips screwdriver. On 1400 and 1600 Series models...


