Owners Manual
Page 1
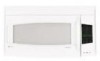
Spacemaker Microwave Oven ge.com Safety Instructions 2-7 Operating Instructions Care and Cleaning 37-40 Cooking Features 12-18 Defrosting Features 21-27 Easy Guide™ Menu System . . . . .9 Help Features ... 28-32 Other Features 33, 35 Power Levels 11 Reheating Features 19-20 Troubleshooting Tips 41 Consumer Support Consumer Support . . . Back Cover Warranty 42 Owner's Manual JVM2070 Write the model and serial numbers here: Model Serial Find these numbers on a label on the left front when the door is open. DE68...
Spacemaker Microwave Oven ge.com Safety Instructions 2-7 Operating Instructions Care and Cleaning 37-40 Cooking Features 12-18 Defrosting Features 21-27 Easy Guide™ Menu System . . . . .9 Help Features ... 28-32 Other Features 33, 35 Power Levels 11 Reheating Features 19-20 Troubleshooting Tips 41 Consumer Support Consumer Support . . . Back Cover Warranty 42 Owner's Manual JVM2070 Write the model and serial numbers here: Model Serial Find these numbers on a label on the left front when the door is open. DE68...
Owners Manual
Page 3
...not operate this product near a sink, or in similar locations. • Keep power cord away from paper or plastic containers before placing them in this manual. • This appliance should be serviced only by children. • Do not store anything directly on top of life. Do not use . - If...this appliance. SAFETY PRECAUTIONS Use this appliance only for laboratory or industrial use as described in water. • To reduce the risk of this manual must be followed to minimize the risk of fire or explosion, electric shock, or to heat, dry or cook food, and is undercooked ...
...not operate this product near a sink, or in similar locations. • Keep power cord away from paper or plastic containers before placing them in this manual. • This appliance should be serviced only by children. • Do not store anything directly on top of life. Do not use . - If...this appliance. SAFETY PRECAUTIONS Use this appliance only for laboratory or industrial use as described in water. • To reduce the risk of this manual must be followed to minimize the risk of fire or explosion, electric shock, or to heat, dry or cook food, and is undercooked ...
Owners Manual
Page 6
... ignite. If the dish remains cool and only the water in microwave ovens. • Do not use plastic cookware without complete supervision. 6 safe, use this manual. If the dish heats, it is suitable for microwaving. When microwaved, the metal can escape. • Cookware may be needed to handle the cookware. •...
... ignite. If the dish remains cool and only the water in microwave ovens. • Do not use plastic cookware without complete supervision. 6 safe, use this manual. If the dish heats, it is suitable for microwaving. When microwaved, the metal can escape. • Cookware may be needed to handle the cookware. •...
Owners Manual
Page 8
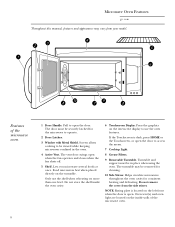
... when placed directly on the inside the oven cavity. 6 Touchscreen Display. Oven vent(s) and oven light are located on the turntable. Microwave Oven Features ge.com Throughout this manual, features and appearance may be removed for cleaning. 10 Side Stirrer. Features of the microwave oven. 8 Press the graphics on the interactive display...
... when placed directly on the inside the oven cavity. 6 Touchscreen Display. Oven vent(s) and oven light are located on the turntable. Microwave Oven Features ge.com Throughout this manual, features and appearance may be removed for cleaning. 10 Side Stirrer. Features of the microwave oven. 8 Press the graphics on the interactive display...
Owners Manual
Page 44
...Other servicing generally should the need arise. Schedule Service ge.com Expert GE repair service is still in the packing material. Extended Warranties ge.com Purchase a GE extended warranty and learn about special discounts that can now download Owner's Manuals, order parts, catalogs, or even schedule service on ... service, you receive from your questions, and so much more... Printed in this manual cover procedures to design for people with disabilities, check out our Web site today. Try the GE Appliances Web site 24 hours a day, any user. Or call 800.TDD.GEAC...
...Other servicing generally should the need arise. Schedule Service ge.com Expert GE repair service is still in the packing material. Extended Warranties ge.com Purchase a GE extended warranty and learn about special discounts that can now download Owner's Manuals, order parts, catalogs, or even schedule service on ... service, you receive from your questions, and so much more... Printed in this manual cover procedures to design for people with disabilities, check out our Web site today. Try the GE Appliances Web site 24 hours a day, any user. Or call 800.TDD.GEAC...

Installation Instructions
Page 1
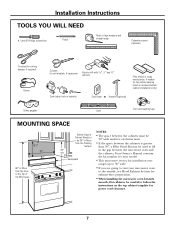
...Over the Range Microwave Oven JVM2050, JVM2070 Questions? Observe all governing codes and ordinances. • Note to Consumer - Call 800.GE.CARES (800.432.2737) or Visit our Website at GEAppliances.com. READ CAREFULLY. Be sure to leave these instructions for future ... IMPORTANT - For a Spanish version of this appliance requires basic mechanical and electrical skills. • Proper installation is the responsibility of this manual, visit our Website at : GEAppliances.com BEFORE YOU BEGIN Read these instructions for local inspector's use. • IMPORTANT - Installation of ...
...Over the Range Microwave Oven JVM2050, JVM2070 Questions? Observe all governing codes and ordinances. • Note to Consumer - Call 800.GE.CARES (800.432.2737) or Visit our Website at GEAppliances.com. READ CAREFULLY. Be sure to leave these instructions for future ... IMPORTANT - For a Spanish version of this appliance requires basic mechanical and electrical skills. • Proper installation is the responsibility of this manual, visit our Website at : GEAppliances.com BEFORE YOU BEGIN Read these instructions for local inspector's use. • IMPORTANT - Installation of ...
Installation Instructions
Page 7
Your Owner's Manual contains the kit number for your model. • This microwave oven is for installation over ranges up to 36″ wide. • If you are ...
Your Owner's Manual contains the kit number for your model. • This microwave oven is for installation over ranges up to 36″ wide. • If you are ...
Installation Instructions
Page 11
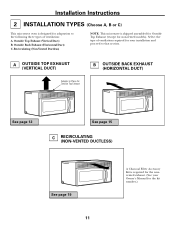
... Filter Accessory Kit is required for the nonvented exhaust. (See your installation and proceed to the following three types of ventilation required for your Owner's Manual for the kit number.) Select the type of ventilation: A. Installation Instructions 2 INSTALLATION TYPES (Choose A, B or C) This microwave oven is designed for adaptation to that section...
... Filter Accessory Kit is required for the nonvented exhaust. (See your installation and proceed to the following three types of ventilation required for your Owner's Manual for the kit number.) Select the type of ventilation: A. Installation Instructions 2 INSTALLATION TYPES (Choose A, B or C) This microwave oven is designed for adaptation to that section...
Installation Instructions
Page 14
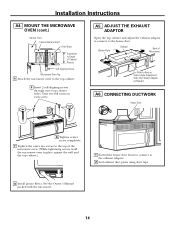
... Cabinet Recess Self-Aligning Screw Microwave Oven Top 4 Attach the microwave oven to -Side Adjustment, Slide the Exhaust Adaptor as Needed A6. See the Owner's Manual packed with the microwave. 14 MOUNT THE MICROWAVE OVEN (cont.) Cabinet Front Cabinet Bottom Shelf Filler Block Equivalent to Depth of Microwave For Front-to...
... Cabinet Recess Self-Aligning Screw Microwave Oven Top 4 Attach the microwave oven to -Side Adjustment, Slide the Exhaust Adaptor as Needed A6. See the Owner's Manual packed with the microwave. 14 MOUNT THE MICROWAVE OVEN (cont.) Cabinet Front Cabinet Bottom Shelf Filler Block Equivalent to Depth of Microwave For Front-to...
Installation Instructions
Page 18
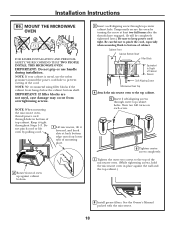
... used, case damage may occur from overtightening screws. Temporarily secure the oven by pulling cord. 1 Lift microwave, tilt it tight throughout Steps 1-3. See the Owner's Manual packed with the microwave. 18 NOTE: If your cabinet is metal, use handle during installation. Be careful not to pinch the cord, especially when mounting...
... used, case damage may occur from overtightening screws. Temporarily secure the oven by pulling cord. 1 Lift microwave, tilt it tight throughout Steps 1-3. See the Owner's Manual packed with the microwave. 18 NOTE: If your cabinet is metal, use handle during installation. Be careful not to pinch the cord, especially when mounting...
Installation Instructions
Page 22
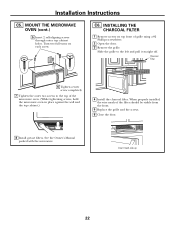
... THE MICROWAVE OVEN (cont.) 5 Insert 2 self-aligning screws through outer top cabinet holes. INSTALLING THE CHARCOAL FILTER 1 Remove screws on each screw. See the Owner's Manual packed with the microwave. Turn two full turns on top front of grille using a #2 Phillips screwdriver. 2 Open the door. 3 Remove the grille.
... THE MICROWAVE OVEN (cont.) 5 Insert 2 self-aligning screws through outer top cabinet holes. INSTALLING THE CHARCOAL FILTER 1 Remove screws on each screw. See the Owner's Manual packed with the microwave. Turn two full turns on top front of grille using a #2 Phillips screwdriver. 2 Open the door. 3 Remove the grille.
Installation Instructions
Page 23
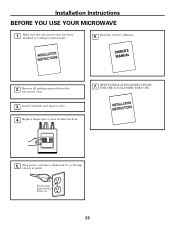
Install turntable and ring in cavity. 4. Ensure proper ground exists before use 23 Make sure the microwave oven has been installed according to 20-amp electrical outlet. Read the Owner's Manual. 2. KEEP INSTALLATION INSTRUCTIONS FOR THE LOCAL INSPECTOR'S USE. 5. to instructions. 6. Remove all packing material from the microwave oven. 3. Installation Instructions BEFORE YOU USE YOUR MICROWAVE 1. Plug power cord into a dedicated 15- Replace house fuse or turn breaker back on. 7.
Install turntable and ring in cavity. 4. Ensure proper ground exists before use 23 Make sure the microwave oven has been installed according to 20-amp electrical outlet. Read the Owner's Manual. 2. KEEP INSTALLATION INSTRUCTIONS FOR THE LOCAL INSPECTOR'S USE. 5. to instructions. 6. Remove all packing material from the microwave oven. 3. Installation Instructions BEFORE YOU USE YOUR MICROWAVE 1. Plug power cord into a dedicated 15- Replace house fuse or turn breaker back on. 7.


