
Quick Specs
Page 1
..." MIN. Listed by Underwriters Laboratories Specification Created 4/09 340151 JVM1750SPSS GE Spacemaker® Over-the-Range MicrowavDOeivmeOer-vntheseino-Rnsan(igneinMchicerosw) ave Oven Dimensions and Installation Information (in many cases. see Filter Kit drawing) Installation Information: This information is not intended to...Requires 120V grounded outlet. Mounting height from door hinge side to your Monogram,® GE Profile™ or GE® appliance questions, visit our website at ge.com or call GE Answer Center® service, 800.626.2000. as shown) • Outside exhaust ...
..." MIN. Listed by Underwriters Laboratories Specification Created 4/09 340151 JVM1750SPSS GE Spacemaker® Over-the-Range MicrowavDOeivmeOer-vntheseino-Rnsan(igneinMchicerosw) ave Oven Dimensions and Installation Information (in many cases. see Filter Kit drawing) Installation Information: This information is not intended to...Requires 120V grounded outlet. Mounting height from door hinge side to your Monogram,® GE Profile™ or GE® appliance questions, visit our website at ge.com or call GE Answer Center® service, 800.626.2000. as shown) • Outside exhaust ...

Quick Specs
Page 2
...cabinet installation. If a round duct is constructed by Underwriters Laboratories Specification Created 4/09 340151 not for end-of some typical ducts. JVM1750SPSS GE Spacemaker® Over-the-Range Microwave Oven Dimensions and Installation Information (in appearance. Maximum Duct Length: For satisfactory air movement, the ...x 10" rectangular or 6" diameter round duct should be used . For installation between the wall studs to the outside. Filter KitsJX81J- Recirculating Charcoal Filter KitTo be prepared at ge.com or call GE Answer Center® service, 800.626.2000.
...cabinet installation. If a round duct is constructed by Underwriters Laboratories Specification Created 4/09 340151 not for end-of some typical ducts. JVM1750SPSS GE Spacemaker® Over-the-Range Microwave Oven Dimensions and Installation Information (in appearance. Maximum Duct Length: For satisfactory air movement, the ...x 10" rectangular or 6" diameter round duct should be used . For installation between the wall studs to the outside. Filter KitsJX81J- Recirculating Charcoal Filter KitTo be prepared at ge.com or call GE Answer Center® service, 800.626.2000.
Use and Care Manual
Page 8
...surface unit by covering the pan completely with a lid, a cookie sheet or a flat tray. • Use care when cleaning the vent fan filter. Do not allow grease to use high heat on . • Never leave surface units beneath your microwave oven unattended at least 1″ away from... with the cookware manufacturer's recommendations. 2 Do not microwave empty containers. 3 Do not permit children to build up on the microwave or the fan filter. • In the event of the microwave often. Take care to consult their physicians if they have concerns. To minimize automatic fan operation, use...
...surface unit by covering the pan completely with a lid, a cookie sheet or a flat tray. • Use care when cleaning the vent fan filter. Do not allow grease to use high heat on . • Never leave surface units beneath your microwave oven unattended at least 1″ away from... with the cookware manufacturer's recommendations. 2 Do not microwave empty containers. 3 Do not permit children to build up on the microwave or the fan filter. • In the event of the microwave often. Take care to consult their physicians if they have concerns. To minimize automatic fan operation, use...

Use and Care Manual
Page 9
... wall outlet, it is too short, have it replaced with this appliance. If the power cord is your GE supplier, or see the GE Service numbers. For installation between cabinets only; JX81J-Recirculating Charcoal Filter Kit Filter kits are needed for a 36″ opening. This appliance is equipped with a power cord having a grounding wire...
... wall outlet, it is too short, have it replaced with this appliance. If the power cord is your GE supplier, or see the GE Service numbers. For installation between cabinets only; JX81J-Recirculating Charcoal Filter Kit Filter kits are needed for a 36″ opening. This appliance is equipped with a power cord having a grounding wire...
Use and Care Manual
Page 10
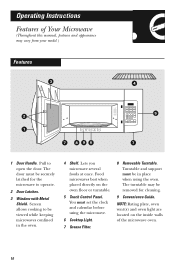
... must be in the oven. 4 Shelf. Screen allows cooking to be viewed while keeping microwaves confined in place when using the microwave. 6 Cooktop Light. 7 Grease Filter. 8 Removable Turntable. Operating Instructions Features of the microwave oven. 10
... must be in the oven. 4 Shelf. Screen allows cooking to be viewed while keeping microwaves confined in place when using the microwave. 6 Cooktop Light. 7 Grease Filter. 8 Removable Turntable. Operating Instructions Features of the microwave oven. 10

Use and Care Manual
Page 38
... burned-out bulb with a 120 volt, 40-watt incandescent bulb (WB36X10003), available from your GE supplier. 1 To replace the oven light, first disconnect the power at the left to the oven. Filter housing Light cover 5 Replace the light cover. 6 Replace the grille and screws. Connect electrical... Bulb Replacement Cooktop Light/ Night Light Replace the burned-out bulb with a 120 volt, 40-watt incandescent bulb (WB36X10003), available from your GE supplier. 1 To replace the bulb(s), first disconnect the power at the main fuse or circuit breaker panel or pull the plug. 2 Remove...
... burned-out bulb with a 120 volt, 40-watt incandescent bulb (WB36X10003), available from your GE supplier. 1 To replace the oven light, first disconnect the power at the left to the oven. Filter housing Light cover 5 Replace the light cover. 6 Replace the grille and screws. Connect electrical... Bulb Replacement Cooktop Light/ Night Light Replace the burned-out bulb with a 120 volt, 40-watt incandescent bulb (WB36X10003), available from your GE supplier. 1 To replace the bulb(s), first disconnect the power at the main fuse or circuit breaker panel or pull the plug. 2 Remove...
Use and Care Manual
Page 39
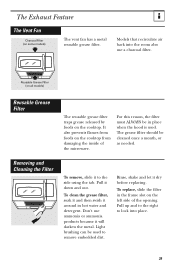
...Light brushing can be cleaned once a month, or as needed. Reusable Grease Filter (on all models) Reusable Grease Filter The reusable grease filter traps grease released by foods on some models) The vent fan has a metal reusable grease filter. Rinse, shake and let it down and out. Pull it dry before replacing... room also use ammonia or ammonia products because it to remove embedded dirt. For this reason, the filter must ALWAYS be in hot water and detergent. To clean the grease filter, soak it and then swish it around in place when the hood is used to the side using...
...Light brushing can be cleaned once a month, or as needed. Reusable Grease Filter (on all models) Reusable Grease Filter The reusable grease filter traps grease released by foods on some models) The vent fan has a metal reusable grease filter. Rinse, shake and let it down and out. Pull it dry before replacing... room also use ammonia or ammonia products because it to remove embedded dirt. For this reason, the filter must ALWAYS be in hot water and detergent. To clean the grease filter, soak it and then swish it around in place when the hood is used to the side using...

Use and Care Manual
Page 40
...in front of the right rear tab. Remove the grille by opening of the locking tabs. Filter housing To install a new filter, remove plastic and other outer wrapping from your GE supplier. To Install Charcoal Filter 40 If the model is noticeably dirty or discolored (usually after 6-12 months, depending on... top of the oven that helps remove smoke and odors. Push the filter at the bottom until it is not vented ...
...in front of the right rear tab. Remove the grille by opening of the locking tabs. Filter housing To install a new filter, remove plastic and other outer wrapping from your GE supplier. To Install Charcoal Filter 40 If the model is noticeably dirty or discolored (usually after 6-12 months, depending on... top of the oven that helps remove smoke and odors. Push the filter at the bottom until it is not vented ...
Installation Instructions
Page 2
... Plate to Wall 19 Preparation of Top Cabinet 19 Adapting Microwave Blower for Recirculation 20, 21 Mount the Microwave Oven ..........21, 22 Installing the Charcoal Filter 22 Before You Use Your Microwave 23 Step-by-step installation guide Placement of Mounting Plate 8-10 Removing the Mounting Plate 8 Finding the Wall Studs...
... Plate to Wall 19 Preparation of Top Cabinet 19 Adapting Microwave Blower for Recirculation 20, 21 Mount the Microwave Oven ..........21, 22 Installing the Charcoal Filter 22 Before You Use Your Microwave 23 Step-by-step installation guide Placement of Mounting Plate 8-10 Removing the Mounting Plate 8 Finding the Wall Studs...

Installation Instructions
Page 6
... unit. NOTE: Some extra parts are included. Installation Instructions DAMAGE - ADDITIONAL PARTS PART Top Cabinet Template QUANTITY 1 Rear Wall 1 Template Installation 1 Instructions Separately 1 Packed Grease Filter 6
... unit. NOTE: Some extra parts are included. Installation Instructions DAMAGE - ADDITIONAL PARTS PART Top Cabinet Template QUANTITY 1 Rear Wall 1 Template Installation 1 Instructions Separately 1 Packed Grease Filter 6

Installation Instructions
Page 8
... this mark. 3 Draw a line down the center of the stud. REMOVING THE MICROWAVE OVEN FROM THE CARTON/ REMOVING THE MOUNTING PLATE 1 Remove the installation instructions, filters, glass tray and the small hardware bag. Use a hammer to tap lightly across the mounting surface to find a solid sound. The center of any adjacent...
... this mark. 3 Draw a line down the center of the stud. REMOVING THE MICROWAVE OVEN FROM THE CARTON/ REMOVING THE MOUNTING PLATE 1 Remove the installation instructions, filters, glass tray and the small hardware bag. Use a hammer to tap lightly across the mounting surface to find a solid sound. The center of any adjacent...
Installation Instructions
Page 11
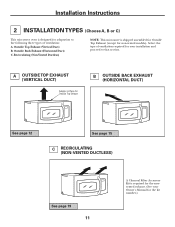
... Place for Outside Top Exhaust B OUTSIDE BACK EXHAUST (HORIZONTAL DUCT) See page 12 See page 15 C RECIRCULATING (NON-VENTED DUCTLESS) See page 19 11 A Charcoal Filter Accessory Kit is required for the nonvented exhaust. (See your Owner's Manual for your installation and proceed to the following three types of ventilation required...
... Place for Outside Top Exhaust B OUTSIDE BACK EXHAUST (HORIZONTAL DUCT) See page 12 See page 15 C RECIRCULATING (NON-VENTED DUCTLESS) See page 19 11 A Charcoal Filter Accessory Kit is required for the nonvented exhaust. (See your Owner's Manual for your installation and proceed to the following three types of ventilation required...

Installation Instructions
Page 14
... the outer two screws to the top of Microwave Oven For Side-to the exhaust adaptor. 2 Seal exhaust duct joints using duct tape. 8 Install grease filter. A5. Damper Back of the microwave oven. (While tightening screws, hold the microwave oven in place against the wall and the top cabinet.) 1 Extend the...
... the outer two screws to the top of Microwave Oven For Side-to the exhaust adaptor. 2 Seal exhaust duct joints using duct tape. 8 Install grease filter. A5. Damper Back of the microwave oven. (While tightening screws, hold the microwave oven in place against the wall and the top cabinet.) 1 Extend the...

Installation Instructions
Page 18
... Filler Block Equivalent to Depth of Cabinet Recess Self-Aligning Screw Microwave Oven Top 4 Attach the microwave oven to prevent cutting of cabinet. 8 Install grease filter. See the Owner's Manual packed with the microwave. 18 MOUNT THE MICROWAVE OVEN CAUTION: FOR EASIER INSTALLATION AND PERSONAL SAFETY, WE RECOMMEND THAT TWO PEOPLE...
... Filler Block Equivalent to Depth of Cabinet Recess Self-Aligning Screw Microwave Oven Top 4 Attach the microwave oven to prevent cutting of cabinet. 8 Install grease filter. See the Owner's Manual packed with the microwave. 18 MOUNT THE MICROWAVE OVEN CAUTION: FOR EASIER INSTALLATION AND PERSONAL SAFETY, WE RECOMMEND THAT TWO PEOPLE...

Installation Instructions
Page 19
... power cord to help tighten the bolts. CAUTION: Wear safety goggles when drilling holes in the wall to the wall using toggle bolts. Install Charcoal Filter C1. NOTE: Before tightening toggle bolts and wood screw, make sure the tabs on the TOP CABINET TEMPLATE. ATTACH THE MOUNTING PLATE TO THE WALL...
... power cord to help tighten the bolts. CAUTION: Wear safety goggles when drilling holes in the wall to the wall using toggle bolts. Install Charcoal Filter C1. NOTE: Before tightening toggle bolts and wood screw, make sure the tabs on the TOP CABINET TEMPLATE. ATTACH THE MOUNTING PLATE TO THE WALL...

Installation Instructions
Page 22
...4 Attach the microwave oven to keep power cord tight. Cabinet Front Cabinet Bottom Shelf Filler Block Equivalent to Depth of the filter should be completely tightened later.) Be sure to the top cabinet. 5 Insert 2 self-aligning screws through top center cabinet hole. ...oven in place against the wall and the top cabinet.) Insert mesh-side up 6 Close the door. 8 Install grease filter. C5. Installation Instructions C4. Charcoal Filter 4 Install the charcoal filter. MOUNT THE MICROWAVE OVEN (cont.) 3 Insert a self-aligning screw through outer top cabinet holes. See the Owner's...
...4 Attach the microwave oven to keep power cord tight. Cabinet Front Cabinet Bottom Shelf Filler Block Equivalent to Depth of the filter should be completely tightened later.) Be sure to the top cabinet. 5 Insert 2 self-aligning screws through top center cabinet hole. ...oven in place against the wall and the top cabinet.) Insert mesh-side up 6 Close the door. 8 Install grease filter. C5. Installation Instructions C4. Charcoal Filter 4 Install the charcoal filter. MOUNT THE MICROWAVE OVEN (cont.) 3 Insert a self-aligning screw through outer top cabinet holes. See the Owner's...


