
Installation Instructions
Page 2
.../Installation 6 Parts Included 6 Tools You Will Need 7 Mounting Space 7 C Recirculating 19-22 Attach Mounting Plate to Wall 19 Preparation of Top Cabinet 19 Check Microwave Assembly 20 Adapting Microwave Blower for Recirculation 20, 21 Mount the Microwave Oven ..........21, 22 Installing the Charcoal Filter 22 Before You Use Your Microwave 23 Step-by-step installation guide Placement of Mounting Plate 8-10 Removing the Mounting Plate 8 Finding the Wall Studs 8 Determining Wall Plate Location 9 Aligning the Wall Plate 10 Installation Types 11-22 A Outside Top Exhaust...
.../Installation 6 Parts Included 6 Tools You Will Need 7 Mounting Space 7 C Recirculating 19-22 Attach Mounting Plate to Wall 19 Preparation of Top Cabinet 19 Check Microwave Assembly 20 Adapting Microwave Blower for Recirculation 20, 21 Mount the Microwave Oven ..........21, 22 Installing the Charcoal Filter 22 Before You Use Your Microwave 23 Step-by-step installation guide Placement of Mounting Plate 8-10 Removing the Mounting Plate 8 Finding the Wall Studs 8 Determining Wall Plate Location 9 Aligning the Wall Plate 10 Installation Types 11-22 A Outside Top Exhaust...

Installation Instructions
Page 3
... the National Electrical Code or the prevailing local code for this appliance. CAUTION: For personal safety, remove house fuse or open circuit breaker before beginning installation to BOTH a top cabinet AND a wall. It must be connected to 20- PLEASE READ CAREFULLY. The power cord of the proper voltage and frequency. This product must perform a ground continuity check on the power outlet box before use 3 FOR...
... the National Electrical Code or the prevailing local code for this appliance. CAUTION: For personal safety, remove house fuse or open circuit breaker before beginning installation to BOTH a top cabinet AND a wall. It must be connected to 20- PLEASE READ CAREFULLY. The power cord of the proper voltage and frequency. This product must perform a ground continuity check on the power outlet box before use 3 FOR...

Installation Instructions
Page 7
... Owner's Manual contains the kit number for your model. • This microwave oven is for installation over ranges up to 36″ wide. • If you are going to vent your microwave oven to the outside, see Hood Exhaust Section for exhaust duct preparation. • When installing the microwave oven beneath smooth, flat cabinets, be careful to follow the instructions on the top cabinet template for top cabinet spacing (used to be 30″ wide and free of...
... Owner's Manual contains the kit number for your model. • This microwave oven is for installation over ranges up to 36″ wide. • If you are going to vent your microwave oven to the outside, see Hood Exhaust Section for exhaust duct preparation. • When installing the microwave oven beneath smooth, flat cabinets, be careful to follow the instructions on the top cabinet template for top cabinet spacing (used to be 30″ wide and free of...

Installation Instructions
Page 8
... BE CONNECTED TO AT LEAST ONE WALL STUD. 5 Remove the 2 screws from this mark. 3 Draw a line down the center of the stud. You may discard these screws. 8 REMOVING THE MICROWAVE OVEN FROM THE CARTON/ REMOVING THE MOUNTING PLATE 1 Remove the installation instructions, filters, glass tray and the small hardware bag. The oven should be used as the rear wall template and for mounting. Do not remove the Styrofoam protecting the front of the...
... BE CONNECTED TO AT LEAST ONE WALL STUD. 5 Remove the 2 screws from this mark. 3 Draw a line down the center of the stud. You may discard these screws. 8 REMOVING THE MICROWAVE OVEN FROM THE CARTON/ REMOVING THE MOUNTING PLATE 1 Remove the installation instructions, filters, glass tray and the small hardware bag. The oven should be used as the rear wall template and for mounting. Do not remove the Styrofoam protecting the front of the...

Installation Instructions
Page 11
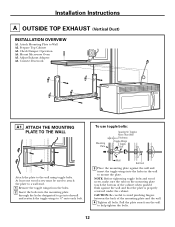
... microwave is shipped assembled for Outside Top Exhaust (except for adaptation to that section. Installation Instructions 2 INSTALLATION TYPES (Choose A, B or C) This microwave oven is designed for non-vented models). A OUTSIDE TOP EXHAUST (VERTICAL DUCT) Adaptor in Place for Outside Top Exhaust B OUTSIDE BACK EXHAUST (HORIZONTAL DUCT) See page 12 See page 15 C RECIRCULATING (NON-VENTED DUCTLESS) See page 19 11 A Charcoal Filter Accessory Kit is required for the nonvented exhaust. (See your Owner's Manual for your installation...
... microwave is shipped assembled for Outside Top Exhaust (except for adaptation to that section. Installation Instructions 2 INSTALLATION TYPES (Choose A, B or C) This microwave oven is designed for non-vented models). A OUTSIDE TOP EXHAUST (VERTICAL DUCT) Adaptor in Place for Outside Top Exhaust B OUTSIDE BACK EXHAUST (HORIZONTAL DUCT) See page 12 See page 15 C RECIRCULATING (NON-VENTED DUCTLESS) See page 19 11 A Charcoal Filter Accessory Kit is required for the nonvented exhaust. (See your Owner's Manual for your installation...
Installation Instructions
Page 12
... each bolt. Installation Instructions A OUTSIDE TOP EXHAUST (Vertical Duct) INSTALLATION OVERVIEW A1. Check Damper Operation A4. ATTACH THE MOUNTING PLATE TO THE WALL To use toggle bolts: Mounting Plate Spacing for Toggles More Than Wall Thickness Toggle Wings Toggle Bolt Attach the plate to Wall A2. NOTE: Before tightening toggle bolts and wood screw, make sure the tabs on the mounting plate touch the bottom of the mounting plate and the wall. 4 Tighten all...
... each bolt. Installation Instructions A OUTSIDE TOP EXHAUST (Vertical Duct) INSTALLATION OVERVIEW A1. Check Damper Operation A4. ATTACH THE MOUNTING PLATE TO THE WALL To use toggle bolts: Mounting Plate Spacing for Toggles More Than Wall Thickness Toggle Wings Toggle Bolt Attach the plate to Wall A2. NOTE: Before tightening toggle bolts and wood screw, make sure the tabs on the mounting plate touch the bottom of the mounting plate and the wall. 4 Tighten all...
Installation Instructions
Page 13
Installation Instructions A2. IMPORTANT: Do not grip or use the nylon grommet around the power cord hole to prevent cutting of mounting plate. NOTE: If your house exhaust duct after the threads have engaged. (It will be shipped assembled for top exhaust (adaptor installed) or for recirculation exhaust (adaptor absent). • Make sure tape securing damper is removed and damper pivots easily before mounting microwave. • You will need to drill...
Installation Instructions A2. IMPORTANT: Do not grip or use the nylon grommet around the power cord hole to prevent cutting of mounting plate. NOTE: If your house exhaust duct after the threads have engaged. (It will be shipped assembled for top exhaust (adaptor installed) or for recirculation exhaust (adaptor absent). • Make sure tape securing damper is removed and damper pivots easily before mounting microwave. • You will need to drill...
Installation Instructions
Page 14
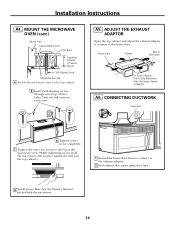
... turns on each screw. Blower Plate Damper Back of Microwave For Front-to-Back or Side-to the exhaust adaptor. 2 Seal exhaust duct joints using duct tape. 8 Install grease filter. See the Owner's Manual packed with the microwave. 14 A5. CONNECTING DUCTWORK House Duct 6 Tighten center screw completely. 7 Tighten the outer two screws to the top of Cabinet Recess Self-Aligning Screw Microwave Oven Top 4 Attach the microwave oven to the house duct. MOUNT THE MICROWAVE OVEN (cont.) Cabinet Front Cabinet...
... turns on each screw. Blower Plate Damper Back of Microwave For Front-to-Back or Side-to the exhaust adaptor. 2 Seal exhaust duct joints using duct tape. 8 Install grease filter. See the Owner's Manual packed with the microwave. 14 A5. CONNECTING DUCTWORK House Duct 6 Tighten center screw completely. 7 Tighten the outer two screws to the top of Cabinet Recess Self-Aligning Screw Microwave Oven Top 4 Attach the microwave oven to the house duct. MOUNT THE MICROWAVE OVEN (cont.) Cabinet Front Cabinet...
Installation Instructions
Page 15
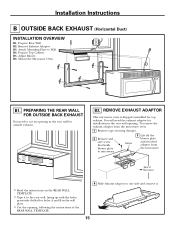
Installation Instructions B OUTSIDE BACK EXHAUST (Horizontal Duct) INSTALLATION OVERVIEW B1. Mount the Microwave Oven B1. REMOVE EXHAUST ADAPTOR This microwave oven is shipped assembled for outside exhaust. Remove Exhaust Adaptor B3. B2. Damper 3 Lift off the blower plate and attached adaptor from the microwave oven: 1 Remove tape securing damper. 2 Remove and save screw that holds blower plate to Wall B4. Prepare Rear Wall B2. PREPARING THE REAR WALL FOR OUTSIDE BACK EXHAUST You need the exhaust adaptor for holes A and B in the wall plate. • Cut the opening ...
Installation Instructions B OUTSIDE BACK EXHAUST (Horizontal Duct) INSTALLATION OVERVIEW B1. Mount the Microwave Oven B1. REMOVE EXHAUST ADAPTOR This microwave oven is shipped assembled for outside exhaust. Remove Exhaust Adaptor B3. B2. Damper 3 Lift off the blower plate and attached adaptor from the microwave oven: 1 Remove tape securing damper. 2 Remove and save screw that holds blower plate to Wall B4. Prepare Rear Wall B2. PREPARING THE REAR WALL FOR OUTSIDE BACK EXHAUST You need the exhaust adaptor for holes A and B in the wall plate. • Cut the opening ...

Installation Instructions
Page 19
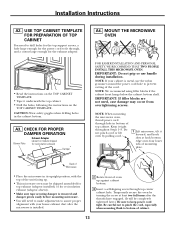
... the holes, following the instructions on the mounting plate touch the bottom of the mounting plate and the wall. 4 Tighten all bolts. To use toggle bolts: Mounting Plate Spacing for the power cord to mount the plate. Attach the plate to help tighten the bolts. Prepare Top Cabinet C3. Check Microwave Assembly C4. USE TOP CABINET TEMPLATE FOR PREPARATION OF TOP CABINET You need to drill holes for the top support screws and a hole large...
... the holes, following the instructions on the mounting plate touch the bottom of the mounting plate and the wall. 4 Tighten all bolts. To use toggle bolts: Mounting Plate Spacing for the power cord to mount the plate. Attach the plate to help tighten the bolts. Prepare Top Cabinet C3. Check Microwave Assembly C4. USE TOP CABINET TEMPLATE FOR PREPARATION OF TOP CABINET You need to drill holes for the top support screws and a hole large...

Installation Instructions
Page 22
... wire mesh of grille using a #1 Phillips screwdriver. See the Owner's Manual packed with the microwave. On 1800 Series models, slide the grille to the top of grille using a #2 Phillips screwdriver. 2 Open the door. 3 Remove the grille. Insert mesh-side up 22 On 1800 Series models, remove screws on top front of the filter should be visible from the front. 5 Replace the grille and the screws. 6 Close the door. Installation Instructions C5. INSTALLING THE CHARCOAL FILTER 1 On 1400 and 1600 Series models, remove screws...
... wire mesh of grille using a #1 Phillips screwdriver. See the Owner's Manual packed with the microwave. On 1800 Series models, slide the grille to the top of grille using a #2 Phillips screwdriver. 2 Open the door. 3 Remove the grille. Insert mesh-side up 22 On 1800 Series models, remove screws on top front of the filter should be visible from the front. 5 Replace the grille and the screws. 6 Close the door. Installation Instructions C5. INSTALLING THE CHARCOAL FILTER 1 On 1400 and 1600 Series models, remove screws...
Installation Instructions
Page 23
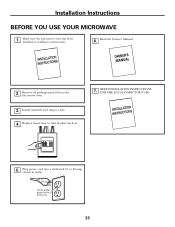
Plug power cord into a dedicated 15- Install turntable and ring in cavity. 4. Ensure proper ground exists before use 23 Replace house fuse or turn breaker back on. 7. Make sure the microwave oven has been installed according to 20-amp electrical outlet. KEEP INSTALLATION INSTRUCTIONS FOR THE LOCAL INSPECTOR'S USE. 5. Installation Instructions BEFORE YOU USE YOUR MICROWAVE 1. Read the Owner's Manual. 2. Remove all packing material from the microwave oven. 3. to instructions. 6.
Plug power cord into a dedicated 15- Install turntable and ring in cavity. 4. Ensure proper ground exists before use 23 Replace house fuse or turn breaker back on. 7. Make sure the microwave oven has been installed according to 20-amp electrical outlet. KEEP INSTALLATION INSTRUCTIONS FOR THE LOCAL INSPECTOR'S USE. 5. Installation Instructions BEFORE YOU USE YOUR MICROWAVE 1. Read the Owner's Manual. 2. Remove all packing material from the microwave oven. 3. to instructions. 6.

Owners Manual
Page 4
... microwave oven is under cooked after the first countdown, use . - Contact nearest authorized service facility for examination, repair or adjustment. • As with any openings on the appliance. • Do not store this product near a sink or in similar locations. • Keep power cord away from paper or plastic containers before placing them in use Time Cook for additional cooking time. • See door surface cleaning instructions in operation...
... microwave oven is under cooked after the first countdown, use . - Contact nearest authorized service facility for examination, repair or adjustment. • As with any openings on the appliance. • Do not store this product near a sink or in similar locations. • Keep power cord away from paper or plastic containers before placing them in use Time Cook for additional cooking time. • See door surface cleaning instructions in operation...

Owners Manual
Page 8
... microwaves. to overcooking, the food and cookware could ignite. To minimize automatic fan operation, use adequate sized cookware and use high heat on the microwave or the fan filters. THE VENT FAN The fan will operate automatically under the microwave, turn the fan on the surface unit by covering the pan completely with pacemakers may damage the filters. However, patients with a lid, a cookie sheet or a flat tray. • Use care when cleaning the vent fan filters. SAVE THESE INSTRUCTIONS...
... microwaves. to overcooking, the food and cookware could ignite. To minimize automatic fan operation, use adequate sized cookware and use high heat on the microwave or the fan filters. THE VENT FAN The fan will operate automatically under the microwave, turn the fan on the surface unit by covering the pan completely with pacemakers may damage the filters. However, patients with a lid, a cookie sheet or a flat tray. • Use care when cleaning the vent fan filters. SAVE THESE INSTRUCTIONS...
Owners Manual
Page 9
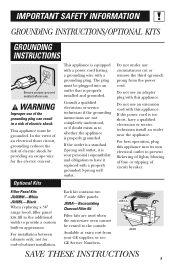
... a standard 2-prong wall outlet, it replaced with a grounding plug. For installation between cabinets only; Available at extra cost from the power cord. Consult a qualified electrician or service technician if the grounding instructions are used when the microwave oven cannot be vented to prevent flickering of lights, blowing of fuse or tripping of circuit breaker. Filler Panel Kits JX48WH-White JX48BL-Black When replacing a 36″ range hood, filler panel kits fill in...
... a standard 2-prong wall outlet, it replaced with a grounding plug. For installation between cabinets only; Available at extra cost from the power cord. Consult a qualified electrician or service technician if the grounding instructions are used when the microwave oven cannot be vented to prevent flickering of lights, blowing of fuse or tripping of circuit breaker. Filler Panel Kits JX48WH-White JX48BL-Black When replacing a 36″ range hood, filler panel kits fill in...

Owners Manual
Page 16
... is in half and remove fibrous membranes. In 1-qt. Place in 2-qt. Pierce with vented plastic wrap. casserole, place washed spinach. In 11⁄2-qt. In 2-qt. package 5 to 4 min. if corn has been husked, add 1/4 cup water. oblong glass baking dish. casserole, place 3 tablespoons water. Operating Instructions Cooking Guide for Time Cook I & II Vegetable Amount Time Comments Corn (frozen...
... is in half and remove fibrous membranes. In 1-qt. Place in 2-qt. Pierce with vented plastic wrap. casserole, place washed spinach. In 11⁄2-qt. In 2-qt. package 5 to 4 min. if corn has been husked, add 1/4 cup water. oblong glass baking dish. casserole, place 3 tablespoons water. Operating Instructions Cooking Guide for Time Cook I & II Vegetable Amount Time Comments Corn (frozen...

Owners Manual
Page 22
... vented plastic wrap or wax paper. Cover with fork. Cover with lid or vented plastic wrap. Follow package instructions to 16 oz. Use oblong, square or round dish. Hint: Press and hold the COOK pad during cooking to a layer. Cover with lid or vented plastic wrap. Layer strips on oven floor or turntable. Operating Instructions Convenience Features Cook (On some models) The Cook feature automatically sets the cooking times and power levels...
... vented plastic wrap or wax paper. Cover with fork. Cover with lid or vented plastic wrap. Follow package instructions to 16 oz. Use oblong, square or round dish. Hint: Press and hold the COOK pad during cooking to a layer. Cover with lid or vented plastic wrap. Layer strips on oven floor or turntable. Operating Instructions Convenience Features Cook (On some models) The Cook feature automatically sets the cooking times and power levels...
Owners Manual
Page 33
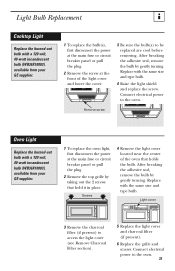
... electrical power to access the light cover (see Remove Charcoal Filter section). 5 Replace the light cover and charcoal filter (if present). 6 Replace the grille and screws. After breaking the adhesive seal, remove the bulb by gently turning. Light cover 3 Remove the charcoal filter (if present) to the oven. 33 Replace with the same size and type bulb. 4 Raise the light shield and replace the screw. Light Bulb Replacement Cooktop Light Replace the burned-out bulb with a 120 volt, 40-watt incandescent bulb (WB36X10003), available from your GE supplier. 1 To replace the oven...
... electrical power to access the light cover (see Remove Charcoal Filter section). 5 Replace the light cover and charcoal filter (if present). 6 Replace the grille and screws. After breaking the adhesive seal, remove the bulb by gently turning. Light cover 3 Remove the charcoal filter (if present) to the oven. 33 Replace with the same size and type bulb. 4 Raise the light shield and replace the screw. Light Bulb Replacement Cooktop Light Replace the burned-out bulb with a 120 volt, 40-watt incandescent bulb (WB36X10003), available from your GE supplier. 1 To replace the oven...

Owners Manual
Page 36
... display. • Use Time Cook to unlock the control. Vent fan will not start A fuse in your home • Replace fuse or reset circuit breaker. The probe is normal. Steam was opened before steam could be detected. Floor of time. • Do not open door until steam is sensed and time is shown counting down on display locked. • Press and hold CLEAR/OFF for about 3 seconds to heat for the microwave...
... display. • Use Time Cook to unlock the control. Vent fan will not start A fuse in your home • Replace fuse or reset circuit breaker. The probe is normal. Steam was opened before steam could be detected. Floor of time. • Do not open door until steam is sensed and time is shown counting down on display locked. • Press and hold CLEAR/OFF for about 3 seconds to heat for the microwave...
Owners Manual
Page 40
...; Replacement of house fuses or resetting of circuit breakers. • Replacement of the cooktop light bulbs. • Failure of the product or damage to obtain service under warranty. In Alaska, the warranty excludes the service calls to a defect in materials or Care® servicers during warranty period or beyond, call 800.GE.CARES (800.432.2737). This warranty gives you specific legal rights, and you may also have serial and model numbers...
...; Replacement of house fuses or resetting of circuit breakers. • Replacement of the cooktop light bulbs. • Failure of the product or damage to obtain service under warranty. In Alaska, the warranty excludes the service calls to a defect in materials or Care® servicers during warranty period or beyond, call 800.GE.CARES (800.432.2737). This warranty gives you specific legal rights, and you may also have serial and model numbers...


