Use and Care Manual
Page 2
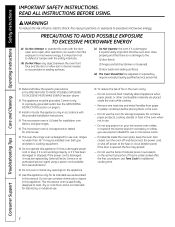
...Tips Care and Cleaning Operating Instructions Safety Instructions IMPORTANT SAFETY INSTRUCTIONS. It is important not to defeat or tamper with the provided installation instructions. s This microwave oven is designed for use over -the-range oven is not approved or tested for additional cooking...by anyone except properly qualified service personnel. s This appliance must be grounded. s Do not operate this appliance only in this manual. Remove wire twist-ties and metal handles from General Electric. s Read and follow the specific precautions in microwave ovens. - ...
...Tips Care and Cleaning Operating Instructions Safety Instructions IMPORTANT SAFETY INSTRUCTIONS. It is important not to defeat or tamper with the provided installation instructions. s This microwave oven is designed for use over -the-range oven is not approved or tested for additional cooking...by anyone except properly qualified service personnel. s This appliance must be grounded. s Do not operate this appliance only in this manual. Remove wire twist-ties and metal handles from General Electric. s Read and follow the specific precautions in microwave ovens. - ...
Use and Care Manual
Page 3
s When using the Auto Grill, Manual Grill or Combo Grill functions, both the outside and ... scouring pads. s Do not store anything directly on top of the oven. s Turntable ring support not installed correctly. Arcing is designed or recommended for examination, repair or adjustment. s This appliance must only be heated...Do not store this appliance over a sink. Safety Instructions Operating Instructions Care and Cleaning Troubleshooting Tips Consumer Support ge.com IMPORTANT SAFETY INSTRUCTIONS. s Do not store any appliance, close supervision is important to explode and should ...
s When using the Auto Grill, Manual Grill or Combo Grill functions, both the outside and ... scouring pads. s Do not store anything directly on top of the oven. s Turntable ring support not installed correctly. Arcing is designed or recommended for examination, repair or adjustment. s This appliance must only be heated...Do not store this appliance over a sink. Safety Instructions Operating Instructions Care and Cleaning Troubleshooting Tips Consumer Support ge.com IMPORTANT SAFETY INSTRUCTIONS. s Do not store any appliance, close supervision is important to explode and should ...
Installation Instructions
Page 7
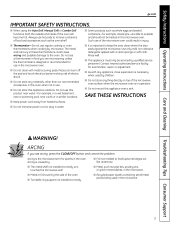
... the instructions on recessed bottom cabinet installations only) Safety goggles Level Duct and masking tape MOUNTING SPACE NOTE: Maximum cabinet depth is 13". 16-1⁄4″ 30″ 2″ 66″ or more from the cooking surface 30″ min. Your Owner's Manual contains the kit number for your ...model. • This oven is for installation over ranges up to 36″ wide. • If you are going to vent your oven to the outside...
... the instructions on recessed bottom cabinet installations only) Safety goggles Level Duct and masking tape MOUNTING SPACE NOTE: Maximum cabinet depth is 13". 16-1⁄4″ 30″ 2″ 66″ or more from the cooking surface 30″ min. Your Owner's Manual contains the kit number for your ...model. • This oven is for installation over ranges up to 36″ wide. • If you are going to vent your oven to the outside...
Installation Instructions
Page 11
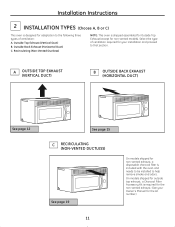
... RECIRCULATING (NON-VENTED DUCTLESS) See page 19 11 On models shipped for your Owner's Manual for non-vented models). Recirculating (Non-Vented Ductless) NOTE: This oven is included with the oven and needs to be installed to help remove smoke and odors. On models shipped for outside top exhaust, a Charcoal...of ventilation required for non-vented exhaust, a disposable charcoal filter is shipped assembled for Outside Top Exhaust (except for the kit number.) Installation Instructions 2 INSTALLATION TYPES (Choose A, B or C) This oven is required for the non-vented exhaust. (See your...
... RECIRCULATING (NON-VENTED DUCTLESS) See page 19 11 On models shipped for your Owner's Manual for non-vented models). Recirculating (Non-Vented Ductless) NOTE: This oven is included with the oven and needs to be installed to help remove smoke and odors. On models shipped for outside top exhaust, a Charcoal...of ventilation required for non-vented exhaust, a disposable charcoal filter is shipped assembled for Outside Top Exhaust (except for the kit number.) Installation Instructions 2 INSTALLATION TYPES (Choose A, B or C) This oven is required for the non-vented exhaust. (See your...
Installation Instructions
Page 14
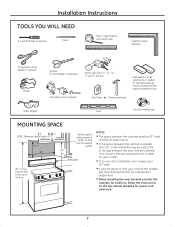
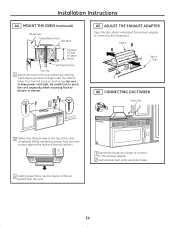
...Attach the oven to Depth of the oven completely. (While tightening screws, hold the oven in place against the wall and the top cabinet.) 5 Install grease filters. MOUNT THE OVEN (continued) Cabinet Front Cabinet Bottom Shelf Filler Block Equivalent to the top cabinet by inserting 3 self-aligning screws through ... house duct. Damper Back of cabinet. Be sure to the exhaust adapter. 2 Seal exhaust duct joints using duct tape. 14 See the Owner's Manual packed with the oven. 1 Extend the house duct down to connect to keep power cord tight. Turn two full turns on each screw. ADJUST...
...Attach the oven to Depth of the oven completely. (While tightening screws, hold the oven in place against the wall and the top cabinet.) 5 Install grease filters. MOUNT THE OVEN (continued) Cabinet Front Cabinet Bottom Shelf Filler Block Equivalent to the top cabinet by inserting 3 self-aligning screws through ... house duct. Damper Back of cabinet. Be sure to the exhaust adapter. 2 Seal exhaust duct joints using duct tape. 14 See the Owner's Manual packed with the oven. 1 Extend the house duct down to connect to keep power cord tight. Turn two full turns on each screw. ADJUST...
Installation Instructions
Page 18
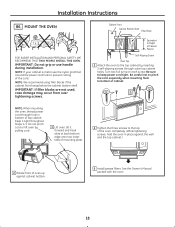
..., thread power cord through outer top cabinet holes. Be careful not to pinch the cord, especially when mounting flush to keep power cord tight. Installation Instructions B6. IMPORTANT: Do not grip or use the nylon grommet around the power cord hole to the top of the oven completely. (While...hole in place against the wall and the top cabinet.) 2 Rotate front of cabinet. See the Owner's Manual packed with the oven. 18 NOTE: If your cabinet is metal, use handle during installation. Keep it forward and hook slots at back bottom edge onto two lower tabs of mounting plate. 4 ...
..., thread power cord through outer top cabinet holes. Be careful not to pinch the cord, especially when mounting flush to keep power cord tight. Installation Instructions B6. IMPORTANT: Do not grip or use the nylon grommet around the power cord hole to the top of the oven completely. (While...hole in place against the wall and the top cabinet.) 2 Rotate front of cabinet. See the Owner's Manual packed with the oven. 18 NOTE: If your cabinet is metal, use handle during installation. Keep it forward and hook slots at back bottom edge onto two lower tabs of mounting plate. 4 ...
Installation Instructions
Page 22
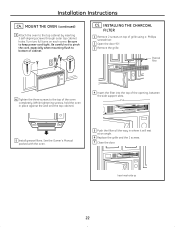
... filters. Be sure to the top cabinet by inserting 3 self-aligning screws through outer top cabinet holes. C5. Installation Instructions C4. See the Owner's Manual packed with the oven. 5 Push the filter all the way in place against the wall and the top cabinet.) 4 Insert the filter ...into the top of cabinet. Insert mesh-side up 22 INSTALLING THE CHARCOAL FILTER 1 Remove 2 screws on each screw. MOUNT THE OVEN (continued)...
... filters. Be sure to the top cabinet by inserting 3 self-aligning screws through outer top cabinet holes. C5. Installation Instructions C4. See the Owner's Manual packed with the oven. 5 Push the filter all the way in place against the wall and the top cabinet.) 4 Insert the filter ...into the top of cabinet. Insert mesh-side up 22 INSTALLING THE CHARCOAL FILTER 1 Remove 2 screws on each screw. MOUNT THE OVEN (continued)...
Installation Instructions
Page 23
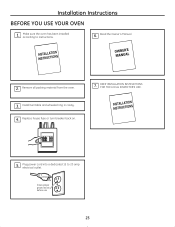
Installation Instructions BEFORE YOU USE YOUR OVEN 1. Remove all packing material from the oven. 3. Plug power cord into a dedicated 15 to instructions. 6. Insure proper ground exists before use 23 Read the Owner's Manual. 2. Replace house fuse or turn breaker back on. 7. Install turntable and wheeled ring in cavity. 4. KEEP INSTALLATION INSTRUCTIONS FOR THE LOCAL INSPECTOR'S USE. 5. Make sure the oven has been installed according to 20 amp electrical outlet.
Installation Instructions BEFORE YOU USE YOUR OVEN 1. Remove all packing material from the oven. 3. Plug power cord into a dedicated 15 to instructions. 6. Insure proper ground exists before use 23 Read the Owner's Manual. 2. Replace house fuse or turn breaker back on. 7. Install turntable and wheeled ring in cavity. 4. KEEP INSTALLATION INSTRUCTIONS FOR THE LOCAL INSPECTOR'S USE. 5. Make sure the oven has been installed according to 20 amp electrical outlet.


