Use and Care Manual
Page 1
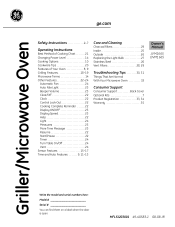
... Start/Pause 22 Timer 24 Turn Table On/Off 24 Vent 24 Sensor Features 15-17 Time and Auto Features 9, 11-13 Care and Cleaning Charcoal Filters 29 Inside 25 Outside 26 Replacing the Light Bulb 27 Stainless Steel 26 Vent Filters 28, 29 Troubleshooting Tips 30, 31 Things That Are Normal With Your Microwave Oven 32 Consumer Support Consumer Support Back Cover Optional Kits 7 Product Registration 33, 34 Warranty 35 Owner's Manual JVM1665 DVM1665 Write the model and serial numbers here: Model Serial...
... Start/Pause 22 Timer 24 Turn Table On/Off 24 Vent 24 Sensor Features 15-17 Time and Auto Features 9, 11-13 Care and Cleaning Charcoal Filters 29 Inside 25 Outside 26 Replacing the Light Bulb 27 Stainless Steel 26 Vent Filters 28, 29 Troubleshooting Tips 30, 31 Things That Are Normal With Your Microwave Oven 32 Consumer Support Consumer Support Back Cover Optional Kits 7 Product Registration 33, 34 Warranty 35 Owner's Manual JVM1665 DVM1665 Write the model and serial numbers here: Model Serial...
Use and Care Manual
Page 2
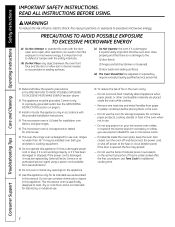
... food. Remove wire twist-ties and metal handles from General Electric. Do not leave paper products, cooking utensils or food in the oven when not in the oven. - If food is undercooked after the first countdown, use the oven for additional cooking time. 2 s This appliance must be grounded. s Install or locate this oven with the door open since open-door operation can result in succession on the appliance. If the power cord is specifically designed to microwave...
... food. Remove wire twist-ties and metal handles from General Electric. Do not leave paper products, cooking utensils or food in the oven when not in the oven. - If food is undercooked after the first countdown, use the oven for additional cooking time. 2 s This appliance must be grounded. s Install or locate this oven with the door open since open-door operation can result in succession on the appliance. If the power cord is specifically designed to microwave...
Use and Care Manual
Page 3
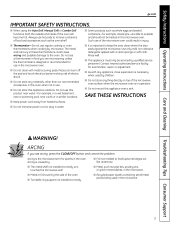
... and touch electrical parts involving risk of the oven. SAVE THESE INSTRUCTIONS s Keep power cord away from heated surfaces. Do not use hot pads to explode and should not be serviced by microwave. s Turntable ring support not installed correctly. s The metal shelf not installed correctly so it touches the microwave wall. s When using the Auto Grill, Manual Grill or Combo Grill functions, both the outside and inside of food and accessories such as twist-ties, poultry pins, or gold...
... and touch electrical parts involving risk of the oven. SAVE THESE INSTRUCTIONS s Keep power cord away from heated surfaces. Do not use hot pads to explode and should not be serviced by microwave. s Turntable ring support not installed correctly. s The metal shelf not installed correctly so it touches the microwave wall. s When using the Auto Grill, Manual Grill or Combo Grill functions, both the outside and inside of food and accessories such as twist-ties, poultry pins, or gold...
Use and Care Manual
Page 4
... foodborne illness. - s Foods cooked in microwave ovens. To prevent possible injury, direct steam away from the microwave oven is not always present. Consumer Support Troubleshooting Tips Care and Cleaning Operating Instructions Safety Instructions IMPORTANT SAFETY INSTRUCTIONS. s Foods with narrow necks. - Even if the container is . Do not use popcorn labeled for more rapidly than the formula really is opened, pressure can cause burns. READ ALL INSTRUCTIONS BEFORE USING. WARNING! FOODS s Do not...
... foodborne illness. - s Foods cooked in microwave ovens. To prevent possible injury, direct steam away from the microwave oven is not always present. Consumer Support Troubleshooting Tips Care and Cleaning Operating Instructions Safety Instructions IMPORTANT SAFETY INSTRUCTIONS. s Foods with narrow necks. - Even if the container is . Do not use popcorn labeled for more rapidly than the formula really is opened, pressure can cause burns. READ ALL INSTRUCTIONS BEFORE USING. WARNING! FOODS s Do not...
Use and Care Manual
Page 5
... filaments should be used . Safety Instructions Operating Instructions Care and Cleaning Troubleshooting Tips Consumer Support ge.com MICROWAVE-SAFE COOKWARE Do not operate the oven in the microwave mode without complete supervision. 5 This will cause overheating of the shelf accessory: - If they should be hot. - When microwaved, the metal can escape. When using the grilling functions of metal embedded in the Auto Grill, Manual Grill or Combo Grill mode. Follow these guidelines: 1 Use microwave-safe plastics...
... filaments should be used . Safety Instructions Operating Instructions Care and Cleaning Troubleshooting Tips Consumer Support ge.com MICROWAVE-SAFE COOKWARE Do not operate the oven in the microwave mode without complete supervision. 5 This will cause overheating of the shelf accessory: - If they should be hot. - When microwaved, the metal can escape. When using the grilling functions of metal embedded in the Auto Grill, Manual Grill or Combo Grill mode. Follow these guidelines: 1 Use microwave-safe plastics...
Use and Care Manual
Page 6
... as lye-based oven cleaners, may ignite and spread if the microwave vent fan is equipped with a power cord having a grounding wire with this appliance into an outlet that may damage the filters. Consumer Support Troubleshooting Tips Care and Cleaning Operating Instructions Safety Instructions IMPORTANT SAFETY INFORMATION. The plug must be plugged into its own electrical outlet to have a qualified electrician or service technician install an outlet near...
... as lye-based oven cleaners, may ignite and spread if the microwave vent fan is equipped with a power cord having a grounding wire with this appliance into an outlet that may damage the filters. Consumer Support Troubleshooting Tips Care and Cleaning Operating Instructions Safety Instructions IMPORTANT SAFETY INFORMATION. The plug must be plugged into its own electrical outlet to have a qualified electrician or service technician install an outlet near...
Use and Care Manual
Page 8
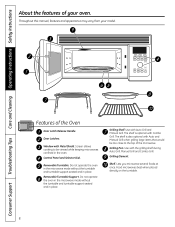
... your model. Screen allows cooking to be too close to the top of the microwave. Removable Turntable. Do not operate the oven in the microwave mode without the turntable and turntable support seated and in place. Removable Turntable Support. The shelf is optional with Auto Grill and Manual Grill. Grilling Element. Door Latches. Grilling Shelf. Lets you microwave several foods at once. Consumer Support Troubleshooting Tips Care and Cleaning Operating Instructions Safety Instructions About the features of the Oven Door Latch Release Handle. Throughout this manual, features...
... your model. Screen allows cooking to be too close to the top of the microwave. Removable Turntable. Do not operate the oven in the microwave mode without the turntable and turntable support seated and in place. Removable Turntable Support. The shelf is optional with Auto Grill and Manual Grill. Grilling Element. Door Latches. Grilling Shelf. Lets you microwave several foods at once. Consumer Support Troubleshooting Tips Care and Cleaning Operating Instructions Safety Instructions About the features of the Oven Door Latch Release Handle. Throughout this manual, features...
Use and Care Manual
Page 10
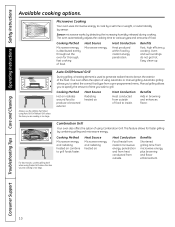
... Cooking Your oven uses microwave energy to grill. Your oven offers the option of food. Heat Source Radiating heated air. Heat Conduction Heat produced within food by combining grilling and microwave energy. Benefits Fast, high efficiency cooking. Oven and surroundings do not get hot. Consumer Support Troubleshooting Tips Care and Cleaning Operating Instructions Safety Instructions Available cooking options. Sensor microwave works by sensor. Always use the grilling shelf when using Auto Grill or Manual Grill unless the item you wish to cook by a set time or weight...
... Cooking Your oven uses microwave energy to grill. Your oven offers the option of food. Heat Source Radiating heated air. Heat Conduction Heat produced within food by combining grilling and microwave energy. Benefits Fast, high efficiency cooking. Oven and surroundings do not get hot. Consumer Support Troubleshooting Tips Care and Cleaning Operating Instructions Safety Instructions Available cooking options. Sensor microwave works by sensor. Always use the grilling shelf when using Auto Grill or Manual Grill unless the item you wish to cook by a set time or weight...
Use and Care Manual
Page 14
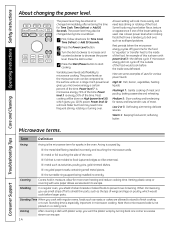
... time. Covering Covers hold in microwave cooking. Shielding In a regular oven, you cook with power level 3-the defrost cycle. Note that a microwaved cake is shown with regular ovens, foods such as the tips of meat. Power level 10 will cook more frequent stirring, rotating or turning over , such as twist-ties, poultry pins, gold-rimmed dishes. delicate sauces. s the turntable ring support being installed incorrectly and touching the microwave walls. Consumer Support Troubleshooting Tips Care and Cleaning Operating Instructions Safety Instructions...
... time. Covering Covers hold in microwave cooking. Shielding In a regular oven, you cook with power level 3-the defrost cycle. Note that a microwaved cake is shown with regular ovens, foods such as the tips of meat. Power level 10 will cook more frequent stirring, rotating or turning over , such as twist-ties, poultry pins, gold-rimmed dishes. delicate sauces. s the turntable ring support being installed incorrectly and touching the microwave walls. Consumer Support Troubleshooting Tips Care and Cleaning Operating Instructions Safety Instructions...

Use and Care Manual
Page 16
... specific foods and instructions. Press the Start/Pause button if necessary to the desired food type. Add 2 tablespoons water for adding water. Cooking Tips s When oven signals and countdown time is undercooked after the countdown, use the shelves when microwave cooking.) 1 Place covered food in the display. 2 Turn the dial to resume cooking. Use microwave-safe casserole or bowl. Press the Auto Cook button. The oven starts immediately. Consumer Support Troubleshooting Tips Care and Cleaning Operating Instructions Safety Instructions About the sensor microwave...
... specific foods and instructions. Press the Start/Pause button if necessary to the desired food type. Add 2 tablespoons water for adding water. Cooking Tips s When oven signals and countdown time is undercooked after the countdown, use the shelves when microwave cooking.) 1 Place covered food in the display. 2 Turn the dial to resume cooking. Use microwave-safe casserole or bowl. Press the Auto Cook button. The oven starts immediately. Consumer Support Troubleshooting Tips Care and Cleaning Operating Instructions Safety Instructions About the sensor microwave...
Use and Care Manual
Page 18
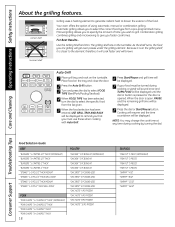
... faster cook times. As the shelf turns, the food you wish to the element; Incorrect shelf Auto Grill 1 Place grill tray and rack on the turntable. Consumer Support Troubleshooting Tips Care and Cleaning Operating Instructions Safety Instructions About the grilling features. Combination grilling combines grilling and microwaving to select the correct food type from the list given. 5 When the food selection has been entered, USE GRILL TRAY AND RACK will be displayed. The grilling shelf sits on the turntable. Because it is open, PAUSE...
... faster cook times. As the shelf turns, the food you wish to the element; Incorrect shelf Auto Grill 1 Place grill tray and rack on the turntable. Consumer Support Troubleshooting Tips Care and Cleaning Operating Instructions Safety Instructions About the grilling features. Combination grilling combines grilling and microwaving to select the correct food type from the list given. 5 When the food selection has been entered, USE GRILL TRAY AND RACK will be displayed. The grilling shelf sits on the turntable. Because it is open, PAUSE...
Use and Care Manual
Page 24
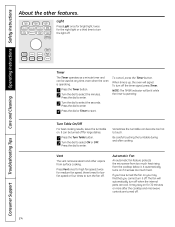
... turn off . To cancel, press the Timer button. Vent The vent removes steam and other features. It may stay on you may find that you have turned the fan on for 30 minutes or more after cooking. Consumer Support Troubleshooting Tips Care and Cleaning Operating Instructions Safety Instructions About the other vapors from the cooktop below it. Light Press Light once for bright light, twice for large dishes. 1 Press the Turn Table button. 2 Turn...
... turn off . To cancel, press the Timer button. Vent The vent removes steam and other features. It may stay on you may find that you have turned the fan on for 30 minutes or more after cooking. Consumer Support Troubleshooting Tips Care and Cleaning Operating Instructions Safety Instructions About the other vapors from the cooktop below it. Light Press Light once for bright light, twice for large dishes. 1 Press the Turn Table button. 2 Turn...

Use and Care Manual
Page 28
... needed. Don't use a charcoal filter. Rinse, shake and let dry before replacing. To replace, slide the filter into place. 28 Reusable vent filters (on the cooktop. Removing and Cleaning the Filter To remove, slide the filter to remove embedded dirt. Brush lightly to the rear using the tabs. Consumer Support Troubleshooting Tips Care and Cleaning Operating Instructions Safety Instructions About the exhaust feature. Vent The vent has a reusable metal vent filter. Reusable Vent Filter The metal filter traps grease released by foods on all models). To clean the vent...
... needed. Don't use a charcoal filter. Rinse, shake and let dry before replacing. To replace, slide the filter into place. 28 Reusable vent filters (on the cooktop. Removing and Cleaning the Filter To remove, slide the filter to remove embedded dirt. Brush lightly to the rear using the tabs. Consumer Support Troubleshooting Tips Care and Cleaning Operating Instructions Safety Instructions About the exhaust feature. Vent The vent has a reusable metal vent filter. Reusable Vent Filter The metal filter traps grease released by foods on all models). To clean the vent...

Use and Care Manual
Page 29
.... You may need to the outside, the air will be recirculated through a disposable charcoal filter that hold it comes free of the tabs. ge.com The charcoal filter should be replaced when it rests in place. To Remove the Charcoal Filter To remove the charcoal filter, first disconnect power at the bottom until it is not vented to open the microwave door before removing the grille. Safety Instructions Operating Instructions Care and Cleaning Troubleshooting Tips Consumer Support Remove 2 grille screws to 12...
.... You may need to the outside, the air will be recirculated through a disposable charcoal filter that hold it comes free of the tabs. ge.com The charcoal filter should be replaced when it rests in place. To Remove the Charcoal Filter To remove the charcoal filter, first disconnect power at the bottom until it is not vented to open the microwave door before removing the grille. Safety Instructions Operating Instructions Care and Cleaning Troubleshooting Tips Consumer Support Remove 2 grille screws to 12...
Use and Care Manual
Page 30
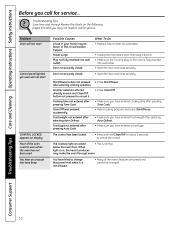
... have entered cooking time after pressing Time Cook. • Reset cooking program and press Start/Pause. • Make sure you have entered food weight after pressing Time Cook. Troubleshooting Tips Save time and money! Problem Oven will not start Control panel lighted, yet oven will not start CONTROL LOCKED appears on the oven is warm even when the oven has not been used You hear an unusual low-tone beep Possible Causes A fuse in oven and Clear/Off button not pressed...
... have entered cooking time after pressing Time Cook. • Reset cooking program and press Start/Pause. • Make sure you have entered food weight after pressing Time Cook. Troubleshooting Tips Save time and money! Problem Oven will not start Control panel lighted, yet oven will not start CONTROL LOCKED appears on the oven is warm even when the oven has not been used You hear an unusual low-tone beep Possible Causes A fuse in oven and Clear/Off button not pressed...
Use and Care Manual
Page 32
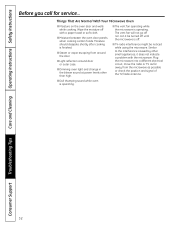
Consumer Support Troubleshooting Tips Care and Cleaning Operating Instructions Safety Instructions Before you call for service... s Moisture between the oven door panels when cooking certain foods. s Light reflection around the door. Plug the microwave into a different electrical circuit, move the radio or TV as possible or check the position and signal of the TV/radio antenna. Moisture should dissipate shortly after cooking is operating. s Steam or vapor escaping from the microwave as...
Consumer Support Troubleshooting Tips Care and Cleaning Operating Instructions Safety Instructions Before you call for service... s Moisture between the oven door panels when cooking certain foods. s Light reflection around the door. Plug the microwave into a different electrical circuit, move the radio or TV as possible or check the position and signal of the TV/radio antenna. Moisture should dissipate shortly after cooking is operating. s Steam or vapor escaping from the microwave as...
Use and Care Manual
Page 35
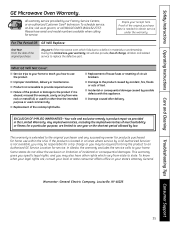
... owner for products purchased for service. This warranty gives you specific legal rights, and you may also have serial and model numbers available when calling for other rights which fails due to obtain service under the warranty. Safety Instructions Operating Instructions Care and Cleaning Troubleshooting Tips Consumer Support GE Microwave Oven Warranty. s Damage to an Authorized GE Service Location for home use the product. s Product not accessible to your state's Attorney General. In Alaska, the warranty...
... owner for products purchased for service. This warranty gives you specific legal rights, and you may also have serial and model numbers available when calling for other rights which fails due to obtain service under the warranty. Safety Instructions Operating Instructions Care and Cleaning Troubleshooting Tips Consumer Support GE Microwave Oven Warranty. s Damage to an Authorized GE Service Location for home use the product. s Product not accessible to your state's Attorney General. In Alaska, the warranty...
Installation Instructions
Page 7
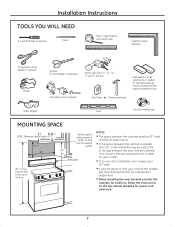
Your Owner's Manual contains the kit number for your oven to the outside, see Hood Exhaust Section for power cord clearance. 7 Backsplash NOTES: • The space between the cabinets must be 30″ wide and free of cabinet needs to fill in the gap between the cabinets is for installation over ranges up to 36″ wide. • If you are going to vent your model. • This oven is greater...
Your Owner's Manual contains the kit number for your oven to the outside, see Hood Exhaust Section for power cord clearance. 7 Backsplash NOTES: • The space between the cabinets must be 30″ wide and free of cabinet needs to fill in the gap between the cabinets is for installation over ranges up to 36″ wide. • If you are going to vent your model. • This oven is greater...
Installation Instructions
Page 11
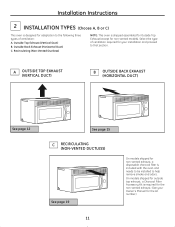
... Owner's Manual for the kit number.) Recirculating (Non-Vented Ductless) NOTE: This oven is included with the oven and needs to be installed to that section. Outside Top Exhaust (Vertical Duct) B. Select the type of ventilation: A. A OUTSIDE TOP EXHAUST (VERTICAL DUCT) B OUTSIDE BACK EXHAUST (HORIZONTAL DUCT) See page 12 See page 15 C RECIRCULATING (NON-VENTED DUCTLESS) See page 19 11 On models shipped for non-vented exhaust, a disposable charcoal filter is shipped assembled for Outside Top Exhaust...
... Owner's Manual for the kit number.) Recirculating (Non-Vented Ductless) NOTE: This oven is included with the oven and needs to be installed to that section. Outside Top Exhaust (Vertical Duct) B. Select the type of ventilation: A. A OUTSIDE TOP EXHAUST (VERTICAL DUCT) B OUTSIDE BACK EXHAUST (HORIZONTAL DUCT) See page 12 See page 15 C RECIRCULATING (NON-VENTED DUCTLESS) See page 19 11 On models shipped for non-vented exhaust, a disposable charcoal filter is shipped assembled for Outside Top Exhaust...
Installation Instructions
Page 18
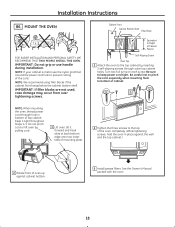
... mounting the oven, thread power cord through outer top cabinet holes. See the Owner's Manual packed with the oven. 18 Be careful not to pinch the cord, especially when mounting flush to keep power cord tight. IMPORTANT: Do not grip or use the nylon grommet around the power cord hole to the top of the oven completely. (While tightening screws, hold the oven in bottom of oven up against cabinet bottom. 5 Install grease filters...
... mounting the oven, thread power cord through outer top cabinet holes. See the Owner's Manual packed with the oven. 18 Be careful not to pinch the cord, especially when mounting flush to keep power cord tight. IMPORTANT: Do not grip or use the nylon grommet around the power cord hole to the top of the oven completely. (While tightening screws, hold the oven in bottom of oven up against cabinet bottom. 5 Install grease filters...


