Quick Specs
Page 1
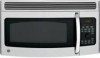
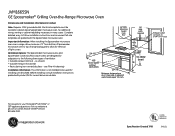
...over a range, allow minimum of light covers. see Filter Kit drawing) Installation Information: This information is not intended to your Monogram,® GE Profile™ or GE® appliance questions, visit our website at ge.com or call GE Answer Center® service, 800.626.2000. width ...Spacemaker microwave oven to top of range backguard to allow for installing unit described. Mounting height from floor 30" MIN. JVM1665SN GE Spacemaker® Grilling Over-the-Range MicrowaOvveerO-thvee-Rnange Microwave Oven Dimensions (in inches) Dimensions and Installation Information (in many cases...
...over a range, allow minimum of light covers. see Filter Kit drawing) Installation Information: This information is not intended to your Monogram,® GE Profile™ or GE® appliance questions, visit our website at ge.com or call GE Answer Center® service, 800.626.2000. width ...Spacemaker microwave oven to top of range backguard to allow for installing unit described. Mounting height from floor 30" MIN. JVM1665SN GE Spacemaker® Grilling Over-the-Range MicrowaOvveerO-thvee-Rnange Microwave Oven Dimensions (in inches) Dimensions and Installation Information (in many cases...
Quick Specs
Page 2
JVM1665SN GE Spacemaker® Grilling Over-the-Range Microwave Oven Hood Exhaust Duct: Outside ventilation requires a HOOD EXHAUST DUCT. If a round duct is to be used, care .... E. 90° Elbow 25 ft. Optional accesories (Available at the time it is longer than a 6" diameter duct. not for end-of-cabinet installation. Filter Kits JX81D-Recirculating Charcoal Filter Kit To be used . Read the following carefully. Specification Created 7/08 Listed by leaving enough space between the wall studs to the outside.
JVM1665SN GE Spacemaker® Grilling Over-the-Range Microwave Oven Hood Exhaust Duct: Outside ventilation requires a HOOD EXHAUST DUCT. If a round duct is to be used, care .... E. 90° Elbow 25 ft. Optional accesories (Available at the time it is longer than a 6" diameter duct. not for end-of-cabinet installation. Filter Kits JX81D-Recirculating Charcoal Filter Kit To be used . Read the following carefully. Specification Created 7/08 Listed by leaving enough space between the wall studs to the outside.
Use and Care Manual
Page 1
MFL51203001 49-40583-1 08-08 JR Griller/Microwave Oven ge.com Safety Instructions 2-7 Operating Instructions Best Method of Cooking Chart 21 Changing Power Level 14 Cooking Options 10 Cookware Tips 20 Features of Your Oven 8, 9 .../Off 24 Vent 24 Sensor Features 15-17 Time and Auto Features 9, 11-13 Care and Cleaning Charcoal Filters 29 Inside 25 Outside 26 Replacing the Light Bulb 27 Stainless Steel 26 Vent Filters 28, 29 Troubleshooting Tips 30, 31 Things That Are Normal With Your Microwave Oven 32 Consumer Support Consumer...
MFL51203001 49-40583-1 08-08 JR Griller/Microwave Oven ge.com Safety Instructions 2-7 Operating Instructions Best Method of Cooking Chart 21 Changing Power Level 14 Cooking Options 10 Cookware Tips 20 Features of Your Oven 8, 9 .../Off 24 Vent 24 Sensor Features 15-17 Time and Auto Features 9, 11-13 Care and Cleaning Charcoal Filters 29 Inside 25 Outside 26 Replacing the Light Bulb 27 Stainless Steel 26 Vent Filters 28, 29 Troubleshooting Tips 30, 31 Things That Are Normal With Your Microwave Oven 32 Consumer Support Consumer...
Use and Care Manual
Page 6
...the vent fan is properly installed and grounded. s When preparing flaming foods under the microwave, turn the fan on the microwave or the fan filters. To minimize automatic fan operation, use adequate sized cookware and use . WARNING! Do not use an adapter plug with a lid, a cookie... Do not under certain conditions (see Automatic Fan feature). For best operation, plug this appliance into an outlet that may damage the filters. Consult a qualified electrician or service technician if the grounding instructions are not completely understood, or if doubt exists as lye-based oven ...
...the vent fan is properly installed and grounded. s When preparing flaming foods under the microwave, turn the fan on the microwave or the fan filters. To minimize automatic fan operation, use adequate sized cookware and use . WARNING! Do not use an adapter plug with a lid, a cookie... Do not under certain conditions (see Automatic Fan feature). For best operation, plug this appliance into an outlet that may damage the filters. Consult a qualified electrician or service technician if the grounding instructions are not completely understood, or if doubt exists as lye-based oven ...
Use and Care Manual
Page 7
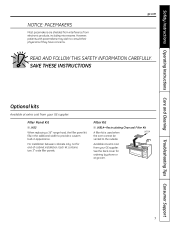
... contains two 3″ wide filler panels. For installation between cabinets only; SAVE THESE INSTRUCTIONS Optional kits Available at extra cost from your GE supplier. Filter Kit s JX81A-Recirculating Charcoal Filter Kit A filter kit is used when the oven cannot be vented to provide a custom built-in the additional width to the outside. JX81A Available...
... contains two 3″ wide filler panels. For installation between cabinets only; SAVE THESE INSTRUCTIONS Optional kits Available at extra cost from your GE supplier. Filter Kit s JX81A-Recirculating Charcoal Filter Kit A filter kit is used when the oven cannot be vented to provide a custom built-in the additional width to the outside. JX81A Available...
Use and Care Manual
Page 26
..., non-abrasive detergents applied with a damp cloth. Use a solution of the microwave with Stainless Steel Magic or a similar product using cleaners with a damp cloth. Vent Filter Lights How to use appliance wax, polish, bleach or products containing chlorine on the panel-they can also scratch the control panel. Wipe the window...
..., non-abrasive detergents applied with a damp cloth. Use a solution of the microwave with Stainless Steel Magic or a similar product using cleaners with a damp cloth. Vent Filter Lights How to use appliance wax, polish, bleach or products containing chlorine on the panel-they can also scratch the control panel. Wipe the window...

Use and Care Manual
Page 28
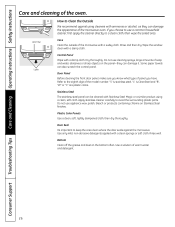
... when the hood is used. Brush lightly to the rear using the tabs. It also prevents flames from foods on some models). The vent filter should be in hot water and detergent. Pull down and out. Rinse, shake and let dry before replacing. Vent The vent has a reusable... metal vent filter. Consumer Support Troubleshooting Tips Care and Cleaning Operating Instructions Safety Instructions About the exhaust feature. Models that recirculate air back into place. 28 For...
... when the hood is used. Brush lightly to the rear using the tabs. It also prevents flames from foods on some models). The vent filter should be in hot water and detergent. Pull down and out. Rinse, shake and let dry before replacing. Vent The vent has a reusable... metal vent filter. Consumer Support Troubleshooting Tips Care and Cleaning Operating Instructions Safety Instructions About the exhaust feature. Models that recirculate air back into place. 28 For...

Use and Care Manual
Page 29
... and odors. You may need to 12 months, depending on the inside of the filter in until it comes free of the filter up and into the grooves on usage). ge.com The charcoal filter should be replaced when it is not vented to remove the grille. See "Optional ...place. You may want to open the cabinet doors to remove the screws. To Install the Charcoal Filter To install a new charcoal filter, remove plastic and other outer wrapping from your GE supplier. Safety Instructions Operating Instructions Care and Cleaning Troubleshooting Tips Consumer Support Remove 2 grille screws to the...
... and odors. You may need to 12 months, depending on the inside of the filter in until it comes free of the filter up and into the grooves on usage). ge.com The charcoal filter should be replaced when it is not vented to remove the grille. See "Optional ...place. You may want to open the cabinet doors to remove the screws. To Install the Charcoal Filter To install a new charcoal filter, remove plastic and other outer wrapping from your GE supplier. Safety Instructions Operating Instructions Care and Cleaning Troubleshooting Tips Consumer Support Remove 2 grille screws to the...
Installation Instructions
Page 2
... Attach Mounting Plate to Wall 19 Preparation of Top Cabinet 19 Adapting Blower for Recirculation 20, 21 Mount the Oven 21, 22 Installing the Charcoal Filter 22 Before You Use Your Oven 23 2
... Attach Mounting Plate to Wall 19 Preparation of Top Cabinet 19 Adapting Blower for Recirculation 20, 21 Mount the Oven 21, 22 Installing the Charcoal Filter 22 Before You Use Your Oven 23 2
Installation Instructions
Page 6
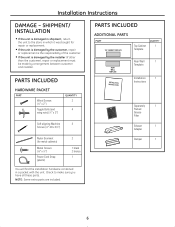
..., repair or replacement is the responsibility of the customer. • If the unit is damaged in a packet with the unit. Installation 1 Instructions Separately 1 Packed Grease Filter Exhaust 1 Adapter Damper 1 6 Installation Instructions DAMAGE -
..., repair or replacement is the responsibility of the customer. • If the unit is damaged in a packet with the unit. Installation 1 Instructions Separately 1 Packed Grease Filter Exhaust 1 Adapter Damper 1 6 Installation Instructions DAMAGE -
Installation Instructions
Page 8
REMOVING THE OVEN FROM THE CARTON/REMOVING THE MOUNTING PLATE 1 Remove the turntable, installation instructions, filters, exhaust Adapter, damper, shelf and the small hardware bag. Remove and properly discard plastic bags and Styrofoam. 6 Open the oven door and remove any adjacent ...
REMOVING THE OVEN FROM THE CARTON/REMOVING THE MOUNTING PLATE 1 Remove the turntable, installation instructions, filters, exhaust Adapter, damper, shelf and the small hardware bag. Remove and properly discard plastic bags and Styrofoam. 6 Open the oven door and remove any adjacent ...
Installation Instructions
Page 11
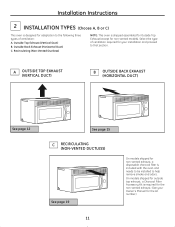
...See page 12 See page 15 C RECIRCULATING (NON-VENTED DUCTLESS) See page 19 11 On models shipped for non-vented exhaust, a disposable charcoal filter is included with the oven and needs to be installed to the following three types of ventilation required for your Owner's Manual for non-vented... (Choose A, B or C) This oven is designed for adaptation to help remove smoke and odors. On models shipped for outside top exhaust, a Charcoal Filter Accessory Kit is required for the non-vented exhaust. (See your installation and proceed to that section. Select the type of ventilation: A.
...See page 12 See page 15 C RECIRCULATING (NON-VENTED DUCTLESS) See page 19 11 On models shipped for non-vented exhaust, a disposable charcoal filter is included with the oven and needs to be installed to the following three types of ventilation required for your Owner's Manual for non-vented... (Choose A, B or C) This oven is designed for adaptation to help remove smoke and odors. On models shipped for outside top exhaust, a Charcoal Filter Accessory Kit is required for the non-vented exhaust. (See your installation and proceed to that section. Select the type of ventilation: A.
Installation Instructions
Page 14
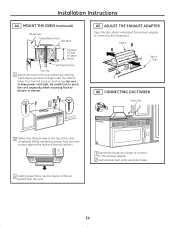
... cord tight. Damper Back of the oven completely. (While tightening screws, hold the oven in place against the wall and the top cabinet.) 5 Install grease filters. Turn two full turns on each screw. Installation Instructions A4. Be careful not to pinch the cord, especially when mounting flush to the exhaust adapter...
... cord tight. Damper Back of the oven completely. (While tightening screws, hold the oven in place against the wall and the top cabinet.) 5 Install grease filters. Turn two full turns on each screw. Installation Instructions A4. Be careful not to pinch the cord, especially when mounting flush to the exhaust adapter...
Installation Instructions
Page 18
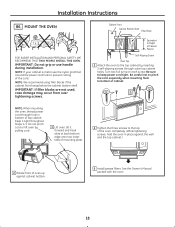
... inserting 3 self-aligning screws through hole in place against the wall and the top cabinet.) 2 Rotate front of oven up against cabinet bottom. 5 Install grease filters. NOTE: When mounting the oven, thread power cord through outer top cabinet holes. Cabinet Front Cabinet Bottom Shelf Filler Block Equivalent to the top cabinet...
... inserting 3 self-aligning screws through hole in place against the wall and the top cabinet.) 2 Rotate front of oven up against cabinet bottom. 5 Install grease filters. NOTE: When mounting the oven, thread power cord through outer top cabinet holes. Cabinet Front Cabinet Bottom Shelf Filler Block Equivalent to the top cabinet...

Installation Instructions
Page 19
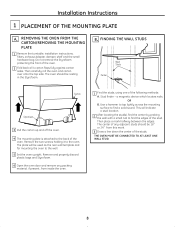
.... Attach the plate to mount the plate. CAUTION: Wear safety goggles when drilling holes in the wall to the wall using toggle bolts. Install Charcoal Filter C1. ATTACH THE MOUNTING PLATE TO THE WALL 3 Place the mounting plate against the wall and that the plate is properly centered under the cabinet...
.... Attach the plate to mount the plate. CAUTION: Wear safety goggles when drilling holes in the wall to the wall using toggle bolts. Install Charcoal Filter C1. ATTACH THE MOUNTING PLATE TO THE WALL 3 Place the mounting plate against the wall and that the plate is properly centered under the cabinet...
Installation Instructions
Page 22
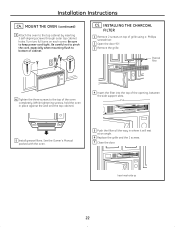
...to the top cabinet by inserting 3 self-aligning screws through outer top cabinet holes. C5. INSTALLING THE CHARCOAL FILTER 1 Remove 2 screws on each screw. See the Owner's Manual packed with the oven. 5 Push the filter all the way in place against the wall and the top cabinet.) 4 Insert the...While tightening screws, hold the oven in where it will rest at an angle. 6 Replace the grille and the 2 screws. 7 Close the door. Charcoal Filter 4 Tighten the three screws to bottom of grille using a Phillips screwdriver. 2 Open the door 90°. 3 Remove the grille. Turn two full turns on...
...to the top cabinet by inserting 3 self-aligning screws through outer top cabinet holes. C5. INSTALLING THE CHARCOAL FILTER 1 Remove 2 screws on each screw. See the Owner's Manual packed with the oven. 5 Push the filter all the way in place against the wall and the top cabinet.) 4 Insert the...While tightening screws, hold the oven in where it will rest at an angle. 6 Replace the grille and the 2 screws. 7 Close the door. Charcoal Filter 4 Tighten the three screws to bottom of grille using a Phillips screwdriver. 2 Open the door 90°. 3 Remove the grille. Turn two full turns on...


