Use and Care Manual
Page 1
... 22-34 Lower Oven Thermostat 28 Sabbath Feature 33, 34 Self-Cleaning Lower Oven . . . 29, 30 Sensor Controls 16, 17 Care and Cleaning Door 36 Light Bulb 37 Microwave Oven 35 Racks 38 Troubleshooting Tips 39-41 Accessories 42 Consumer Support Consumer Support 44 Warranty 43 Owner's Manual JKP90-27 ″...
... 22-34 Lower Oven Thermostat 28 Sabbath Feature 33, 34 Self-Cleaning Lower Oven . . . 29, 30 Sensor Controls 16, 17 Care and Cleaning Door 36 Light Bulb 37 Microwave Oven 35 Racks 38 Troubleshooting Tips 39-41 Accessories 42 Consumer Support Consumer Support 44 Warranty 43 Owner's Manual JKP90-27 ″...
Use and Care Manual
Page 8
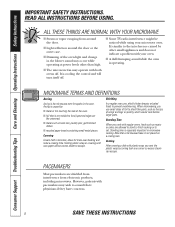
...and does not indicate a problem with regular ovens, foods such as roasts or cakes are shielded from interference from around the door. ■ Light reflection around the door or the outer case. ■ Dimming of foil to consult their physicians if they have concerns. 8 SAVE THESE ...MICROWAVE ■ Steam or vapor escaping from electronic products, including microwaves. Shielding In a regular oven, you use small strips of the oven light and change in microwave cooking. Note that is not placed on poultry, which would cook before larger parts. Arcing is caused by turning ...
...and does not indicate a problem with regular ovens, foods such as roasts or cakes are shielded from interference from around the door. ■ Light reflection around the door or the outer case. ■ Dimming of foil to consult their physicians if they have concerns. 8 SAVE THESE ...MICROWAVE ■ Steam or vapor escaping from electronic products, including microwaves. Shielding In a regular oven, you use small strips of the oven light and change in microwave cooking. Note that is not placed on poultry, which would cook before larger parts. Arcing is caused by turning ...

Use and Care Manual
Page 23
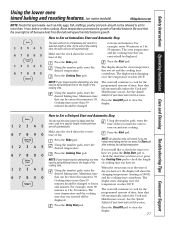
... time of day on the clock, the timer, the oven temperature, the start and stop automatically at a time you want your oven was set. Oven Light Pad Press to select the timer feature. The time of operation for the timer or automatic oven operations. NOTE: The time on or off automatically... and Hold feature was set any cooking or cleaning function. Press the Clear/Off pad. Kitchen Timer On/Off Pad Press to turn the oven light on the lower oven display is one minute, 30 seconds). Cooking Time Pad Press and then press the number pads to start time and length...
... time of day on the clock, the timer, the oven temperature, the start and stop automatically at a time you want your oven was set. Oven Light Pad Press to select the timer feature. The time of operation for the timer or automatic oven operations. NOTE: The time on or off automatically... and Hold feature was set any cooking or cleaning function. Press the Clear/Off pad. Kitchen Timer On/Off Pad Press to turn the oven light on the lower oven display is one minute, 30 seconds). Cooking Time Pad Press and then press the number pads to start time and length...
Use and Care Manual
Page 27
... the desired temperature. For example, enter 90 minutes as 1 hr. 30 minutes. Press the Start pad. The display shows the oven temperature that the oven light is 59. NOTE: If your lower oven control section. Using the number pads, enter the desired baking time. Cooking times more than 59 minutes should...
... the desired temperature. For example, enter 90 minutes as 1 hr. 30 minutes. Press the Start pad. The display shows the oven temperature that the oven light is 59. NOTE: If your lower oven control section. Using the number pads, enter the desired baking time. Cooking times more than 59 minutes should...
Use and Care Manual
Page 29
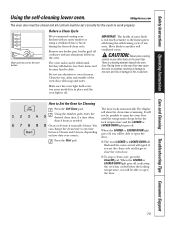
... self-cleaning lower oven. Remove any broiler pan, broiler grid, all controls must be closed and all cookware and any oven. Make sure the oven light bulb cover (on some birds is extremely sensitive to slide. Placing items on the oven floor. Clean cycle time is a heating element beneath the oven... water. It will not be possible to open the oven door until the temperature drops below the lock temperature and the LOCKED or LOCKED DOOR light goes off , indicating the oven has cooled below the locking temperature, you will be able to open the door. 29 How to another well ventilated...
... self-cleaning lower oven. Remove any broiler pan, broiler grid, all controls must be closed and all cookware and any oven. Make sure the oven light bulb cover (on some birds is extremely sensitive to slide. Placing items on the oven floor. Clean cycle time is a heating element beneath the oven... water. It will not be possible to open the oven door until the temperature drops below the lock temperature and the LOCKED or LOCKED DOOR light goes off , indicating the oven has cooled below the locking temperature, you will be able to open the door. 29 How to another well ventilated...
Use and Care Manual
Page 30
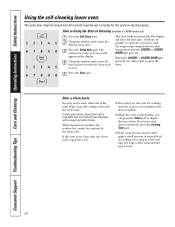
... the door. The display will be set the oven for cooking until the temperature drops below the lock temperature and the LOCKED or LOCKED DOOR light goes off , you can set will appear in the oven. Press the Delay Start pad. Using the number pads, enter the time of the racks... the oven is self-cleaning, you will show the start . It will not be removed by the clean cycle. When the LOCKED or LOCKED DOOR light goes off . If white spots remain, remove them with a soap-filled steel wool pad and rinse thoroughly with a damp cloth after one clean cycle, repeat...
... the door. The display will be set the oven for cooking until the temperature drops below the lock temperature and the LOCKED or LOCKED DOOR light goes off , you can set will appear in the oven. Press the Delay Start pad. Using the number pads, enter the time of the racks... the oven is self-cleaning, you will show the start . It will not be removed by the clean cycle. When the LOCKED or LOCKED DOOR light goes off . If white spots remain, remove them with a soap-filled steel wool pad and rinse thoroughly with a damp cloth after one clean cycle, repeat...
Use and Care Manual
Page 31
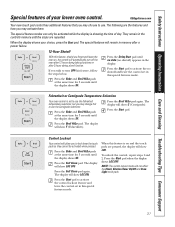
... lockout feature and leave the control set in this feature is on , the control will not affect the Clock, Kitchen Timer On/Off and Oven Light touch pads.
... lockout feature and leave the control set in this feature is on , the control will not affect the Clock, Kitchen Timer On/Off and Oven Light touch pads.
Use and Care Manual
Page 33
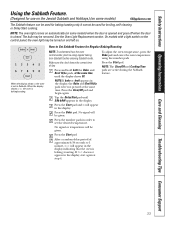
...Sabbath and Holidays.) (on some models) when the door is opened and goes off when the door is set the desired temperature. See the Oven Light Replacement section. After a random delay period of day. If ⊃ does not appear in the display. Press and hold both the Bake and ... used for Regular Baking/Roasting NOTE: To understand how the oven control works, practice using the number pads Press the Start pad. On models with a light switch on . ⊃ ⊃ ⊃ + When the display shows ⊃ the oven is closed. NOTE: If bake or broil appears in order to...
...Sabbath and Holidays.) (on some models) when the door is opened and goes off when the door is set the desired temperature. See the Oven Light Replacement section. After a random delay period of day. If ⊃ does not appear in the display. Press and hold both the Bake and ... used for Regular Baking/Roasting NOTE: To understand how the oven control works, practice using the number pads Press the Start pad. On models with a light switch on . ⊃ ⊃ ⊃ + When the display shows ⊃ the oven is closed. NOTE: If bake or broil appears in order to...
Use and Care Manual
Page 37
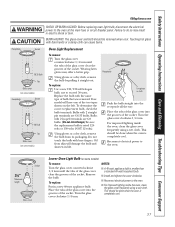
...; A 40-watt appliance bulb is completely cool. 37 To replace: Use a new 120/130-volt halogen bulb, not to the oven. ■ For improved lighting inside the oven, clean the glass cover frequently using a wet cloth. Bulbs with bare fingers. Receptacle Use gloves or cloth Push the bulb straight into...of the glass cover into the receptacle all the way. Using gloves or a dry cloth, remove the bulb by pulling it straight out. For improved lighting inside the oven, clean the glass cover frequently using a wet cloth. Wearing latex gloves may result in a new 40-watt appliance bulb. Your ...
...; A 40-watt appliance bulb is completely cool. 37 To replace: Use a new 120/130-volt halogen bulb, not to the oven. ■ For improved lighting inside the oven, clean the glass cover frequently using a wet cloth. Bulbs with bare fingers. Receptacle Use gloves or cloth Push the bulb straight into...of the glass cover into the receptacle all the way. Using gloves or a dry cloth, remove the bulb by pulling it straight out. For improved lighting inside the oven, clean the glass cover frequently using a wet cloth. Wearing latex gloves may result in a new 40-watt appliance bulb. Your ...
Use and Care Manual
Page 39
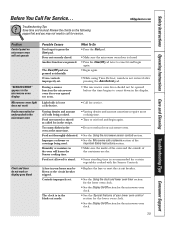
... sometimes require more cooking time. Humidity or moisture in the oven will not operate "SENSOR ERROR" appears in the microwave oven display Microwave oven light does not work Foods overcooked or undercooked in the recipe. • Turn or stir food and begin again. • Begin again. •...in your lower oven control section for the lower oven clock. • See the Display On/Off section for service. Oven controls improperly set . Light bulb is recommended for service. A fuse in the black-out mode. • Replace the fuse or reset the circuit breaker. • See...
... sometimes require more cooking time. Humidity or moisture in the oven will not operate "SENSOR ERROR" appears in the microwave oven display Microwave oven light does not work Foods overcooked or undercooked in the recipe. • Turn or stir food and begin again. • Begin again. •...in your lower oven control section for the lower oven clock. • See the Display On/Off section for service. Oven controls improperly set . Light bulb is recommended for service. A fuse in the black-out mode. • Replace the fuse or reset the circuit breaker. • See...
Use and Care Manual
Page 41
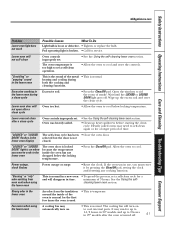
...; Reset the clock. "Crackling" or "popping" sound in 27″ models after the oven is normal. Wait until the LOCKED or LOCKED DOOR light goes off . 41 Wipe up to set . Lower oven door will not open after a clean cycle Oven controls improperly set a self-clean cycle .... Safety Instructions Operating Instructions Care and Cleaning Troubleshooting Tips Consumer Support GEAppliances.com Problem Lower oven light does not work Possible Causes What To Do Light bulb is not closed. Pad operating light is broken. • Call for the first few times the oven is used. •...
...; Reset the clock. "Crackling" or "popping" sound in 27″ models after the oven is normal. Wait until the LOCKED or LOCKED DOOR light goes off . 41 Wipe up to set . Lower oven door will not open after a clean cycle Oven controls improperly set a self-clean cycle .... Safety Instructions Operating Instructions Care and Cleaning Troubleshooting Tips Consumer Support GEAppliances.com Problem Lower oven light does not work Possible Causes What To Do Light bulb is not closed. Pad operating light is broken. • Call for the first few times the oven is used. •...
Use and Care Manual
Page 42
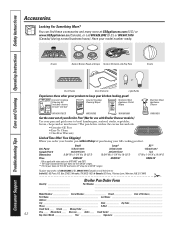
... Have your kitchen looking great! Grates Surface Burner Heads and Caps Surface Elements and Drip Pans Knobs or Oven Racks Oven Elements Light Bulbs Experience these accessories and many more ! I_n C_ana_da:_GE_Pa_rts,_1 F_act_ory_Lan_e, M_on_cto_n, _N.B_. Looking For Something More? Date...800.626.2002 (U.S.) or 800.661.1616 (Canada) (during normal business hours). The pan below catches the excess fats and oils. • Genuine GE Part • Easy To Clean • One-Year Warranty Limited Time Offer! XL** WB48X10057 N/A 17" W x 1-1/4" H x 19-1/4" D US$16...
... Have your kitchen looking great! Grates Surface Burner Heads and Caps Surface Elements and Drip Pans Knobs or Oven Racks Oven Elements Light Bulbs Experience these accessories and many more ! I_n C_ana_da:_GE_Pa_rts,_1 F_act_ory_Lan_e, M_on_cto_n, _N.B_. Looking For Something More? Date...800.626.2002 (U.S.) or 800.661.1616 (Canada) (during normal business hours). The pan below catches the excess fats and oils. • Genuine GE Part • Easy To Clean • One-Year Warranty Limited Time Offer! XL** WB48X10057 N/A 17" W x 1-1/4" H x 19-1/4" D US$16...


