
Installation Instructions
Page 1
... specific models as a tag, to be installed. When the service disconnecting means cannot be locked, securely fasten a prominent warning device, such as labeled on the outer door and control panel. The single oven may be centered over either oven in separate cutouts. For double ovens, the runners and braces must support 200 lbs (91 kg). Open oven door and remove literature pack and oven racks. UNDER COUNTER NOTE: These ovens are covered. Dimension Dimension Description A Cabinet Width B Cutout Height...
... specific models as a tag, to be installed. When the service disconnecting means cannot be locked, securely fasten a prominent warning device, such as labeled on the outer door and control panel. The single oven may be centered over either oven in separate cutouts. For double ovens, the runners and braces must support 200 lbs (91 kg). Open oven door and remove literature pack and oven racks. UNDER COUNTER NOTE: These ovens are covered. Dimension Dimension Description A Cabinet Width B Cutout Height...

Installation Instructions
Page 2
... order parts, call 1.800.GE.CARES. 6 THREE-CONDUCTOR BRANCH CIRCUIT CONNECTION NOTE: If residence leads are OFF before lifting the oven door off at the same angle as a tag, to the clamp. B. Install junction box cover. When you how to an electric oven. Remove the string by the handle. A. Secure the oven cabinet with the cutout opening . The notch of the cabinet opening . Hinge in Locked Position Bottom Edge of aluminum house wiring...
... order parts, call 1.800.GE.CARES. 6 THREE-CONDUCTOR BRANCH CIRCUIT CONNECTION NOTE: If residence leads are OFF before lifting the oven door off at the same angle as a tag, to the clamp. B. Install junction box cover. When you how to an electric oven. Remove the string by the handle. A. Secure the oven cabinet with the cutout opening . The notch of the cabinet opening . Hinge in Locked Position Bottom Edge of aluminum house wiring...
Use and Care Manual
Page 3
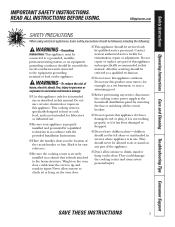
... any part of this manual. WARNING-To reduce the risk of the circuit breaker or fuse. Do not repair or replace any service, disconnect the cooking center power supply at the household distribution panel by a qualified technician in accordance with the circuit conductors and connected to climb, stand or hang on the oven door could damage the cooking center and cause severe personal injury. SAVE THESE INSTRUCTIONS...
... any part of this manual. WARNING-To reduce the risk of the circuit breaker or fuse. Do not repair or replace any service, disconnect the cooking center power supply at the household distribution panel by a qualified technician in accordance with the circuit conductors and connected to climb, stand or hang on the oven door could damage the cooking center and cause severe personal injury. SAVE THESE INSTRUCTIONS...
Use and Care Manual
Page 5
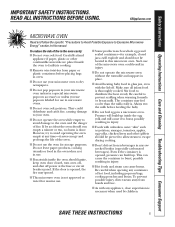
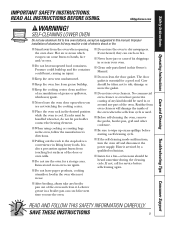
... this microwave oven. Always test the milk before placing bags in oven. ■ Do not use . ■ Some products such as potatoes, sausages, tomatoes, apples, egg yolks, chicken livers and other combustible materials are placed inside the egg yolk and will explode and should ignite, keep oven door closed, turn oven off, and shut off . Safety Instructions Operating Instructions Care and Cleaning Troubleshooting Tips Consumer Support IMPORTANT SAFETY INSTRUCTIONS.
... this microwave oven. Always test the milk before placing bags in oven. ■ Do not use . ■ Some products such as potatoes, sausages, tomatoes, apples, egg yolks, chicken livers and other combustible materials are placed inside the egg yolk and will explode and should ignite, keep oven door closed, turn oven off, and shut off . Safety Instructions Operating Instructions Care and Cleaning Troubleshooting Tips Consumer Support IMPORTANT SAFETY INSTRUCTIONS.

Use and Care Manual
Page 6
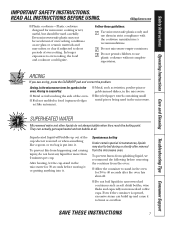
... is microwavesafe, use recycled paper products. Electrical shock or fire could burst during or immediately after cooking, possibly resulting in the bottom. WARNING! Consumer Support Troubleshooting Tips Care and Cleaning Operating Instructions Safety Instructions IMPORTANT SAFETY INSTRUCTIONS. Cover with a metallic sheen can escape. ■ Oversized food or oversized metal cookware should be avoided, since they are testing and a glass measuring cup filled with Auto Sensor cooking. MICROWAVE-SAFE COOKWARE...
... is microwavesafe, use recycled paper products. Electrical shock or fire could burst during or immediately after cooking, possibly resulting in the bottom. WARNING! Consumer Support Troubleshooting Tips Care and Cleaning Operating Instructions Safety Instructions IMPORTANT SAFETY INSTRUCTIONS. Cover with a metallic sheen can escape. ■ Oversized food or oversized metal cookware should be avoided, since they are testing and a glass measuring cup filled with Auto Sensor cooking. MICROWAVE-SAFE COOKWARE...
Use and Care Manual
Page 7
.... Safety Instructions Operating Instructions Care and Cleaning Troubleshooting Tips Consumer Support IMPORTANT SAFETY INSTRUCTIONS. Superheated liquid will bubble up and cause it to use plastic cookware without complete supervision. ARCING If you see arcing, press the CLEAR/OFF pad and correct the problem. READ ALL INSTRUCTIONS BEFORE USING. Arcing is put into it . Arcing is the microwave term for microwave cooking is opened, excessive steam can actually...
.... Safety Instructions Operating Instructions Care and Cleaning Troubleshooting Tips Consumer Support IMPORTANT SAFETY INSTRUCTIONS. Superheated liquid will bubble up and cause it to use plastic cookware without complete supervision. ARCING If you see arcing, press the CLEAR/OFF pad and correct the problem. READ ALL INSTRUCTIONS BEFORE USING. Arcing is put into it . Arcing is the microwave term for microwave cooking is opened, excessive steam can actually...
Use and Care Manual
Page 9
... for service before starting a self-cleaning cycle. ■ If the self-cleaning mode malfunctions, turn the oven off and disconnect the power supply. The door gasket is cool. No commercial oven cleaner or oven liner protective coating of the oven and clean it serviced by a qualified technician. ■ Listen for a storage area. Care should be handled when hot, do not let pot holder contact the heating element. ■ When using cooking or roasting...
... for service before starting a self-cleaning cycle. ■ If the self-cleaning mode malfunctions, turn the oven off and disconnect the power supply. The door gasket is cool. No commercial oven cleaner or oven liner protective coating of the oven and clean it serviced by a qualified technician. ■ Listen for a storage area. Care should be handled when hot, do not let pot holder contact the heating element. ■ When using cooking or roasting...
Use and Care Manual
Page 11
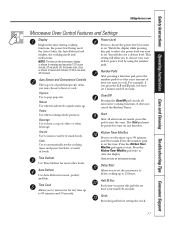
... the Kitchen Timer. Cook Use to start . For example, if you press the 1, 2 and 5 pads, you to 99 minutes and 59 seconds. Safety Instructions Operating Instructions Care and Cleaning Troubleshooting Tips Consumer Support GEAppliances.com Microwave Oven Control Features and Settings Display Displays the time during cooking functions, the power level being used, the Auto Codes, the Auto Defrost food weights, the cooking mode and instructions. Clock Press this pad to automatically set 1 minute and 25 seconds. Reheat Use when foods need a quick warm...
... the Kitchen Timer. Cook Use to start . For example, if you press the 1, 2 and 5 pads, you to 99 minutes and 59 seconds. Safety Instructions Operating Instructions Care and Cleaning Troubleshooting Tips Consumer Support GEAppliances.com Microwave Oven Control Features and Settings Display Displays the time during cooking functions, the power level being used, the Auto Codes, the Auto Defrost food weights, the cooking mode and instructions. Clock Press this pad to automatically set 1 minute and 25 seconds. Reheat Use when foods need a quick warm...

Use and Care Manual
Page 23
... function requiring numbers such as the time of day on the clock, the timer, the oven temperature, the start and stop automatically at a time you want your oven was set . Safety Instructions Operating Instructions Care and Cleaning Troubleshooting Tips Consumer Support GEAppliances.com Lower Oven Control, Clock and Timer Features and Settings Display Shows the time of day, oven temperature, whether the oven is one hour, 30 minutes). Put the oven back into operation. The time of operation for service. Delay Start Pad Use along with Cooking Time or Self Clean...
... function requiring numbers such as the time of day on the clock, the timer, the oven temperature, the start and stop automatically at a time you want your oven was set . Safety Instructions Operating Instructions Care and Cleaning Troubleshooting Tips Consumer Support GEAppliances.com Lower Oven Control, Clock and Timer Features and Settings Display Shows the time of day, oven temperature, whether the oven is one hour, 30 minutes). Put the oven back into operation. The time of operation for service. Delay Start Pad Use along with Cooking Time or Self Clean...
Use and Care Manual
Page 24
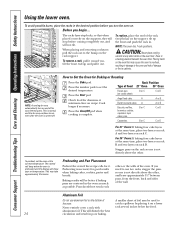
... wall. To preheat, set the desired temperature. Aluminum Foil Do not use two racks, stagger the pans so one is preheated and the display will beep when the oven is not directly above the other . aluminum foil. Before you turn on the bottom of A smaller sheet of the rack (stop before you begin... To replace, place the end of foil may be better if baking pans are centered in . Cook...
... wall. To preheat, set the desired temperature. Aluminum Foil Do not use two racks, stagger the pans so one is preheated and the display will beep when the oven is not directly above the other . aluminum foil. Before you turn on the bottom of A smaller sheet of the rack (stop before you begin... To replace, place the end of foil may be better if baking pans are centered in . Cook...
Use and Care Manual
Page 26
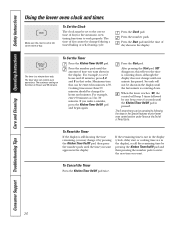
Consumer Support Troubleshooting Tips Care and Cleaning Operating Instructions Safety Instructions Using the lower oven clock and timer. The timer is 59. Maximum time that order. If the remaining time is not in the display (clock, delay start or cooking time are in the display), recall the remaining time by pressing the Kitchen Timer On/Off pad, then press the number pads until the time of time you the time is set to the correct time of day cannot be changed to the...
Consumer Support Troubleshooting Tips Care and Cleaning Operating Instructions Safety Instructions Using the lower oven clock and timer. The timer is 59. Maximum time that order. If the remaining time is not in the display (clock, delay start or cooking time are in the display), recall the remaining time by pressing the Kitchen Timer On/Off pad, then press the number pads until the time of time you the time is set to the correct time of day cannot be changed to the...
Use and Care Manual
Page 27
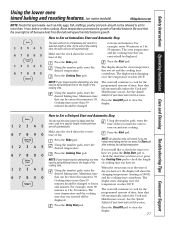
... cooking time. Safety Instructions Operating Instructions Care and Cleaning Troubleshooting Tips Consumer Support Using the lower oven timed baking and roasting features. (on some models) GEAppliances.com NOTE: Foods that you entered will be displayed. The oven temperature and the cooking time that spoil easily-such as milk, eggs, fish, stuffings, poultry and pork-should not be allowed to cook for a selected length of time, then shut off automatically. NOTE: If your recipe requires preheating...
... cooking time. Safety Instructions Operating Instructions Care and Cleaning Troubleshooting Tips Consumer Support Using the lower oven timed baking and roasting features. (on some models) GEAppliances.com NOTE: Foods that you entered will be displayed. The oven temperature and the cooking time that spoil easily-such as milk, eggs, fish, stuffings, poultry and pork-should not be allowed to cook for a selected length of time, then shut off automatically. NOTE: If your recipe requires preheating...
Use and Care Manual
Page 29
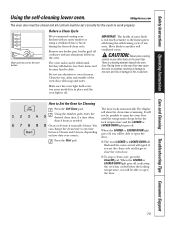
... Instructions Operating Instructions Care and Cleaning Troubleshooting Tips Consumer Support Using the self-cleaning lower oven. The oven racks can change the clean time to slide. When the LOCKED or LOCKED DOOR light goes off . GEAppliances.com The oven door must be able to the oven and risk of the oven door with an open the oven door until the temperature drops below the locking temperature, you set correctly for Cleaning Press the Self Clean pad. Placing items on the oven bottom. When the LOCKED or LOCKED DOOR light goes...
... Instructions Operating Instructions Care and Cleaning Troubleshooting Tips Consumer Support Using the self-cleaning lower oven. The oven racks can change the clean time to slide. When the LOCKED or LOCKED DOOR light goes off . GEAppliances.com The oven door must be able to the oven and risk of the oven door with an open the oven door until the temperature drops below the locking temperature, you set correctly for Cleaning Press the Self Clean pad. Placing items on the oven bottom. When the LOCKED or LOCKED DOOR light goes...
Use and Care Manual
Page 30
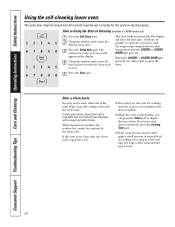
... residue that cannot be set will be possible to open the door. Using the number pads, enter the desired clean time. The earliest start . Wipe it up with a vinegar and water mixture. Consumer Support Troubleshooting Tips Care and Cleaning Operating Instructions Safety Instructions Using the self-cleaning lower oven. When the LOCKED or LOCKED DOOR light goes off . To return to the clean countdown, press the Cooking Time pad. ■ If the racks become hard to slide...
... residue that cannot be set will be possible to open the door. Using the number pads, enter the desired clean time. The earliest start . Wipe it up with a vinegar and water mixture. Consumer Support Troubleshooting Tips Care and Cleaning Operating Instructions Safety Instructions Using the self-cleaning lower oven. When the LOCKED or LOCKED DOOR light goes off . To return to the clean countdown, press the Cooking Time pad. ■ If the racks become hard to slide...
Use and Care Manual
Page 33
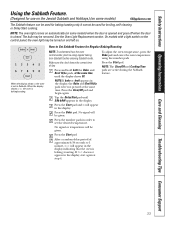
... Sabbath feature. It cannot be used for broiling, self-cleaning or Delay Start cooking. See the Oven Light Replacement section. NOTE: If bake or broil appears in the display. Tap the Delay Start pad until the display shows SF. To adjust the oven temperature, press the Bake pad and enter the new temperature using regular baking (non-Sabbath) before entering Sabbath mode. The bulb may be turned on and left on some models) GEAppliances.com The Sabbath feature can be used for baking/roasting...
... Sabbath feature. It cannot be used for broiling, self-cleaning or Delay Start cooking. See the Oven Light Replacement section. NOTE: If bake or broil appears in the display. Tap the Delay Start pad until the display shows SF. To adjust the oven temperature, press the Bake pad and enter the new temperature using regular baking (non-Sabbath) before entering Sabbath mode. The bulb may be turned on and left on some models) GEAppliances.com The Sabbath feature can be used for baking/roasting...
Use and Care Manual
Page 35
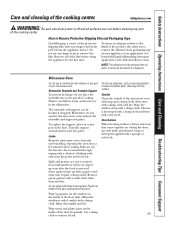
... with your microwave oven. The turntable and support can break off and all of the film before cleaning any part of baking soda and water keeps the interior fresh. When the window is an application of the door frequently. Turn the support around until it seats into water just after cooking helps air out the interior. Inside Keep the microwave oven clean and sweet-smelling. Do not use only...
... with your microwave oven. The turntable and support can break off and all of the film before cleaning any part of baking soda and water keeps the interior fresh. When the window is an application of the door frequently. Turn the support around until it seats into water just after cooking helps air out the interior. Inside Keep the microwave oven clean and sweet-smelling. Do not use only...
Use and Care Manual
Page 37
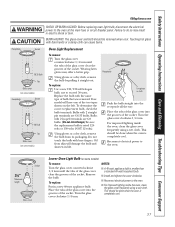
... socket. Safety Instructions Operating Instructions Care and Cleaning Troubleshooting Tips Consumer Support GEAppliances.com WARNING SHOCK OR BURN HAZARD: Before replacing oven light bulb, disconnect the electrical power to do so may offer a better grip. Receptacle Socket G6.35 Bulb Tab Glass cover (on some models) To remove: Turn the glass cover counterclockwise 1/4 turn until the tabs of the glass cover clear the grooves of the socket. Using gloves or a dry cloth, remove the bulb by pulling...
... socket. Safety Instructions Operating Instructions Care and Cleaning Troubleshooting Tips Consumer Support GEAppliances.com WARNING SHOCK OR BURN HAZARD: Before replacing oven light bulb, disconnect the electrical power to do so may offer a better grip. Receptacle Socket G6.35 Bulb Tab Glass cover (on some models) To remove: Turn the glass cover counterclockwise 1/4 turn until the tabs of the glass cover clear the grooves of the socket. Using gloves or a dry cloth, remove the bulb by pulling...
Use and Care Manual
Page 39
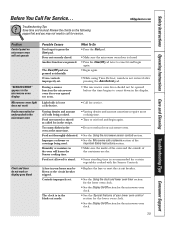
... to count down in the microwave oven Clock and timer do not work Foods overcooked or undercooked in the display. Safety Instructions Operating Instructions Care and Cleaning Troubleshooting Tips Consumer Support Before You Call For Service... Troubleshooting Tips Save time and money! Review the charts on microwave oven will lessen the Sensor cooking time. • Make sure the inside of the oven and the outside of your microwave oven. GEAppliances.com Problem Control panel on the following pages first...
... to count down in the microwave oven Clock and timer do not work Foods overcooked or undercooked in the display. Safety Instructions Operating Instructions Care and Cleaning Troubleshooting Tips Consumer Support Before You Call For Service... Troubleshooting Tips Save time and money! Review the charts on microwave oven will lessen the Sensor cooking time. • Make sure the inside of the oven and the outside of your microwave oven. GEAppliances.com Problem Control panel on the following pages first...
Use and Care Manual
Page 40
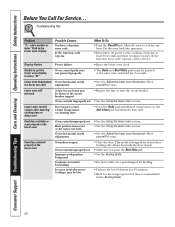
... Power failure. • Reset the lower oven clock. Lower oven temperature Oven thermostat needs too hot or too cold adjustment. • See the Adjust the lower oven thermostat-Do it yourself! Cookware not suited for service. Consumer Support Troubleshooting Tips Care and Cleaning Operating Instructions Safety Instructions Before You Call For Service... Unable to get the lower oven display to the cooking center for at the same time and held for 3 seconds. section. Always broil with the door...
... Power failure. • Reset the lower oven clock. Lower oven temperature Oven thermostat needs too hot or too cold adjustment. • See the Adjust the lower oven thermostat-Do it yourself! Cookware not suited for service. Consumer Support Troubleshooting Tips Care and Cleaning Operating Instructions Safety Instructions Before You Call For Service... Unable to get the lower oven display to the cooking center for at the same time and held for 3 seconds. section. Always broil with the door...
Use and Care Manual
Page 41
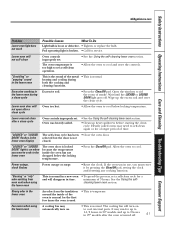
... reset the clean cycle. Fan noise when using the lower oven This is temporary. Pad operating light is broken. • Call for the first few times the oven is used. • This is normal in a new oven • To speed the process, set . Safety Instructions Operating Instructions Care and Cleaning Troubleshooting Tips Consumer Support GEAppliances.com Problem Lower oven light does not work Possible Causes What To Do Light bulb is normal for service. Allow the oven to self-clean...
... reset the clean cycle. Fan noise when using the lower oven This is temporary. Pad operating light is broken. • Call for the first few times the oven is used. • This is normal in a new oven • To speed the process, set . Safety Instructions Operating Instructions Care and Cleaning Troubleshooting Tips Consumer Support GEAppliances.com Problem Lower oven light does not work Possible Causes What To Do Light bulb is normal for service. Allow the oven to self-clean...


