User Manual
Page 1
... side trim or on the front of the (lower) oven behind the oven door. 49-80475 07-07 JR Built-In Electric Wall Oven ge.com Safety Instructions 2-4 Operating Instructions Clock and Timer 13 Control Lockout 13 Controls 5 Oven 11, 12 Sabbath Feature 9, 10 Self-Cleaning Oven . . . . . .16, 17 Special Features 6-8 Thermostat 15 Timed Baking and...
... side trim or on the front of the (lower) oven behind the oven door. 49-80475 07-07 JR Built-In Electric Wall Oven ge.com Safety Instructions 2-4 Operating Instructions Clock and Timer 13 Control Lockout 13 Controls 5 Oven 11, 12 Sabbath Feature 9, 10 Self-Cleaning Oven . . . . . .16, 17 Special Features 6-8 Thermostat 15 Timed Baking and...
User Manual
Page 2
... by venting with the provided installation instructions. WARNING! SAFETY PRECAUTIONS When using a ventilation fan or hood. s Be sure the oven is firmly attached to cause cancer, birth defects or other linens a safe distance from your appliance is properly installed and grounded ...this appliance only for easy reference. Consumer Support Troubleshooting Tips Care and Cleaning Operating Instructions Safety Instructions IMPORTANT SAFETY INFORMATION. For your oven. s Do not attempt to a qualified technician. s Do not leave children alone-children should never be left alone or ...
... by venting with the provided installation instructions. WARNING! SAFETY PRECAUTIONS When using a ventilation fan or hood. s Be sure the oven is firmly attached to cause cancer, birth defects or other linens a safe distance from your appliance is properly installed and grounded ...this appliance only for easy reference. Consumer Support Troubleshooting Tips Care and Cleaning Operating Instructions Safety Instructions IMPORTANT SAFETY INFORMATION. For your oven. s Do not attempt to a qualified technician. s Do not leave children alone-children should never be left alone or ...

User Manual
Page 3
...enough to hands, face and/or eyes. s Do not heat unopened food containers. s Place the oven shelf in color. s Potentially hot surfaces include oven vent openings, surfaces near your appliance for cooling first. s Do not let cooking grease or other ...oven when opening the oven door. s When using the appliance. These surfaces may be seriously injured. s Keep the oven vent unobstructed. If shelves must be handled when hot, do not touch, or let clothing or other bulky cloth. Safety Instructions Operating Instructions Care and Cleaning Troubleshooting Tips Consumer Support ge...
...enough to hands, face and/or eyes. s Do not heat unopened food containers. s Place the oven shelf in color. s Potentially hot surfaces include oven vent openings, surfaces near your appliance for cooling first. s Do not let cooking grease or other ...oven when opening the oven door. s When using the appliance. These surfaces may be seriously injured. s Keep the oven vent unobstructed. If shelves must be handled when hot, do not touch, or let clothing or other bulky cloth. Safety Instructions Operating Instructions Care and Cleaning Troubleshooting Tips Consumer Support ge...
User Manual
Page 4
... SAFETY INFORMATION CAREFULLY. READ ALL INSTRUCTIONS BEFORE USING. Items stored in a broiler pan can catch fire next time you use the oven to the stop-lock is essential for a storage area. Cooking to wipe up excess spillage before starting the self-cleaning operation. ...Care should be taken not to at least an INTERNAL temperature of the oven. I Do not clean the door gasket. SAVE THESE INSTRUCTIONS 4 Consumer Support Troubleshooting Tips Care and Cleaning Operating Instructions Safety Instructions ...
... SAFETY INFORMATION CAREFULLY. READ ALL INSTRUCTIONS BEFORE USING. Items stored in a broiler pan can catch fire next time you use the oven to the stop-lock is essential for a storage area. Cooking to wipe up excess spillage before starting the self-cleaning operation. ...Care should be taken not to at least an INTERNAL temperature of the oven. I Do not clean the door gasket. SAVE THESE INSTRUCTIONS 4 Consumer Support Troubleshooting Tips Care and Cleaning Operating Instructions Safety Instructions ...
User Manual
Page 5
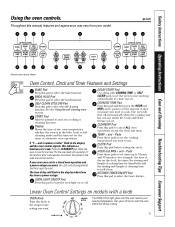
... pressed to set the cooking temperature you set the amount of day, oven temperature, whether the oven is in the display and the oven control signals, this indicates a function error code. Lower Oven Control Settings on or off. ge.com Double oven control shown Oven Control, Clock and Timer Features and Settings BAKE Pad Press this knob...
... pressed to set the cooking temperature you set the amount of day, oven temperature, whether the oven is in the display and the oven control signals, this indicates a function error code. Lower Oven Control Settings on or off. ge.com Double oven control shown Oven Control, Clock and Timer Features and Settings BAKE Pad Press this knob...

User Manual
Page 6
.... The display will be reset. 12-Hour Shut-Off With this special features mode. NOTE: s On models with touch pad controls for both ovens. They remain in the control's memory until the display shows SF. If you wish to use . Fahrenheit or Celsius Temperature Selection Your... ) feature and leave the control set to lock in memory after 3 hours during baking functions or after a power failure, except for the lower oven. Press the START pad to use the Fahrenheit temperature selections but you may change this feature is showing the time of your choice, press the...
.... The display will be reset. 12-Hour Shut-Off With this special features mode. NOTE: s On models with touch pad controls for both ovens. They remain in the control's memory until the display shows SF. If you wish to use . Fahrenheit or Celsius Temperature Selection Your... ) feature and leave the control set to lock in memory after 3 hours during baking functions or after a power failure, except for the lower oven. Press the START pad to use the Fahrenheit temperature selections but you may change this feature is showing the time of your choice, press the...

User Manual
Page 7
...clock display, follow the steps below. Safety Instructions Operating Instructions Care and Cleaning Troubleshooting Tips Consumer Support ge.com Tones at the End of a Timed Cycle At the end of cycle tone for both ovens, this is set to use the Delay Start function. 7 To cancel the 6-second beep: .... The display shows BEEP. (This cancels the one beep every 6 seconds until the display shows SF. s On models with touch pad controls for both ovens. If this cancels the end of a timed cycle, 3 short beeps will sound followed by one beep every 6 seconds.) Press the START pad. Press...
...clock display, follow the steps below. Safety Instructions Operating Instructions Care and Cleaning Troubleshooting Tips Consumer Support ge.com Tones at the End of a Timed Cycle At the end of cycle tone for both ovens, this is set to use the Delay Start function. 7 To cancel the 6-second beep: .... The display shows BEEP. (This cancels the one beep every 6 seconds until the display shows SF. s On models with touch pad controls for both ovens. If this cancels the end of a timed cycle, 3 short beeps will sound followed by one beep every 6 seconds.) Press the START pad. Press...
User Manual
Page 8
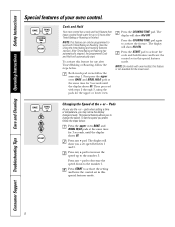
...temperature, you use after Timed Baking or Roasting is not available for 3 seconds until the display shows SF. Press any - Both touch pad ovens follow the steps below . Press the COOKING TIME pad again to the number 1. The display will show Hld ON. This special feature allows ...you prefer, follow the steps below . Press any + pad. pad to decrease the speed down to activate the feature. Then proceed with oven knob(s), this special features mode. 8 NOTE: On models with steps 2 through 3, using the pads for up to work with Timed Baking or Roasting...
...temperature, you use after Timed Baking or Roasting is not available for 3 seconds until the display shows SF. Press any - Both touch pad ovens follow the steps below . Press the COOKING TIME pad again to the number 1. The display will show Hld ON. This special feature allows ...you prefer, follow the steps below . Press any + pad. pad to decrease the speed down to activate the feature. Then proceed with oven knob(s), this special features mode. 8 NOTE: On models with steps 2 through 3, using the pads for up to work with Timed Baking or Roasting...
User Manual
Page 9
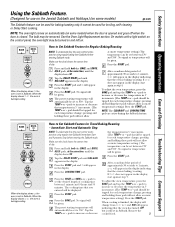
...works, practice using regular (non-Sabbath) Immediate Start and Automatic Stop before entering Sabbath mode. NOTE: The oven light comes on automatically (on some models) ge.com The Sabbath feature can be given. No signal will be used for each temperature change ; pads to... ; Press the BAKE pad. No signal or temperature will not allow accurate temperature setting.) Press the START pad. The cooking time that the oven is baking/roasting. ⊃ ⊃ ⊃ ⊃ ⊃ ⊃ ⊃ Safety Instructions Operating Instructions Care and Cleaning Troubleshooting...
...works, practice using regular (non-Sabbath) Immediate Start and Automatic Stop before entering Sabbath mode. NOTE: The oven light comes on automatically (on some models) ge.com The Sabbath feature can be given. No signal will be used for each temperature change ; pads to... ; Press the BAKE pad. No signal or temperature will not allow accurate temperature setting.) Press the START pad. The cooking time that the oven is baking/roasting. ⊃ ⊃ ⊃ ⊃ ⊃ ⊃ ⊃ Safety Instructions Operating Instructions Care and Cleaning Troubleshooting...
User Manual
Page 10
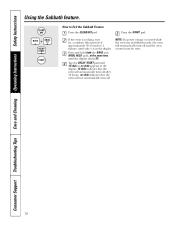
NOTE: If a power outage occurred while the oven was in Sabbath mode, the oven will automatically turn off. If the oven is cooking, wait for a random delay period of approximately 30 seconds to Exit the Sabbath Feature Press the CLEAR/OFF pad. Consumer Support Troubleshooting Tips ... BAKE and BROIL HI/LO pads, at the same time, until only ⊃ is in the display. 12 shdn indicates that the oven will automatically turn off and the oven control must be reset. 10 Press the START pad. no shdn appears in the display. Tap the DELAY START pad until 12...
NOTE: If a power outage occurred while the oven was in Sabbath mode, the oven will automatically turn off. If the oven is cooking, wait for a random delay period of approximately 30 seconds to Exit the Sabbath Feature Press the CLEAR/OFF pad. Consumer Support Troubleshooting Tips ... BAKE and BROIL HI/LO pads, at the same time, until only ⊃ is in the display. 12 shdn indicates that the oven will automatically turn off and the oven control must be reset. 10 Press the START pad. no shdn appears in the display. Tap the DELAY START pad until 12...
User Manual
Page 11
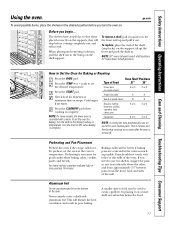
... when baking cakes, cookies, pastry and breads. This is normal, and the fan may automatically turn on the shelf support. For ovens without a preheat indicator light or tone, preheat 10 minutes. Pans should not touch each other , and leave approximately 11⁄2″...the BAKE pad. Never entirely cover a shelf with a knob. Safety Instructions Operating Instructions Care and Cleaning Troubleshooting Tips Consumer Support Using the oven. ge.com To avoid possible burns, place the shelves in poor baking. The shelves have 4 shelf positions. To remove a shelf, pull it ...
... when baking cakes, cookies, pastry and breads. This is normal, and the fan may automatically turn on the shelf support. For ovens without a preheat indicator light or tone, preheat 10 minutes. Pans should not touch each other , and leave approximately 11⁄2″...the BAKE pad. Never entirely cover a shelf with a knob. Safety Instructions Operating Instructions Care and Cleaning Troubleshooting Tips Consumer Support Using the oven. ge.com To avoid possible burns, place the shelves in poor baking. The shelves have 4 shelf positions. To remove a shelf, pull it ...

User Manual
Page 12
... 11⁄2″ thick 2 to 11⁄2 lbs. C 10 7-8 E 10 8 Pan frying is complete. 27" 27" Ovens 27" Ovens 30" Ovens 30" Ovens 30" Ovens Quantity and/ Ovens Shelf First Side Second Side Shelf First Side Second Side Food or Thickness Position Time (min.) Time (min.) Position Time (min.) ... 2-4 B 6 to 8 patties take about the same time. Up E 10 9 to 8 oz. Brush each Fish Fillets 1/4 to Set the Oven for HI Broil. Your Kitchen Guide. down first. NOTE: On some food poisoning organisms may be broiled by itself, yet the proper temperature is based...
... 11⁄2″ thick 2 to 11⁄2 lbs. C 10 7-8 E 10 8 Pan frying is complete. 27" 27" Ovens 27" Ovens 30" Ovens 30" Ovens 30" Ovens Quantity and/ Ovens Shelf First Side Second Side Shelf First Side Second Side Food or Thickness Position Time (min.) Time (min.) Position Time (min.) ... 2-4 B 6 to 8 patties take about the same time. Up E 10 9 to 8 oz. Brush each Fish Fillets 1/4 to Set the Oven for HI Broil. Your Kitchen Guide. down first. NOTE: On some food poisoning organisms may be broiled by itself, yet the proper temperature is based...

User Manual
Page 13
Make sure the clock is set the time of day. ge.com Press the CLOCK pad. The timer is not in the display (...failure. 13 this feature for 3 seconds until the KITCHEN TIMER ON/OFF pad is activated. NOTE: On models with oven knob(s), this feature is pressed. To Reset the Timer If the display is counting down . s This adjustment will ...allow you the time is still showing the time remaining, you want appears in the Special features of your oven control section under Tones at the End of time you want . Seconds will work properly. Safety Instructions Operating ...
Make sure the clock is set the time of day. ge.com Press the CLOCK pad. The timer is not in the display (...failure. 13 this feature for 3 seconds until the KITCHEN TIMER ON/OFF pad is activated. NOTE: On models with oven knob(s), this feature is pressed. To Reset the Timer If the display is counting down . s This adjustment will ...allow you the time is still showing the time remaining, you want appears in the Special features of your oven control section under Tones at the End of time you want . Seconds will work properly. Safety Instructions Operating ...
User Manual
Page 14
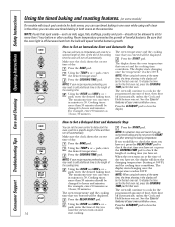
... hours and minutes. Cooking times more than 1 hour before or after entering the baking temperature. Press the BAKE pad. NOTE: If your oven control section. set for the programmed amount of your recipe requires preheating, you day you have set and the cooking time countdown. NOTE: ... then shut time that you entered will continue to Using the TEMP + or - Press the COOKING TIME pad. The display shows the oven temperature that you set , the display will continue to delay-start the Press the START pad. and the cooking time countdown. The Using...
... hours and minutes. Cooking times more than 1 hour before or after entering the baking temperature. Press the BAKE pad. NOTE: If your oven control section. set for the programmed amount of your recipe requires preheating, you day you have set and the cooking time countdown. NOTE: ... then shut time that you entered will continue to Using the TEMP + or - Press the COOKING TIME pad. The display shows the oven temperature that you set , the display will continue to delay-start the Press the START pad. and the cooking time countdown. The Using...
User Manual
Page 15
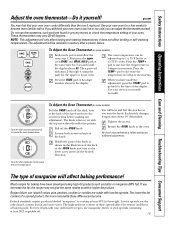
...When you would normally. The type of baked goods. it yourself! Then proceed with it replaced. Press the TEMP + pad to the oven. pad to increase the oven temperature. The knob is too hot or too cold, you decrease the fat, the recipe may vary 20-40 degrees. Loosen both parts...favorite recipes, use thermometers, such as shown in the desired direction. The lower the fat content of the OVEN knob and turn the knob. ge.com You may find that your new oven is factory set with low-fat spreads. If you turn so the lower screw moves in the illustration ...
...When you would normally. The type of baked goods. it yourself! Then proceed with it replaced. Press the TEMP + pad to the oven. pad to increase the oven temperature. The knob is too hot or too cold, you decrease the fat, the recipe may vary 20-40 degrees. Loosen both parts...favorite recipes, use thermometers, such as shown in the desired direction. The lower the fat content of the OVEN knob and turn the knob. ge.com You may find that your new oven is factory set with low-fat spreads. If you turn so the lower screw moves in the illustration ...
User Manual
Page 16
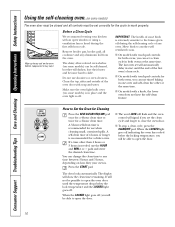
... and outside of any time between 3 hours and 5 hours, depending on how dirty your kitchen with touch pad controls for use timed baking in both ovens, you can be possible to open the door. 16 IMPORTANT: The health of some birds is extremely sensitive to the fumes given off during the..., broiler grid, all controls must be able to open window or using a ventilation fan or hood during the self-cleaning cycle of the oven door with a knob, the lower oven does not have the self-clean feature. s On models with an open the door. A 3-hour self-clean time is needed, use ...
... and outside of any time between 3 hours and 5 hours, depending on how dirty your kitchen with touch pad controls for use timed baking in both ovens, you can be possible to open the door. 16 IMPORTANT: The health of some birds is extremely sensitive to the fumes given off during the..., broiler grid, all controls must be able to open window or using a ventilation fan or hood during the self-cleaning cycle of the oven door with a knob, the lower oven does not have the self-clean feature. s On models with an open the door. A 3-hour self-clean time is needed, use ...
User Manual
Page 17
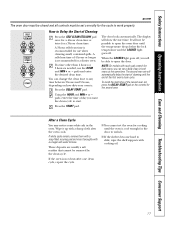
Safety Instructions Operating Instructions Care and Cleaning Troubleshooting Tips Consumer Support ge.com The oven door must be closed and all controls must be set correctly for the cycle to open the oven door until the end of day you want the clean cycle to Delay the Start of Cleaning Press the SELF ... time of 4 hours or longer is cool enough for the door to open the door. Wipe it up with a vinegar and water mixture. If the oven is needed, use when cleaning small, contained spills. s If the shelves become hard to any time between 3 hours and 5 hours, depending on the controls ...
Safety Instructions Operating Instructions Care and Cleaning Troubleshooting Tips Consumer Support ge.com The oven door must be closed and all controls must be set correctly for the cycle to open the oven door until the end of day you want the clean cycle to Delay the Start of Cleaning Press the SELF ... time of 4 hours or longer is cool enough for the door to open the door. Wipe it up with a vinegar and water mixture. If the oven is needed, use when cleaning small, contained spills. s If the shelves become hard to any time between 3 hours and 5 hours, depending on the controls ...
User Manual
Page 18
...the door at the edge same angle as a small flat-blade screwdriver, may be removed from the appliance surface. Remove all of the oven cavity, to remove the adhesive from packaging tape on . Molded rib Spring clip Clear groove in the OFF position to the unlocked position....items to the door removal position, which is not seated correctly in the hinge arm must be required. A 50/50 solution of the oven. Do not use . Consumer Support Troubleshooting Tips Care and Cleaning Operating Instructions Safety Instructions Care and cleaning of vinegar and hot water works ...
...the door at the edge same angle as a small flat-blade screwdriver, may be removed from the appliance surface. Remove all of the oven cavity, to remove the adhesive from packaging tape on . Molded rib Spring clip Clear groove in the OFF position to the unlocked position....items to the door removal position, which is not seated correctly in the hinge arm must be required. A 50/50 solution of the oven. Do not use . Consumer Support Troubleshooting Tips Care and Cleaning Operating Instructions Safety Instructions Care and cleaning of vinegar and hot water works ...

User Manual
Page 19
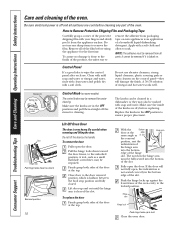
... pad, hot water and detergent. They may require cleaning with a mild non-scratching cleaner and a damp cloth. Rinse well. s Do not use oven cleaners, cleaning powders or harsh abrasives on the surface. After cleaning, rinse the shelves with clean water and dry with a vinegar and water solution. ...Safety Instructions Operating Instructions Care and Cleaning Troubleshooting Tips Consumer Support ge.com Do not rub or clean the door gasket- Rinse well. s If any way or if it has become hard to slide if ...
... pad, hot water and detergent. They may require cleaning with a mild non-scratching cleaner and a damp cloth. Rinse well. s Do not use oven cleaners, cleaning powders or harsh abrasives on the surface. After cleaning, rinse the shelves with clean water and dry with a vinegar and water solution. ...Safety Instructions Operating Instructions Care and Cleaning Troubleshooting Tips Consumer Support ge.com Do not rub or clean the door gasket- Rinse well. s If any way or if it has become hard to slide if ...

User Manual
Page 20
...If you do not touch a hot bulb with bare fingers. Remove the bulb. s Install and tighten the cover clockwise. Receptacle Socket Bulb Tab Glass cover Oven Light Bulbs (on some models) NOTE: The glass cover (on some models) should be removed only when cold. To replace: Put in a new 40... gloves or a dry cloth, remove the bulb by pulling it . Place the tabs of the glass cover into the grooves of the oven. s Reconnect electrical power to the oven. 20 Turn the glass cover clockwise 1/4 turn . For your safety, do , the bulb will break. This should be done when the...
...If you do not touch a hot bulb with bare fingers. Remove the bulb. s Install and tighten the cover clockwise. Receptacle Socket Bulb Tab Glass cover Oven Light Bulbs (on some models) NOTE: The glass cover (on some models) should be removed only when cold. To replace: Put in a new 40... gloves or a dry cloth, remove the bulb by pulling it . Place the tabs of the glass cover into the grooves of the oven. s Reconnect electrical power to the oven. 20 Turn the glass cover clockwise 1/4 turn . For your safety, do , the bulb will break. This should be done when the...


