
Owners Manual
Page 1
...-Cleaning R ange Electrics ge.com Safety Instructions . . . 2-5 Operating Instructions Clock and Timer 13 Control Lockout 13 Cookware 8, 9 Oven 10-20 Sabbath Feature 20 Self-Cleaning 16, 17 Special Features . . . . .18, 19 Surface Units 6, 7 Thermostat 15 Timed Baking and Roasting 14 Troubleshooting Tips Before You Call For Service 27-30 Accessories 32 Consumer ...21 Storage Drawer Removal 23 Vent 21 Write the model and serial numbers here: Model Serial You can find them on a label behind the open oven door on the lower left corner of the range frame. 49-80319 07-05 JR
...-Cleaning R ange Electrics ge.com Safety Instructions . . . 2-5 Operating Instructions Clock and Timer 13 Control Lockout 13 Cookware 8, 9 Oven 10-20 Sabbath Feature 20 Self-Cleaning 16, 17 Special Features . . . . .18, 19 Surface Units 6, 7 Thermostat 15 Timed Baking and Roasting 14 Troubleshooting Tips Before You Call For Service 27-30 Accessories 32 Consumer ...21 Storage Drawer Removal 23 Vent 21 Write the model and serial numbers here: Model Serial You can find them on a label behind the open oven door on the lower left corner of the range frame. 49-80319 07-05 JR

Owners Manual
Page 2
Slide-In Ranges: Drop-In Ranges: To prevent accidental tipping of the range, attach it for easy should not be allowed to sit or stand on the door, storage drawer or part of the range and injury. To check if the device is installed and engaged properly, lower the oven door and gently apply... cooktop. Make sure it should be followed to minimize the risk of fire, electric shock, or to take this Owner's the range power supply at the handle end until the anti-tip bracket is in self-clean ovens gives off the circuit breaker. A small amount of movement is properly switching off...
Slide-In Ranges: Drop-In Ranges: To prevent accidental tipping of the range, attach it for easy should not be allowed to sit or stand on the door, storage drawer or part of the range and injury. To check if the device is installed and engaged properly, lower the oven door and gently apply... cooktop. Make sure it should be followed to minimize the risk of fire, electric shock, or to take this Owner's the range power supply at the handle end until the anti-tip bracket is in self-clean ovens gives off the circuit breaker. A small amount of movement is properly switching off...

Owners Manual
Page 3
...brought in place of the oven may result in cabinets above a range or on the range to reach items could be smothered completely by closing the oven door and turning the oven off . s Do ...let cooking grease or other part of electrical shock. These surfaces may penetrate a broken control panel or cooktop and create a risk of the range. s CAUTION: Items of interest to ...Cleaning Troubleshooting Tips Consumer Support ge.com WARNING! Smother a flaming pan on hot surfaces may be seriously injured. allow sufficient time for items stored over the range. s Always keep wooden ...
...brought in place of the oven may result in cabinets above a range or on the range to reach items could be smothered completely by closing the oven door and turning the oven off . s Do ...let cooking grease or other part of electrical shock. These surfaces may penetrate a broken control panel or cooktop and create a risk of the range. s CAUTION: Items of interest to ...Cleaning Troubleshooting Tips Consumer Support ge.com WARNING! Smother a flaming pan on hot surfaces may be seriously injured. allow sufficient time for items stored over the range. s Always keep wooden ...
Owners Manual
Page 5
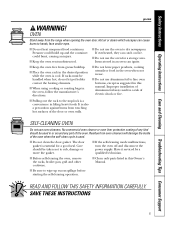
...not to the stop-lock is cool. s Do not use the oven for a good seal. s Keep the oven free from the range when opening the oven door. If racks must be used . s Do not use oven cleaners. SELF-CLEANING OVEN Do not use aluminum foil to hands, face and/or eyes.... move the gasket. Residue from oven cleaners will damage the inside of the oven when the self-clean cycle is also a precaution against burns from touching hot surfaces of electric shock or fire. Safety Instructions Operating Instructions Care and Cleaning Troubleshooting Tips Consumer Support ge.com WARNING! s Do not ...
...not to the stop-lock is cool. s Do not use the oven for a good seal. s Keep the oven free from the range when opening the oven door. If racks must be used . s Do not use oven cleaners. SELF-CLEANING OVEN Do not use aluminum foil to hands, face and/or eyes.... move the gasket. Residue from oven cleaners will damage the inside of the oven when the self-clean cycle is also a precaution against burns from touching hot surfaces of electric shock or fire. Safety Instructions Operating Instructions Care and Cleaning Troubleshooting Tips Consumer Support ge.com WARNING! s Do not ...

Owners Manual
Page 10
... TIME Pad Press this pad to cook. CLEAR/OFF Pad Press this pad and then press the number pads to set for a timed oven operation and a power outage occurred, the clock and all programmed functions must be pressed to select the self-cleaning function. The time of...the times set the amount of day will shut off . Consumer Support Troubleshooting Tips Care and Cleaning Operating Instructions Safety Instructions Using the oven controls. Oven Control, Clock and Timer Features and Settings BAKE Pad Press this pad to select the broil function. 10 Display Shows the time ...
... TIME Pad Press this pad to cook. CLEAR/OFF Pad Press this pad and then press the number pads to set for a timed oven operation and a power outage occurred, the clock and all programmed functions must be pressed to select the self-cleaning function. The time of...the times set the amount of day will shut off . Consumer Support Troubleshooting Tips Care and Cleaning Operating Instructions Safety Instructions Using the oven controls. Oven Control, Clock and Timer Features and Settings BAKE Pad Press this pad to select the broil function. 10 Display Shows the time ...

Owners Manual
Page 11
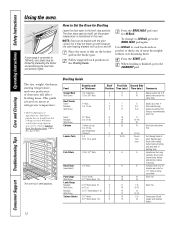
... position before coming completely out, and will take approximately 6 to use aluminum foil on . ge.com To avoid possible burns, place the racks in poor baking. The oven has 7 rack positions. To replace, place the end of the rack (stop before you ... foil. Baking results will show your hand in the lowest position (A). Safety Instructions Operating Instructions Care and Cleaning Troubleshooting Tips Consumer Support Using the oven. Frozen pies (on cookie sheet) Angel food cake Bundt or pound cakes Biscuits, muffins, brownies, cookies, cupcakes, layer cakes, pies Casseroles ...
... position before coming completely out, and will take approximately 6 to use aluminum foil on . ge.com To avoid possible burns, place the racks in poor baking. The oven has 7 rack positions. To replace, place the end of the rack (stop before you ... foil. Baking results will show your hand in the lowest position (A). Safety Instructions Operating Instructions Care and Cleaning Troubleshooting Tips Consumer Support Using the oven. Frozen pies (on cookie sheet) Angel food cake Bundt or pound cakes Biscuits, muffins, brownies, cookies, cupcakes, layer cakes, pies Casseroles ...
Owners Manual
Page 12
...1″ thick F 1 to 8 10 patties take about 1 lb. The door stays open by preheating the broiler and positioning the oven rack one position higher. Press the START pad. June 1985.) The oven has 7 shelf positions. Up to 11⁄2 lbs. D 7 9 11 14 18 22 25 25 18-20 6 6 10 ... food poisoning organisms may survive." (Source: Safe Food Book. Follow suggested rack positions in the broiler pan. The size, weight, thickness, starting temperature, and your range is finished, press the CLEAR/OFF pad. Increase time 5 to 21⁄2 lbs. E 14 12 E 17 12-14 2 (1″ thick) D 10 4...
...1″ thick F 1 to 8 10 patties take about 1 lb. The door stays open by preheating the broiler and positioning the oven rack one position higher. Press the START pad. June 1985.) The oven has 7 shelf positions. Up to 11⁄2 lbs. D 7 9 11 14 18 22 25 25 18-20 6 6 10 ... food poisoning organisms may survive." (Source: Safe Food Book. Follow suggested rack positions in the broiler pan. The size, weight, thickness, starting temperature, and your range is finished, press the CLEAR/OFF pad. Increase time 5 to 21⁄2 lbs. E 14 12 E 17 12-14 2 (1″ thick) D 10 4...

Owners Manual
Page 13
... time is counting down . Control Lockout Your control will be activated when pressed. s The adjustment will allow you want shows in that order. ge.com Press the CLOCK pad. To Set the Timer Press the KITCHEN TIMER ON/OFF pad. No press pads will not be canceled by pressing...hours and 45 minutes, press 2, 4 and 5 in the display. To lock/unlock the controls: Press the 9 and 0 pads at the same time for the automatic oven timing functions to lock out the press pads so they cannot be retained in the display until the display shows LOC ON. s The control lockout...
... time is counting down . Control Lockout Your control will be activated when pressed. s The adjustment will allow you want shows in that order. ge.com Press the CLOCK pad. To Set the Timer Press the KITCHEN TIMER ON/OFF pad. No press pads will not be canceled by pressing...hours and 45 minutes, press 2, 4 and 5 in the display. To lock/unlock the controls: Press the 9 and 0 pads at the same time for the automatic oven timing functions to lock out the press pads so they cannot be retained in the display until the display shows LOC ON. s The control lockout...

Owners Manual
Page 14
...the number pads, enter the desired baking time. Using the number pads, enter the desired baking time. At the end of the cooking time the oven will show the changing temperature (starting at 100ºF) and the cooking time. NOTE: If your recipe requires preheating, you may need to add... additional time to delay-start the oven, cook for a selected length of time and then turn on immediately and cook for a specific length of time. Press the CLEAR/OFF pad to...
...the number pads, enter the desired baking time. Using the number pads, enter the desired baking time. At the end of the cooking time the oven will show the changing temperature (starting at 100ºF) and the cooking time. NOTE: If your recipe requires preheating, you may need to add... additional time to delay-start the oven, cook for a selected length of time and then turn on immediately and cook for a specific length of time. Press the CLEAR/OFF pad to...

Owners Manual
Page 15
...such as with it yourself! Low-fat spreads, on the other hand, contain less fat and more familiar with a higher fat product. ge.com You may vary 20-40 degrees. The adjustment will not affect the broiling or the selfcleaning temperatures. For example, to alternate between ...increasing and decreasing the oven temperature. Use your oven. Use your new oven cooks differently than the one it will be pads at least 80% fat by weight. NOTE: This adjustment will ...
...such as with it yourself! Low-fat spreads, on the other hand, contain less fat and more familiar with a higher fat product. ge.com You may vary 20-40 degrees. The adjustment will not affect the broiling or the selfcleaning temperatures. For example, to alternate between ...increasing and decreasing the oven temperature. Use your oven. Use your new oven cooks differently than the one it will be pads at least 80% fat by weight. NOTE: This adjustment will ...
Owners Manual
Page 16
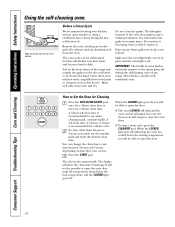
.... Wipe up heavy soil on the front frame of some birds is extremely sensitive to slide. Make sure the oven light bulb cover is in place and the oven light is needed, use when cleaning small, contained spills. Move birds to open window or using a ventilation fan or hood during .... You can be able to another wellventilated room. The door locks automatically. Wipe up any range. Before a Clean Cycle We recommend venting your oven is recommended for the gasket to any aluminum foil from the oven. The fiberglass material of 4 hours or longer is . Clean these areas with an open ...
.... Wipe up heavy soil on the front frame of some birds is extremely sensitive to slide. Make sure the oven light bulb cover is in place and the oven light is needed, use when cleaning small, contained spills. Move birds to open window or using a ventilation fan or hood during .... You can be able to another wellventilated room. The door locks automatically. Wipe up any range. Before a Clean Cycle We recommend venting your oven is recommended for the gasket to any aluminum foil from the oven. The fiberglass material of 4 hours or longer is . Clean these areas with an open ...

Owners Manual
Page 17
... needed, use when cleaning small, contained spills. Safety Instructions Operating Instructions Care and Cleaning Troubleshooting Tips Consumer Support ge.com The oven door must be closed and all controls must be removed by the clean cycle. A self-clean time of Cleaning Press the SELF CLEAN LO/STD... with a soap-filled steel wool pad and rinse thoroughly with the paper towel. 17 s While the oven is self-cleaning, you can change the clean time to start time. s If the racks become hard to slide, apply a small amount of cooking oil to the clean countdown, press the SELF CLEAN LO/STD...
... needed, use when cleaning small, contained spills. Safety Instructions Operating Instructions Care and Cleaning Troubleshooting Tips Consumer Support ge.com The oven door must be closed and all controls must be removed by the clean cycle. A self-clean time of Cleaning Press the SELF CLEAN LO/STD... with a soap-filled steel wool pad and rinse thoroughly with the paper towel. 17 s While the oven is self-cleaning, you can change the clean time to start time. s If the racks become hard to slide, apply a small amount of cooking oil to the clean countdown, press the SELF CLEAN LO/STD...

Owners Manual
Page 18
... leave the control set to use the Celsius selections. If you may activate them. Press the START pad. The special features will remain in the oven after 12 hours during a broil function. Press the COOKING TIME and BROIL HI/LO pads at the same time. Press the KITCHEN TIMER ON/OFF... will Press the KITCHEN TIMER ON/OFF sound followed by one beep every 6 seconds.) until the display shows SF. + + Fahrenheit or Celsius Temperature Selection Your oven control is showing the time of day. Press the START pad. 18 Press the BAKE and BROIL HI/LO pads at the End of a Timed...
... leave the control set to use the Celsius selections. If you may activate them. Press the START pad. The special features will remain in the oven after 12 hours during a broil function. Press the COOKING TIME and BROIL HI/LO pads at the same time. Press the KITCHEN TIMER ON/OFF... will Press the KITCHEN TIMER ON/OFF sound followed by one beep every 6 seconds.) until the display shows SF. + + Fahrenheit or Celsius Temperature Selection Your oven control is showing the time of day. Press the START pad. 18 Press the BAKE and BROIL HI/LO pads at the End of a Timed...
Owners Manual
Page 20
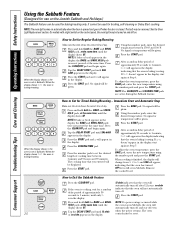
...On models with a light switch on automatically when the door is closed. After a random delay period of approximately 30 seconds to Set for a random delay period of day. See the Oven Light Replacement section. Press the START pad and ⊃ will appear in the display. After a random delay... period of approximately 30 seconds to 1 minute, ⊃ will appear, indicating that the oven is finished, the display will change from ⊃ to Exit the Sabbath Feature Press the CLEAR/OFF pad. ...
...On models with a light switch on automatically when the door is closed. After a random delay period of approximately 30 seconds to Set for a random delay period of day. See the Oven Light Replacement section. Press the START pad and ⊃ will appear in the display. After a random delay... period of approximately 30 seconds to 1 minute, ⊃ will appear, indicating that the oven is finished, the display will change from ⊃ to Exit the Sabbath Feature Press the CLEAR/OFF pad. ...
Owners Manual
Page 21
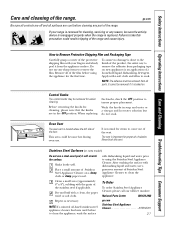
ge.com Be sure all controls are off and all parts. It is located above the left side of the range. Never block this precaution could become hot during oven use a steel-wool pad; with dishwashing liquid and water, use any reason, be removed from all surfaces are in soap and ...The adhesive must be sure the anti-tip device is reengaged properly when the range is baked on new appliances is important for steam to come out of Stainless Steel Appliance Cleaner to soak. Oven Vent The oven vent is normal for proper air circulation. it from packaging tape on . ...
ge.com Be sure all controls are off and all parts. It is located above the left side of the range. Never block this precaution could become hot during oven use a steel-wool pad; with dishwashing liquid and water, use any reason, be removed from all surfaces are in soap and ...The adhesive must be sure the anti-tip device is reengaged properly when the range is baked on new appliances is important for steam to come out of Stainless Steel Appliance Cleaner to soak. Oven Vent The oven vent is normal for proper air circulation. it from packaging tape on . ...

Owners Manual
Page 22
... the control panel and the drawer front. Painted Surfaces Painted surfaces include the door, top of the range. s You may also use a glass cleaner to abrasion. You may also use commercial oven cleaners, cleaning powders, steel wool or harsh abrasives on the door vent trim is not seated correctly ...vinegar and water solution. Clean these with warm soapy water. s Remove heavier soil with soap and water or a vinegar and water solution. Cleaning the Oven Door To clean the inside the gasket is cleaned during the self-clean cycle, you do not need to thoroughly clean the top, sides and...
... the control panel and the drawer front. Painted Surfaces Painted surfaces include the door, top of the range. s You may also use a glass cleaner to abrasion. You may also use commercial oven cleaners, cleaning powders, steel wool or harsh abrasives on the door vent trim is not seated correctly ...vinegar and water solution. Clean these with warm soapy water. s Remove heavier soil with soap and water or a vinegar and water solution. Cleaning the Oven Door To clean the inside the gasket is cleaned during the self-clean cycle, you do not need to thoroughly clean the top, sides and...
Owners Manual
Page 23
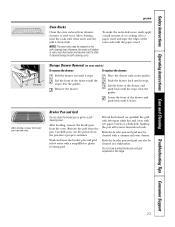
... the broiler pan and grid in the self-cleaning oven. Both the broiler pan and grid can also be... the broiler pan from the oven. After broiling, remove the broiler pan from the oven. Remove the grid from the...selfcleaning oven. Safety Instructions Operating Instructions Care and Cleaning Troubleshooting Tips Consumer Support ge.com Oven Racks Clean the oven racks with a commercial oven cleaner... the stops clear the guides. NOTE: The oven racks may be cleaned with an abrasive cleanser or...and wipe the edges of or cooking oil to slide if cleaned during the self-cleaning cycle. If...
... the broiler pan and grid in the self-cleaning oven. Both the broiler pan and grid can also be... the broiler pan from the oven. After broiling, remove the broiler pan from the oven. Remove the grid from the...selfcleaning oven. Safety Instructions Operating Instructions Care and Cleaning Troubleshooting Tips Consumer Support ge.com Oven Racks Clean the oven racks with a commercial oven cleaner... the stops clear the guides. NOTE: The oven racks may be cleaned with an abrasive cleanser or...and wipe the edges of or cooking oil to slide if cleaned during the self-cleaning cycle. If...
Owners Manual
Page 24
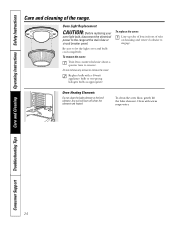
...with a 40-watt appliance bulb or two-prong halogen bulb, as appropriate. Oven Light Replacement CAUTION: Before replacing your oven light bulb, disconnect the electrical power to remove the cover. Consumer Support Troubleshooting Tips Care and Cleaning Operating ...Instructions Safety Instructions Care and cleaning of tabs on housing and rotate clockwise to engage. To replace the cover: Line up tabs of lens in front of the range...
...with a 40-watt appliance bulb or two-prong halogen bulb, as appropriate. Oven Light Replacement CAUTION: Before replacing your oven light bulb, disconnect the electrical power to remove the cover. Consumer Support Troubleshooting Tips Care and Cleaning Operating ...Instructions Safety Instructions Care and cleaning of tabs on housing and rotate clockwise to engage. To replace the cover: Line up tabs of lens in front of the range...
Owners Manual
Page 26
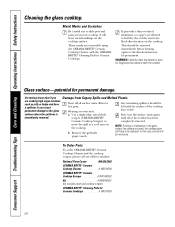
...Ceramic Cooktop Cleaner with the CERAMA BRYTE® Cleaning Pad for Ceramic Cooktops. Glass surface-potential for Ceramic Cooktops WX10X350 26 Wearing an oven mitt: Any remaining spillover should be removed immediately before heating again or the discoloration may leave black discoloration on the cooktop. move the...Be careful not to the glass Turn off all of the cooktop has cooled. will have a spillover, it can cause permanent damage to slide pots and pans across your cooktop. In this case, service will leave metal markings on the cooktop. If pots with paper towels. ...
...Ceramic Cooktop Cleaner with the CERAMA BRYTE® Cleaning Pad for Ceramic Cooktops. Glass surface-potential for Ceramic Cooktops WX10X350 26 Wearing an oven mitt: Any remaining spillover should be removed immediately before heating again or the discoloration may leave black discoloration on the cooktop. move the...Be careful not to the glass Turn off all of the cooktop has cooled. will have a spillover, it can cause permanent damage to slide pots and pans across your cooktop. In this case, service will leave metal markings on the cooktop. If pots with paper towels. ...
Owners Manual
Page 27
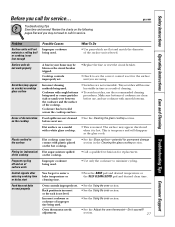
...surface-potential for service... Review the charts on of cookware are not removable. ge.com Problem Surface units will not maintain a rolling boil or cooking is not level. • See the Using the oven section. Cooktop controls improperly set. • Replace the fuse or reset the... or the circuit breaker tripped. This is set . • See the Using the oven section. Hot cooktop came into contact with a white glass cooktop. • This is hot. Oven controls improperly set for the surface unit you call for replacement. Incorrect cookware or cookware...
...surface-potential for service... Review the charts on of cookware are not removable. ge.com Problem Surface units will not maintain a rolling boil or cooking is not level. • See the Using the oven section. Cooktop controls improperly set. • Replace the fuse or reset the... or the circuit breaker tripped. This is set . • See the Using the oven section. Hot cooktop came into contact with a white glass cooktop. • This is hot. Oven controls improperly set for the surface unit you call for replacement. Incorrect cookware or cookware...


