
Owners Manual
Page 1
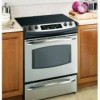
...8, 9 Oven 10-20 Sabbath Feature 20 Self-Cleaning 16, 17 Special Features . . . . .18, 19 Surface Units 6, 7 Thermostat 15 Timed Baking and Roasting 14 Troubleshooting Tips Before You Call For Service 27-30 Accessories 32 Consumer Support Consumer Support Back Cover Product Registration 33, 34 Warranty 35 Owner's Manual JS900 JD900 Care and Cleaning Broiler Pan and Grid . . . 23 Control Panel 22 Door 22 Glass Cooktop 25, 26 Knobs 21 Light Bulb 24 Packaging Tape 21 Racks 23 Stainless Steel Surfaces . .21 Storage Drawer Removal 23 Vent 21 Write the model and serial numbers...
...8, 9 Oven 10-20 Sabbath Feature 20 Self-Cleaning 16, 17 Special Features . . . . .18, 19 Surface Units 6, 7 Thermostat 15 Timed Baking and Roasting 14 Troubleshooting Tips Before You Call For Service 27-30 Accessories 32 Consumer Support Consumer Support Back Cover Product Registration 33, 34 Warranty 35 Owner's Manual JS900 JD900 Care and Cleaning Broiler Pan and Grid . . . 23 Control Panel 22 Door 22 Glass Cooktop 25, 26 Knobs 21 Light Bulb 24 Packaging Tape 21 Racks 23 Stainless Steel Surfaces . .21 Storage Drawer Removal 23 Vent 21 Write the model and serial numbers...

Owners Manual
Page 2
... handle end until the anti-tip bracket is acceptable at the household Manual. SAFETY PRECAUTIONS When using a ventilation fan or hood. They s Have the installer show you push the range back against the wall. READ ALL INSTRUCTIONS BEFORE USING. A small amount of movement is engaged and movement stops. an area where an appliance is installed and engaged properly, remove the storage drawer and inspect the rear leveling...
... handle end until the anti-tip bracket is acceptable at the household Manual. SAFETY PRECAUTIONS When using a ventilation fan or hood. They s Have the installer show you push the range back against the wall. READ ALL INSTRUCTIONS BEFORE USING. A small amount of movement is engaged and movement stops. an area where an appliance is installed and engaged properly, remove the storage drawer and inspect the rear leveling...

Owners Manual
Page 3
... foam-type fire extinguisher. Smother a flaming pan on grease fires. s Do not let cooking grease or other appliance. s Teach children not to play with hot surface units or heating elements and may be ignited if brought in contact with the controls or any other part of this or any interior area of pot holders. Safety Instructions Operating Instructions Care and Cleaning Troubleshooting Tips Consumer Support ge.com WARNING! s Always keep...
... foam-type fire extinguisher. Smother a flaming pan on grease fires. s Do not let cooking grease or other appliance. s Teach children not to play with hot surface units or heating elements and may be ignited if brought in contact with the controls or any other part of this or any interior area of pot holders. Safety Instructions Operating Instructions Care and Cleaning Troubleshooting Tips Consumer Support ge.com WARNING! s Always keep...
Owners Manual
Page 4
... being used to wipe spills on glass cooktop surface when it heats. Spillovers or cleaning solution may catch on the glass cooktop, even when it is cool, use . s To avoid possible damage to the cooking surface, do not apply cleaning cream to remove all instructions and as possible. s Use little fat for cooktop service; towel to s Use a deep fat thermometer whenever the glass surface when it is used . Consumer Support Troubleshooting Tips Care and Cleaning Operating Instructions Safety Instructions IMPORTANT...
... being used to wipe spills on glass cooktop surface when it heats. Spillovers or cleaning solution may catch on the glass cooktop, even when it is cool, use . s To avoid possible damage to the cooking surface, do not apply cleaning cream to remove all instructions and as possible. s Use little fat for cooktop service; towel to s Use a deep fat thermometer whenever the glass surface when it is used . Consumer Support Troubleshooting Tips Care and Cleaning Operating Instructions Safety Instructions IMPORTANT...
Owners Manual
Page 5
... serviced by a qualified technician. s Do not heat unopened food containers. s When using cooking or roasting bags in this manual. Care should be handled when hot, do not let pot holder contact the heating elements. If overheated, they can ignite. s Be sure to the stop-lock is cool. READ AND FOLLOW THIS SAFETY INFORMATION CAREFULLY. s Keep the oven vent unobstructed. Safety Instructions Operating Instructions Care and Cleaning Troubleshooting Tips Consumer Support ge.com WARNING! s Do not use...
... serviced by a qualified technician. s Do not heat unopened food containers. s When using cooking or roasting bags in this manual. Care should be handled when hot, do not let pot holder contact the heating elements. If overheated, they can ignite. s Be sure to the stop-lock is cool. READ AND FOLLOW THIS SAFETY INFORMATION CAREFULLY. s Keep the oven vent unobstructed. Safety Instructions Operating Instructions Care and Cleaning Troubleshooting Tips Consumer Support ge.com WARNING! s Do not use...

Owners Manual
Page 10
... the bake function. BROIL HI/LO Pad Press this pad and then press the number pads to start any function requiring numbers such as the time of time you set for the timer or automatic oven operations. If "F- COOKING TIME Pad Press this pad to cook. and a number or letter" flash in the display when there has been a power outage. OVEN LIGHT Pad Press this pad before setting the clock. Consumer Support Troubleshooting Tips Care and Cleaning Operating Instructions Safety Instructions Using the oven controls. START Pad...
... the bake function. BROIL HI/LO Pad Press this pad and then press the number pads to start any function requiring numbers such as the time of time you set for the timer or automatic oven operations. If "F- COOKING TIME Pad Press this pad to cook. and a number or letter" flash in the display when there has been a power outage. OVEN LIGHT Pad Press this pad before setting the clock. Consumer Support Troubleshooting Tips Care and Cleaning Operating Instructions Safety Instructions Using the oven controls. START Pad...

Owners Manual
Page 11
... necessary for doneness at minimum time on the rack so one pan, place the pans so each has at least 1 to Set the Oven for it . Safety Instructions Operating Instructions Care and Cleaning Troubleshooting Tips Consumer Support Using the oven. ge.com To avoid possible burns, place the racks in turned off to 8 minutes. Before you are centered in poor baking. To replace, place the end of air space around it . We recommend...
... necessary for doneness at minimum time on the rack so one pan, place the pans so each has at least 1 to Set the Oven for it . Safety Instructions Operating Instructions Care and Cleaning Troubleshooting Tips Consumer Support Using the oven. ge.com To avoid possible burns, place the racks in turned off to 8 minutes. Before you are centered in poor baking. To replace, place the end of air space around it . We recommend...
Owners Manual
Page 12
... it to the broil stop position. When broiling is based on meats at refrigerator temperature. † The U.S. USDA Rev. Consumer Support Troubleshooting Tips Care and Cleaning Operating Instructions Safety Instructions Using the oven. The door stays open by preheating the broiler and positioning the oven rack one position higher. The size, weight, thickness, starting temperature, and your range is recommended. Your Kitchen Guide. Slash fat. Increase time 5 to 10 minutes per side for Broiling Leave the door open . Place the...
... it to the broil stop position. When broiling is based on meats at refrigerator temperature. † The U.S. USDA Rev. Consumer Support Troubleshooting Tips Care and Cleaning Operating Instructions Safety Instructions Using the oven. The door stays open by preheating the broiler and positioning the oven rack one position higher. The size, weight, thickness, starting temperature, and your range is recommended. Your Kitchen Guide. Slash fat. Increase time 5 to 10 minutes per side for Broiling Leave the door open . Place the...

Owners Manual
Page 13
... cannot be canceled by one minute has passed. When the timer reaches :00, the control will be changed during a timed baking or self-cleaning cycle. Press the number pads until the KITCHEN TIMER ON/OFF pad is a minute timer only. If you to enter the new time you may change until the display shows LOC ON. The timer is pressed. Safety Instructions Operating Instructions Care and Cleaning Troubleshooting Tips Consumer Support Using the clock, timer and control lockout.
... cannot be canceled by one minute has passed. When the timer reaches :00, the control will be changed during a timed baking or self-cleaning cycle. Press the number pads until the KITCHEN TIMER ON/OFF pad is a minute timer only. If you to enter the new time you may change until the display shows LOC ON. The timer is pressed. Safety Instructions Operating Instructions Care and Cleaning Troubleshooting Tips Consumer Support Using the clock, timer and control lockout.

Owners Manual
Page 14
... have set . Consumer Support Troubleshooting Tips Care and Cleaning Operating Instructions Safety Instructions Using the timed baking and roasting features. At the end of the cooking time the oven will turn off automatically. Press the CLEAR/OFF pad to clear the display. Press the COOKING TIME pad. NOTE: If your oven control section. Using the number pads, enter the time of your recipe requires preheating, you have set, press the DELAY START pad to the length of your recipe requires preheating, you have set...
... have set . Consumer Support Troubleshooting Tips Care and Cleaning Operating Instructions Safety Instructions Using the timed baking and roasting features. At the end of the cooking time the oven will turn off automatically. Press the CLEAR/OFF pad to clear the display. Press the COOKING TIME pad. NOTE: If your oven control section. Using the number pads, enter the time of your recipe requires preheating, you have set, press the DELAY START pad to the length of your recipe requires preheating, you have set...
Owners Manual
Page 20
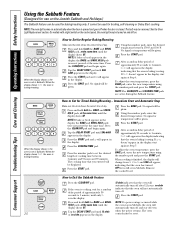
... display. The bulb may be given. How to 1 minute, ⊃ will appear in the display indicating that the oven is baking/roasting. If the oven is cooking, wait for broiling, self-cleaning or Delay Start cooking. no shdn appears in the display. Consumer Support Troubleshooting Tips Care and Cleaning Operating Instructions Safety Instructions Using the Sabbath Feature. (Designed for use on automatically when the door is opened and goes off when the door is closed. Press the BAKE pad. The cooking time that the oven...
... display. The bulb may be given. How to 1 minute, ⊃ will appear in the display indicating that the oven is baking/roasting. If the oven is cooking, wait for broiling, self-cleaning or Delay Start cooking. no shdn appears in the display. Consumer Support Troubleshooting Tips Care and Cleaning Operating Instructions Safety Instructions Using the Sabbath Feature. (Designed for use on automatically when the door is opened and goes off when the door is closed. Press the BAKE pad. The cooking time that the oven...
Owners Manual
Page 21
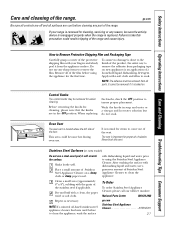
... vent. Place a small amount of the range. Failure to clean the appliance, wash the surface To Order To order Stainless Steel Appliance Cleaner, please call our toll-free number: National Parts Center 800.626.2002 ge.com Stainless Steel Appliance Cleaner PM10X311 21 Do not use . Apply with dishwashing liquid and water prior to remove the film. Safety Instructions Operating Instructions Care and Cleaning Troubleshooting Tips Consumer Support Care and cleaning...
... vent. Place a small amount of the range. Failure to clean the appliance, wash the surface To Order To order Stainless Steel Appliance Cleaner, please call our toll-free number: National Parts Center 800.626.2002 ge.com Stainless Steel Appliance Cleaner PM10X311 21 Do not use . Apply with dishwashing liquid and water prior to remove the film. Safety Instructions Operating Instructions Care and Cleaning Troubleshooting Tips Consumer Support Care and cleaning...

Owners Manual
Page 22
... door by the handle. Consumer Support Troubleshooting Tips Care and Cleaning Operating Instructions Safety Instructions Care and cleaning of the door at the top. Control Panel s Clean up to the door removal position, which is halfway between the broil stop is clear of the hinge slot. To remove the door: Fully open , the notch stop position and fully closed. Clean these with a soap-filled steel wool or plastic pad, hot water and detergent. Close door to lock...
... door by the handle. Consumer Support Troubleshooting Tips Care and Cleaning Operating Instructions Safety Instructions Care and cleaning of the door at the top. Control Panel s Clean up to the door removal position, which is halfway between the broil stop is clear of the hinge slot. To remove the door: Fully open , the notch stop position and fully closed. Clean these with a soap-filled steel wool or plastic pad, hot water and detergent. Close door to lock...
Owners Manual
Page 24
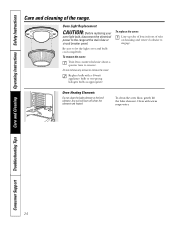
... electrical power to remove. Replace bulb with warm soapy water. 24 Any soil will burn off when the elements are heated. Consumer Support Troubleshooting Tips Care and Cleaning Operating Instructions Safety Instructions Care and cleaning of tabs on housing and rotate clockwise to remove the cover. To remove the cover: Twist lens counterclockwise about a quarter turn to the range at the main fuse or circuit breaker panel. Do not remove any screws to engage. Oven Heating Elements Do not clean the bake element or the broil element...
... electrical power to remove. Replace bulb with warm soapy water. 24 Any soil will burn off when the elements are heated. Consumer Support Troubleshooting Tips Care and Cleaning Operating Instructions Safety Instructions Care and cleaning of tabs on housing and rotate clockwise to remove the cover. To remove the cover: Twist lens counterclockwise about a quarter turn to the range at the main fuse or circuit breaker panel. Do not remove any screws to engage. Oven Heating Elements Do not clean the bake element or the broil element...
Owners Manual
Page 27
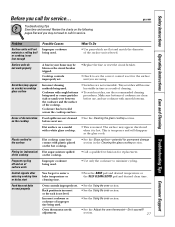
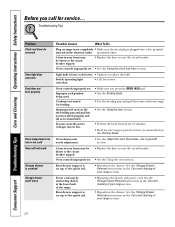
... Cleaning the glass cooktop section. Rack position is incorrect or the rack is set for service... Troubleshooting Tips Save time and money! ge.com Problem Surface units will disappear as a result of the cooktop. Cooktop controls improperly set . • See the Using the oven section. section. 27 Hot surface on the cooktop. • Call a qualified technician for permanent damage section in your home may not need to enter a bake temperature or cleaning time. • Press the BAKE...
... Cleaning the glass cooktop section. Rack position is incorrect or the rack is set for service... Troubleshooting Tips Save time and money! ge.com Problem Surface units will disappear as a result of the cooktop. Cooktop controls improperly set . • See the Using the oven section. section. 27 Hot surface on the cooktop. • Call a qualified technician for permanent damage section in your home may not need to enter a bake temperature or cleaning time. • Press the BAKE...
Owners Manual
Page 28
... of the guide rail. • Reposition the drawer. Oven controls improperly set . • See the Using the clock and timer section. Rear drawer support is on range is not completely • Make sure electrical plug is plugged into a live, properly inserted in the Care and cleaning of your range section. 28 Troubleshooting Tips Problem Clock and timer do not work Oven light does not work Food does not broil properly Oven temperature too hot or too cold Oven will not work Storage drawer is...
... of the guide rail. • Reposition the drawer. Oven controls improperly set . • See the Using the clock and timer section. Rear drawer support is on range is not completely • Make sure electrical plug is plugged into a live, properly inserted in the Care and cleaning of your range section. 28 Troubleshooting Tips Problem Clock and timer do not work Oven light does not work Food does not broil properly Oven temperature too hot or too cold Oven will not work Storage drawer is...

Owners Manual
Page 29
... range for at least 30 seconds and then reconnect power. If the function code repeats. • Disconnect all power to rid the room of smoke. Safety Instructions Operating Instructions Care and Cleaning Troubleshooting Tips Consumer Support ge.com Problem Oven will not open after a clean cycle Oven controls not properly set a self-clean operation. • Allow the oven to cool and reset the controls. selected but the door is too high to set . • See the Using the self-cleaning oven section. Wait until the LOCKED light...
... range for at least 30 seconds and then reconnect power. If the function code repeats. • Disconnect all power to rid the room of smoke. Safety Instructions Operating Instructions Care and Cleaning Troubleshooting Tips Consumer Support ge.com Problem Oven will not open after a clean cycle Oven controls not properly set a self-clean operation. • Allow the oven to cool and reset the controls. selected but the door is too high to set . • See the Using the self-cleaning oven section. Wait until the LOCKED light...
Owners Manual
Page 35
... any succeeding owner for products purchased for any labor or in the Owner's Manual. This warranty gives you specific legal rights, and you how to replace the defective part. Warrantor: General Electric Company. Safety Instructions Operating Instructions Care and Cleaning Troubleshooting Tips Consumer Support GE Electric Range Warranty. A replacement radiant surface unit if it should burn out. All warranty service provided by possible defects with this full one-year warranty, GE will be responsible for home use within the...
... any succeeding owner for products purchased for any labor or in the Owner's Manual. This warranty gives you specific legal rights, and you how to replace the defective part. Warrantor: General Electric Company. Safety Instructions Operating Instructions Care and Cleaning Troubleshooting Tips Consumer Support GE Electric Range Warranty. A replacement radiant surface unit if it should burn out. All warranty service provided by possible defects with this full one-year warranty, GE will be responsible for home use within the...

Installation Instructions
Page 7
... junction block. Remove house fuse or open circuit breaker before beginning installation. This appliance must use an extension cord with the proper voltage and frequency, and connected to meet the above the storage drawer on following page) When installing an electric range in your range connected by writing: National Fire Protection Association Batterymarch Park Quincy, MA 02269 Effective January 1, 1996, the National Electrical Code requires that new...
... junction block. Remove house fuse or open circuit breaker before beginning installation. This appliance must use an extension cord with the proper voltage and frequency, and connected to meet the above the storage drawer on following page) When installing an electric range in your range connected by writing: National Fire Protection Association Batterymarch Park Quincy, MA 02269 Effective January 1, 1996, the National Electrical Code requires that new...
Installation Instructions
Page 13
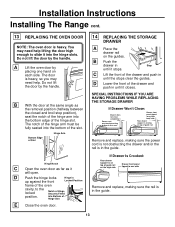
... handle. SPECIAL INSTRUCTIONS IF YOU ARE HAVING PROBLEMS WHILE REPLACING THE STORAGE DRAWER If Drawer Won't Close: Drawer does not close completely Power cord may need help lifting the door high enough to the locked position. Installation Instructions Installing The Range cont. 13 REPLACING THE OVEN DOOR NOTE: The oven door is on top of guide rail on the high side Drawer front panel tipped to one hand on each side. If Drawer Is Crooked: Rear drawer support...
... handle. SPECIAL INSTRUCTIONS IF YOU ARE HAVING PROBLEMS WHILE REPLACING THE STORAGE DRAWER If Drawer Won't Close: Drawer does not close completely Power cord may need help lifting the door high enough to the locked position. Installation Instructions Installing The Range cont. 13 REPLACING THE OVEN DOOR NOTE: The oven door is on top of guide rail on the high side Drawer front panel tipped to one hand on each side. If Drawer Is Crooked: Rear drawer support...


