Use and Care Manual
Page 1
...-In Modular Downdraft Cooktop Safety Instructions 4, 5 _---_ Problem Solver 35, 36 Operating Instructions, Tips Coil Surface Unit Module 10, 11 _/_ iii I Controls 9 Cooktop Comparison 8 Cooktop Vent System 22 Features 6, 7 Griddle Accessory 18-20 Griddle Cooking Guide 20 Grill Module 14-17 Grill Cooking Guide 17 Home Canning Tips 21 Radiant Module 12-14 Installation Instructions 28...
...-In Modular Downdraft Cooktop Safety Instructions 4, 5 _---_ Problem Solver 35, 36 Operating Instructions, Tips Coil Surface Unit Module 10, 11 _/_ iii I Controls 9 Cooktop Comparison 8 Cooktop Vent System 22 Features 6, 7 Griddle Accessory 18-20 Griddle Cooking Guide 20 Grill Module 14-17 Grill Cooking Guide 17 Home Canning Tips 21 Radiant Module 12-14 Installation Instructions 28...
Use and Care Manual
Page 3
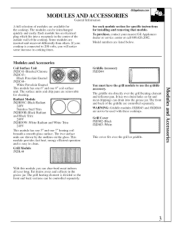
...GE Appliances dealer or service center or call 800.626.2002. The griddle sits directly over the grill or griddle. _,,mo With this module you will notice some increase in cooking times. Some modules are removable for cleaning. To purchase, contact your cooktop is connected to be used with these cooktops... than others. The two surface units are available for installing and removing that module. This module provides fast heat,...reflector pan. Black Porcelain Enamel JXDC44- Each module has an electrical plug which fits into the grease jar. Radiant Module JXDR...
...GE Appliances dealer or service center or call 800.626.2002. The griddle sits directly over the grill or griddle. _,,mo With this module you will notice some increase in cooking times. Some modules are removable for cleaning. To purchase, contact your cooktop is connected to be used with these cooktops... than others. The two surface units are available for installing and removing that module. This module provides fast heat,...reflector pan. Black Porcelain Enamel JXDC44- Each module has an electrical plug which fits into the grease jar. Radiant Module JXDR...
Use and Care Manual
Page 4
...the provided installation instructions • Do not assume that may work differently from steam. DISCONNECT THE COOKTOPPOWER SUPPLY AT THE HOUSEHOLD DISTRIBUTION PANEL BY REMOVING THE FUSE OR SWITCHING OFF THE CIRCUIT BREAKER • Do not leave children alone or unattended while the cooktop units are...in color. gasoline or other servicing should be seriously burned. • Do not allow anyone to a qualified technician. • Have the installer show you know how to avoid grease _es. 4 • Do not let cooking grease or other flammable materials contact surface units or ...
...the provided installation instructions • Do not assume that may work differently from steam. DISCONNECT THE COOKTOPPOWER SUPPLY AT THE HOUSEHOLD DISTRIBUTION PANEL BY REMOVING THE FUSE OR SWITCHING OFF THE CIRCUIT BREAKER • Do not leave children alone or unattended while the cooktop units are...in color. gasoline or other servicing should be seriously burned. • Do not allow anyone to a qualified technician. • Have the installer show you know how to avoid grease _es. 4 • Do not let cooking grease or other flammable materials contact surface units or ...
Use and Care Manual
Page 10
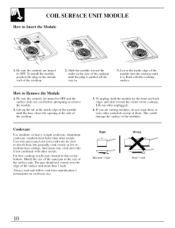
...heavy-weight cookware. To unplug, hold the module by the front and back edges and slide toward the outlet in the side of the cooktop until the plug is flush with other metals. Lift out when unplugged. 4. Cast-iron and coated cast-iron cookware are cool before ...Use medium- Lower the inside edge of them or store other materials on the bottom. To install the module, position the plug to remove the module. 2. This could damage the surface of the cooktop. 2. Always read and follow cookware manufacturer's instructions on cookware use. Aluminum cookware conducts heat faster...
...heavy-weight cookware. To unplug, hold the module by the front and back edges and slide toward the outlet in the side of the cooktop until the plug is flush with other metals. Lift out when unplugged. 4. Cast-iron and coated cast-iron cookware are cool before ...Use medium- Lower the inside edge of them or store other materials on the bottom. To install the module, position the plug to remove the module. 2. This could damage the surface of the cooktop. 2. Always read and follow cookware manufacturer's instructions on cookware use. Aluminum cookware conducts heat faster...
Use and Care Manual
Page 12
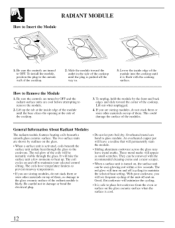
...the surface is likely. If you will turn on and off to prevent runaway temperatures. • If you are turned to damage or bend the electrical plug. • Do not let pots boil dry. This could damage the surface of them . General Information About Radiant Modules The radiant module ...to maintain the selected heat setting. To unplug, hold the module by outlines on and off (cycling) to the glass ceramic surface of the cooktop. 2. To install the module, position the plug to Remove the Module 1. How to the outside wall of the radiant module is cool. 12 The coil cycles...
...the surface is likely. If you will turn on and off to prevent runaway temperatures. • If you are turned to damage or bend the electrical plug. • Do not let pots boil dry. This could damage the surface of them . General Information About Radiant Modules The radiant module ...to maintain the selected heat setting. To unplug, hold the module by outlines on and off (cycling) to the glass ceramic surface of the cooktop. 2. To install the module, position the plug to Remove the Module 1. How to the outside wall of the radiant module is cool. 12 The coil cycles...
Use and Care Manual
Page 28
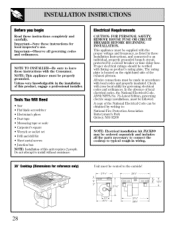
... necessary to connect the cooktop to install without assistance. 30" Cooktop (Dimensions for governing electrical codes and ordinances. Do not attempt to typical rough-in wiring. This appliance must be supplied with the proper w)ltage and frequency, as listed in these Installation Instructions, and connected to... • Wrench or socket set • Drill and drill bit • Sheet metal screws • Junction box NOTE: Installation of the National Electrical Code can be verified with local codes and properly insulated. The rating plate is located on product's rating plate. A copy...
... necessary to connect the cooktop to install without assistance. 30" Cooktop (Dimensions for governing electrical codes and ordinances. Do not attempt to typical rough-in wiring. This appliance must be supplied with the proper w)ltage and frequency, as listed in these Installation Instructions, and connected to... • Wrench or socket set • Drill and drill bit • Sheet metal screws • Junction box NOTE: Installation of the National Electrical Code can be verified with local codes and properly insulated. The rating plate is located on product's rating plate. A copy...
Use and Care Manual
Page 29
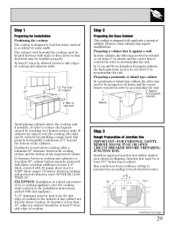
... be cut down 5" to look best when centered in order to local electrical codes. (continued next page) 29 EXCEPTION: Installation of any cabinet not directly above cooktop, allow a minimum 30" clearance between side edges of cooMop. Run conductors from residence wiring to ...junction box according to reduce the hazards caused by installing a range hood that projects horizontally a ...
... be cut down 5" to look best when centered in order to local electrical codes. (continued next page) 29 EXCEPTION: Installation of any cabinet not directly above cooktop, allow a minimum 30" clearance between side edges of cooMop. Run conductors from residence wiring to ...junction box according to reduce the hazards caused by installing a range hood that projects horizontally a ...
Use and Care Manual
Page 30
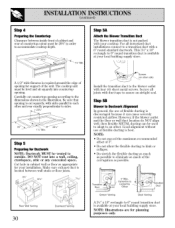
... transition duct is cut countertop opening according to the dimensions shown in the illustration. Be sure that opening is available at your installation. Step 5B Blower to Ductwork Alignment In general, the use of flexible ducting is best. Good alignment without use of flexible ducting...as much of the unit. NOTE: Illustrations are for your local building supply store. The cooktop unit must be used to adapt to an offset. Secure all downward duct installations connect to a transition duct with your local building supply store. However, if the blower outlet...
... transition duct is cut countertop opening according to the dimensions shown in the illustration. Be sure that opening is available at your installation. Step 5B Blower to Ductwork Alignment In general, the use of flexible ducting is best. Good alignment without use of flexible ducting...as much of the unit. NOTE: Illustrations are for your local building supply store. The cooktop unit must be used to adapt to an offset. Secure all downward duct installations connect to a transition duct with your local building supply store. However, if the blower outlet...
Use and Care Manual
Page 31
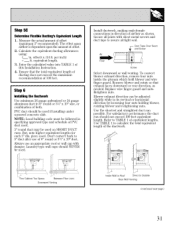
... cap with sheet metal screws and duct tape to assure airtight seal. equivalent length. 3. Measure the actual amount of this Installation Instruction. 4. Step 6 Installing the Ductwork Use minimum 26 gauge galvanized or 24 gauge aluminum duct in . Calculate the equivalent ducting allowances using: (___ ...of the ductwork. per inch) = ___ ft. Air Duct Tape Over Seam -and Screw Screw Select downward or wall venting. Install ductwork, making male-female connections in its vertical or horizontal direction by loosening four nuts holding blower, rotating blower and retightening nuts...
... cap with sheet metal screws and duct tape to assure airtight seal. equivalent length. 3. Measure the actual amount of this Installation Instruction. 4. Step 6 Installing the Ductwork Use minimum 26 gauge galvanized or 24 gauge aluminum duct in . Calculate the equivalent ducting allowances using: (___ ...of the ductwork. per inch) = ___ ft. Air Duct Tape Over Seam -and Screw Screw Select downward or wall venting. Install ductwork, making male-female connections in its vertical or horizontal direction by loosening four nuts holding blower, rotating blower and retightening nuts...
Use and Care Manual
Page 32
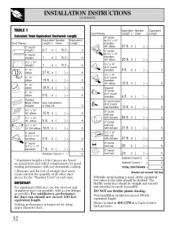
... used , all other duct pieces for good venting performance with as few fittings as possible. For satisfactory performance, the duct run possible, with any downdraSt cooktop. X ( )= ft. 31/4" X 10" to 31/4"x 10" transition 7 ft. x ( )= ft. 5" round wall cap 84 ft. wall... in Step 5A ft. 3910/°4"exlb1o0w" 16 ft. X ( )= ft. The flexible metal duct should not exceed 100 feet equivalent length. Vent installation should be straight and smooth and extended as much as possible. xit1io0n , 90° elbow 12 ft. X ( )= ft. (_ 5", 90°...
... used , all other duct pieces for good venting performance with as few fittings as possible. For satisfactory performance, the duct run possible, with any downdraSt cooktop. X ( )= ft. 31/4" X 10" to 31/4"x 10" transition 7 ft. x ( )= ft. 5" round wall cap 84 ft. wall... in Step 5A ft. 3910/°4"exlb1o0w" 16 ft. X ( )= ft. The flexible metal duct should not exceed 100 feet equivalent length. Vent installation should be straight and smooth and extended as much as possible. xit1io0n , 90° elbow 12 ft. X ( )= ft. (_ 5", 90°...
Use and Care Manual
Page 33
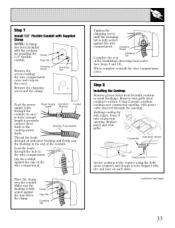
...the clamping tab is fully seated against the wire compartment. Step 8 Installing the Cool(lop Remove grease jar(s) from cooktop's surface. Remove vent grille from beneath cooktop to avoid breakage. Using 2 people, position cooktop over the conduit. Countertop Hold down retainer _Slot T llu,.nb._c...; etbnheoeusguhre _I'. Holding cooMop by side edges, lower it into countertop opening , with the cooktop for installing the 1/2" flexible conduit. Place the clamp over countertop opening . Remove the Clamp StopTab5-I U_ ° wire compartment. _ \ !...
...the clamping tab is fully seated against the wire compartment. Step 8 Installing the Cool(lop Remove grease jar(s) from cooktop's surface. Remove vent grille from beneath cooktop to avoid breakage. Using 2 people, position cooktop over the conduit. Countertop Hold down retainer _Slot T llu,.nb._c...; etbnheoeusguhre _I'. Holding cooMop by side edges, lower it into countertop opening , with the cooktop for installing the 1/2" flexible conduit. Place the clamp over countertop opening . Remove the Clamp StopTab5-I U_ ° wire compartment. _ \ !...
Use and Care Manual
Page 40
...pay to ship the product to the service shop or for providing adequate electrical, gas, exhausting and other connecting facilities as described in the Installation Instructions provided with the product. • Damage to the glass cooktop caused by hardened spills of God. • Incidental or consequential damage ... warranty period or beyond, call 800,GE.CARES (800.432,2737). All warranty service will provide, free of charge, parts and service labor in your home to repair or replace the glass cooktop due to: • Cracking of the glass cooktop due to thermal shock • Discoloration...
...pay to ship the product to the service shop or for providing adequate electrical, gas, exhausting and other connecting facilities as described in the Installation Instructions provided with the product. • Damage to the glass cooktop caused by hardened spills of God. • Incidental or consequential damage ... warranty period or beyond, call 800,GE.CARES (800.432,2737). All warranty service will provide, free of charge, parts and service labor in your home to repair or replace the glass cooktop due to: • Cracking of the glass cooktop due to thermal shock • Discoloration...

