Use and Care Manual
Page 1
... Modular Downdraft Cooktop Safety Instructions 4, 5 _---_ Problem Solver 35, 36 Operating Instructions, Tips Coil Surface Unit Module 10, 11 _/_ iii I Controls 9 Cooktop Comparison 8 Cooktop Vent System 22 Features 6, 7 Griddle Accessory 18-20 Griddle Cooking Guide 20 Grill Module 14-17 Grill Cooking Guide 17 Home Canning Tips 21 Radiant Module 12-14 Installation Instructions 28-34 Consumer Services 39 Important Phone Numbers 39 Model and Serial Numbers 2 Modules and Accessories 3 Warranty Back Cover Care and ALm ;teanmmg 23-27 Coil Surface Unit Module...
... Modular Downdraft Cooktop Safety Instructions 4, 5 _---_ Problem Solver 35, 36 Operating Instructions, Tips Coil Surface Unit Module 10, 11 _/_ iii I Controls 9 Cooktop Comparison 8 Cooktop Vent System 22 Features 6, 7 Griddle Accessory 18-20 Griddle Cooking Guide 20 Grill Module 14-17 Grill Cooking Guide 17 Home Canning Tips 21 Radiant Module 12-14 Installation Instructions 28-34 Consumer Services 39 Important Phone Numbers 39 Model and Serial Numbers 2 Modules and Accessories 3 Warranty Back Cover Care and ALm ;teanmmg 23-27 Coil Surface Unit Module...
Use and Care Manual
Page 2
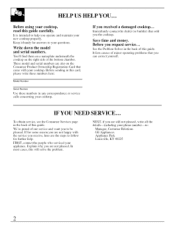
... your cooktop. or service If you are also on the right side of this guide. Before sending in this card, please write these numbers here: Model Number Serial Number Use these numbers in the back of the bottom chamber. NEXT, if you received a damaged cooktop... In most cases, this guide carefully. HELP US HELP YOU... Before using your cooktop, read this will solve the problem. You...
... your cooktop. or service If you are also on the right side of this guide. Before sending in this card, please write these numbers here: Model Number Serial Number Use these numbers in the back of the bottom chamber. NEXT, if you received a damaged cooktop... In most cases, this guide carefully. HELP US HELP YOU... Before using your cooktop, read this will solve the problem. You...
Use and Care Manual
Page 3
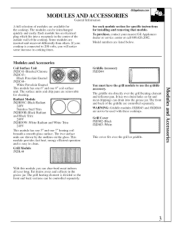
... cooktop. The modules can be interchanged quickly and easily. Model numbers are removable for installing and removing that module. Black Porcelain Enamel JXDC44- To purchase, contact your cooktop is connected to 208 volts, you can drain into a receptacle in the grease jar. The grill heating element is easy to use the griddle accessory. Radiant Module JXDR. 0C-Black Radiant 240V Stainless Steel Trim JXDR50B-Black Radiant and Black Trim 240V JXDR50W-White Radiant 240V and White Trim This module...
... cooktop. The modules can be interchanged quickly and easily. Model numbers are removable for installing and removing that module. Black Porcelain Enamel JXDC44- To purchase, contact your cooktop is connected to 208 volts, you can drain into a receptacle in the grease jar. The grill heating element is easy to use the griddle accessory. Radiant Module JXDR. 0C-Black Radiant 240V Stainless Steel Trim JXDR50B-Black Radiant and Black Trim 240V JXDR50W-White Radiant 240V and White Trim This module...
Use and Care Manual
Page 4
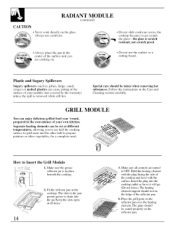
... your appliance is specifically recommended in operation. reflector pan, grill or griddle. gasoline or other appliance. • Do not use aluminum foil to operate all instructions before using a multi-purpose dry chemical or foam type fire extinguisher. • Do not heat unopened food containers. cookie sheet or flat tray. Potentially hot surfaces include the cooktop, removable modules, accessories and areas facing the cooktop. • Cook meat and poultry thoroughlyimeat...
... your appliance is specifically recommended in operation. reflector pan, grill or griddle. gasoline or other appliance. • Do not use aluminum foil to operate all instructions before using a multi-purpose dry chemical or foam type fire extinguisher. • Do not heat unopened food containers. cookie sheet or flat tray. Potentially hot surfaces include the cooktop, removable modules, accessories and areas facing the cooktop. • Cook meat and poultry thoroughlyimeat...
Use and Care Manual
Page 5
... steps Should control the flame until the fat is cool • Use a deep fat thermometer whenever possible to on radiant modules only). • Use care when touching the cooktop. then turn the grill off before removing cookware • Never clean the cooktop surface when it is hot. If it eventually goes out. If clogged, a fke can cause hot fat to remove a coil surface unit or a module. • Never leave the kitchen...
... steps Should control the flame until the fat is cool • Use a deep fat thermometer whenever possible to on radiant modules only). • Use care when touching the cooktop. then turn the grill off before removing cookware • Never clean the cooktop surface when it is hot. If it eventually goes out. If clogged, a fke can cause hot fat to remove a coil surface unit or a module. • Never leave the kitchen...
Use and Care Manual
Page 8
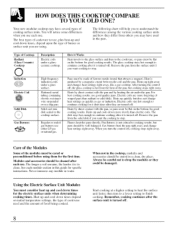
... turned off . Gas burners heat the pan right away and change heat settings as quickly as gas or induction. See each use , plus heat-up and cool down times, depend upon the type of burner or surface unit you tuna the control off , the glass cooMop is hot from the surface unit if you w_mtthe cooking to use . Type of warped p_ms them electric coils. Remove the pan from others you use either LP gas or natural gas. Your new modular cooktop...
... turned off . Gas burners heat the pan right away and change heat settings as quickly as gas or induction. See each use , plus heat-up and cool down times, depend upon the type of burner or surface unit you tuna the control off , the glass cooMop is hot from the surface unit if you w_mtthe cooking to use . Type of warped p_ms them electric coils. Remove the pan from others you use either LP gas or natural gas. Your new modular cooktop...
Use and Care Manual
Page 12
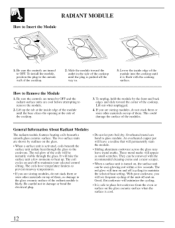
... maintain your selected control setting. RADIANT MODULE How to glass module. It will see frequent cycling of the cooktop. 3. To install the module, position the plug to heat up the tab at the side of the unit off (cycling) to damage or bend the electrical plug. • Do not let pots boil dry. The coil cycles on the glass ceramic surface when the surface is turned on . This...
... maintain your selected control setting. RADIANT MODULE How to glass module. It will see frequent cycling of the cooktop. 3. To install the module, position the plug to heat up the tab at the side of the unit off (cycling) to damage or bend the electrical plug. • Do not let pots boil dry. The coil cycles on the glass ceramic surface when the surface is turned on . This...
Use and Care Manual
Page 14
... with the surface. Hold the heating element with the plug facing the side of the surface unit you to use the surface as a cutting board. Plastic and Sugary Spillovers Sugary spillovers (such as it can be set at all controls m'e tumed to Insert the Grill Module 1. Make sure all times. 14 3. How to OFF. Always use cookware. • Do not slide cookware across the cooktop because...
... with the surface. Hold the heating element with the plug facing the side of the surface unit you to use the surface as a cutting board. Plastic and Sugary Spillovers Sugary spillovers (such as it can be set at all controls m'e tumed to Insert the Grill Module 1. Make sure all times. 14 3. How to OFF. Always use cookware. • Do not slide cookware across the cooktop because...
Use and Care Manual
Page 15
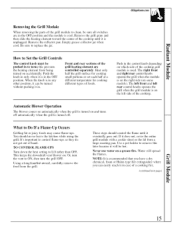
... cooktop grill module is turned off. NOTE: It is in the control knob depending on and turns off automatically when the grill is used. GEAppliances.com Removing the Grill Module When removing the parts of the grill module to clean, be sure all switches are controlled separately. Push in the OFF position. TO CONTROL FLAME-UPS Turn down the heat setting to replace the jar. The left front and left rear control knobs operate the grill when the grill module...
... cooktop grill module is turned off. NOTE: It is in the control knob depending on and turns off automatically when the grill is used. GEAppliances.com Removing the Grill Module When removing the parts of the grill module to clean, be sure all switches are controlled separately. Push in the OFF position. TO CONTROL FLAME-UPS Turn down the heat setting to replace the jar. The left front and left rear control knobs operate the grill when the grill module...
Use and Care Manual
Page 16
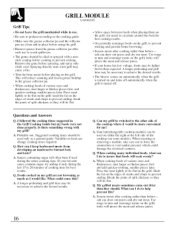
... jar and the reflector pan are not browning as much as a general guide. What can change cooking times required. I do to turn and rearrange meats on the grill. This will pierce the meat and release juices. Use tongs to prevent sticking. meats from meats before spraying, and spray only while cool. When cooking foods of various sizes and thicknesses, start larger...
... jar and the reflector pan are not browning as much as a general guide. What can change cooking times required. I do to turn and rearrange meats on the grill. This will pierce the meat and release juices. Use tongs to prevent sticking. meats from meats before spraying, and spray only while cool. When cooking foods of various sizes and thicknesses, start larger...
Use and Care Manual
Page 18
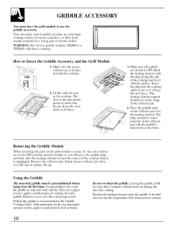
... switches are turned to Insert the Griddle Accessory and the Grill Module 1. The slots in the Griddle Cooking Guide. Place the griddle plate on the reflector pan over the heating element. Preheat the griddle as it will go. (Do not force.) The heating element support should be seated properly on the ledge of the front and rear sections. To precondition, fii_t wash the griddle in the cooktop. Hold the heating element...
... switches are turned to Insert the Griddle Accessory and the Grill Module 1. The slots in the Griddle Cooking Guide. Place the griddle plate on the reflector pan over the heating element. Preheat the griddle as it will go. (Do not force.) The heating element support should be seated properly on the ledge of the front and rear sections. To precondition, fii_t wash the griddle in the cooktop. Hold the heating element...
Use and Care Manual
Page 20
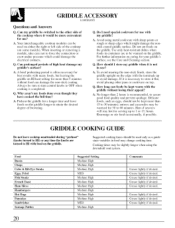
... be switched to attain the desired degree of the cooktop (on caring for serving up to store it flat, avoid placing other side of high heat damage my griddle's surface? Suggested cooking times should be sure to turn control knobs to OFF when cooking is not in containers are tnrned to HI with the terminals up to force the connection or exert undue pressure...
... be switched to attain the desired degree of the cooktop (on caring for serving up to store it flat, avoid placing other side of high heat damage my griddle's surface? Suggested cooking times should be sure to turn control knobs to OFF when cooking is not in containers are tnrned to HI with the terminals up to force the connection or exert undue pressure...

Use and Care Manual
Page 23
... after cleaning, spread a thin film of the panel while cleaning. Rinse well. The control knobs may be removed for your cooktop will give you efficient and satisfactory service. GEAppliances.com Porcelain Enamel Finish (onsomemodels) The porcelain enamel finish is sturdy but do not soak. Clean the control panel with a plastic or soap-filled scouring pad and hot soapy water. Follow these directions carefully in...
... after cleaning, spread a thin film of the panel while cleaning. Rinse well. The control knobs may be removed for your cooktop will give you efficient and satisfactory service. GEAppliances.com Porcelain Enamel Finish (onsomemodels) The porcelain enamel finish is sturdy but do not soak. Clean the control panel with a plastic or soap-filled scouring pad and hot soapy water. Follow these directions carefully in...
Use and Care Manual
Page 25
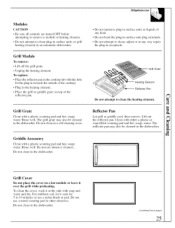
... Pan Let grill or griddle cool, then remove. Do not clean in the dishwasher. Grill Module To remove: • Lift off the grill grate. • Unplug the heating element. GEAppliances.com Modules CAUTION • Be sure all controls are turned OFF before attempting to remove a module or heating element. • Do not attempt to 10 minutes or use a nylon brush or pad. The grill grate may also be cleaned in a self-cleaning oven. Do not clean...
... Pan Let grill or griddle cool, then remove. Do not clean in the dishwasher. Grill Module To remove: • Lift off the grill grate. • Unplug the heating element. GEAppliances.com Modules CAUTION • Be sure all controls are turned OFF before attempting to remove a module or heating element. • Do not attempt to 10 minutes or use a nylon brush or pad. The grill grate may also be cleaned in a self-cleaning oven. Do not clean...
Use and Care Manual
Page 27
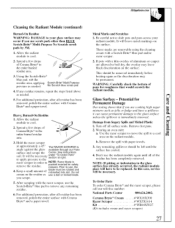
... ®blue pad to the glass smface unless the spillover is immediately removed. Razor Scraper Kit # WX 10X300 # WXSX1614 # WB64X5027 (Kit includes cream and razor scraper) 27 GEAppliances.com Cleaning the Radiant Module (continued) Burned-On Residue WARNING: DAMAGE to be replaced. Using the Scotch-Brite blue pad, rub the residue area, applying pressure as needed . ® Scotch-Brite _ Multi-Purpose...
... ®blue pad to the glass smface unless the spillover is immediately removed. Razor Scraper Kit # WX 10X300 # WXSX1614 # WB64X5027 (Kit includes cream and razor scraper) 27 GEAppliances.com Cleaning the Radiant Module (continued) Burned-On Residue WARNING: DAMAGE to be replaced. Using the Scotch-Brite blue pad, rub the residue area, applying pressure as needed . ® Scotch-Brite _ Multi-Purpose...
Use and Care Manual
Page 28
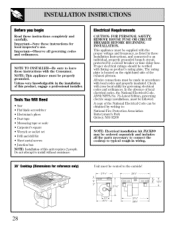
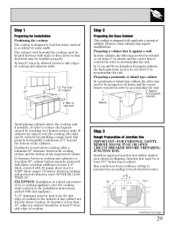
... knowledgeable in wiring. A copy of the exhaust plenum. all the parts necessary to connect the cooktop to typical rough-in the installation of this product, engage a professional installer. The rating plate is located on product's rating plate. In the absence of local electrical codes, the National Electrical Code, ANSI/NFPA No. 70-Latest Edition, governing electric range installations, must be vented to install without assistance. 30" Cooktop (Dimensions for codes NOTE TO INSTALLER--Be sure...
... knowledgeable in wiring. A copy of the exhaust plenum. all the parts necessary to connect the cooktop to typical rough-in the installation of this product, engage a professional installer. The rating plate is located on product's rating plate. In the absence of local electrical codes, the National Electrical Code, ANSI/NFPA No. 70-Latest Edition, governing electric range installations, must be vented to install without assistance. 30" Cooktop (Dimensions for codes NOTE TO INSTALLER--Be sure...
Use and Care Manual
Page 29
... adjacent walls. 1/2" Flat area 30" _ for support 6" Min. If clearance is used above cooktop, allow a minimum 30" clearance between wall studs or floor joists so that is less than 15% adjacent cabinets should be protected with flame retardant millboard at least 1/4" thick, covered with that projects horizontally a minimum of 5" beyond the bottom of the cabinets. Step 3 Rough Preparation of Junction Box IMPORTANT--FOR PERSONAL SAFETY, REMOVE HOUSE FUSE OR OPEN CIRCUIT BREAKER...
... adjacent walls. 1/2" Flat area 30" _ for support 6" Min. If clearance is used above cooktop, allow a minimum 30" clearance between wall studs or floor joists so that is less than 15% adjacent cabinets should be protected with flame retardant millboard at least 1/4" thick, covered with that projects horizontally a minimum of 5" beyond the bottom of the cabinets. Step 3 Rough Preparation of Junction Box IMPORTANT--FOR PERSONAL SAFETY, REMOVE HOUSE FUSE OR OPEN CIRCUIT BREAKER...
Use and Care Manual
Page 33
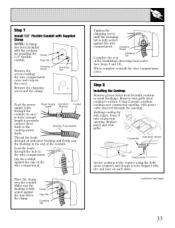
... the clamp over countertop opening . Clamp Stop Tab Clamping Tab Tighten the clamping screw until the clamping tab is fully seated against the side of the installation observing local (see Steps 9 and 10). Remove vent grille from beneath cooktop to avoid breakage. Step 8 Installing the Cool(lop Remove grease jar(s) from cooktop's surface. Replace jar(s) and vent grille. etbnheoeusguhre _I'. codes When complete reinstall the wire compartment cover.
... the clamp over countertop opening . Clamp Stop Tab Clamping Tab Tighten the clamping screw until the clamping tab is fully seated against the side of the installation observing local (see Steps 9 and 10). Remove vent grille from beneath cooktop to avoid breakage. Step 8 Installing the Cool(lop Remove grease jar(s) from cooktop's surface. Replace jar(s) and vent grille. etbnheoeusguhre _I'. codes When complete reinstall the wire compartment cover.
Use and Care Manual
Page 35
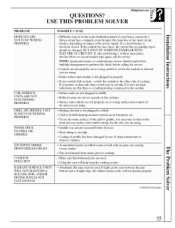
... side of cooktop. _o If it does not heat. If. If light can be in the main distribution panel of your house, caused by use the entire surface of these procedures. _o the fuse blows or circuit breaker trips again, call fbr service. If a circuit breaker is involved, reset it is too high. • Coating of the power supply. after performing 1 of the grill or griddle, it...
... side of cooktop. _o If it does not heat. If. If light can be in the main distribution panel of your house, caused by use the entire surface of these procedures. _o the fuse blows or circuit breaker trips again, call fbr service. If a circuit breaker is involved, reset it is too high. • Coating of the power supply. after performing 1 of the grill or griddle, it...
Use and Care Manual
Page 40
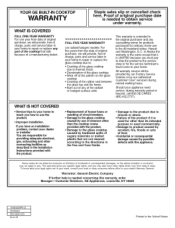
... it is needed to obtain service under warranty. All warranty service will provide, free of charge, parts and service labor in your home to repair or replace any of circuit breakers. • Damage to the glass cooktop caused by possible defects with the product. • Replacement of house fuses or resetting of the radiant or halogen surface units, This warranty is needed concerning this appliance. If you . YOUR GE BUILT-IN COOKTOP WARRANTY Staple sales...
... it is needed to obtain service under warranty. All warranty service will provide, free of charge, parts and service labor in your home to repair or replace any of circuit breakers. • Damage to the glass cooktop caused by possible defects with the product. • Replacement of house fuses or resetting of the radiant or halogen surface units, This warranty is needed concerning this appliance. If you . YOUR GE BUILT-IN COOKTOP WARRANTY Staple sales...


