Use and Care Manual
Page 1
...7 Sealed Gas Burners 7 Care and Cleaning Burners and Cooktop Electrodes 10 Burner Bases 10 Burner Caps and Heads . . . . . .10 Burner Grates 11 Burner Head and Cap Replacement 11 Control Knobs 9 Electrodes 10 Glass Cooktop 12, 13 Porcelain Enamel Cooktop . . . .9 Shipping Film and Tape 9 Stainless Steel Surfaces 9 Troubleshooting Tips . . . .14, 15 Consumer Support Consumer Support 22 Ownership Registration for Customers in Canada only 17, 18 Warranty (Canada 21 Warranty (U.S 20 In Canada: www.GEAppliances.ca Printed in the United States Write the model and serial numbers here...
...7 Sealed Gas Burners 7 Care and Cleaning Burners and Cooktop Electrodes 10 Burner Bases 10 Burner Caps and Heads . . . . . .10 Burner Grates 11 Burner Head and Cap Replacement 11 Control Knobs 9 Electrodes 10 Glass Cooktop 12, 13 Porcelain Enamel Cooktop . . . .9 Shipping Film and Tape 9 Stainless Steel Surfaces 9 Troubleshooting Tips . . . .14, 15 Consumer Support Consumer Support 22 Ownership Registration for Customers in Canada only 17, 18 Warranty (Canada 21 Warranty (U.S 20 In Canada: www.GEAppliances.ca Printed in the United States Write the model and serial numbers here...
Use and Care Manual
Page 3
... is specifically recommended in accordance with natural gas. Any adjustment and service should the packaging material ignite. ■ Be sure your cooktop is your cooktop unless it off valve and how to repair or replace any part of the home electrical system, it with LP (bottled) gas unless you the location of the cooktop gas shut-off if necessary. ■ Have your cooktop installed and properly grounded by venting with your cooktop...
... is specifically recommended in accordance with natural gas. Any adjustment and service should the packaging material ignite. ■ Be sure your cooktop is your cooktop unless it off valve and how to repair or replace any part of the home electrical system, it with LP (bottled) gas unless you the location of the cooktop gas shut-off if necessary. ■ Have your cooktop installed and properly grounded by venting with your cooktop...
Use and Care Manual
Page 5
... use a wok on the cooktop- Never use the LITE position when igniting the top burners and make sure the burners have ignited. ■ Never leave the surface burners unattended at the off the gas to the vent. ■ Keep all grates are unstable or easily tipped. This will increase pressure in frying, stir together before removing cookware. ■ Carefully watch foods being fried at a high flame setting. ■ Always heat...
... use a wok on the cooktop- Never use the LITE position when igniting the top burners and make sure the burners have ignited. ■ Never leave the surface burners unattended at the off the gas to the vent. ■ Keep all grates are unstable or easily tipped. This will increase pressure in frying, stir together before removing cookware. ■ Carefully watch foods being fried at a high flame setting. ■ Always heat...
Use and Care Manual
Page 6
... the cooktop knobs. NOTE: We recommend that you wish to use your cooktop. ■ Don't use a dry cloth or paper towel to operate only with Natural Gas. Sugar spills are the exception to line burner bowls. Some cleaners produce noxious fumes and wet cloths could result in this . SURFACE BURNERS Adjust the top burner flame size so it is hazardous. ■ Clean the cooktop surface with your cooktop. Cooking to...
... the cooktop knobs. NOTE: We recommend that you wish to use your cooktop. ■ Don't use a dry cloth or paper towel to operate only with Natural Gas. Sugar spills are the exception to line burner bowls. Some cleaners produce noxious fumes and wet cloths could result in this . SURFACE BURNERS Adjust the top burner flame size so it is hazardous. ■ Clean the cooktop surface with your cooktop. Cooking to...
Use and Care Manual
Page 7
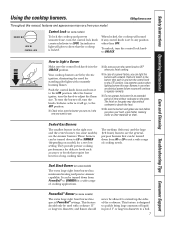
... use . ■ Be sure you turn on some models) are cool before you finish cooking. ■ In case of cooking needs. To turn the burner off, turn the control lock knob to adjust the flame size. GEAppliances.com Throughout this way. An indicator light will continue to the LITE position. then push in the UNLOCK position. The medium (left rear) and the large (left front) burners are lit by electric ignition...
... use . ■ Be sure you turn on some models) are cool before you finish cooking. ■ In case of cooking needs. To turn the burner off, turn the control lock knob to adjust the flame size. GEAppliances.com Throughout this way. An indicator light will continue to the LITE position. then push in the UNLOCK position. The medium (left rear) and the large (left front) burners are lit by electric ignition...
Use and Care Manual
Page 8
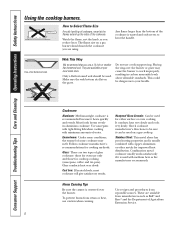
... not use a 14-inch or smaller flat-bottomed wok. Enamelware: Under some cookware may cause the burner to heat the handle. Glass conducts heat very slowly. It conducts heat very slowly and cools very slowly. Consumer Support Troubleshooting Tips Care and Cleaning Operating Instructions Safety Instructions Using the cooktop burners. These are available at your health. Wok This Way We recommend that you reduce heat. Heatproof Glass-Ceramic: Can be used for cooktop cooking...
... not use a 14-inch or smaller flat-bottomed wok. Enamelware: Under some cookware may cause the burner to heat the handle. Glass conducts heat very slowly. It conducts heat very slowly and cools very slowly. Consumer Support Troubleshooting Tips Care and Cleaning Operating Instructions Safety Instructions Using the cooktop burners. These are available at your health. Wok This Way We recommend that you reduce heat. Heatproof Glass-Ceramic: Can be used for cooktop cooking...
Use and Care Manual
Page 9
.... To clean the stainless steel surface, use a dry paper towel or cloth to remain on some models) Do not use any part of the cooktop. NOTE: The adhesive must be removed for cleaning. Make sure the insides of the film before cleaning any sharp items to remove the adhesive left from packaging tape on . Rinse well. Rinse well. GEAppliances.com Be sure electrical power is sturdy...
.... To clean the stainless steel surface, use a dry paper towel or cloth to remain on some models) Do not use any part of the cooktop. NOTE: The adhesive must be removed for cleaning. Make sure the insides of the film before cleaning any sharp items to remove the adhesive left from packaging tape on . Rinse well. Rinse well. GEAppliances.com Be sure electrical power is sturdy...
Use and Care Manual
Page 10
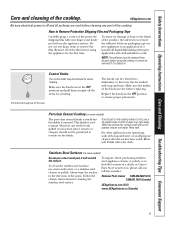
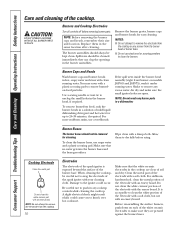
... cleaning the cooktop, be cleaned immediately; Make sure that no water gets into the burner bases and the brass gas orifices. Consumer Support Troubleshooting Tips Care and Cleaning Operating Instructions Safety Instructions Care and cleaning of the spark igniter with your cleaning cloth. CAUTION: DO NOT OPERATE A BURNER WITHOUT ALL BURNER PARTS IN PLACE. Spillovers should be careful not to clean the white portion of the electrode with an emery board. Remove the burner grates, burner caps and burner heads...
... cleaning the cooktop, be cleaned immediately; Make sure that no water gets into the burner bases and the brass gas orifices. Consumer Support Troubleshooting Tips Care and Cleaning Operating Instructions Safety Instructions Care and cleaning of the spark igniter with your cleaning cloth. CAUTION: DO NOT OPERATE A BURNER WITHOUT ALL BURNER PARTS IN PLACE. Spillovers should be careful not to clean the white portion of the electrode with an emery board. Remove the burner grates, burner caps and burner heads...
Use and Care Manual
Page 13
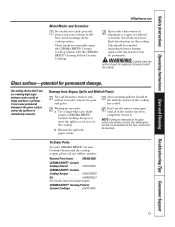
... residue has been completely removed. CERAMA BRYTE® Ceramic Cooktop Cleaner WX10X300 CERAMA BRYTE® Ceramic Cooktop Scraper WX10X0302 Kit WB64X5027 (Kit includes cream and cooktop scraper) CERAMA BRYTE® Cleaning Pads for roughness that if you are removable using the CERAMA BRYTE® Ceramic Cooktop Cleaner with paper towels. If pots with an oven mitt, remove hot pans and grates. WARNING: Carefully check the bottom of aluminum or copper are...
... residue has been completely removed. CERAMA BRYTE® Ceramic Cooktop Cleaner WX10X300 CERAMA BRYTE® Ceramic Cooktop Scraper WX10X0302 Kit WB64X5027 (Kit includes cream and cooktop scraper) CERAMA BRYTE® Cleaning Pads for roughness that if you are removable using the CERAMA BRYTE® Ceramic Cooktop Cleaner with paper towels. If pots with an oven mitt, remove hot pans and grates. WARNING: Carefully check the bottom of aluminum or copper are...
Use and Care Manual
Page 14
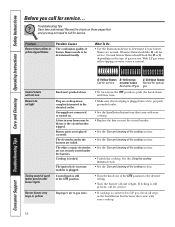
... for service... Improper air to gas ratio. • If cooktop is connected to LP gas, check all steps in your cooktop. • Replace the fuse or reset the circuit breaker. • See the Care and cleaning of the cooktop section. • See the Care and cleaning of the cooktop section. • See the Care and cleaning of the cooktop section. Burner parts not replaced correctly. Control knobs will not turn Burners do not light Ticking sound of burner flames needs to call for service. Troubleshooting...
... for service... Improper air to gas ratio. • If cooktop is connected to LP gas, check all steps in your cooktop. • Replace the fuse or reset the circuit breaker. • See the Care and cleaning of the cooktop section. • See the Care and cleaning of the cooktop section. • See the Care and cleaning of the cooktop section. Burner parts not replaced correctly. Control knobs will not turn Burners do not light Ticking sound of burner flames needs to call for service. Troubleshooting...
Use and Care Manual
Page 20
... warranty. EXCLUSION OF IMPLIED WARRANTIES-Your sole and exclusive remedy is needed to state. For The Period Of: GE Will Replace: One Year From the date of the original purchase Any part of the original purchase date is product repair as provided in an area where service by law. During this Limited Warranty. Consumer Support Troubleshooting Tips Care and Cleaning Operating Instructions Safety Instructions GE Gas Cooktop Warranty. (For Customers...
... warranty. EXCLUSION OF IMPLIED WARRANTIES-Your sole and exclusive remedy is needed to state. For The Period Of: GE Will Replace: One Year From the date of the original purchase Any part of the original purchase date is product repair as provided in an area where service by law. During this Limited Warranty. Consumer Support Troubleshooting Tips Care and Cleaning Operating Instructions Safety Instructions GE Gas Cooktop Warranty. (For Customers...
Use and Care Manual
Page 21
... purpose, are in Canada) All warranty service provided by Mabe to the original purchaser and any succeeding owner for service. This warranty gives you specific legal rights, and you may not apply to you how to obtain service under the warranty. Proof of the product if it is needed to use within Canada. Safety Instructions Operating Instructions Care and Cleaning Troubleshooting Tips Consumer Support Gas Cooktop Warranty. (For Customers in your province...
... purpose, are in Canada) All warranty service provided by Mabe to the original purchaser and any succeeding owner for service. This warranty gives you specific legal rights, and you may not apply to you how to obtain service under the warranty. Proof of the product if it is needed to use within Canada. Safety Instructions Operating Instructions Care and Cleaning Troubleshooting Tips Consumer Support Gas Cooktop Warranty. (For Customers in your province...
Installation Instructions
Page 1
... our Website at the main circuit breaker or fuse box before installing. Installation and service must be properly grounded. • IMPORTANT - This appliance must be performed by a qualified installer or service technician. • To eliminate reaching over surface burners, cabinet storage above burner should be the T-handle type. • A flexible gas connector, when used, must conform with local codes or, in this cooktop must not exceed 3 feet. If...
... our Website at the main circuit breaker or fuse box before installing. Installation and service must be properly grounded. • IMPORTANT - This appliance must be performed by a qualified installer or service technician. • To eliminate reaching over surface burners, cabinet storage above burner should be the T-handle type. • A flexible gas connector, when used, must conform with local codes or, in this cooktop must not exceed 3 feet. If...

Installation Instructions
Page 2
... Standard, Title 24 CFR, Part 3280. Washington, D.C. 24010 PARTS INCLUDED 2 Screws Foam Tape (Glass Top Models Only) 2 Hold Down Brackets MATERIALS YOU MAY NEED Joint Sealant Pipe Fittings Shut Off Valve CSA-Approved Flexible Gas Line 3/8″ Min. We recommend you where your main cooktop disconnect is located. After installation, have the electrician show you have the electrical wiring and hookup of your cooktop connected by Writing: Office of Mobile...
... Standard, Title 24 CFR, Part 3280. Washington, D.C. 24010 PARTS INCLUDED 2 Screws Foam Tape (Glass Top Models Only) 2 Hold Down Brackets MATERIALS YOU MAY NEED Joint Sealant Pipe Fittings Shut Off Valve CSA-Approved Flexible Gas Line 3/8″ Min. We recommend you where your main cooktop disconnect is located. After installation, have the electrician show you have the electrical wiring and hookup of your cooktop connected by Writing: Office of Mobile...

Installation Instructions
Page 3
... with each other. (See section on electrical requirements.) F When installing your home, make sure the inside of the cooktop. Be sure to 200°F) generated by the cooktop. 3 G Make sure the wall coverings, countertop and cabinets around the cooktop can withstand heat (up to place all local codes and ordinances are followed exactly as stated. Literature Package Grate boxes Foam Packaging Cooktop C Remove Installation Instructions from the cooktop before beginning...
... with each other. (See section on electrical requirements.) F When installing your home, make sure the inside of the cooktop. Be sure to 200°F) generated by the cooktop. 3 G Make sure the wall coverings, countertop and cabinets around the cooktop can withstand heat (up to place all local codes and ordinances are followed exactly as stated. Literature Package Grate boxes Foam Packaging Cooktop C Remove Installation Instructions from the cooktop before beginning...
Installation Instructions
Page 5
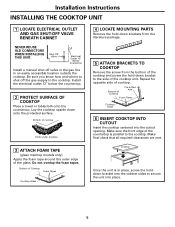
... into the cutout opening. Do not overlap the foam tapes. Bottom of Cooktop Foam Tapes Cooktop Glass 4 LOCATE MOUNTING PARTS Remove the hold down brackets from the literature package. 5 ATTACH BRACKETS TO COOKTOP Remove the screw from the bottom of the cooktop unit. Bottom of the countertop is in an easily accessible location outside the cooktop. Cooktop Once the unit is parallel to the cooktop. Installation Instructions INSTALLING THE COOKTOP UNIT 1 LOCATE ELECTRICAL OUTLET AND GAS SHUT-OFF VALVE BENEATH CABINET NEVER REUSE...
... into the cutout opening. Do not overlap the foam tapes. Bottom of Cooktop Foam Tapes Cooktop Glass 4 LOCATE MOUNTING PARTS Remove the hold down brackets from the literature package. 5 ATTACH BRACKETS TO COOKTOP Remove the screw from the bottom of the cooktop unit. Bottom of the countertop is in an easily accessible location outside the cooktop. Cooktop Once the unit is parallel to the cooktop. Installation Instructions INSTALLING THE COOKTOP UNIT 1 LOCATE ELECTRICAL OUTLET AND GAS SHUT-OFF VALVE BENEATH CABINET NEVER REUSE...

Installation Instructions
Page 8
... electrical parts of an extension cord. C A grounding adaptor will be needed to be sure it be replaced. Disconnect all electrical power at the main circuit breaker or fuse box before use of your local appliance dealer. Do not under certain conditions, we strongly recommend against the use 3 TWO-PRONG WALL RECEPTACLE Where a standard 2-prong wall receptacle is encountered, it replaced with a properly grounded 3-prong wall receptacle. Installation Instructions INSTALLATION-ELECTRICAL CONNECTIONS...
... electrical parts of an extension cord. C A grounding adaptor will be needed to be sure it be replaced. Disconnect all electrical power at the main circuit breaker or fuse box before use of your local appliance dealer. Do not under certain conditions, we strongly recommend against the use 3 TWO-PRONG WALL RECEPTACLE Where a standard 2-prong wall receptacle is encountered, it replaced with a properly grounded 3-prong wall receptacle. Installation Instructions INSTALLATION-ELECTRICAL CONNECTIONS...

Installation Instructions
Page 11
... been connected to the electrical power. Installation Instructions 2 CHECK IGNITERS Operation of the electric igniters should be checked frequently WARNING: If you attempt to measure the flame, please use caution. The flame should be no less than 1-1/2″ on the "INSIDE" edge of the side grates. A Light a match and hold the flame near the burner you turn the knob off and wait one minute before trying again. 4 THE BURNER FLAMES Turn each valve...
... been connected to the electrical power. Installation Instructions 2 CHECK IGNITERS Operation of the electric igniters should be checked frequently WARNING: If you attempt to measure the flame, please use caution. The flame should be no less than 1-1/2″ on the "INSIDE" edge of the side grates. A Light a match and hold the flame near the burner you turn the knob off and wait one minute before trying again. 4 THE BURNER FLAMES Turn each valve...

Installation Instructions
Page 13
... remove the retainer. • Carefully look at the main circuit breaker or fuse box. C Adjust the pressure regulator, by the following adjustments must be performed by closing the manual shut-off valve. CAUTION: The cooktop, as described in accordance with natural gas. WARNING: This conversion must first replace the orifices and convert the pressure regulator. CAUTION: The following instructions: • Unscrew the cap. • Place your cooktop with Liquefied Petroleum (Propane) gas, you wish to use Propane Gas, the regulator and burner orifices...
... remove the retainer. • Carefully look at the main circuit breaker or fuse box. C Adjust the pressure regulator, by the following adjustments must be performed by closing the manual shut-off valve. CAUTION: The cooktop, as described in accordance with natural gas. WARNING: This conversion must first replace the orifices and convert the pressure regulator. CAUTION: The following instructions: • Unscrew the cap. • Place your cooktop with Liquefied Petroleum (Propane) gas, you wish to use Propane Gas, the regulator and burner orifices...

Installation Instructions
Page 15
... natural gas orifices to the bracket and reattach the bracket and the instruction sheet to the cooktop burner. These marks denote the precise location of 10 in the center of the burner while the simmer orifice is located higher behind the center of engraved marks, (I II III X 18,000 BTU/HR Burner (on the top. G Replace the burner bases, heads, caps and top grates. (NOTE: When re-attaching the burner bases to glass...
... natural gas orifices to the bracket and reattach the bracket and the instruction sheet to the cooktop burner. These marks denote the precise location of 10 in the center of the burner while the simmer orifice is located higher behind the center of engraved marks, (I II III X 18,000 BTU/HR Burner (on the top. G Replace the burner bases, heads, caps and top grates. (NOTE: When re-attaching the burner bases to glass...


