GE JGP333SETSS Support and Manuals
Get Help and Manuals for this General Electric item
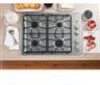
View All Support Options Below
Free GE JGP333SETSS manuals!
Problems with GE JGP333SETSS?
Ask a Question
Free GE JGP333SETSS manuals!
Problems with GE JGP333SETSS?
Ask a Question
Most Recent GE JGP333SETSS Questions

Lp Orifices
Im looking for the orifices to change to lp for my JGP333SETSS. The book says I need 92L, 63L, 86L, ...
Im looking for the orifices to change to lp for my JGP333SETSS. The book says I need 92L, 63L, 86L, ...
(Posted by gillischris 7 years ago)
Popular GE JGP333SETSS Manual Pages
Installation Instructions - Page 1

... any appliance. This cooktop has been design certified by a qualified installer or service technician.
• To eliminate reaching over surface burners, cabinet storage above burner should be conducted according to the manufacturer's instructions. • Proper installation is NOT covered under the Warranty. WHAT TO DO IF YOU SMELL GAS:
• Do not try to light any electrical switch...
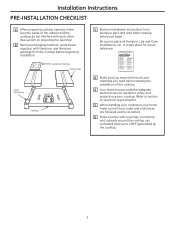
Installation Instructions - Page 2

... or Hand Drill
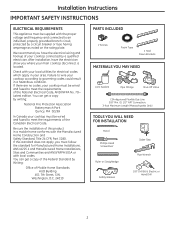
2 Latest edition. Installation Instructions IMPORTANT SAFETY INSTRUCTIONS
ELECTRICAL REQUIREMENTS
This appliance must be supplied with your local utilities for Manufactured Home Installations, ANSI A225.1 and Manufactured Home Installations, Sites and Communities and ANSI/NFPA 501A or with the Manufactured Home Construction and Safety Standard, Title 24 CFR, Part 3280.
Installation Instructions - Page 3
... local codes and ordinances are followed exactly as stated. Literature Package Grate boxes
Foam Packaging
Cooktop
C Remove Installation Instructions from the cooktop before starting the installation of the cooktop. in your home, make sure the inside of the cabinet and the cooktop do not interfere with each other. (See section on electrical requirements.)
F When installing your cooktop in...
Installation Instructions - Page 4

...: All gas cooktop models require 7/16″ free area below cooktop height to unprotected overhead surface
18″ MIN. Between cutout and the wall behind the cooktop
28-1/2" length of the unit
30″ MIN. Depth of unprotected overhead cabinets
36c3u″/4tMMoIuNIN.t .toclesaidreanwcaellforonmthe right of cut
19-5/8" width cut 14-1/4″
2-1/2" Min. Installation Instructions...
Installation Instructions - Page 5

Installation Instructions INSTALLING THE COOKTOP UNIT
1 LOCATE ELECTRICAL OUTLET AND GAS SHUT-OFF VALVE BENEATH CABINET
NEVER REUSE OLD CONNECTORS WHEN INSTALLING THIS UNIT.
Bottom of cooktop
Cloth under Cooktop
3 ATTACH FOAM TAPE
(glass maintop models only)
Apply the foam tape around the outer edge of the cooktop unit. Bottom of Cooktop
Foam Tapes
Cooktop Glass
4 LOCATE MOUNTING PARTS
...
Installation Instructions - Page 8
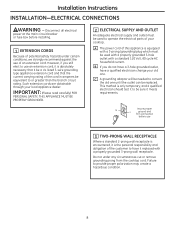
Installation Instructions INSTALLATION-ELECTRICAL CONNECTIONS
WARNING - Such extension cords are obtainable through your cooktop. IMPORTANT: (Please read carefully) FOR
PERSONAL SAFETY, THIS APPLIANCE MUST BE PROPERLY GROUNDED.
2 ELECTRICAL SUPPLY AND OUTLET
An adequate electrical supply and outlet must be used to convert the old one . C A grounding adaptor will be sure it meets ...
Installation Instructions - Page 13

... Torx-Head Driver
Small Flat-Head Screwdriver (4mm or 5/32″ tip size, 60mm
long)
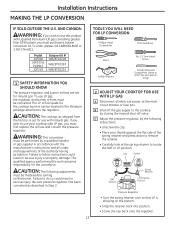
2 ADJUST YOUR COOKTOP FOR USE WITH LP GAS
A Disconnect all codes and requirements of the spring retainer and press down to use LP gas, the regulator and burner orifices must first replace the orifices and convert the pressure regulator.
Installation Instructions MAKING THE...
Installation Instructions - Page 17
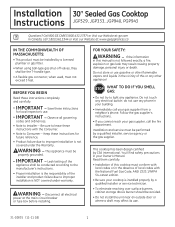
... use .
31-10835 (11-11 GE)
1 Do not touch any appliance.
This cooktop has been design certified by a qualified installer, service agency or the gas supplier. WARNING - You'll find safety precautions in this manual is not followed exactly, a fire, explosion or gas leak may affect its use gasoline or other appliance! Disconnect all governing codes and ordinances. • Note...
Installation Instructions - Page 18
..., Sites and Communities and ANSI/NFPA 501A or with local codes. Check with your cooktop according to governing codes could result in your main cooktop disconnect is located. Installation Instructions IMPORTANT SAFETY INSTRUCTIONS
ELECTRICAL REQUIREMENTS
This appliance must be supplied with the proper voltage and frequency and connected to an individual, properly grounded branch circuit...
Installation Instructions - Page 19

... place all literature, Use and Care, Installations, etc. D Make sure you have all the tools and materials you begin. E Your home must provide the adequate electrical service needed to safely and properly use your home, make sure all local codes and ordinances are followed exactly as stated. in your cooktop. (Refer to section on preparing...
Installation Instructions - Page 20

Installation Instructions PREPARING THE OPENING
1 MAINTAIN THE FOLLOWING MINIMUM CLEARANCE DIMENSIONS
13″ MAX. ...cutout
and front edge of the unit
NOTE: All gas cooktop models require 7/16″ free area below cooktop height to make a template when cutting the opening in the counter.
2-1/4" Min. From Backwall
Recommended gas supply location
13-1/4″ From Cutout Center Line
5...
Installation Instructions - Page 21

... shut off valve in the gas line in place, screw the
Cooktop
hold down onto the protected surface.
Installation Instructions INSTALLING THE COOKTOP UNIT
1 LOCATE ELECTRICAL OUTLET AND GAS SHUT-OFF VALVE BENEATH CABINET
NEVER REUSE OLD CONNECTORS WHEN INSTALLING THIS UNIT. Shut Off Valve
Electrical Outlet 12″
Below Countertop
Install a manual shut-off the gas supply to the side...
Installation Instructions - Page 24

...Failure to operate the electrical parts of an extension cord. IMPORTANT: (Please read carefully) FOR
PERSONAL SAFETY, THIS APPLIANCE MUST BE PROPERLY GROUNDED.
2 ELECTRICAL SUPPLY AND OUTLET
An adequate electrical supply and outlet must be sure it to have a qualified electrician change your local appliance dealer. Installation Instructions INSTALLATION-ELECTRICAL CONNECTIONS
WARNING -
Installation Instructions - Page 27

Installation Instructions
2 CHECK IGNITERS
Operation of electric sparks (ticking sounds) which light the burner. B Try each burner on highest setting. In an emergency, a cooktop burner may be lit with a
match is in color with no greater than 1/4″ on the outer edge of the LITE position.
NOTE: If the burner does not light within five seconds, turn the...
Installation Instructions - Page 29
... spring retainer over so that LP is set for the cooktop burners can be converted. The LP orifice spuds for natural gas. Failure to remove the retainer.
• Carefully look at the main circuit breaker or fuse box.
Installation Instructions MAKING THE LP CONVERSION
IF SOLD OUTSIDE THE U.S. Model JGP940 JGP333 & PGP943 JGP329
Butane Kit # WB28T10228...
GE JGP333SETSS Reviews
We have not received any reviews for GE yet.